
When working with multiple accounts without antidetect, it is like no hands. However, antidetect is quite an expensive pleasure. And if, in the case of working with Facebook, it is practically impossible to do without paid expensive solutions, then when working with free (or "shareware") traffic, the antidetect can be assembled by yourself using Firefox and a couple of free plugins.
Preparing the browser
Our software will work on the basis of Firefox, or rather its portable version. Download from here:
 portableapps.com
Unpack it to any folder on your desktop.
First, we need to turn off auto update. Launch and go to settings:
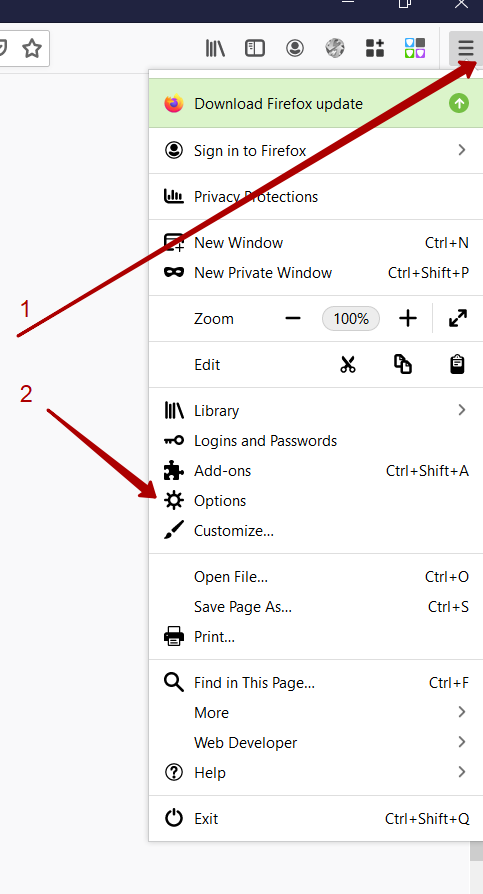
Scroll down to the Firefox Updates block and check the “Check for updates but let you choose to install them” checkbox:
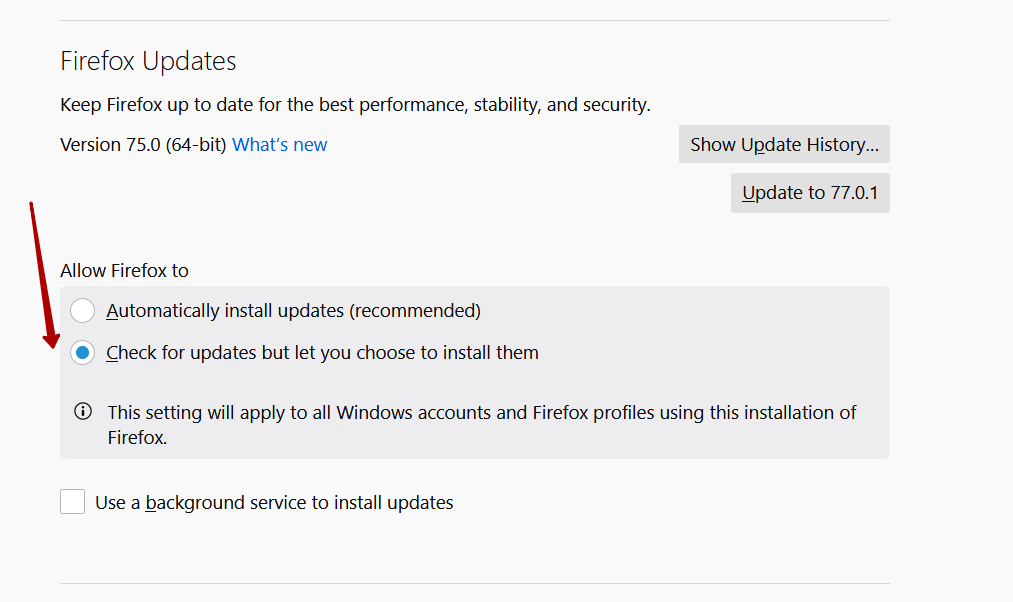
This means that the browser will check for updates, but before the update itself it will ask you - "Do I need to update." We need to undo these updates, because when you update, all settings and plugins will fly off!
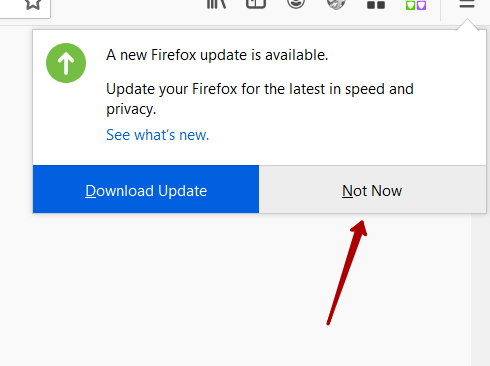
Now the browser will constantly ask "Can I update?" You need to click “Not now”:
Install plugins
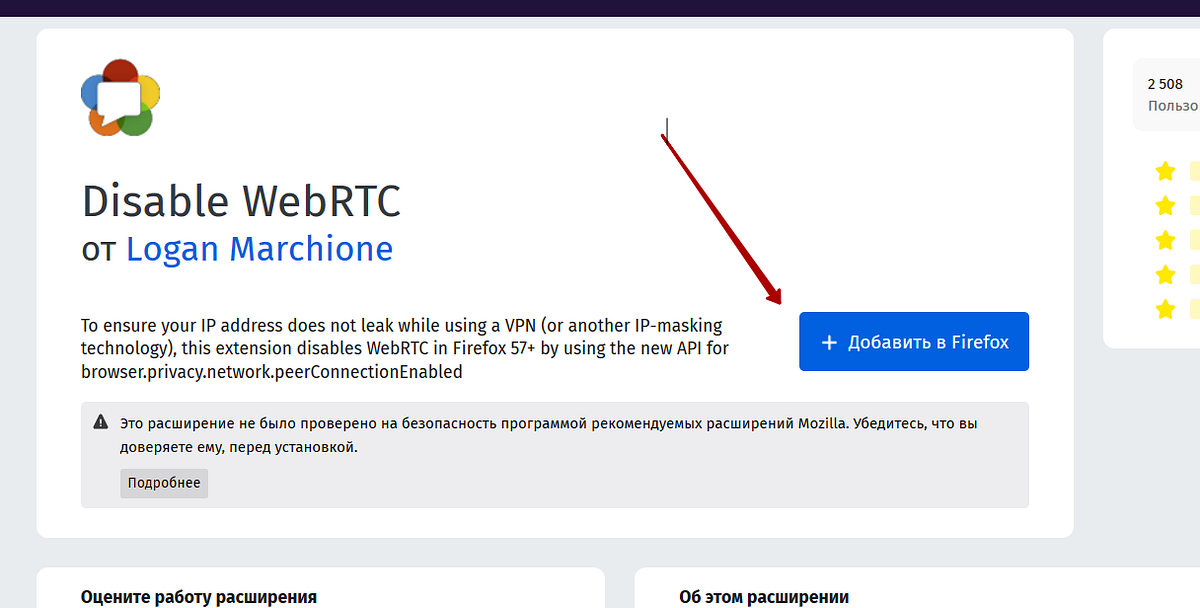
Now you need to install the plugins. The first one is Disable WebRTC, it is needed so that sites do not "slip through" that proxies are being used.
You can install it using the link - https://addons.mozilla.org/ru/firefox/addon/disable-webrtc/
You just need to click on the "Add to Firefox" button:
After that, we need to install the Multi-Account Container plugin. It is needed so that you can open different profiles in different tabs.
It is installed by the link: https://addons.mozilla.org/ru/firefox/addon/multi-account-containers/
And the last plugin is to install Container Proxy - it allows you to open different profiles with different proxies. Download from the link: https://addons.mozilla.org/ru/firefox/addon/container-proxy/
After all plugins have been installed, you may need to restart your browser.
Let's continue. Now you need to configure these plugins.
Configuring plugins
To make it clear why we need these plugins, I will explain the essence. You have several accounts with which you work.
In any source, one account has a limit (either by the number of sent messages per day, or by other criteria).
Therefore, we need a lot of accounts and a lot of proxies. In order not to download a separate browser for each account (there are not so many browsers just =)), we will use the Multi-Account Container plugin (which we installed second). In it, we will create a separate profile for each account.
And with the help of the Container Proxy plugin, which we downloaded last, we will configure an individual proxy for each profile.
After correct configuration, we will open different accounts with different proxies in different tabs.
Let's add the first profile for the first account. Click on the Multi-Account Container plugin icon, then on Manage Containers:

And then on the New Container:

As you can see here, I have one test profile created. After installation, you may have several profiles created in advance. They can be removed. To do this, click on Manage Containers -> Select a profile to delete -> Click Delete this Container:

So, we clicked on the plus sign, and now we add a new profile.
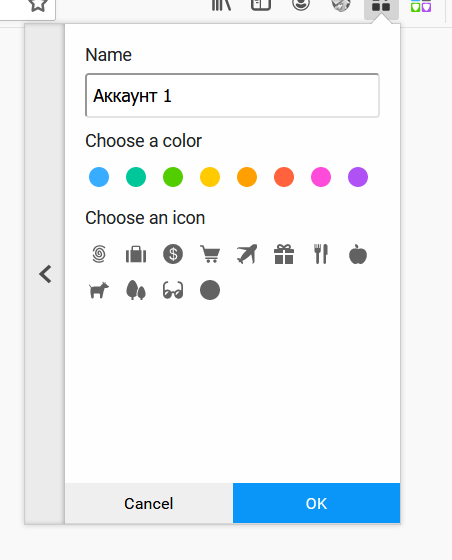
In the Name field, write the name of the profile. It is needed purely for you to separate the tabs among themselves. I call profiles by account name.
Color or icon - at your discretion, I just separate different accounts in different colors (each profile will have its own color on the tab, this is convenient).
Now you need to configure Proxy for the created profile. Click on the Container Proxy icon:
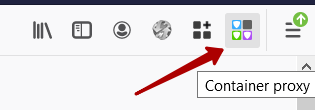
Go to the Proxies section:
Click on the plus at the very bottom to add a new proxy:

On the page that opens, fill in the fields:
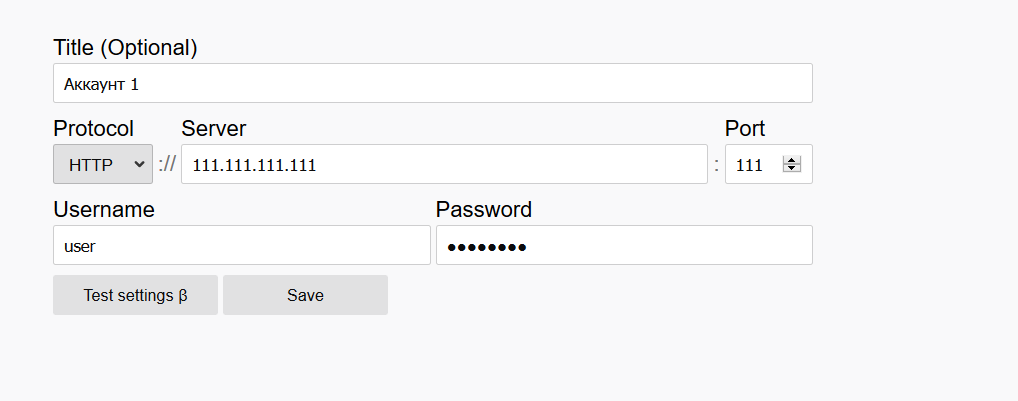
In Title, write the name of the proxy. It is needed so as not to confuse which proxy from which profile, so I enter the same name there as the name of the profile.
Protocol select HTTP, even if you have a proxy httpS. For some reason, proxies do not work for me when specifying httpS.
We indicate the server and port that will be given to us when buying a proxy. Username (login) and Password (password) are also entered from the proxy that was given upon purchase.
We save (the Save button).
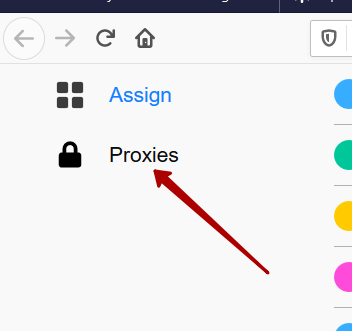
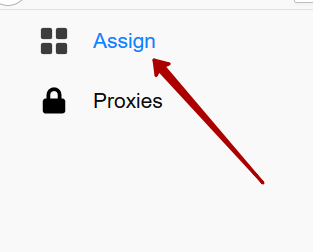
Now let's move on to “attaching” the proxy and profile. Open the Assign tab:
Select your account in the list of accounts and change the proxy from Directly (no proxy) to the just created proxy:

It was

Has become
The first profile is configured. In order to open a tab under this profile, you need to click on the Multi-Account Container and click on the profile under which you want to open the tab:

That's it, now we will have a tab under this profile:
]

The account name is indicated on the right in the address bar
Which profile is used can be seen by the blue color under the tab title and the profile name at the end of the address line.
You can go to 2ip.ru and check if the proxy is connected.
This concludes setting up your own browser antidetect.
Newbie tip: why do we need an antidetect browser? With it, you can maintain several accounts in one window: in different tabs you will have one site open, but with different accounts. For example, in the first tab in VK you are Anastasia Ivanovna, and in the second - Ivan Petrovich.
Preparing the browser
Our software will work on the basis of Firefox, or rather its portable version. Download from here:
Mozilla Firefox, Portable (browser) | PortableApps.com
Mozilla Firefox® is a fast, full-featured web browser that's easy to use. It has lots of great features including popup-blocking, tabbed-browsing, integrated search, improved privacy features, automatic updating and more. Plus, thanks to the PortableApps.com launcher bundled in the Mozilla...
Unpack it to any folder on your desktop.
First, we need to turn off auto update. Launch and go to settings:
Scroll down to the Firefox Updates block and check the “Check for updates but let you choose to install them” checkbox:
This means that the browser will check for updates, but before the update itself it will ask you - "Do I need to update." We need to undo these updates, because when you update, all settings and plugins will fly off!
Now the browser will constantly ask "Can I update?" You need to click “Not now”:
Install plugins
Now you need to install the plugins. The first one is Disable WebRTC, it is needed so that sites do not "slip through" that proxies are being used.
You can install it using the link - https://addons.mozilla.org/ru/firefox/addon/disable-webrtc/
You just need to click on the "Add to Firefox" button:
After that, we need to install the Multi-Account Container plugin. It is needed so that you can open different profiles in different tabs.
It is installed by the link: https://addons.mozilla.org/ru/firefox/addon/multi-account-containers/
And the last plugin is to install Container Proxy - it allows you to open different profiles with different proxies. Download from the link: https://addons.mozilla.org/ru/firefox/addon/container-proxy/
After all plugins have been installed, you may need to restart your browser.
Let's continue. Now you need to configure these plugins.
Configuring plugins
To make it clear why we need these plugins, I will explain the essence. You have several accounts with which you work.
In any source, one account has a limit (either by the number of sent messages per day, or by other criteria).
Therefore, we need a lot of accounts and a lot of proxies. In order not to download a separate browser for each account (there are not so many browsers just =)), we will use the Multi-Account Container plugin (which we installed second). In it, we will create a separate profile for each account.
And with the help of the Container Proxy plugin, which we downloaded last, we will configure an individual proxy for each profile.
After correct configuration, we will open different accounts with different proxies in different tabs.
Let's add the first profile for the first account. Click on the Multi-Account Container plugin icon, then on Manage Containers:
And then on the New Container:
As you can see here, I have one test profile created. After installation, you may have several profiles created in advance. They can be removed. To do this, click on Manage Containers -> Select a profile to delete -> Click Delete this Container:
So, we clicked on the plus sign, and now we add a new profile.
In the Name field, write the name of the profile. It is needed purely for you to separate the tabs among themselves. I call profiles by account name.
Color or icon - at your discretion, I just separate different accounts in different colors (each profile will have its own color on the tab, this is convenient).
Now you need to configure Proxy for the created profile. Click on the Container Proxy icon:
Go to the Proxies section:
Click on the plus at the very bottom to add a new proxy:
On the page that opens, fill in the fields:
In Title, write the name of the proxy. It is needed so as not to confuse which proxy from which profile, so I enter the same name there as the name of the profile.
Protocol select HTTP, even if you have a proxy httpS. For some reason, proxies do not work for me when specifying httpS.
We indicate the server and port that will be given to us when buying a proxy. Username (login) and Password (password) are also entered from the proxy that was given upon purchase.
We save (the Save button).
Now let's move on to “attaching” the proxy and profile. Open the Assign tab:
Select your account in the list of accounts and change the proxy from Directly (no proxy) to the just created proxy:
It was
Has become
The first profile is configured. In order to open a tab under this profile, you need to click on the Multi-Account Container and click on the profile under which you want to open the tab:
That's it, now we will have a tab under this profile:
]
The account name is indicated on the right in the address bar
Which profile is used can be seen by the blue color under the tab title and the profile name at the end of the address line.
You can go to 2ip.ru and check if the proxy is connected.
This concludes setting up your own browser antidetect.