
Hacker
Professional
- Messages
- 1,041
- Reaction score
- 857
- Points
- 113
OFFLINE HACKING 2021
Part l
Offline Hacking is hacking, which will done without any network connection, so you can hack for example physically devices.
In this series of offline hacking. I will guide you what will happen if you lost your computer in a train with unknown password for hacker, and how the hacker can steal data from it. If our target will not encrypt the harddrive, we can easily boot from a another medium like live usb, like dvd with Kali Linux for example, and if it won't we can remove the harddisk and connect it to our pc.
In the coming posts we will handle with BIOS/UEFI basics, Windows basics, how you can boot with an live medium like Kali Linux, And how we can resets Windows and macOS passwords.
To protect ourself against these attacks is easily, use an encrypted hdd/sdd, windows users can use the tool bitlocker.
INDEX:
Chapter II: BIOS/UEFT basics
Chapter III: Accessing of other system
Chapter IV: Accessing of external sdd harddrives
Chapter V: Password resetting of windows
Chapter VI: Password resetting of macOS and Linux
Chapter VII: The harddrives encrypting
Part 2.0
BIOS/EFI Basics
The basic idea for accessing the data of a foreign computer is not to start the computer with the installed operating system (most windows), but to use a boot medium of your own with another operating system instead, e.g. Kali Linux.
If you now put yourself in the role of a hacker, the EFI is your first hurdle. EFI stands for Extensible Firmware Interface and is pre-installed software on the computer or motherboard that initializes the hardware and then starts an operating system.
In the past the BIOS (Basic Input/Output System) took over these tasks. Current EFI versions are still BIOS compact in many respects. Also the handling has not changed much, so both terms are still common, even if in reality they are almost always EFI. Real BIOS computers are becoming rarer and rarer. The situation is different with virtual machines, where a simple BIOS is often still used.
The boot process
Normally the EFI starts the Windows installed on the hard disk or the SSD after switching on. In most cases this is not a complete restart. On the contrary, Windows saves the current system status on the hard disk/SSD when it is switched off and thus enables a particularly fast start.
From a hacking point of view, this detail is significant in that most EFI features should not be available if Windows was last shut down for a later quick start.
It is therefore possible that the EFI does not react to the shortcuts provided to open the EFT configuration dialogs or to select the boot medium.
The recommended procedure is to shut down windows completely first, e.g. by additionally pressing shift in the shutdown menu. If you do not know the password of an external computer, you will not be able to do this. Fortunately, on many computers key combinations still work to select a boot medium or to open the EFI menus immediately after switching on.
Part 2.1
EFI settings and password protection
Since booting from external media is an obvious security risk, this feature can be disabled in EFI. To prevent their reactivation, the EFI settings are usually password-protected. Changes are only possible if you know this password.
To avoid this hurdle, you can search the internet for a default password. Especially older notebooks or motherboard models are often successful in this search. Sometimes there are also password lists, because the default password depends on a parameter, e.g. the current date.
If the search is unsuccessful, you can try to remove the battery and/or the CMOS battery for a few minutes. In the past the BIOS settings and password were lost. However, this procedure is seldom effective for common computers.
Another option is to reset the EEPROM chip with the EFI settings. On some motherboards there is a jumper, on others two contacts have to be short-circuited. In any case you have to remove the motherboard and need some manual skills. You can find corresponding instructions on the Internet or on YouTube.
UEFI Secure Boot
Another obstacle when starting the software on a USB stick can be UEFI-Secure Boot. This security mechanism only loads programs that are signed with a key known to the motherboard during the boot process. This requirement applies to Microsoft Windows and a few Linux distributions (e.g. Fedora, Red Hat or Ubuntu) but not to Kali Linux.
To use Kali Linux nevertheless, you have to search for the UEFI Secure Boot option in the EFI settings (it is often called differently there) and deactivate it. If this is impossible due to an EFI password, current installation media from ubuntu or fedora are a good alternative. They are not only UEFI secure boot compact, but also run as a Linux live system. This means that the installer is embedded in a fully functional Linux system.
Naturally, the choice of pre-installed hacking tools in the live Ubuntu and Fedora systems is modest.
However, many commands can be reinstalled with little effort. For example, to install the command chntpw, which we will discuss in detail in this topic, you need to establish a network connection in the Ubuntu Live system, add the package source universe to the file /etc/apt/sources.list, and then execute the commands:
and
Part 2.2
If the EFT is insurmountable: Remove the hard disk
if you are unable to boot the computer with an external boot medium, you can remove the hard disk or SSD.
With maintenance-friendly company devices, this can be done in no time at all. The opposite is true for notebooks whose SSD is soldered to the mainboard.
With Apple devices, this will increasingly become the norm, the other manufacturers will probably follow. And as much as this measure restricts the expandability of the device, it can definitely be an advantage in terms of security.
How to remove the hard disks is quite simple, turn off the Pc, unscrew the PC and remove them carefully, how this works you can surely find in YouTube.
Sorry short part of 2, the next part will be "accessing of other systems". See you tomorrow with an bigger post.
Part 3.0
Accessing foreign systems
In this section, I'll show you how hackers can access the data of a notebook (not a desktop PC) or an external hard disk or SSD. We concentrate on Windows PC even if the procedure is basically just as easy to use for computers with Linux or MacOS.
Continuation follows: boot the notebook with Kali Linux
Part 3.1
Booting the notebook with Kali Linux
The basic idea for accessing a system with an unknown password is simple:
You do not start the computer from the built-in hard disk/SSD but boot it from a USB stick. If the notebook has a DVD drive, this is also suitable for the boot process, but this is increasingly rare.
Basically every Linux Live system is suitable as start system. If uefi secure boot does not prevent you from doing so, you should prefer Kali Linux. This gives you all the hacking tools you can think of right at your fingertips. For example, to reset your Windows password.
So that you can use Kali Linux as a boot medium, transfer the ISO image block by block to a USB stick, e.g. with etcher (Windows, macOS, Linux). After you have plugged in the USB stick, start the notebook.
By default, boot the notebook from the built-in disk. In order for the USB stick to be considered as the boot medium, you must press a key or key combination that varies depending on the model. ESC or one of the function keys F8 to F12 works most frequently. If the boot screen does not display a message, search the Internet for the appropriate key combination for the model.
 www.groovypost.com
For notebooks of security-conscious owners, booting from a USB stick is deactivated and any changes to the BIOS/EFI settings are password protected.
When booting Kali Linux, use either LIVE or LIVE FORENSIC MODE. The forensic mode has the advantage that any unintentional modification of files on the computer running Kali Linux is excluded.
This is especially important for forensic analysis.
Part 3.2
Read Windows file system
In Kali Linux, in the "Region and Language" module of the system settings, set the keyboard layout corresponding to your country, mine is German. Open a terminal and let's find the partitions using »lsblk« and »parted«.
$ 1lsb1k - lists all block devices. A Windows notebook is simply all partitions of the hard disk or SSD.
$ parted /dev/sd<X> print - provides detailed information about the partitions of a hard disk or SDD.
On my system Isblk finds 4 partitions, I currently don't have any sda there because I don't have a 2nd hard disk. SDA are mostly external hard disks, and SDC is the USB stick we used to start Kali Linux.
Parted shows that the Windows partitions are on /dev/sdb. With ordinary notebooks there is usually only one internal data carrier whose device name is /dev/sda.
Now you have full access to almost all files of the Windows notebook without having to enter any password. You can now view individual files or copy a user directory /Users/<name> to an external hard drive or upload it to a cloud directory for later analysis. With some skill you can determine which Internet pages the user of the computer has visited last, which passwords the browser has stored etc.
Part 3.3
Vault files
With the outlined procedure almost all files are open to you - but only almost. For security reasons, Windows and the web browser Edge store passwords and other sensitive data. These are located in the directory \User\hacker\Appdata\Local\Microsoft\Vault. Hacker is my name in this case, don't worry you'll find the user already. Background information can be found here:

 serverfault.com
The contents of the file can be accessed via the traditional system control program (User Accounts module - Logon Information Management) but only after a successful login.
This restriction also applies to the vaultemd command, which you can run in cmd.exe or in the PowerShell. However, Kali Linux cannot evaluate these files.
The free program VaultPasswordView can also help to read the Vault files:
The program runs under Windows only. For example, you can use it to read Vault files that originate from another computer. The following also applies to the program: The Vault files can only be read if you know the Windows password of the relevant account.
IT forensic
The process of analyzing a file system to track the actions of the user is called IT forensics. Although good forensic know-how can of course be enormously helpful for hackers, this area is more likely to be classified as criminalistics - something when it comes to tracing a suspect's communication. A crucial point is never to change the file system so that the accusation cannot be made afterwards that the data is manipulated.
Part 3.4
Write access to the Windows file system
So far, we've confined ourselves to reading files. If you also want to make changes in the Windows file system, you have to execute the mount command without the -o option:
Even if you have already run mount with the -o ro option before, you can still activate the write mode afterwards:
Relatively often, however, mount will return an error message because Windows was not shut down properly last time:
Windows is hibernated, refused to mount.
The file system is included in the directory tree, but contrary to your wishes it is only read-only.
The recommended solution now is to start Windows and then shut down properly. One way to do this is to start cmd.exe with administrator rights and run shutdown /p there. This way is not available due to a lack of password.
The emergency solution is to cancel the read-only-mount command with umount and then repeat mount with two additional options:
The option -t ntfs-3g explicitly prescribes the file system driver to be used for the mount command. -o remove_hiberfile also deletes the so-called hibernation file, in which Windows has stored the necessary information for a quick restart of Windows.
However, changes that were last made but not yet saved consistently in the file system are also lost.
Part 3.5
Linux and MacOS
Access to the file system works exactly the same for computers on which Linux is installed. So you start the computer with Kali Linux, find the partitions or logical volume with the data you want to read, and then mount. The command recognizes the file system in question itself:
A little more complicated is the thing under MacOS: macOS uses since version 10.13 by default the file system APFS. Currently there are no open source drivers available to access APFS file systems from (Kali) Linux. A possible alternative are commercial drivers, which are difficult to use ona live system. It is easier to clone your own macOS system to an external hard disk and then use it as boot media.
T2 Chip
Launched at the end of 2017, iMac Pro is the first Apple computer with an additional chip under the brand name "T2". The chip performs various tasks, including securing the boot process. It is to be expected that Apple will equip most Apple computers with this chip in the future. A detailed description of the adapted boot process can be found here:
 twocanoes.com
As long as the default settings apply, booting such machines from an external boot medium with Linux is impossible. Booting from external media with Windows and MacOS is allowed, but requires an Internet connection for authentication. The T2 chip thus considerably improves the security of unencrypted file systems, but of course it cannot prevent the removal of the hard disk or SDD. This is also impossible with more and more Apple computers because the SSDs are soldered to the motherboard.
Nevertheless, you should encrypt the file system with FileVault on Apple computers with a T2 chip, a guide here:
 support.apple.com
Part 3.6
Are login passwords meaningless?
Once you have realized how little protection even a good login password offers - whether under windows or Linux or MacOS - the question naturally arises: »Are login passwords completely pointless? «
But I'm telling you, no, it's not that! Your password protects the computer in the office from a colleague logging in during the coffee break and doing mischief. Passwords also protect the computer in the local network. But the protection just doesn't go far enough to protect the data on the computer from someone who steals/find the computer that has physical access to the device for a longer period of time.
Part 4.0
Access external hard drives or SSDs
Basically, everything we explained in the previous section also applies to external hard disks: So if you want to analyze a hard disk that has come into your hands, whichever way you go, just connect it to a computer that already has an operating system running. With Isblk you can then determine the partitions on the hard disk. parted print gives you more detailed information about the type and size of the partitions. With mount you finally mount the filesystem of a partition into the local directory tree.
Part 4.1
Hard disks and SSDs removed from notebooks
Of course, this also applies to a hard disk or SSD that was previously removed from a notebook. If the data carrier is a SATA device, it can be installed in any standard desktop PC. An alternative way is to use a USB adapter, which can be bought for a few Euros in any electronics store. Comparable adapters are also available for SSD Plantines with an M.2 connector, if the SSD is SATA compact.
More difficult is the handling of the especially fast PCIe SSDs, which are used in modern notebooks (especially in the expensive models): These SSDs no longer support SATA, there are currently no USB adapters. To read the SSD, it must be plugged into a mainboard that has a suitable PCIe port for SSDs.
The most unpleasant case from a hacker's perspective are SSDs that are soldered to the motherboard of a notebook. A removal of such SSDs is impossible. The data contained on them can therefore only be read by the running notebook. However, a few notebook models have a special interface, thanks to which this hurdle can be overcome - even if only with special hardware. The interface is designed to rescue at least the data after a defect of the device. An example of such notebooks are MacBook Pro models from 2016 onwards.
Part 5.0
Windows Password Reset
If you once have write access to a hard disk / SSD, it should be actually only a small step to the password reset. Local passwords are stored as hash codes in the file system - and you can change them there.
As it turns out, however, the matter is not quite that simple. The difficulties begin with the fact that there are various authentication procedures under Windows:
- Local passwords: The easiest way to hack local passwords. Windows stores the hash codes of such passwords in the file Windows/System32/SAM.
- Image codes, PINs etc: In current Windows versions, you can set a PIN or character pattern on a picture you select instead of a traditional password. These methods are primarily intended for tablets or hybrid systems where a full keyboard is not always available.
- Microsoft account: Private users are forced by Microsoft to log in via a Microsoft account. In this case, the password is stored on a Microsoft server. So that a login is also possible without Internet access, there is also a local copy of the password hash in the Vault files of Windows (\Users\hacker\Local\Microsoft\Vault).
- Active Directory: On Windows computers in a local network, user accounts and passwords are usually managed by an Active Directory (AD), i.e. centrally on a server.
The next section focuses on resetting local passwords, i.e. the first point of the above enumeration.
Network passwords are naturally outside the requirements for these chapters (offline hacking).
Part 5.1
Tools
If you search the Internet for "windows password reset", you will find numerous tools to help you reset Windows passwords or disable password control. However, many tools are almost biblical in age and only work with ancient Windows versions or 32-bit versions.
We are dealing here with current 64-bit versions of windows, whose local passwords you can reset with the following means, among others:
chntpw command: The Linux command »chntpw«, which is available by default under Kali Linux and can be installed in many other distributions with little effort, resets local Windows passwords, activates deactivated users and adds them to the administrator group if required.
PCUnlocker: The commercial tool PCUnlocker offers similar functions as chntpw, but packages them behind an attractive user interface. Depending on the version, PCUnlocker offers additional functions including support for Active Directory passwords at moderate prices (20 to 50 US dollars):
 www.top-password.com
The program is delivered in the form of an ISO file, which must be transferred to a USB stick. The PCUnlocker is embedded in a Windows PE system (Windows Preinstallation Environment).
DakT: Surprisingly, even Microsoft offers a password reset tool. The Diagnostic and Recovery Toolset is part of the Microsoft Desktop Optimization Pack, which is only available to Microsoft Software Assurance customers. More details here:

Part 5.2
Undesirable side effects
Local passwords can be reset amazingly easily with the tools listed above. But before we get started, we would like to give you a warning: The Vault files in which Windows stores Edge passwords and those of services such as OneDrive or Skype are encrypted for security reasons.
After changing your password, you can no longer access them or EFS-encrypted files and directories.
Further details can be found here:

 superuser.com
You can only avoid this restriction by not resetting the password, but trying to guess it. The procedure is very complex and seldom crowned with success. The basic idea is to read the hash codes of the local passwords from the binary file and Windows\System32\config\SAM and then use a password cracker like John the Ripper to determine them by systematically trying them out or using dictionary lists.
Since the Womdpws Ammoversary Update for Windows 10, i.e. since August 2016, the hash codes in the SAM file are generated with a modern AES algorithm.
Many programs established in the past for reading the hash codes from the file cannot cope with this, e.g. pwdump, bkhive or samdump2. Currently only the tool mimikatz is suitable.
More here:

 security.stackexchange.com
Part 5.3
Reset local Windows password with chntpw
If you want to reset Windows passwords with chntpw, you must first boot the machine with a Linux distribution. Kali Linux is only available if you can disable UEFI Secure Boot first. Alternatively, you can use an installation image from Ubuntu that is secure boot compatible.
In the next step, locate the partition with the Windows file system and mount it to a local directory so that you have write access to it. Kali Linux does not allow you to use the forensic mode. For control you can use mount to list all file systems, grep filters the list and displays only entries that contain win.
It is important that the attribute rw appears on the Windows file system.
Now change to the directory windows/system32/config. It contains several files whose names begin with SAM. They are managed by the Security Account manager.
The critical critical file is SAM. The command chntpw with the options -| lists which users are stored in the account file, which of them have admin rights and which are currently blocked.
To actually make changes, start the command with the option -i (for interactive). You can now first list all accounts and groups, select an account, and finally reset its password to an empty password. With you leave first the user edit menu and then the main interactive menu. chntpw asks if you really want to save the changes.
>> chtnpw Main Interactive Menu
Loaded hives: <SAM>
1 - Edit user data and password
2 - List Groups
9 - Registry editor, now with full write support!
gq - Quit (you will be asked if there is something to save)
What to do? > 1
Please enter user number (RID) or O to exit: (enter here user number) 3e9
>> User Edit Menu:
1 - Clear (blank) user password
Select: [q] > 1
Password cleared
Select: [q] > q
Hives that have changed:
# Name
O <SAM>
Write hive files(y|n) : y
oO <SAM> - OK
Those were the steps. After restarting windows you can login to the changed account without entering a password. If this does not work, the user has set a different authentication procedure.
Part 5.4
Activate administrative Windows user with chntpw
Unfortunately, chntpw does not hide which login procedure applies to the accounts. If you reset a user's password as described above, but their login is protected by a PIN, a Microsoft account or Active Directory, the action will be completely ineffective.
For such cases there is a plan B: You can activate the normally existing but not active administrator account with chntpw and assign an empty password to this account.
Then select 1 for edit user data and passwords.
Choose the administrator RID.
Now type 2 for Unlock amd enable user account.
Hit 1 for Clear(blank) user password.
Then q for quit.
You can then restart the computer, log on as administrator without password and access all files of all users via Windows Explorer (C:\Users). You can also change the local passwords of all users via the system settings. However, the Windows system settings do not allow you to change the authentication method of another user.
Part 6.0
Reset Linux and MacOS password
Under Linux and macOS many things are easier than under Windows - and this also applies to a password reset. The following two instructions assume that the password is a local one (no network login with Kerberos etc.) and that the file system is not encrypted.
Reset Linux password:
We assume here that you want to reset the root password of a computer. To do this, start the device with Kali Linux or any Linux live system. With Islbk and parted print you search for the system partition, i.e. the partition that contains the /etce directory. Include it in the directory tree.
With chroot you can now make the mouint directory the new starting point for all further commands. If you work as root in the Linux Live system (and this is a mandatory requirement to execute the above commands), the following command passwd applies to change a password for the Linux computer or its file system. With exit you leave the chroot mode and return to the live system.
Reset macOS password:
To reset a local password under macOS, you have to get into the emergency system. There you open a terminal window with UTILITIES TERMINAL and execute resetpassword. A window appears with all accounts submitted to the recorder. Now select an account.
With older versions of resetpassword you could now easily set a new password for this account.
Current versions, however, are much more cautious:
If the account is associated with an Apple ID, you will need to enter the Apple ID password in the next step. This requires an Internet connection. After the login, a two-factor authentication takes place. To do this, a control code is sent to another device of the user. The password can only be reset with this code.
If the account is not connected to an Apple ID account, a new password can easily be set; however, it was not possible to complete the process during our tests. The error message Reset Password Failed was always displayed at the end of the process.
If you don't get to it with resetpassword, there is a second way: During the restart you have to enter the single-user-mode. This will take you to a text console. There you execute the following commands:
In short, this means that you delete the file system azs the file AppleSetzoDone. At the next restart macO$ thinks it would be the first start. You can now create a new administrative user (do not use an account name that already exists and skip the Appel-ID login).
Once the configuration is complete, you reach the macOS interface. Now open the "Users & Groups” module in the system settings. After you have unlocked the module with the new admin password, all other accounts known on the system are listed. You can now easily reset their passwords.
Part 7.0
Encrypt hard disks
Now that we've shown them what you can do as a hacker if you have physical access to a Windows or Linux machine, switch to the administrator's perspective: How can you protect yourself against such attacks?
At the beginning of this chapter, we have already mentioned the protective functions of the EFI or BIOS: UEFI Secure Boot is always activated on modem Windows computers anyway. In addition, you should block the possibility of booting from an external drive and make sure you have a master password for the EFI/BIOS.
Part 7.1
BitLocker
The only effective protection against a hacker being able to read the hard disk or SSD of a device is to fully encrypt the file carrier. Windows has integrated BitLocker technology into the Pro and Enterprise versions of Windows for this purpose.
BitLocker normally assumes that the computer contains a Trusted Platform Module (TPM). This is a chip that provides basic encryption functions according to a standard, uniquely identifies the device with a key, and provides a memory for securely storing additional keys.
TPM can be implemented as its own chip, but also as part of the CPU. Intel uses the highly controversial Management Engine (ME) for some models and calls its TPM implementation Platform Trust Technology (PTT).
BitLocker stores the encryption key in the TPM chip. As long as Windows is started directly from the device, the BitLocker file system can be accessed without the annoying specification of a key. If, on the other hand, a hacker uses another boot medium or removes the hard disk/SSD from the computer, access to the encrypted file system is only possible with the corresponding BitLocker password.
It is also possible to use BitLocker without TPM. To do this, you must first change a group policy. In the Group Policy Editor (gpedit for short), look for the BitLocker options in the local computer policies. Double-click to change the settings for the policy "Request additional authentication at startup", so that BitLocker accepts a USB stick with a key file or a password instead of TPM for security reasons.
Activate and deactivate BitLocker in the system control module of the same name. In the following dialogs you can set a password, print or save the recovery key, choose between different encryption
modes, etc. The actual encryption takes place after the next Windows restart. If you use BitLocker without TPM, a USB stick with the key file (*.BET file) must be plugged into the computer. In the
future, this USB stick will also allow booting without entering a BitLocker password.
While the file system is encrypted, you can work normally. If you want to know how advanced the encryption is, execute the command manage-bde in a cmd.exe or PowerShell window with administration rights:
BitLocker to Go
External drives can also be encrypted with BitLocker to Go. This is especially important when backups are stored there - otherwise an unencrypted backup undermines the BitLocker protection on the notebook.
Speed
Encrypting and decrypting files takes time. Fortunately, modern notebooks don't have a significant speed disadvantage, because hardware encoders or decoders help the CPU with its work. Their efficiency is so high that not even fast SDDs are significantly slowed down.
Part 7.2
Access to BitLocker file systems under Linux (dislocker)
If you know the password or have a key file, you can also access the Bitlocker file system under Linux.
You need the dislocker package, which can also be installed in the live system:
S$ apt install dislocker
With dislocker-metadata you can find out which encryption method bitlocker uses:
(sdb2 is your bitlocker filesystem)
To access the contents of the partition, run dislocker-fuse. The command will ask you for the BitLocker password, without which access will not work.
Enter the user password: *********
If you have a *.BEK file with the BitLocker key, you can pass it with the -f option. dislocker-fuse still asks for the password. However, it is now sufficient to simply press Enter.
Enter the user password: *********
In the directory /mnt/bitlocker you will find only one file, the dislocker-file. This file can now be used as NTFS file system in a second step with mount:
You can read more about dislocker here:

 github.com
Part 7.3
BitLocker Security
BitLocker is considered secure to the best of our knowledge - that is, until the beginning of 2018 there was no known way to break the protection if the computer is switched off and the password is not known.
Naturally, encryption protection depends on the quality of the password. A password that is too short or too simple can be discovered by systematic testing. Another security risk is the storage of the key:
During setup, the configuration program recommends printing a key for data recovery or storing it on a USB data carrier.
Microsoft say that bitlocker does not contain backdoors. Since the source code of the software is not available, this statement cannot be proven. Police and secret services have demanded such a backdoor several times.
The concept of a cold boot attack is outlined on the English Wikipedia page on Bitlocker. It is based on the fact that the Bitlocker key is in memory while Windows is running: If a hacker steals the device while it is running and restarts it with its own boot medium within minutes, it may be possible to read the key from memory.
The situation becomes even easier if the attacker has access to the running, unlocked computer. Since the BitLocker password is stored in memory, the attacker only has to succeed in reading out the entire working memory. The company PassWare offers a corresponding attack kit for purchase. It can read the main memory via the FireWire interface if the computer offers such an interface:

 www.passware.com
Part 7.4
BitLocker-Alternatives
In the past, the TrueCrypt program in the source code was considered an alternative to Bitlocker.
However, the development of the program 2014 was discontinued. At the same time, a warning was issued about possible security holes in TrueCrypt. Various forks or variants of TrueCrypt e.g. VeraCrypt or GhostCrypt never achieved the same popularity as TrueCrypt - and were never checked to the same extent with regard to security problems.
If you do not want to encrypt the entire file system, but only individual files or directories, you can use the Encrypted File System (EFS).
This relatively old Windows function is only available in selected Windows versions, e.g. the Pro, Enterprise and Education versions of Windows 10.
In order to use the EFS functions, execute the context menu entry PROPERTIES of a file or directory, click the ADVANCED button and then activate the CONTENT KEY option. Surprisingly, Windows does not ask for an encryption password. Instead, Windows generates a key when setting up the first EFS file and secures access to this key with the current account data. An access to the files is thus associated with a successful Widnwos login. However, Windows recommends saving the access key on an external data medium and displays a corresponding dialog after encryption.
If a hacker under Linux or from another Windows account tries to view the files, he will see the files including the file names, but access is not possible.
macOS (FileVault)
macO$ offers an encryption function similar to Bitlocker under the name FILE VAULT. The encryption
can be set either in the system settings (module SECURITY) or via the following command:
Unlike under Windows, however, access to the encrypted data is linked to the login password. There is no password of its own. TPM hardware for storing keys is not available on Apple computers.
The T2 chip introduced at the end of 2017 together with the iMac Pro can take over this task. This chip will probably also be integrated into other Mac models in the longer term.
When setting up FileVault, MacOS gives you the option to store the key in the iCloud or in a local file.
In an emergency, the key file provides a way to access data without the login password.
From a security point of view, File Vault is comparable to BitLocker. The attacks outlined there, e.g. reading RAM, are in principle also conceivable under macOS.
However, the prerequisites for this are only given if the attacker already has access to the computer any way.
Linux (LUKS)
Under Linux, there are several ways to encrypt a file system. The most popular is LUKS (Linux Unified Key Setup). It is based on the core module dm_crypt, which adds cryptographic functions to the Device Mapper (which is responsible for accessing partitions and block devices in general). The module thus forms a logical layer between the encrypted raw data on the hard disk/SSD and in the file system, as the user sees it. dm_crypt is often combined with LVM, but this is not absolutely necessary.
A subsequent setup of LUKS is only possible with very high time and administration effort. Therefore, it is recommended to set up LUKS immediately during installation. All common Linux distrobutions offer corresponding options: Under Ubuntu select the option Encrypt the new Ubuntu installation for security in the installation menu, under RHEL and CentOS activate the option Encrypt my data in the partitioning dialog.
For both distributions, encryption is already performed at LVM level. This encrypts all logical volumes.
Unlike under Windows where the BitLocker key is stored in the TPM chip, or under MacOS where the key access is secured with the login password, under Linux the LUKS password must always be entered at the beginning of the boot process. An unattended restart is not possible without further ado.
LUKS is therefore well suited for notebooks, but not for servers running in a remote data center or in remote basement rooms.
Part 7.5
File system encryption on the server
After this offline hacking series it should be clear that the file systems of corporate notebooks should always be encrypted - no matter if the devices use Windows, macOS or Linux as operating system.
But what is the recommendation for servers? The answer depends on several factors. The first question is where the servers are located. If they are locked rooms to which only a few people have access, the need for encryption is often unnecessary. If, on the other hand, the server of a small company is accessible to everyone in the copy room, then encryption is very useful.
Another factor is the operating system: Windows servers with TPM can be restarted without much additional effort even if encryption is activated. Linux servers, on the other hand, require the LUKS password to be entered manually each time they are restarted. To do this, an administrator must have physical access to the computer. This is extremely inconvenient for servers that are usually administered via the network (e.g. with SSH). For root servers running in an external data center, the procedure is simply impossible.
A special case are NAS devices: With many devices a hard disk can be removed with a handle. For example, if an attacker comes to a company as a visitor and sees an unattended NAS device, he can steal a hard drive in no time at all.
With common NAS operating systems, you usually cannot encrypt the system as a whole, but you can encrypt individual directories. After a restart, e.g. after an update, the encrypted directories must be opened explicitly via the web interface of the NAS device by specifying the password. Until this happens, the directories are not available in the corporate network. As so often the question arises where the right compromise between high security and sufficient convenience lies.
LAST WORDS:
TIT REALLY INVESTED A LOT OF TIME IN THIS GUIDE I HOPE YOU LIKED THIS GUIDE
AND IT COULD HELPS YOU. THANKS FOR ALL HAVE FUN AT READING.
To be continued...
Part l
Offline Hacking is hacking, which will done without any network connection, so you can hack for example physically devices.
In this series of offline hacking. I will guide you what will happen if you lost your computer in a train with unknown password for hacker, and how the hacker can steal data from it. If our target will not encrypt the harddrive, we can easily boot from a another medium like live usb, like dvd with Kali Linux for example, and if it won't we can remove the harddisk and connect it to our pc.
In the coming posts we will handle with BIOS/UEFI basics, Windows basics, how you can boot with an live medium like Kali Linux, And how we can resets Windows and macOS passwords.
To protect ourself against these attacks is easily, use an encrypted hdd/sdd, windows users can use the tool bitlocker.
INDEX:
Chapter II: BIOS/UEFT basics
Chapter III: Accessing of other system
Chapter IV: Accessing of external sdd harddrives
Chapter V: Password resetting of windows
Chapter VI: Password resetting of macOS and Linux
Chapter VII: The harddrives encrypting
Part 2.0
BIOS/EFI Basics
The basic idea for accessing the data of a foreign computer is not to start the computer with the installed operating system (most windows), but to use a boot medium of your own with another operating system instead, e.g. Kali Linux.
If you now put yourself in the role of a hacker, the EFI is your first hurdle. EFI stands for Extensible Firmware Interface and is pre-installed software on the computer or motherboard that initializes the hardware and then starts an operating system.
In the past the BIOS (Basic Input/Output System) took over these tasks. Current EFI versions are still BIOS compact in many respects. Also the handling has not changed much, so both terms are still common, even if in reality they are almost always EFI. Real BIOS computers are becoming rarer and rarer. The situation is different with virtual machines, where a simple BIOS is often still used.
The boot process
Normally the EFI starts the Windows installed on the hard disk or the SSD after switching on. In most cases this is not a complete restart. On the contrary, Windows saves the current system status on the hard disk/SSD when it is switched off and thus enables a particularly fast start.
From a hacking point of view, this detail is significant in that most EFI features should not be available if Windows was last shut down for a later quick start.
It is therefore possible that the EFI does not react to the shortcuts provided to open the EFT configuration dialogs or to select the boot medium.
The recommended procedure is to shut down windows completely first, e.g. by additionally pressing shift in the shutdown menu. If you do not know the password of an external computer, you will not be able to do this. Fortunately, on many computers key combinations still work to select a boot medium or to open the EFI menus immediately after switching on.
Part 2.1
EFI settings and password protection
Since booting from external media is an obvious security risk, this feature can be disabled in EFI. To prevent their reactivation, the EFI settings are usually password-protected. Changes are only possible if you know this password.
To avoid this hurdle, you can search the internet for a default password. Especially older notebooks or motherboard models are often successful in this search. Sometimes there are also password lists, because the default password depends on a parameter, e.g. the current date.
If the search is unsuccessful, you can try to remove the battery and/or the CMOS battery for a few minutes. In the past the BIOS settings and password were lost. However, this procedure is seldom effective for common computers.
Another option is to reset the EEPROM chip with the EFI settings. On some motherboards there is a jumper, on others two contacts have to be short-circuited. In any case you have to remove the motherboard and need some manual skills. You can find corresponding instructions on the Internet or on YouTube.
UEFI Secure Boot
Another obstacle when starting the software on a USB stick can be UEFI-Secure Boot. This security mechanism only loads programs that are signed with a key known to the motherboard during the boot process. This requirement applies to Microsoft Windows and a few Linux distributions (e.g. Fedora, Red Hat or Ubuntu) but not to Kali Linux.
To use Kali Linux nevertheless, you have to search for the UEFI Secure Boot option in the EFI settings (it is often called differently there) and deactivate it. If this is impossible due to an EFI password, current installation media from ubuntu or fedora are a good alternative. They are not only UEFI secure boot compact, but also run as a Linux live system. This means that the installer is embedded in a fully functional Linux system.
Naturally, the choice of pre-installed hacking tools in the live Ubuntu and Fedora systems is modest.
However, many commands can be reinstalled with little effort. For example, to install the command chntpw, which we will discuss in detail in this topic, you need to establish a network connection in the Ubuntu Live system, add the package source universe to the file /etc/apt/sources.list, and then execute the commands:
Code:
S apt update
Code:
S$ apt install chntpwPart 2.2
If the EFT is insurmountable: Remove the hard disk
if you are unable to boot the computer with an external boot medium, you can remove the hard disk or SSD.
With maintenance-friendly company devices, this can be done in no time at all. The opposite is true for notebooks whose SSD is soldered to the mainboard.
With Apple devices, this will increasingly become the norm, the other manufacturers will probably follow. And as much as this measure restricts the expandability of the device, it can definitely be an advantage in terms of security.
How to remove the hard disks is quite simple, turn off the Pc, unscrew the PC and remove them carefully, how this works you can surely find in YouTube.
Sorry short part of 2, the next part will be "accessing of other systems". See you tomorrow with an bigger post.
Part 3.0
Accessing foreign systems
In this section, I'll show you how hackers can access the data of a notebook (not a desktop PC) or an external hard disk or SSD. We concentrate on Windows PC even if the procedure is basically just as easy to use for computers with Linux or MacOS.
Continuation follows: boot the notebook with Kali Linux
Part 3.1
Booting the notebook with Kali Linux
The basic idea for accessing a system with an unknown password is simple:
You do not start the computer from the built-in hard disk/SSD but boot it from a USB stick. If the notebook has a DVD drive, this is also suitable for the boot process, but this is increasingly rare.
Basically every Linux Live system is suitable as start system. If uefi secure boot does not prevent you from doing so, you should prefer Kali Linux. This gives you all the hacking tools you can think of right at your fingertips. For example, to reset your Windows password.
So that you can use Kali Linux as a boot medium, transfer the ISO image block by block to a USB stick, e.g. with etcher (Windows, macOS, Linux). After you have plugged in the USB stick, start the notebook.
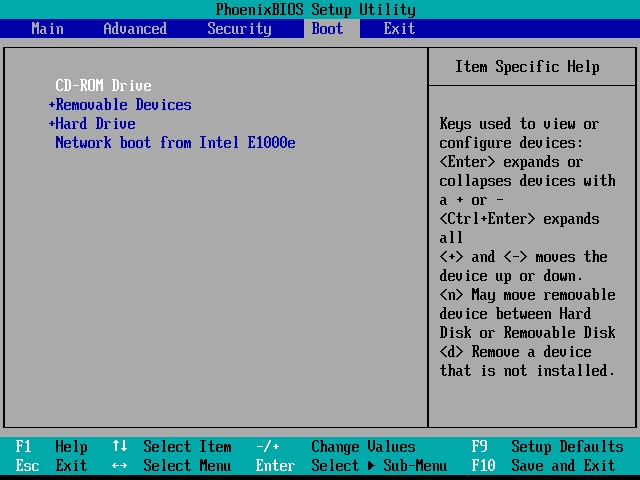
By default, boot the notebook from the built-in disk. In order for the USB stick to be considered as the boot medium, you must press a key or key combination that varies depending on the model. ESC or one of the function keys F8 to F12 works most frequently. If the boot screen does not display a message, search the Internet for the appropriate key combination for the model.
BIOS/UEFI Setup Guide: Boot from a CD, DVD, USB Drive or SD Card
Booting from a USB or CD/DVD drive can be tricky depending on your computer's BIOS / UEFI setup. In this guide, we'll break it down step-by-step.
For notebooks of security-conscious owners, booting from a USB stick is deactivated and any changes to the BIOS/EFI settings are password protected.
When booting Kali Linux, use either LIVE or LIVE FORENSIC MODE. The forensic mode has the advantage that any unintentional modification of files on the computer running Kali Linux is excluded.
This is especially important for forensic analysis.
Part 3.2
Read Windows file system
In Kali Linux, in the "Region and Language" module of the system settings, set the keyboard layout corresponding to your country, mine is German. Open a terminal and let's find the partitions using »lsblk« and »parted«.
$ 1lsb1k - lists all block devices. A Windows notebook is simply all partitions of the hard disk or SSD.
$ parted /dev/sd<X> print - provides detailed information about the partitions of a hard disk or SDD.
On my system Isblk finds 4 partitions, I currently don't have any sda there because I don't have a 2nd hard disk. SDA are mostly external hard disks, and SDC is the USB stick we used to start Kali Linux.
Parted shows that the Windows partitions are on /dev/sdb. With ordinary notebooks there is usually only one internal data carrier whose device name is /dev/sda.
Code:
S$ lsblk
NAME MAJ:MIN RM SIZE RO TYPE MOUNTPOINT
loopO 7:0 0 147,3M 1 loop /snap/skype/66
loopl Til 0 47,7M 1 loop /snap/riseup-vpn/152
loop2 7:2 O 54,4M 1 loop /snap/corel8/1066
loop3 7:3 0 88,5M 1 loop /snap/core/7270
loop4 7:4 O 21,1M 1 loop /snap/testss1/2
loop5 7:5 O 54,4M 1 loop /snap/corel8/1055
loop6é 7:6 0 202,9M 1 loop /snap/vlc/1049
loop7 7:7 0 47,7M 1 loop /snap/riseup-vpn/148
loops 7:8 0 105,7M 1 loop /snap/mrblackx/49
sda 8:0 0 931,5G 0 disk
sdal 8:1 0 745,1G 0 part /
sda2 8:2 0) 380M 0 part /boot/efi
sda3 8:3 0 139,7G 0 part /home
sda4 8:4 0 7,9G 0 part [SWAP]
S$ parted /dev/sdal print
Model: Unknown (unknown)
Disk /dev/sdal: 800GB
Sector size (logical/physical): 512B/4096B
Partition Table: loop
Disk Flags:
Number Start End Size File system Flags
1 0,00B 800GB 800GB btrfs[CODE]

The largest partition is always the partition we are looking for. For example SDA1 is 800GB big for me - which is still a Linux partition after all. There are mostly other partitions which have to be used for booting.

So that you can now access the data of this partition, create a local directory in the Kali file system with mkdir and connect the Windows partition to this directory with mount. The »-o ro« option makes the access read-only. If you also want to make changes, e.g. to reset the Windows password, execute the command without »-o ro«. With Nautilus you start the Linux file manager.
[CODE]S$ mkdir /mnt/windows
$ mount -o ro /dev/sdb2 /mnt/windows
S$ nautilus /mnt/windows &
Now you have full access to almost all files of the Windows notebook without having to enter any password. You can now view individual files or copy a user directory /Users/<name> to an external hard drive or upload it to a cloud directory for later analysis. With some skill you can determine which Internet pages the user of the computer has visited last, which passwords the browser has stored etc.
Part 3.3
Vault files
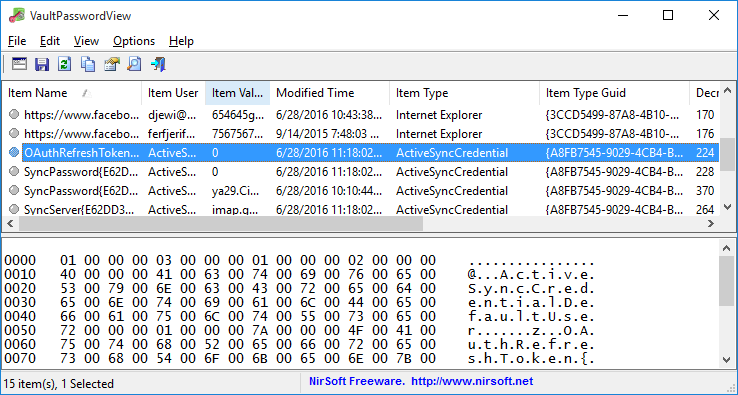
With the outlined procedure almost all files are open to you - but only almost. For security reasons, Windows and the web browser Edge store passwords and other sensitive data. These are located in the directory \User\hacker\Appdata\Local\Microsoft\Vault. Hacker is my name in this case, don't worry you'll find the user already. Background information can be found here:
Where does Credential Manager store credentials on the file system?
I want to clear a users stored credentials on a remote machine. Without having to have the user login and open the Cred manager GUI or run CMDKEY with them logged in. Is there a place on the file ...
serverfault.com
The contents of the file can be accessed via the traditional system control program (User Accounts module - Logon Information Management) but only after a successful login.
This restriction also applies to the vaultemd command, which you can run in cmd.exe or in the PowerShell. However, Kali Linux cannot evaluate these files.
The free program VaultPasswordView can also help to read the Vault files:
Decrypt Windows Vault Passwords
Simple tool for Windows 10 / 8 / 7 that decrypts and displays the passwords and other data stored inside Windows Vault
www.nirsoft.net
The program runs under Windows only. For example, you can use it to read Vault files that originate from another computer. The following also applies to the program: The Vault files can only be read if you know the Windows password of the relevant account.
IT forensic
The process of analyzing a file system to track the actions of the user is called IT forensics. Although good forensic know-how can of course be enormously helpful for hackers, this area is more likely to be classified as criminalistics - something when it comes to tracing a suspect's communication. A crucial point is never to change the file system so that the accusation cannot be made afterwards that the data is manipulated.
Part 3.4
Write access to the Windows file system
So far, we've confined ourselves to reading files. If you also want to make changes in the Windows file system, you have to execute the mount command without the -o option:
Code:
S$ mount /dev/sdb2 /mnt/windowsEven if you have already run mount with the -o ro option before, you can still activate the write mode afterwards:
Code:
$ mount -o remount,rw /dev/sdb2Relatively often, however, mount will return an error message because Windows was not shut down properly last time:
Windows is hibernated, refused to mount.
The file system is included in the directory tree, but contrary to your wishes it is only read-only.
The recommended solution now is to start Windows and then shut down properly. One way to do this is to start cmd.exe with administrator rights and run shutdown /p there. This way is not available due to a lack of password.
The emergency solution is to cancel the read-only-mount command with umount and then repeat mount with two additional options:
Code:
$ umount /dev/sdb2
$ mount -t ntfs-3g -o remove hiberfile /dev/sdb2 /mnt/windows
The option -t ntfs-3g explicitly prescribes the file system driver to be used for the mount command. -o remove_hiberfile also deletes the so-called hibernation file, in which Windows has stored the necessary information for a quick restart of Windows.
However, changes that were last made but not yet saved consistently in the file system are also lost.
Part 3.5
Linux and MacOS
Access to the file system works exactly the same for computers on which Linux is installed. So you start the computer with Kali Linux, find the partitions or logical volume with the data you want to read, and then mount. The command recognizes the file system in question itself:
Code:
S$ mkdir /mnt/linux
S$ mount /dev/sdb6 /mnt/linux
A little more complicated is the thing under MacOS: macOS uses since version 10.13 by default the file system APFS. Currently there are no open source drivers available to access APFS file systems from (Kali) Linux. A possible alternative are commercial drivers, which are difficult to use ona live system. It is easier to clone your own macOS system to an external hard disk and then use it as boot media.
T2 Chip
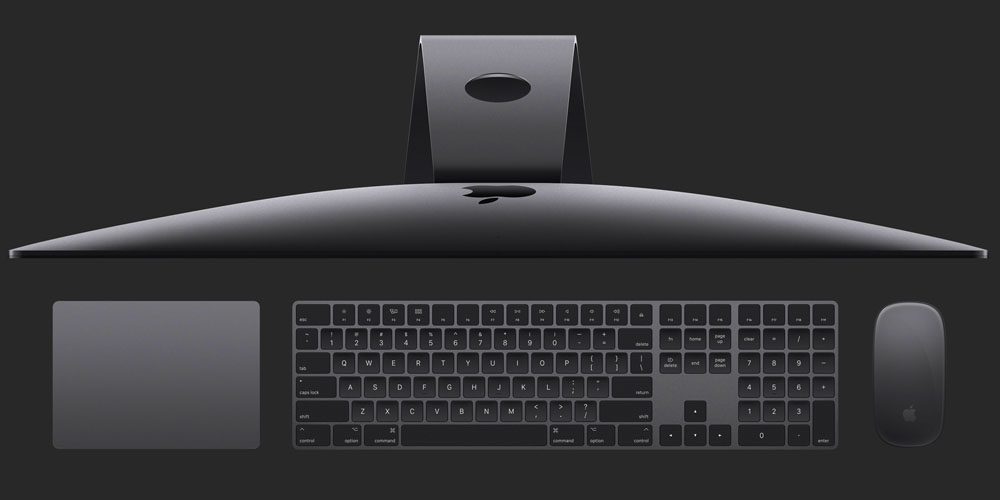
Launched at the end of 2017, iMac Pro is the first Apple computer with an additional chip under the brand name "T2". The chip performs various tasks, including securing the boot process. It is to be expected that Apple will equip most Apple computers with this chip in the future. A detailed description of the adapted boot process can be found here:
SecureBoot & the 2017 iMac Pro
SecureBoot One of the areas that Apple has made big improvements with the release of the 2017 iMac Pro is the introduction of SecureBoot. SecureBoot ...
As long as the default settings apply, booting such machines from an external boot medium with Linux is impossible. Booting from external media with Windows and MacOS is allowed, but requires an Internet connection for authentication. The T2 chip thus considerably improves the security of unencrypted file systems, but of course it cannot prevent the removal of the hard disk or SDD. This is also impossible with more and more Apple computers because the SSDs are soldered to the motherboard.
Nevertheless, you should encrypt the file system with FileVault on Apple computers with a T2 chip, a guide here:
Protect data on your Mac with FileVault
Turn on FileVault to add an extra layer of security to the encrypted data on your Mac.
Part 3.6
Are login passwords meaningless?
Once you have realized how little protection even a good login password offers - whether under windows or Linux or MacOS - the question naturally arises: »Are login passwords completely pointless? «
But I'm telling you, no, it's not that! Your password protects the computer in the office from a colleague logging in during the coffee break and doing mischief. Passwords also protect the computer in the local network. But the protection just doesn't go far enough to protect the data on the computer from someone who steals/find the computer that has physical access to the device for a longer period of time.
Part 4.0
Access external hard drives or SSDs
Basically, everything we explained in the previous section also applies to external hard disks: So if you want to analyze a hard disk that has come into your hands, whichever way you go, just connect it to a computer that already has an operating system running. With Isblk you can then determine the partitions on the hard disk. parted print gives you more detailed information about the type and size of the partitions. With mount you finally mount the filesystem of a partition into the local directory tree.
Part 4.1
Hard disks and SSDs removed from notebooks
Of course, this also applies to a hard disk or SSD that was previously removed from a notebook. If the data carrier is a SATA device, it can be installed in any standard desktop PC. An alternative way is to use a USB adapter, which can be bought for a few Euros in any electronics store. Comparable adapters are also available for SSD Plantines with an M.2 connector, if the SSD is SATA compact.
More difficult is the handling of the especially fast PCIe SSDs, which are used in modern notebooks (especially in the expensive models): These SSDs no longer support SATA, there are currently no USB adapters. To read the SSD, it must be plugged into a mainboard that has a suitable PCIe port for SSDs.
The most unpleasant case from a hacker's perspective are SSDs that are soldered to the motherboard of a notebook. A removal of such SSDs is impossible. The data contained on them can therefore only be read by the running notebook. However, a few notebook models have a special interface, thanks to which this hurdle can be overcome - even if only with special hardware. The interface is designed to rescue at least the data after a defect of the device. An example of such notebooks are MacBook Pro models from 2016 onwards.
Part 5.0
Windows Password Reset
If you once have write access to a hard disk / SSD, it should be actually only a small step to the password reset. Local passwords are stored as hash codes in the file system - and you can change them there.
As it turns out, however, the matter is not quite that simple. The difficulties begin with the fact that there are various authentication procedures under Windows:
- Local passwords: The easiest way to hack local passwords. Windows stores the hash codes of such passwords in the file Windows/System32/SAM.
- Image codes, PINs etc: In current Windows versions, you can set a PIN or character pattern on a picture you select instead of a traditional password. These methods are primarily intended for tablets or hybrid systems where a full keyboard is not always available.
- Microsoft account: Private users are forced by Microsoft to log in via a Microsoft account. In this case, the password is stored on a Microsoft server. So that a login is also possible without Internet access, there is also a local copy of the password hash in the Vault files of Windows (\Users\hacker\Local\Microsoft\Vault).
- Active Directory: On Windows computers in a local network, user accounts and passwords are usually managed by an Active Directory (AD), i.e. centrally on a server.
The next section focuses on resetting local passwords, i.e. the first point of the above enumeration.
Network passwords are naturally outside the requirements for these chapters (offline hacking).
Part 5.1
Tools
If you search the Internet for "windows password reset", you will find numerous tools to help you reset Windows passwords or disable password control. However, many tools are almost biblical in age and only work with ancient Windows versions or 32-bit versions.
We are dealing here with current 64-bit versions of windows, whose local passwords you can reset with the following means, among others:
chntpw command: The Linux command »chntpw«, which is available by default under Kali Linux and can be installed in many other distributions with little effort, resets local Windows passwords, activates deactivated users and adds them to the administrator group if required.
PCUnlocker: The commercial tool PCUnlocker offers similar functions as chntpw, but packages them behind an attractive user interface. Depending on the version, PCUnlocker offers additional functions including support for Active Directory passwords at moderate prices (20 to 50 US dollars):
Reset Lost or Forgotten Windows Password with PCUnlocker
www.top-password.com
The program is delivered in the form of an ISO file, which must be transferred to a USB stick. The PCUnlocker is embedded in a Windows PE system (Windows Preinstallation Environment).
DakT: Surprisingly, even Microsoft offers a password reset tool. The Diagnostic and Recovery Toolset is part of the Microsoft Desktop Optimization Pack, which is only available to Microsoft Software Assurance customers. More details here:
Diagnostics and Recovery Toolset 10 - Microsoft Desktop Optimization Pack
Microsoft Diagnostics and Recovery Toolset (DaRT) 10 lets you diagnose and repair a computer that can't be started or that has problems starting as expected.
docs.microsoft.com
Part 5.2
Undesirable side effects
Local passwords can be reset amazingly easily with the tools listed above. But before we get started, we would like to give you a warning: The Vault files in which Windows stores Edge passwords and those of services such as OneDrive or Skype are encrypted for security reasons.
After changing your password, you can no longer access them or EFS-encrypted files and directories.
Further details can be found here:
Accessing EFS-encrypted files after resetting Windows password
I have some EFS-encrypted files in Windows. The owning user account is protected by a password, which can be easily bypassed (i.e. reset) by many tools and methods. So what will happen to these
superuser.com
You can only avoid this restriction by not resetting the password, but trying to guess it. The procedure is very complex and seldom crowned with success. The basic idea is to read the hash codes of the local passwords from the binary file and Windows\System32\config\SAM and then use a password cracker like John the Ripper to determine them by systematically trying them out or using dictionary lists.
Since the Womdpws Ammoversary Update for Windows 10, i.e. since August 2016, the hash codes in the SAM file are generated with a modern AES algorithm.
Many programs established in the past for reading the hash codes from the file cannot cope with this, e.g. pwdump, bkhive or samdump2. Currently only the tool mimikatz is suitable.
More here:
How are Windows 10 hashes stored if the account is setup using a Microsoft account?
I was testing the integrity of my passwords and noticed that after I dumped the hashes, there was only one account where the NTLM hash was not a "default hash." I also know that that account happen...
security.stackexchange.com
Part 5.3
Reset local Windows password with chntpw
If you want to reset Windows passwords with chntpw, you must first boot the machine with a Linux distribution. Kali Linux is only available if you can disable UEFI Secure Boot first. Alternatively, you can use an installation image from Ubuntu that is secure boot compatible.
In the next step, locate the partition with the Windows file system and mount it to a local directory so that you have write access to it. Kali Linux does not allow you to use the forensic mode. For control you can use mount to list all file systems, grep filters the list and displays only entries that contain win.
It is important that the attribute rw appears on the Windows file system.
Code:
S$ mount | grep winNow change to the directory windows/system32/config. It contains several files whose names begin with SAM. They are managed by the Security Account manager.
Code:
S cd /mnt/Windows/System32/config/
S ls -l SAM*
The critical critical file is SAM. The command chntpw with the options -| lists which users are stored in the account file, which of them have admin rights and which are currently blocked.
Code:
S$ chntpw -l1 SAMTo actually make changes, start the command with the option -i (for interactive). You can now first list all accounts and groups, select an account, and finally reset its password to an empty password. With you leave first the user edit menu and then the main interactive menu. chntpw asks if you really want to save the changes.
Code:
S$ chntpw -i SAM>> chtnpw Main Interactive Menu
Loaded hives: <SAM>
1 - Edit user data and password
2 - List Groups
9 - Registry editor, now with full write support!
gq - Quit (you will be asked if there is something to save)
What to do? > 1
Please enter user number (RID) or O to exit: (enter here user number) 3e9
>> User Edit Menu:
1 - Clear (blank) user password
Select: [q] > 1
Password cleared
Select: [q] > q
Hives that have changed:
# Name
O <SAM>
Write hive files(y|n) : y
oO <SAM> - OK
Those were the steps. After restarting windows you can login to the changed account without entering a password. If this does not work, the user has set a different authentication procedure.
Part 5.4
Activate administrative Windows user with chntpw
Unfortunately, chntpw does not hide which login procedure applies to the accounts. If you reset a user's password as described above, but their login is protected by a PIN, a Microsoft account or Active Directory, the action will be completely ineffective.
For such cases there is a plan B: You can activate the normally existing but not active administrator account with chntpw and assign an empty password to this account.
Code:
S$ cd /mnt/windows/Windows/System32/config
S$ chntpw -i SAM
Then select 1 for edit user data and passwords.
Choose the administrator RID.
Now type 2 for Unlock amd enable user account.
Hit 1 for Clear(blank) user password.
Then q for quit.
You can then restart the computer, log on as administrator without password and access all files of all users via Windows Explorer (C:\Users). You can also change the local passwords of all users via the system settings. However, the Windows system settings do not allow you to change the authentication method of another user.
Part 6.0
Reset Linux and MacOS password
Under Linux and macOS many things are easier than under Windows - and this also applies to a password reset. The following two instructions assume that the password is a local one (no network login with Kerberos etc.) and that the file system is not encrypted.
Reset Linux password:
We assume here that you want to reset the root password of a computer. To do this, start the device with Kali Linux or any Linux live system. With Islbk and parted print you search for the system partition, i.e. the partition that contains the /etce directory. Include it in the directory tree.
Code:
S$ mkdir mnt/linux
S$ mount /dev/sda2 /mnt/linux
With chroot you can now make the mouint directory the new starting point for all further commands. If you work as root in the Linux Live system (and this is a mandatory requirement to execute the above commands), the following command passwd applies to change a password for the Linux computer or its file system. With exit you leave the chroot mode and return to the live system.
Code:
$ chroot /mnt/linux
S passwd
Reset macOS password:
To reset a local password under macOS, you have to get into the emergency system. There you open a terminal window with UTILITIES TERMINAL and execute resetpassword. A window appears with all accounts submitted to the recorder. Now select an account.
With older versions of resetpassword you could now easily set a new password for this account.
Current versions, however, are much more cautious:
If the account is associated with an Apple ID, you will need to enter the Apple ID password in the next step. This requires an Internet connection. After the login, a two-factor authentication takes place. To do this, a control code is sent to another device of the user. The password can only be reset with this code.
If the account is not connected to an Apple ID account, a new password can easily be set; however, it was not possible to complete the process during our tests. The error message Reset Password Failed was always displayed at the end of the process.
If you don't get to it with resetpassword, there is a second way: During the restart you have to enter the single-user-mode. This will take you to a text console. There you execute the following commands:
Code:
$ mount -uw /
S$ rm /var/db/.AppleSetupDone
S shutdown -h now
In short, this means that you delete the file system azs the file AppleSetzoDone. At the next restart macO$ thinks it would be the first start. You can now create a new administrative user (do not use an account name that already exists and skip the Appel-ID login).
Once the configuration is complete, you reach the macOS interface. Now open the "Users & Groups” module in the system settings. After you have unlocked the module with the new admin password, all other accounts known on the system are listed. You can now easily reset their passwords.
Part 7.0
Encrypt hard disks
Now that we've shown them what you can do as a hacker if you have physical access to a Windows or Linux machine, switch to the administrator's perspective: How can you protect yourself against such attacks?
At the beginning of this chapter, we have already mentioned the protective functions of the EFI or BIOS: UEFI Secure Boot is always activated on modem Windows computers anyway. In addition, you should block the possibility of booting from an external drive and make sure you have a master password for the EFI/BIOS.
Part 7.1
BitLocker
The only effective protection against a hacker being able to read the hard disk or SSD of a device is to fully encrypt the file carrier. Windows has integrated BitLocker technology into the Pro and Enterprise versions of Windows for this purpose.
BitLocker normally assumes that the computer contains a Trusted Platform Module (TPM). This is a chip that provides basic encryption functions according to a standard, uniquely identifies the device with a key, and provides a memory for securely storing additional keys.
TPM can be implemented as its own chip, but also as part of the CPU. Intel uses the highly controversial Management Engine (ME) for some models and calls its TPM implementation Platform Trust Technology (PTT).
BitLocker stores the encryption key in the TPM chip. As long as Windows is started directly from the device, the BitLocker file system can be accessed without the annoying specification of a key. If, on the other hand, a hacker uses another boot medium or removes the hard disk/SSD from the computer, access to the encrypted file system is only possible with the corresponding BitLocker password.
It is also possible to use BitLocker without TPM. To do this, you must first change a group policy. In the Group Policy Editor (gpedit for short), look for the BitLocker options in the local computer policies. Double-click to change the settings for the policy "Request additional authentication at startup", so that BitLocker accepts a USB stick with a key file or a password instead of TPM for security reasons.
Activate and deactivate BitLocker in the system control module of the same name. In the following dialogs you can set a password, print or save the recovery key, choose between different encryption
modes, etc. The actual encryption takes place after the next Windows restart. If you use BitLocker without TPM, a USB stick with the key file (*.BET file) must be plugged into the computer. In the
future, this USB stick will also allow booting without entering a BitLocker password.
While the file system is encrypted, you can work normally. If you want to know how advanced the encryption is, execute the command manage-bde in a cmd.exe or PowerShell window with administration rights:
Code:
> manage-bde -statusBitLocker to Go
External drives can also be encrypted with BitLocker to Go. This is especially important when backups are stored there - otherwise an unencrypted backup undermines the BitLocker protection on the notebook.
Speed
Encrypting and decrypting files takes time. Fortunately, modern notebooks don't have a significant speed disadvantage, because hardware encoders or decoders help the CPU with its work. Their efficiency is so high that not even fast SDDs are significantly slowed down.
Part 7.2
Access to BitLocker file systems under Linux (dislocker)
If you know the password or have a key file, you can also access the Bitlocker file system under Linux.
You need the dislocker package, which can also be installed in the live system:
S$ apt install dislocker
With dislocker-metadata you can find out which encryption method bitlocker uses:
Code:
S$ dislocker -metadata -V /dev/sdb2 | grep TypeTo access the contents of the partition, run dislocker-fuse. The command will ask you for the BitLocker password, without which access will not work.
Code:
S$ mkdir /mnt/bitlocker
S$ dislocker-fuse -V /dev/sdb2 -u /mnt/bitlocker
Enter the user password: *********
If you have a *.BEK file with the BitLocker key, you can pass it with the -f option. dislocker-fuse still asks for the password. However, it is now sufficient to simply press Enter.
Code:
S dislocker-fuse -V /dev/sdb2 -u /mnt/bitlocker/ \ -f£ F662AE50-8C93-4847-8441-FAA1 84AFF9AD. BEKEnter the user password: *********
In the directory /mnt/bitlocker you will find only one file, the dislocker-file. This file can now be used as NTFS file system in a second step with mount:
Code:
$ ls -lh /mnt/bitlocker/
$ mkdir /mnt/windows
$ mount -o ro /mnt/bitlocker/dislocker-file /mnt/windows
$ ls /mnt/windows
You can read more about dislocker here:
GitHub - Aorimn/dislocker: FUSE driver to read/write Windows' BitLocker-ed volumes under Linux / Mac OSX
FUSE driver to read/write Windows' BitLocker-ed volumes under Linux / Mac OSX - Aorimn/dislocker
github.com
Part 7.3
BitLocker Security
BitLocker is considered secure to the best of our knowledge - that is, until the beginning of 2018 there was no known way to break the protection if the computer is switched off and the password is not known.
Naturally, encryption protection depends on the quality of the password. A password that is too short or too simple can be discovered by systematic testing. Another security risk is the storage of the key:
During setup, the configuration program recommends printing a key for data recovery or storing it on a USB data carrier.
Microsoft say that bitlocker does not contain backdoors. Since the source code of the software is not available, this statement cannot be proven. Police and secret services have demanded such a backdoor several times.
The concept of a cold boot attack is outlined on the English Wikipedia page on Bitlocker. It is based on the fact that the Bitlocker key is in memory while Windows is running: If a hacker steals the device while it is running and restarts it with its own boot medium within minutes, it may be possible to read the key from memory.
The situation becomes even easier if the attacker has access to the running, unlocked computer. Since the BitLocker password is stored in memory, the attacker only has to succeed in reading out the entire working memory. The company PassWare offers a corresponding attack kit for purchase. It can read the main memory via the FireWire interface if the computer offers such an interface:
Password recovery tools by Passware
Lost password? No problem. Easy to use password recovery software for Windows, Word, Excel, Outlook, Access mdb and more. Over 300 file types supported.
Part 7.4
BitLocker-Alternatives
In the past, the TrueCrypt program in the source code was considered an alternative to Bitlocker.
However, the development of the program 2014 was discontinued. At the same time, a warning was issued about possible security holes in TrueCrypt. Various forks or variants of TrueCrypt e.g. VeraCrypt or GhostCrypt never achieved the same popularity as TrueCrypt - and were never checked to the same extent with regard to security problems.
If you do not want to encrypt the entire file system, but only individual files or directories, you can use the Encrypted File System (EFS).
This relatively old Windows function is only available in selected Windows versions, e.g. the Pro, Enterprise and Education versions of Windows 10.
In order to use the EFS functions, execute the context menu entry PROPERTIES of a file or directory, click the ADVANCED button and then activate the CONTENT KEY option. Surprisingly, Windows does not ask for an encryption password. Instead, Windows generates a key when setting up the first EFS file and secures access to this key with the current account data. An access to the files is thus associated with a successful Widnwos login. However, Windows recommends saving the access key on an external data medium and displays a corresponding dialog after encryption.
If a hacker under Linux or from another Windows account tries to view the files, he will see the files including the file names, but access is not possible.
macOS (FileVault)
macO$ offers an encryption function similar to Bitlocker under the name FILE VAULT. The encryption
can be set either in the system settings (module SECURITY) or via the following command:
Code:
S$ sudo fdesetup enableUnlike under Windows, however, access to the encrypted data is linked to the login password. There is no password of its own. TPM hardware for storing keys is not available on Apple computers.
The T2 chip introduced at the end of 2017 together with the iMac Pro can take over this task. This chip will probably also be integrated into other Mac models in the longer term.
When setting up FileVault, MacOS gives you the option to store the key in the iCloud or in a local file.
In an emergency, the key file provides a way to access data without the login password.
From a security point of view, File Vault is comparable to BitLocker. The attacks outlined there, e.g. reading RAM, are in principle also conceivable under macOS.
However, the prerequisites for this are only given if the attacker already has access to the computer any way.
Linux (LUKS)
Under Linux, there are several ways to encrypt a file system. The most popular is LUKS (Linux Unified Key Setup). It is based on the core module dm_crypt, which adds cryptographic functions to the Device Mapper (which is responsible for accessing partitions and block devices in general). The module thus forms a logical layer between the encrypted raw data on the hard disk/SSD and in the file system, as the user sees it. dm_crypt is often combined with LVM, but this is not absolutely necessary.
A subsequent setup of LUKS is only possible with very high time and administration effort. Therefore, it is recommended to set up LUKS immediately during installation. All common Linux distrobutions offer corresponding options: Under Ubuntu select the option Encrypt the new Ubuntu installation for security in the installation menu, under RHEL and CentOS activate the option Encrypt my data in the partitioning dialog.
For both distributions, encryption is already performed at LVM level. This encrypts all logical volumes.
Unlike under Windows where the BitLocker key is stored in the TPM chip, or under MacOS where the key access is secured with the login password, under Linux the LUKS password must always be entered at the beginning of the boot process. An unattended restart is not possible without further ado.
LUKS is therefore well suited for notebooks, but not for servers running in a remote data center or in remote basement rooms.
Part 7.5
File system encryption on the server
After this offline hacking series it should be clear that the file systems of corporate notebooks should always be encrypted - no matter if the devices use Windows, macOS or Linux as operating system.
But what is the recommendation for servers? The answer depends on several factors. The first question is where the servers are located. If they are locked rooms to which only a few people have access, the need for encryption is often unnecessary. If, on the other hand, the server of a small company is accessible to everyone in the copy room, then encryption is very useful.
Another factor is the operating system: Windows servers with TPM can be restarted without much additional effort even if encryption is activated. Linux servers, on the other hand, require the LUKS password to be entered manually each time they are restarted. To do this, an administrator must have physical access to the computer. This is extremely inconvenient for servers that are usually administered via the network (e.g. with SSH). For root servers running in an external data center, the procedure is simply impossible.
A special case are NAS devices: With many devices a hard disk can be removed with a handle. For example, if an attacker comes to a company as a visitor and sees an unattended NAS device, he can steal a hard drive in no time at all.
With common NAS operating systems, you usually cannot encrypt the system as a whole, but you can encrypt individual directories. After a restart, e.g. after an update, the encrypted directories must be opened explicitly via the web interface of the NAS device by specifying the password. Until this happens, the directories are not available in the corporate network. As so often the question arises where the right compromise between high security and sufficient convenience lies.
LAST WORDS:
TIT REALLY INVESTED A LOT OF TIME IN THIS GUIDE I HOPE YOU LIKED THIS GUIDE
AND IT COULD HELPS YOU. THANKS FOR ALL HAVE FUN AT READING.
To be continued...
Last edited: