Carding
Professional
- Messages
- 2,870
- Reaction score
- 2,521
- Points
- 113
Lecturer: Xerl
[19:15:01] <Xerl> Welcome to the lecture. Today the lecture is dedicated to Antidetects. In this lecture we will talk generally about antidetects, we will analyze two popular antidetects from the forum, which are great for our work, we will understand some features and chips in working with these programs.
[19:16:36] <Xerl> For those who have long been in this field, I have heard a lot about Antidetects, but for beginners who have only recently come to this area it will be useful to find out what it is all about and with what “it are eating". Antidetect is a program or a set of programs that allows you to unify your system, change various prints and parameters in order to bypass the antifraud system in stores (shops), payment systems (Paypal, Skrill, etc.), online banking, and everything else, where you want to change your identity. A huge plus of antidetects is that they allow you to use your system to work without changing it, thereby saving you valuable time. Previously, the main task of Antidetects was simply to unify the system, but now - not just to unify the system, but to make all prints and parameters natural, so that you can "merge with the rest of the crowd of users." This is very useful and necessary, for example, when working with logs.
[19:18:10] <Xerl> I will explain using available examples from life how antidetect and antifraud work: in the first case, if you imagine that the FACE ID on the Iphone is an antifraud system, and to unlock it you need to show a NEW face every time, then thanks to antidetect, we can make a very, very many faces, and each time calmly and successfully pass this defense.
In the second case, if you imagine that the FACE ID on the Iphone is an antifraud system, and to unlock it you need to show the same face every time, which is basically the reality on the Iphone, then we can “copy” the owner’s face and successfully bypass protection (of course knowing roughly how this “facial print” should look).
[19:19:52] <Xerl> But in modern Antifraud systems, too, are not fools and the development of new protections and detections does not stand still, therefore they are improved every day and today not only the parameters and prints of the system are evaluated, but also a number of other factors.
For example, in such a large Amazon store or Paypal payment system, the behavioral factor is assessed by the neural network, your IP, DNS, and your “fingerprint” on the Internet are also evaluated according to various parameters (more details below).
Therefore, although the antidetect plays an important role, success lies not only in its use, but in its proper use in combination with other factors, which I indicated above. With a conscious work, analysis of your drive-ins and various tools that you use - you are doomed to success")
[19:23:15] <Xerl> https://www.youtube.com/watch?v=2PQxoQQOPpY
Screenshot: http://prntscr.com/isj1yg
Above, I indicated a link to a video in which you can see how many factors the Antifraud system takes into account. Look after the lecture ends and you will see that the browser plays an important role, but this role is not the only one.
In the screenshot, you can see how many parameters refer to the use of the E-mail address when driving in other services.
[19:24:28] <Xerl> Types of antidetects
There are two types of antidetects:
1) Antidetects that allow you to replace the iron settings of your system or your virtual machine.
These parameters include: information about the processor, video card, BIOS, network card, folder creation date, and system, various other devices in the system.
These antidetects are needed when working with programs that are installed on your Windows. These can be poker clients, for example, PokerStars, clients of bookmakers, etc.
[19:27:10] <Xerl> Examples of topical iron antidetects:
A) Antidetect 2.0 by Vektor T13 - The current solution in the field of iron antidetect from Vertor_T13 for VirtualBox. The solution is fully supported by the author, as can be seen from his telegram channel. The disadvantage of this solution is that the solution is free, so you won’t get a full technical support for free, and getting into a consultation for money will still take a huge amount of time and it’s not a fact that you will still receive it.
B) Aff Combine (KRAKEN PRO) is a relatively new iron antidetect for VmWare, which also includes browser-based antidetect. Recently released version 1.0. Sold on our forum for $ 1,400. The antidetect is supported by the author, there is support in Telegram, a general chat for discussing work and solving various problems. We’ll talk more about this solution today below.
[19:29:52] <Xerl> 2) Anti-detectors, which allow you to change browser settings, thereby simulating any system or device.
Using these anti-detectors, you can simulate any system (Windows, MAC, Linux, Android, IOS), a browser (FF, Chrome, Opera, Safari), game consoles, Smart TV, etc.
These antidetects can also be of two types:
1 view: Antidetect based on a normal browser in which the extension or Addon is installed. Basically, all antidetects of this type (Antidetect 7.8, Antidetect 8, Anti-Detect from Cert, Genesis Security, Anti-Detect Ivan Iovation, AFF Combine)
Here Antidetects can be divided into two more categories:
A) Firefox based antidetects. This category includes: Antidetect 7.5, Good Job Anti-Detect, AFF Combine, Ivan Iovation Anti-Detect)
B) Chromuim browser-based antidetects. This category includes: Antidetect from Cert, Antidetect 8, Genesis Security.
Category B antidetects have a higher purchase price than the first because they require more cash investments, more knowledge to create it.
[19:32:32] <Xerl> 2 KIND OF ANTI-DETECTIONS: Antidetect written on the source code of the engine. Of the examples that I know, Linken Sphere can be attributed here. It is written in the source code of Chromuim, and therefore contains a very large number of possible chips and tools. But more on this later.
Examples of relevant antidetects:
Cert Anti-Detect - Chromuim-based antidetect. Binds to iron, i.e. can be used only on 1 system. The author of antidetect is one of the very first developers of antidetect in general, and especially based on the Chromuim browser. Updates are stable. Sold on Verif, costs $ 5000. The most expensive antidetect available. The price of the product is unreasonably high. Each update is also paid and costs from 50 to 300 $. Even if you missed some update and didn’t take it, you will have to pay for all previous updates to get the latest version. In my opinion, taking into account the remaining antidetects on the market, a beginner should not take it.
Byte Antidetect 8 - Chromuim based antidetect. This author has other products: Antidetect 5,6,7, which are developed based on the Mozilla Firefox browser. They have shown and proven themselves in due time. Antidetect 8 is not a very popular product, there are no more than 30-40 users of antidetect. Also sold in Verife, price: $ 3000 + $ 100 per month subscription fee. This antidetect does not develop very quickly, but it has some advantages: free configs, non-unique Canvas and a small number of users. More about what Canvas will be below.
[19:37:37] <Xerl> Byte Anti-Detect 7 - Anti-Detect based on the Firefox physical browser. In parallel with the 8th antidetect, the 7th version of the antidetect is supported and periodically updated. The author sells it for $ 500 forever / or for $ 100 but monthly. On our forum, you can buy version 7.1 from Billy Bones. The stock price for students is $ 50. The product is completely worth the money. A good option for a beginner, especially if you take for $ 50. Configs can also be purchased immediately from the author for $ 3 from Billy Bones for $ 1 and below, without the need to fulfill any conditions. By cons, the antidetect does not replace some prints, for example, audiofingerprint, some configs require a little manual editing.
Antidetect Ivan Iovation - Antidetect from a Romanian author, who appeared on the market recently. It also includes iron antidetect, but the main focus is on the browser-side blood pressure, which is why I classified it in this category. Firefox based antidetect. The price of this solution is $ 200 per month, which is quite a considerable price for a beginner. Of the minuses of this Anti-Detect: its price, the complexity of installation, it is difficult to install and even the manual is very difficult and hemorrhaging, and technical support from the author costs 99 $ / 1 DAY, plus support only in English, binding to one system. From the pluses: non-unique canvas, but only a few pieces, well, the antidetect itself is still new, unstacked in carder circles, which is a good plus. I would advise him to take it NOT for beginners, for those who do not get any kind of shops, merch from other Anti-Detects. And then, given the fact that, for example, there are only a few pieces of non-unique canvas, you won’t be able to get into a drive in one drive.
[19:39:22] <Xerl> Genesis Security - this product is not quite an Anti-Detect in the usual sense. It is used for logs. Now I will explain in more detail.
This product has a Genesis Market, which has a large number of bots that you can buy. The price of a bot is on average from $ 20 to $ 60.
A bot can contain logs, a browser cookie, and most importantly a fingerprint of its system (Fingerprint), which from the point of view of Anti-Detect can be called a config (more on that later). Buying a bot that has access to Paypal in the logs, a browser cookie and its fingerprint, we get essentially an excellent option for working with logs, thereby increasing the chance of success, because in addition to the logs and browser cookies, we have a system imprint, thereby evoking the best trust of Antifraud systems.
But from the point of view of ordinary drives, it is not very rational on average $ 30 or more dollars per 1 config. But the plus of this option is that access to the store is free, there is no monthly payment or payment in order to get there. All expenses will only be in the purchase of bots (configs)
Another significant minus for a beginner in this shop is that there are no replacements. Suppose, if you take the Paypal or Amazon log or any other shop log from the forum, from the Azorult stiller or another similar solution and the LOGIN / PASSWORD is incorrect, then you will be replaced, but there are no replacements in the Genesis shop. Therefore, for beginners, there is some risk of squandering money just like that, especially not being able to work with logs. In my opinion, for those who want to go in the direction of working with logs, it is first better to practice and learn from the logs of the Azorult stiller and the like that are sold on our forum, and only then, if necessary, switch to Genesis.
[19:41:38] <Xerl> Well, since we have already touched on the topic of working with logs, the best option for working with the logs of the Azorult stiller and the like is definitely Linken Sphere.
Using Linken Sphere, you can quickly and conveniently import cookies into the session, quickly configure the available parameters for the log: UserAgent, resolution, timezone, language, number of cores (hardwareConcurrency), RAM (deviceMemory), video card (WebGL).
And using tools such as a heater and an automatic machine, it’s quick and convenient to warm up the desired store without spending a lot of time on it.
You can read more about this in my article.
[19:42:54] <Xerl> And we go, after a long digression, to a browser antidetect corresponding to price-quality, definitely suitable for beginners, and which is worth having in our "arsenal:
Linken Sphere (Sphere) - one of the most popular antidetects. It is written on the source code of the Chromuim engine. For sale on our forum. Advantages include: Excellent support, updates, no binding to the system, spoofing of all the main fingerprints, built-in functionality for working with ssh, socks and tor, own unique socks service integrated into Anti-Detect, which will appear in the near future; the ability to drive from several tabs at once, because 1 tab as one system, and you can open a lot of such tabs; built-in automator and web emulator, etc. pluses. Also, for anyone who is being trained for the first time, they will be given Linken Sphere for 1 month for free. Therefore, you will be able to evaluate this product in practice.
Cons, as for a beginner, will be: a monthly subscription of $ 95 (5% lifetime discount by user BBX), a shop with configurations is unavailable, i.e. configs; if there is no PRO subscription ($ 475 for half a year), there is no way to fully configure windows.navigator settings. But the combination of parameters allows you to fully recommend it, I also use it myself.
[19:44:16] <Xerl> But it’s worth immediately explaining about driving in: antidetects are not a panacea and the loot button; it is just a tool. Therefore, do not neglect driving in from VNC, Dediks, virtual machines, real systems. It happens that for some reason it goes better in one shop, with something worse, for something it makes no difference at all. So make it a rule: "In the fight against antifraud, all means are good."
I think it is worth explaining right away what a config is in any antidetect and what types of configs exist. A config is a set of files or just code that contains information about the browser and the system (browser javascript parameters, WebGL parameters, font set, etc., Canvas parameters and any others.) Simply put, a config is a snapshot of the system and browser. Using configs reduces the time to configure antidetect, just took, downloaded the config, and you're almost ready to go.
Configs are real and generated. Real ones are those configs that are “copied” from real systems by collecting parameters, and the generated configs are made using the generator program. The minus of the generated configs is that the parameters may be incorrect, not correspond to reality. Currently, the generated configs are in little use at all.
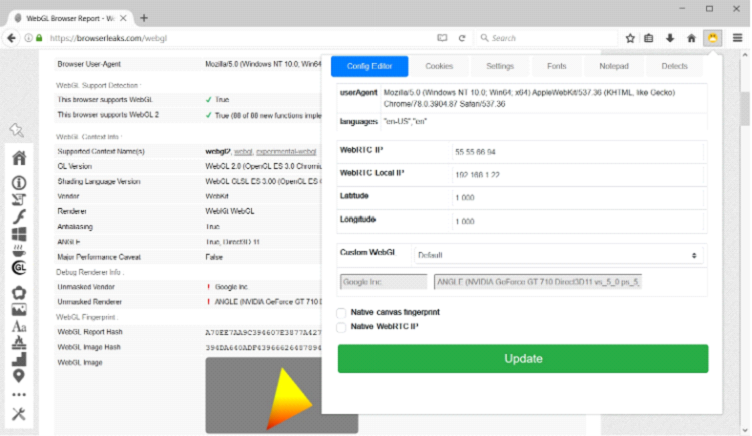
[19:45:38] <Xerl> Very often after the lecture there are questions about what Canvas, WebGL, WebRTC are. Therefore, I will immediately explain this with the simplest option that I have found for all time, so that each person can understand what it is and what it is eaten with.
Canvas is a technology that is used to render the visual elements of web pages. Before 2006, when surfing the web to display a web page, the server had to transfer visual elements of the site to our PC - graphics, tables, etc., which heavily loaded the communication channel (remember the speed of that time) or we had to use Macromedia Flash, to watch a video, or play simple games. But then came Canvas, which is based on JavaScript and now the site does not transmit ready-made elements, but simply shows us the text of the script, which is not executed on the server, but ON OUR PC using our browser and our hardware. Speed increased, server load decreased, opportunities expanded. Canvas refers to 2D graphics. So, systems, depending on various parameters, render elements differently. This allows you to create a fingerprint, as well as determine which browser and OC it belongs to.
[19:47:19] <Xerl> WebGL is a 3D building technology and this technology is based on the OpenGL accelerator, and to be more precise, on OpenGL ES.
WebGL works like this - The website transfers javascript code to our PC, which is processed by our browser in two modes:
1. Software Acceleration
2. Hardware acceleration
Since javascript is run only on the user's PC, the above accelerators will not be used from the server, but from our regular desktop or home PC.
The algorithm is as follows:
1. Peaks are formed
2. Vertex shaders are formed
3. Between the vertices, lines are drawn and the shape of the image appears
4. Add geometry
5. Pixels are formed
6. Pixels are filled with color (Pixel shader)
7. Effects are added (smoothing, transparency, etc.)
And that’s it - the picture is ready. For the user, this will take an instant, but the number of operations that will be carried out is simply colossal and hundreds of different graphic parameters take part in all this. This picture and a set of parameters allows you to create a print.
[19:48:32] <Xerl> WebRTC is a technology that allows you to transfer audio and video streaming data between browsers and mobile applications. Thanks to WebRTC, user browsers can transfer data to each other directly. WebRTC does not need a separate server that stores and processes data. All data is processed directly by the browsers and mobile applications of end users. The danger of WebRTC technology lies in determining your real IP address. Since the connection is direct with another user, browser, website or mobile application, the network settings are ignored. To create audio and video communications, browsers must exchange external and local IP addresses. Therefore, despite the VPN, TOR is determined by the real IP address.
If you use tunnels or socks, then WebRTC will be able to determine your real IP address for the proxy or the IP address of the VPN server if you use the VPN + tunnel / toe chain.
[19:49:57] <Xerl> Any antidetect can and should be used for its anonymity and security in your chain. This, of course, is not a panacea, but I highly recommend adding an antidetect, at least the Sphere, to your security chain.
Tips for securing your security with antidetects:
First, use different configs on different sites. On one, let's say Windows OC, on another OC Linux.
Secondly, periodically change these configs.
Thirdly, store the software itself on an encrypted flash drive or hard drive or container.
For Linken Sphere antidetector (Scope), you can add:
A) Keep the password in your head in order to avoid the possibility of a third party logging into your antidetect account and receiving your configuration, history, cookies.
B) Use in the TOR connection chain.
[19:51:24] <Xerl> The Sphere is a free product from Linken Sphere developers. The advantages of this solution, even in contrast to Antidetects, are that:
1) The product is completely free.
2) The product does not have server bindings, hardware bindings, therefore, it can be used wherever you want
3) The product does not require installation, it is Portable, this is a huge plus in that it is convenient to transfer between systems, convenient to place on an encrypted container, flash drive, disk, and there will be no installation traces to all this.
4) The information about the sessions in this decision is also encrypted, which, if received by third parties, makes it impossible to use.
5) The product has all the necessary substitutions in its arsenal.
[19:52:54] <Xerl> AFF Combine
We pass to the main part of the lecture and consider two antidetects. One iron antidetect - AFF Combine, which combines browser antidetect and Linken Sphere - one of the best browser antidetects.
For all questions about AFF Combine, by the way, you can always contact me in the LAN or Jabber or support, which will solve the problems with installation, with the configuration and configuration of antidetect. Telegram: @AFF_Combine
This antidetect consists of two parts. We will analyze each part in detail: what, why, and why.
So, after installation, open the first part of the antidetect. Run the file "clc.exe". Screenshot: https://prnt.sc/lu5yao
[19:53:53] <Xerl> Press the “Connect” button and your personal copy of the antidetect will be authorized on the server and is fully ready to work. Screenshot: https://prnt.sc/lua3ps
We will analyze in detail all the possible settings.
1 area shows which version of VMware is needed for the full operation of the iron antidetect. To put, of course, only this version. If you click on this inscription, a link will open for downloading Wmware of the desired version. A detailed step-by-step manual for installing a virtual machine on Windows 10 is attached to this antidetect.
The Session Quality area under the number 10 shows the connection quality of your antidetect with the authorization server, and if authorization is successful, it is displayed that the connection to the server is successful: “connected”
[19:55:09] <Xerl> We pass to the following area: "My Tools"
The Share button allows you to make a shared folder for all physical devices and virtual machines. The feature is needed for quick and convenient transfer of files and folders, for example, to your virtual machines. To copy folders you need to use archives.
Button 2 "Syscheck" shows your version of VMware, if it does not match the version you need. When it matches, it shows that everything is “SYSTEM OK”
Button 3 “DNS LP” (DNS Leak Protection) is a useful feature for Windows 10. The fact is that in addition to the DNS server, which you specified in your system or system to drive in, Windows 7, 8.10 still sends everything to all in parallel known to the server system, but uses the response from the server from which information arrived faster. Those. it may not be the DNS server that is specified in the configuration. Therefore, the inclusion of this function is simply necessary for driving and for safety.
Button 4 "Connect / Disconnect" just allows you to connect to the antidetect server for work or vice versa to disconnect from it.
[19:56:43] <Xerl> The next area of "VMware" refers to the iron antidetect, just in this area you can select the components of your virtual machine on VmWare.
Button 5 “Select graphics adapter” allows you to select the video card of your virtual machine from the drop-down list. There are video cards Nvidia, AMD, Intel (Only 5 pieces). I’ll clarify that the system does not just install the name of the video card and driver. Drivers for video cards will soon be available, and therefore, by installing various drivers, the uniqueness of the video card will be even greater, plus Canvas and WebGL will have a different fingerprint when installing different drivers.
Button 6 “Select mainboard / chipset” allows you to select the motherboard of your virtual machine from the drop-down list (the motherboard is emulated). There are 8 Intel and AMD motherboards.
After selecting the motherboard, the processor family is automatically selected, button 7 "Select CPU family". There is an opportunity to choose it yourself. There are 9 processors in total.
[19:57:47] <Xerl> Button 7 "Select network vendor" allows you to select the MAC Address for the virtual machine from the drop-down list under the manufacturer. Only 15 manufacturers. Example: “D-Link, Asus, Apple, TP-link, etc.”
Button 8 “Select network vendor” allows you to select your processor ID from the drop-down list. This feature is not for beginners, and is not yet available at all.
This whole area makes it possible to obtain various real virtual systems: with different video cards, processors, network equipment and use them in turn or simultaneously, if the system requirements of your PC allow this.
[19:58:47] <Xerl> The “Network” area (number 11) corresponds to the quality of the Internet connection and allows you to make some interesting points.
Network Latency Tx / Rx allows you to add latency to receive (Rx) and send data (Tx) in milliseconds.
Net packets loss Tx / Rx allows you to specify in percentage how much data will be lost when transmitting or receiving packets.
In order for this to work, you need to click the switch from OFF to ON.
Why is this even necessary? This allows you to emulate bad internet. Suppose if the Internet with 2G or even 3G, with a bad signal, with bad weather, there will be delays, roughly speaking, as in games there will be high ping, and some amount of data may be lost, again the analogy with games when the Internet “lags” . In conventional devices, this can also be, especially if the Internet is via a USB modem or through a DSL connection or via a satellite dish.
[19:58:57] <Xerl> And the last area (number 12) is just the final one, in this part of the program. It allows you to just patch the Vmware program itself, so that the iron antidetect works (Patch VMware), and patch your virtual machines with the settings that you specify in the VMware area (numbers 5,6,7,8,9).
[20:00:05] <Xerl> The first part of the antidetect was sorted out; we pass to the second. The second part also contains iron and browser antidetect. The second part can be used, like on those virtual machines that we created and patched (the first part of the program), and simply as a browser antidetect on your main system.
Screenshot: https://prnt.sc/lw4ulz
[20:01:02] <Xerl> 1) Button for switching between browser antidetect WEB (Firefox) and iron OS (Windows)
2) This area is intended to add a list of sites that will open when the antidetect is launched. “+” Adds the site, “-” deletes.
3) Button to create a new configuration.
4) Button to save the configuration.
[20:02:06] <Xerl> 5) A button that allows you to select and load your configurations for work.
When loading a configuration, the name of your configuration will be displayed instead of “Add or Open Config”.
6) Button for launching browser antidetect in private mode. This mode does not save browser history, cookies, search history, temporary files.
7) Button to launch the browser antidetect.
[20:03:46] <Xerl> Go to the "Network ID" area. Screenshot: https://prnt.sc/lw6hd2
1) DNS Leak Protection - the same feature as in the first part of the program. If you use the second part of the program on the basis, then the second time it makes no sense to cut. If you are using a virtual machine, then you must enable it.
2) DPI Protection. The Deep Packet Inspection (abbreviated DPI) system performs an in-depth analysis of all packets passing through it and allows you to filter traffic by its contents. Enabling this feature allows you to bypass DPI systems and complicate your security surveillance. More details about this system: https://habr.com/post/111054/ (read at your leisure)
3) Allows you to select a network adapter to replace the MAC address.
4) Actually the substitution of the MAC address. The dice button makes this parameter random, random. You can also manually select the manufacturer (D-Link, Asus, Apple, TP-link, etc.). The Set New button sets the MAC address for the adapter. “Test eth ..” checks for MAC address spoofing.
[20:05:50] <Xerl> Next area is HW ID's.Screenshot: https://prnt.sc/lw6i4y
This area is responsible for replacing the processor in your system. From the drop-down list, you can select various processors for installation, you can manually specify the processor. The “Set” button sets the processor override. You can choose between Intel and AMD processors, set the processor frequency.
[20:06:46] <Xerl> And the main area of the iron antidetect: "Windows ID". Screenshot: https://prnt.sc/lw72qf
We will quickly analyze the main parameters. Let me remind you that dice makes this parameter random, random "SET ALL" - this button sets all the parameters from this area at once.
[20:07:48] <Xerl> Owner (UName) - this parameter sets the username in OC.
Company - this parameter sets the company name in OC. This field may be empty.
Product name - this parameter sets the version of the Windows system and its number. Example: Windows 10 Pro
Edition - this option also applies to the system version. Example: "Home", "Professional", "Enteprise"
System build - this option sets the BUILD build of your system. You can view it by opening "All Programs" -> "Accessories" -> "Utilities" -> "System Information".
[20:08:41] <Xerl> Windows ID / IE ID / MPID - this parameter sets the activation key of your operating system, the unique ID of Internet Explorer and Mediaplayer.
Install Date - these parameters set the date and time of installing your OC on your system.
Windows / Program Files dirs creation date / time - these parameters specify the date and time the Program Files folder was created in your OC.
And the parameters of area “A” in the screenshot set the version and build number of your OC (a similar parameter of System Build), the version of the kernel.
[20:09:51] <Xerl> We pass to the first part of the program - WEB (Firefox), i.e. browser antidetect. Let's start with the proxy section. Screenshot: https://prnt.sc/lw9tuj
[20:12:13] <Xerl> This section allows you to connect Socks, Http, FTP, SSL Proxy and TOR. To enable TOR, you just need to click the inscription “Tor” in the upper right corner of this section. To work with us, it’s enough to use two modes: Socks and SSH.
To connect, we use the IP: Port format, example: “157.205.203.45:19723”.
If Socks / SSH has a Login: Password, then we use the section with the built-in Proxyfier. (Screenshot: http://prntscr.com/lw9w56). Just fill in IP, PORT, Login, Password and click the ">" button
After successfully adding Proxy, you can check the IP using the MaxMind database. To do this, click on the picture “MaxMind” in the upper right corner, and after a few seconds in this section you will see all the necessary information by IP address. (Screenshot: http://prntscr.com/lw9xzi). We pay attention to two parameters: 1) No proxy - this parameter shows whether your IP is defined as a proxy. 2) Low - this parameter displays the level of IP “spam” on MaxMind databases (The smaller the better).
The “Auto TZ” checkbox allows you to automatically set the Timezone in the system (time).
[20:14:31] <Xerl> Configs Section (Screenshot: http://prntscr.com/lwa0jg).
In this section, it will be possible to purchase paid configs. The main feature compared to other antidetects will be that configs will contain cookies, history of visits, logged in social networks. This, firstly, reduces our time for warming up and downloading the session, we don’t need to go to different sites and spend time on it, and secondly, logged in accounts from the side of the Antifraud shop can give us some confidence, and, therefore, the chances of a successful driving in may be higher.
[20:16:04] <Xerl> Go to the next section. (Screenshot: https://prnt.sc/lwa57l)
This section allows you to set the parameter UserAgent'a and language (Languages). For better traffic it is better to use user agents of the latest versions of Firefox browser. As for the language, the last parameter shows the coefficient of the preferred language from 0.1 to 0.9. Betting is best from 0.5 to 0.8. At the end, you need to click to switch to "ON" for the substitution to work.
[20:17:18] <Xerl> We pass to substitutions of Canvas, WebGL and Audio. (Screenshot: http://prntscr.com/lwag5h).
To generate the fingerprint data, you only need to click the "Generate" button. The slider controls the uniqueness of these prints. Without the need to move in a big direction is not worth it. Also in this section you can change the parameter responsible for the video card in WebGL (Unmasked Renderer).
[20:18:17] <Xerl> The next section is related to fonts. Screenshot: https://prnt.sc/lwm3hm
Checkbox Font FP - responsible for replacing the print of fonts. Under it is just a field with a random fingerprint generator.
DF (Document Font) - a check mark is responsible for using document fonts / external CSS fonts in the browser.
The “Use legible fonts” checkbox is responsible for using standard fonts in the browser, below you can specify and use non-standard fonts.
[20:19:15] <Xerl> Section BOM | DOM. Screenshot: http://prntscr.com/lwmauw
This section already refers to the config parameters. Without a strong need to touch them is not worth it.
Actually what can be edited here? BuildID version of Firefox, there is the possibility to pre-warn it, the capacity of Windows (32-bit or 64-bit), the number of cores in the processor (most popular values: 2,4,8), the version of Windows (XP, 7,8, 8.1, 10) .
[20:21:06] <Xerl> And the last interesting section is the "options". Screenshot: https://prnt.sc/lwmwn9
The most necessary parameters for work:
Flash - this checkbox enables or disables Flash in your browser. It is better not to use Flash without the need.
Plugin scan - this checkbox allows you to enable or disable the ability of sites to see your browser plug-ins. Be sure to include.
WebGL - this checkbox enables or disables WebGL. Be sure to include.
JSP Fingerprint - this checkmark includes the ability to get a unique fingerprint browser through the speed of video rendering and errors in the process. Better turn it on.
[20:23:10] <Xerl> WebRTC - this checkbox enables or disables WebRTC.
ClearRTC - this checkmark also applies to WebRTC and is associated with the display of external and internal. IP addresses Better turn it on.
Unlinkable - a parameter for security, it is better not to use it for work. In a nutshell: the parameter prevents the site from seeing Cookies and other data in the browser of other sites, only those related to this site.
Keyb.FP - this checkbox enables or disables the ability of the site to receive the fingerprint of your keyboard. Better turn it on.
[20:24:58] <Xerl> And we move on to the Linken Sphere browser antidetect.
For all questions, you can always, by the way, turn to a support service that will solve installation problems and launch a browser. Telegram: @devtnbrs
So, I open the antidetect, enter the login / password.
First of all, open the general browser settings. They are in the “Edit” tab, then from the drop-down list we find “Preferences”. Screenshot: https://prnt.sc/lkaf5p
[20:26:21] <Xerl> You can read about all the settings and all points of the sphere in the documentation, but in the screenshot I highlighted all the most important and necessary settings for a beginner.
1. This parameter sets the default site, which will open after creating the session. You can install any checker, for example f.vision, whoer.net or the search engine Google, Yandex, Yahoo, or any site in general, which you may think of.
2. This parameter sets the default search engine, ie What kind of search engine will the search go through if you enter in the address bar of the browser.
3. This parameter sets the physical screen size. It is best to put it under the config, i.e. if in the config 1920 by 1080, then in this parameter we set the same values. A very important parameter, it is best to put it every time under the session (config).
4. This parameter sets the substitution of the system time. You can choose two options: either using Javascript, or the system time will change. Choose 2 option (system time).
[20:28:16] <Xerl> 5. This parameter sets whether to use TOR during authorization in anti-detection. Check the box necessarily
6. This parameter sets whether or not to save the password for your account at login. For security, it is better to disable this checkbox.
7. This option allows you to close ports in Web Sockets. Web sockets is a protocol for messaging between a browser and a web server. Simply put, a site can check your open / closed Web Sockets ports.
8. This parameter allows you to enable / disable GPU acceleration in the browser. Simply put, if this function is enabled, then drawing elements and windows is faster. If possible, it is better to enable this item, but if the browser crashes, stops working after that, then it is better to disable this item.
The remaining parameters are directed more than any little thing, and do not greatly affect the work, so you can read about them in the documentation.
Now let's move on to setting up the sessions themselves in the browser, in other words - configs.
In more detail about free and paid configs in this anti-detection and work options we will analyze at the end of the lecture.
[20:29:34] <Xerl> So, let's start by parsing the first area. (Screenshot: https://prnt.sc/lkak5t)
[20:29:38] <Xerl> 1. This parameter allows you to select a session from the list.
2. This parameter is needed to create a new session. To do this, enter the session name in this field.
3. This parameter allows you to write a note for the session. It is useful to indicate all the necessary information about the session, for example, about IP, open ports, whether driving from the session is successful or not, other features. Very useful feature. In order not to get confused in the sessions and to simplify your life for driving analysis, I advise you to indicate all the useful information in this field: Proxy Score, Risk Score, which shops were driven in, which method used the map, the result of driving, etc.
4. This parameter sets the session color in the browser. It is useful to use in order to make it more convenient not to get confused in them.
[20:31:56] <Xerl> 5. This parameter allows you to completely print the session and, if necessary, not copy the canvas, fonts, rect, audiofingerprint prints.
6. This parameter is needed in order to rename the session.
7. This parameter allows you to enable / disable WebGL rendering using the resources of the video card. Disable only if the video card is weak or not at all, such as, for example, on remote servers.
8,9,10. These parameters allow you to enable / disable HTML 5 Storage, paragraph 9 - allows you to save data and use it even after the browser is rebooted, paragraph 10 - allows you to save and use data using the IndexedDB standard for storing large structured data. What you need to know: to drive them, it is better to turn them on, and if the session is for security, it is better to disconnect.
[20:33:13] <Xerl> Go to the next area, i.e. section. (Screenshot: http://prntscr.com/lkb5e2)
[20:34:37] <Xerl> 1. This parameter allows you to enable or disable Canvas spoofing. What is Canvas I explained above. This substitution uniqueizes Canvas, thereby changing this print. The only minus of all antidetects is that the uniqueness of Canvas becomes 100%, and the uniqueness of a real system is about 99% with something. Therefore, you can periodically disable this option if there is a suspicion that because of this, antifraud may not skip driving.
2. This parameter allows you to enable or disable the substitution of Audio fingerprint. The audio footprint in 2019 is no longer as rare as before; It has gained great popularity in antifraud systems recently. Website where you can check the audio print: https://audiofingerprint.openwpm.com/
Antidetect replaces 4 parameters: Fingerprint using DynamicsCompressor (sum of buffer values), Fingerprint using DynamicsCompressor (hash of full buffer), Fingerprint using OscillatorNode, Fingerprint using hybrid of OscillatorNode / DynamicsCompressor method
[20:36:22] <Xerl> 3. This parameter allows you to enable or disable font substitution. Detect appeared a long time ago, is used everywhere. A special plus of the sphere is that you can not only replace the fingerprint, but also use any list of fonts or create your own. The site where you can check the font print: https://browserleaks.com/fonts (two “Fingerprint” parameters)
4. This parameter allows you to enable or disable the substitution of the browser coordinate system (rects). The getClientRects element allows you to get the exact position and pixel size of the desired element, and depending on the system, and more precisely on the system screen resolution, fonts and many other parameters, the results will be different. This detection also appeared a very long time ago and is highly popular. The site where you can check the fingerprint of rects: https://browserleaks.com/rects (Parameter: "Full Hash")
5. This option allows you to enable or disable the use of random plugins. It makes sense to use in free configs or if there are no plugins in the config. But it is best to prescribe them manually if necessary.
[20:37:29] <Xerl> 6. This parameter allows you to enable or disable the storage and encryption of cookies. For your safety, the Must Have item.
7. This option allows you to enable or disable Flash. Flash technology is already obsolete, so in 2019 there is nothing suspicious about the fact that Flash is turned off. For many, it is no longer installed in the system at all. Include only when absolutely necessary.
8. This option allows you to enable or disable fingerprint uniqueization. Those. when you start the session every time they will be new. For security, you can completely use it, for driving in it is absolutely not worth using.
9. This parameter allows you to specify which fingerprints to unify (Canvas, Audio, Plugins, Rects, WebGL, Fonts, Media Devices). This parameter is closely related to the previous one.
10. This parameter blocks the output of the Canvas hash. There is no need to use the parameter. A practical effect on driving has not been noticed.
[20:39:41] <Xerl> Let's move on to the next area. (Screenshot: http://prntscr.com/lkazhi)
[20:40:59] <Xerl> 1. Select the type of connection. Now I will indicate the most necessary and describe them.
No proxy - this type of connection involves the use of your Internet connection, i.e. as if using the most normal browser. It is necessary if you need to use Proxyfier and other programs to use Socks / SSH. But if you use these programs, then a huge plus of the sphere is “killed” in that you can use different sessions at the same time with different socks or SSH tunnels. The only option when at least it might be wise to use this type of connection is if you have a configured router in which it is possible to connect a sock or SSH tunnel, for example, a router from Sedoy.
Tor - this type of connection is an excellent option for surfing sites, i.e. for use in the security chain, which I talked about at the beginning of the lecture.
Socks, SSH Tunnel - these two types of connection are the basis for working with this product. These modes should be used for driving. For each session, you can configure different socks or SSH tunnels and use all the tabs (sessions) at the same time, i.e. work like a machine gun not from one session, but immediately from 3 or 5 or even more.
[20:42:45] <Xerl> 2. Area for specifying SOCKS / SSH and port.
Input Example: 154.250.117.3:6732
3. This item disables Local IP in WebRTC.
4. This area is responsible for the Login / Password in Socks / SSH. If you have a Socks or SSH tunnel has a username / password, then you must definitely enter them in this area, if they are not there, just leave the fields empty.
5. This checkbox enables / disables WebRTC spoofing. If you disable the spoofing, your real WebRTC will be used.
[20:44:12] <Xerl> 5. This checkbox enables / disables WebRTC spoofing. If you disable the spoofing, your real WebRTC will be used.
6. This checkbox is responsible for External IP WebRTC. The IP of the External WebRTC should match your IP Sock or SSH tunnel. The checkbox must be disabled if the IP connection is different from the IP that we get “on the output”. The output IP, by the way, is usually indicated in the history of the service where you take socks, for example in Faceless or Luxsocks.
7. This checkbox enables IPv6 spoofing. Use only if the IPv6 Leak Test item is leaking IP address on your system at the https://browserleaks.com/ip checker. Otherwise, do not include.
8. This checkbox completely disables WebRTC in the session. I clarify that it is WebRTC itself, and not its substitution.
[20:45:12] <Xerl> 9. This feature allows you to install the DNS server manually. When you click the Check DNS button, its validity is checked. It must be used for security, as well as for driving if the DNS country of your Socks or SSH tunnel is different. This parameter is very important, since there are often SSH tunnels or Socks that show the DNS of another country, or your own DNS system (this is what happens by default if this field is empty and the Socks or SSH tunnel does not have its own parameter) , and you catch cancellations due to suspicious activity.
10. Button, which greatly simplifies the work. When you click on it, it checks the validity of the Socks / SSH tunnel and automatically sets the geolocation, session language, time zone, external WebRTC.
[20:47:38] <Xerl> Let's move on to the next area. Screenshot: http://prntscr.com/lkan72
[20:48:05] <Xerl> 1. This section is associated with a UserAgent. In it, you can control UserAgents, i.e. add, edit or delete. The “Chrome”, “Safari”, “MSIE”, “Other” buttons allow you to quickly select UserAgent by browser type. The “Regenerate configure after useragent change” item allows you to change session parameters after changing the UserAgent
2. This section is responsible for the language of the session. Manually registering it is not necessary, it is easier to click the “Check proxy / geo” button and the language will be installed automatically under the country of the Socks / SSH tunnel.
3. This function allows you to block pop-ups on sites in the session, prohibits the creation of pop-ups. Use only if it is really necessary.
[20:50:07] <Xerl> 4. This function should not be included unnecessarily. Simply put, you should enable it then, the site is loading crookedly or is not fully functional.
5. This feature blocks the entry of Russian characters on the site when driving. It’s useful to include, because in which case it does not allow you to enter Russian characters when driving. To enter Russian characters in the URL, of course, this feature does not work.
[20:51:21] <Xerl> Let's move on to the next area. Screenshot: http://prntscr.com/lkat45
[20:52:07] <Xerl> 1. Config manager - free configurations for the sphere. At the moment there are more than 60,000. The downside is that they can be used by all active users, and the selection happens randomly. You can only choose the type of browser and OC when downloading a free config.
2. WebGL Parameters. I already talked about what WebGL is above, this section just allows you to configure all the parameters of WebGL 1 Version and WebGL 2 Versions or disable it completely if necessary.
3. Section "Advanced Settings". One of the most interesting and important sections of the field for me. In it you can edit most of the parameters, add plugins, edit HTTP headers.
[20:53:23] <Xerl> 4. A set of Fonts. In this section, you can create / add or edit font names, i.e. create your own list of fonts that will see the antifraud of the shop in addition to the font print itself, which we examined above.
5. Button simulate window resolution. This function allows you to adjust your actual screen resolution to the session data. The function is necessary when working with mobile configs (Android, Iphone, as well as tablets).
6. Button simulate Touch Screen. The most necessary function when working with mobile configs. It completely simulates the operation of the Touch Screen, just like on mobile devices.
7. This parameter determines the screen length. Example: 1920
8. This parameter determines the width of the screen. Example: 1080
[20:54:59] <Xerl> The next two small areas. Screenshot: http://prntscr.com/lkapz3
1. This area is responsible for replacing the geolocation of your system. Latitude - geographical latitude, longitude - geographical longitude.
2. This area corresponds to the time zone and time.
These two areas do not require manual adjustment. You just need to click the “check proxy / geo” button and the values will be set automatically under your SSH tunnel / Socks.
[20:56:58] <Xerl> Let's move on to the possible options for working with this antidetect.
1. If you have access to the configshop, or you can purchase configs from someone, then take the desired config, add it to the antidetect, configure the connection to SSH / Socks, if necessary Custom DNS, configure the time zone and geo-location, fingerprints you need replace and drive forward.
2. If you don’t have access to the configshop or you don’t have anyone to get configs, then use the free configurations, which are already more than 60,000. After that, as in the first version, set up and drive forward.
You can also manually adjust the necessary parameters in order to make the free configuration more unique.
This can and should be done, because a considerable number of people use the built-in configs, and this can negatively affect the result. But for a beginner, they are more than suitable.
It is also possible not to download a free config, but to write it yourself in a sphere from scratch, but for the first option, for the second, you need to have experience, knowledge of all parameters.
[20:57:54] <Xerl> Useful tools in this Anti-Detect that you can use:
1) Antidetect has a Web Emulator - this function allows you to automatically simulate user behavior by visiting sites in automatic mode for you while you are drinking cold beer relaxing on a chair. In practice, this is necessary to warm up the store before driving, i.e. cookies are typed, a history of visits, or you can type history in the shop you are going to drive into.
2) The Anti-Detect has a function to automatically drive in text. Those. copy the text to the clipboard, press the key combination, and the antidetect imitates manual input. The function is very convenient and useful, but, despite the advanced imitation, the antifraud may not treat this function very well. Therefore, use only when more or less confident that this will not affect the success of driving.
[20:58:36] <Xerl> 3) The Anti-Detector has an Automator - this is a more advanced heater that allows finer and more advanced settings for warming up shops. The downside is that to use this tool, you need to understand and study this tool well, because Writing a script for the machine is not so simple, and even few of all active users in the field can do this.
[21:01:07] <Xerl> And now I will answer all your questions about antidetects or in general in our area of work.
Subscribe to my profile.
Leave feedback in your profile. Jabber for those who have questions or who personally want to chat: wirl@prv.st
[21:03:16] <Serrwrtet> 1. How deep should cookies be?
2. If the Sox checker shows a location other than the Sphere’s automatic geolocation, should the parameters (longitude-latitude) be manually driven in via ZIP?
3. How relevant is the use of an “iron” antidetect in a cart?
4. Does the Sphere have an analogue of DPI Protection?
[21:04:32] <Xerl> 1) If you mean how many pages to visit on the site, then FROM 2-3.
2) Better to bet on the Sox checker.
3) Someone applies, and applies in conjunction with the iron + browser
4) No
[21:05:11] <bloomberg> 1) what browser antidetect would be better than linken sphere or kraken pro? 2) In what cases do I need to replace both the hardware and the browser at the same time?
3) The only minus of all antidetects is that the Canvas uniqueness becomes 100%, and the uniqueness of a real system is about 99% with something, didn’t you understand this?
4) is the sphere updated frequently, because the antifraud doesn’t doze off? 5? Is it possible to drive new or not delayed ones into free shops with free configs?
6) before driving into the shop do you need google cookies, YouTube, etc., and if so, haven't the antifraud seen that they are fresh?
[21:08:09] <Xerl> 1) Browser rather Linken
2) Substitute in all cases (driving, PayPaling, BA, etc.). I mean, there are no special cases here.
3) If you explain in a simple way, then yes, the minus is that the canvas is too unique
4) Now not so often
5) Maybe.
6) A visit to these resources is advisable. Between the options - they are not there and they are fresh, it is better to choose the second. Moreover, this moment can be checked not by cookies
[21:09:14] <macpru> 1) I have CC from phishing page already, is it advisable to buy random config for antidetect for shopping?
Also do we get to learn how to get logs using Azorult stiler next lecture or soon?
[21:11:11] <Xerl> if possible better use config from configshop or configure the config yourself
About amazon and other lecture - i don't know. I'm only learn about Antidetects
[21:11:16] <bloomberg> Is it possible to import a lot of all kinds of different cookies before each drive to show the active user, and only then fill in the cookies of the shop of interest?
[21:12:29] <bloomberg> in working with logs also need a special config?
[21:12:51] <Xerl> you can, I know that they did this when they take cookies and import them in several sessions. Let's just say, by cookie and visited site, detect when almost every site has a metric from Google or Facebook; I think this is the main detection. And here is how the final site will react to this - how lucky.
[21:13:04] <Xerl> bloomberg: No, it's just better to adjust as much as possible to the parameters
[21:16:29] <bloomberg> Do all antifrauds check the canvas? It seems that it’s easier to probably start with the logs, what can you say about this?
[21:16:59] <Boat> Where can I read about AFF Combine?
[21:17:22] <Xerl> in 2020 I think 95%. According to the logs, it’s easier to some extent, but the point here is in cookies, acc and not in the detection of canvas))
[21:18:56] <Boat> If that settings can be accessed?
[21:19:37] <Xerl> you can
[21:20:01] <bloomberg> as I understand it, it’s better to change the iron then, as you described, when you beat at the office, or poker, but they don’t give a damn what kind of processor or video card are there, because anything can be with user?
[21:21:38] <Xerl> I think the main thing here is to keep track of the same, that is, The PC problem will be that there are several such passages in the system and, roughly speaking, your hardware will be "banned"
[21:23:07] <Boat> Everything needs to be tried, and there questions will appear
[21:24:05] <bloomberg> and you have a personal tag you gave or I did not see?
[21:25:24] <revolvervv81> Thank you so much for the lecture !!! At first I was upset that you are not on the list of lecturers .... (like you are not in the Main working conference) ... The main questions will appear when we start working with the Sphere
[21:25:25] <Xerl> in the PM on the forum about this)
[21:25:54] <Boat> Thanks for the lecture, it was intelligible and understandable, finally I realized what Canvas, WebRTC, aWebGL are
[21:25:59] <Xerl> revolvervv81: let's just say that I am now mainly connected with working with antique people, therefore it’s just a purely lecture of the Vedas
[19:15:01] <Xerl> Welcome to the lecture. Today the lecture is dedicated to Antidetects. In this lecture we will talk generally about antidetects, we will analyze two popular antidetects from the forum, which are great for our work, we will understand some features and chips in working with these programs.
[19:16:36] <Xerl> For those who have long been in this field, I have heard a lot about Antidetects, but for beginners who have only recently come to this area it will be useful to find out what it is all about and with what “it are eating". Antidetect is a program or a set of programs that allows you to unify your system, change various prints and parameters in order to bypass the antifraud system in stores (shops), payment systems (Paypal, Skrill, etc.), online banking, and everything else, where you want to change your identity. A huge plus of antidetects is that they allow you to use your system to work without changing it, thereby saving you valuable time. Previously, the main task of Antidetects was simply to unify the system, but now - not just to unify the system, but to make all prints and parameters natural, so that you can "merge with the rest of the crowd of users." This is very useful and necessary, for example, when working with logs.
[19:18:10] <Xerl> I will explain using available examples from life how antidetect and antifraud work: in the first case, if you imagine that the FACE ID on the Iphone is an antifraud system, and to unlock it you need to show a NEW face every time, then thanks to antidetect, we can make a very, very many faces, and each time calmly and successfully pass this defense.
In the second case, if you imagine that the FACE ID on the Iphone is an antifraud system, and to unlock it you need to show the same face every time, which is basically the reality on the Iphone, then we can “copy” the owner’s face and successfully bypass protection (of course knowing roughly how this “facial print” should look).
[19:19:52] <Xerl> But in modern Antifraud systems, too, are not fools and the development of new protections and detections does not stand still, therefore they are improved every day and today not only the parameters and prints of the system are evaluated, but also a number of other factors.
For example, in such a large Amazon store or Paypal payment system, the behavioral factor is assessed by the neural network, your IP, DNS, and your “fingerprint” on the Internet are also evaluated according to various parameters (more details below).
Therefore, although the antidetect plays an important role, success lies not only in its use, but in its proper use in combination with other factors, which I indicated above. With a conscious work, analysis of your drive-ins and various tools that you use - you are doomed to success
[19:23:15] <Xerl> https://www.youtube.com/watch?v=2PQxoQQOPpY
Screenshot: http://prntscr.com/isj1yg
Above, I indicated a link to a video in which you can see how many factors the Antifraud system takes into account. Look after the lecture ends and you will see that the browser plays an important role, but this role is not the only one.
In the screenshot, you can see how many parameters refer to the use of the E-mail address when driving in other services.
[19:24:28] <Xerl> Types of antidetects
There are two types of antidetects:
1) Antidetects that allow you to replace the iron settings of your system or your virtual machine.
These parameters include: information about the processor, video card, BIOS, network card, folder creation date, and system, various other devices in the system.
These antidetects are needed when working with programs that are installed on your Windows. These can be poker clients, for example, PokerStars, clients of bookmakers, etc.
[19:27:10] <Xerl> Examples of topical iron antidetects:
A) Antidetect 2.0 by Vektor T13 - The current solution in the field of iron antidetect from Vertor_T13 for VirtualBox. The solution is fully supported by the author, as can be seen from his telegram channel. The disadvantage of this solution is that the solution is free, so you won’t get a full technical support for free, and getting into a consultation for money will still take a huge amount of time and it’s not a fact that you will still receive it.
B) Aff Combine (KRAKEN PRO) is a relatively new iron antidetect for VmWare, which also includes browser-based antidetect. Recently released version 1.0. Sold on our forum for $ 1,400. The antidetect is supported by the author, there is support in Telegram, a general chat for discussing work and solving various problems. We’ll talk more about this solution today below.
[19:29:52] <Xerl> 2) Anti-detectors, which allow you to change browser settings, thereby simulating any system or device.
Using these anti-detectors, you can simulate any system (Windows, MAC, Linux, Android, IOS), a browser (FF, Chrome, Opera, Safari), game consoles, Smart TV, etc.
These antidetects can also be of two types:
1 view: Antidetect based on a normal browser in which the extension or Addon is installed. Basically, all antidetects of this type (Antidetect 7.8, Antidetect 8, Anti-Detect from Cert, Genesis Security, Anti-Detect Ivan Iovation, AFF Combine)
Here Antidetects can be divided into two more categories:
A) Firefox based antidetects. This category includes: Antidetect 7.5, Good Job Anti-Detect, AFF Combine, Ivan Iovation Anti-Detect)
B) Chromuim browser-based antidetects. This category includes: Antidetect from Cert, Antidetect 8, Genesis Security.
Category B antidetects have a higher purchase price than the first because they require more cash investments, more knowledge to create it.
[19:32:32] <Xerl> 2 KIND OF ANTI-DETECTIONS: Antidetect written on the source code of the engine. Of the examples that I know, Linken Sphere can be attributed here. It is written in the source code of Chromuim, and therefore contains a very large number of possible chips and tools. But more on this later.
Examples of relevant antidetects:
Cert Anti-Detect - Chromuim-based antidetect. Binds to iron, i.e. can be used only on 1 system. The author of antidetect is one of the very first developers of antidetect in general, and especially based on the Chromuim browser. Updates are stable. Sold on Verif, costs $ 5000. The most expensive antidetect available. The price of the product is unreasonably high. Each update is also paid and costs from 50 to 300 $. Even if you missed some update and didn’t take it, you will have to pay for all previous updates to get the latest version. In my opinion, taking into account the remaining antidetects on the market, a beginner should not take it.
Byte Antidetect 8 - Chromuim based antidetect. This author has other products: Antidetect 5,6,7, which are developed based on the Mozilla Firefox browser. They have shown and proven themselves in due time. Antidetect 8 is not a very popular product, there are no more than 30-40 users of antidetect. Also sold in Verife, price: $ 3000 + $ 100 per month subscription fee. This antidetect does not develop very quickly, but it has some advantages: free configs, non-unique Canvas and a small number of users. More about what Canvas will be below.
[19:37:37] <Xerl> Byte Anti-Detect 7 - Anti-Detect based on the Firefox physical browser. In parallel with the 8th antidetect, the 7th version of the antidetect is supported and periodically updated. The author sells it for $ 500 forever / or for $ 100 but monthly. On our forum, you can buy version 7.1 from Billy Bones. The stock price for students is $ 50. The product is completely worth the money. A good option for a beginner, especially if you take for $ 50. Configs can also be purchased immediately from the author for $ 3 from Billy Bones for $ 1 and below, without the need to fulfill any conditions. By cons, the antidetect does not replace some prints, for example, audiofingerprint, some configs require a little manual editing.
Antidetect Ivan Iovation - Antidetect from a Romanian author, who appeared on the market recently. It also includes iron antidetect, but the main focus is on the browser-side blood pressure, which is why I classified it in this category. Firefox based antidetect. The price of this solution is $ 200 per month, which is quite a considerable price for a beginner. Of the minuses of this Anti-Detect: its price, the complexity of installation, it is difficult to install and even the manual is very difficult and hemorrhaging, and technical support from the author costs 99 $ / 1 DAY, plus support only in English, binding to one system. From the pluses: non-unique canvas, but only a few pieces, well, the antidetect itself is still new, unstacked in carder circles, which is a good plus. I would advise him to take it NOT for beginners, for those who do not get any kind of shops, merch from other Anti-Detects. And then, given the fact that, for example, there are only a few pieces of non-unique canvas, you won’t be able to get into a drive in one drive.
[19:39:22] <Xerl> Genesis Security - this product is not quite an Anti-Detect in the usual sense. It is used for logs. Now I will explain in more detail.
This product has a Genesis Market, which has a large number of bots that you can buy. The price of a bot is on average from $ 20 to $ 60.
A bot can contain logs, a browser cookie, and most importantly a fingerprint of its system (Fingerprint), which from the point of view of Anti-Detect can be called a config (more on that later). Buying a bot that has access to Paypal in the logs, a browser cookie and its fingerprint, we get essentially an excellent option for working with logs, thereby increasing the chance of success, because in addition to the logs and browser cookies, we have a system imprint, thereby evoking the best trust of Antifraud systems.
But from the point of view of ordinary drives, it is not very rational on average $ 30 or more dollars per 1 config. But the plus of this option is that access to the store is free, there is no monthly payment or payment in order to get there. All expenses will only be in the purchase of bots (configs)
Another significant minus for a beginner in this shop is that there are no replacements. Suppose, if you take the Paypal or Amazon log or any other shop log from the forum, from the Azorult stiller or another similar solution and the LOGIN / PASSWORD is incorrect, then you will be replaced, but there are no replacements in the Genesis shop. Therefore, for beginners, there is some risk of squandering money just like that, especially not being able to work with logs. In my opinion, for those who want to go in the direction of working with logs, it is first better to practice and learn from the logs of the Azorult stiller and the like that are sold on our forum, and only then, if necessary, switch to Genesis.
[19:41:38] <Xerl> Well, since we have already touched on the topic of working with logs, the best option for working with the logs of the Azorult stiller and the like is definitely Linken Sphere.
Using Linken Sphere, you can quickly and conveniently import cookies into the session, quickly configure the available parameters for the log: UserAgent, resolution, timezone, language, number of cores (hardwareConcurrency), RAM (deviceMemory), video card (WebGL).
And using tools such as a heater and an automatic machine, it’s quick and convenient to warm up the desired store without spending a lot of time on it.
You can read more about this in my article.
[19:42:54] <Xerl> And we go, after a long digression, to a browser antidetect corresponding to price-quality, definitely suitable for beginners, and which is worth having in our "arsenal:
Linken Sphere (Sphere) - one of the most popular antidetects. It is written on the source code of the Chromuim engine. For sale on our forum. Advantages include: Excellent support, updates, no binding to the system, spoofing of all the main fingerprints, built-in functionality for working with ssh, socks and tor, own unique socks service integrated into Anti-Detect, which will appear in the near future; the ability to drive from several tabs at once, because 1 tab as one system, and you can open a lot of such tabs; built-in automator and web emulator, etc. pluses. Also, for anyone who is being trained for the first time, they will be given Linken Sphere for 1 month for free. Therefore, you will be able to evaluate this product in practice.
Cons, as for a beginner, will be: a monthly subscription of $ 95 (5% lifetime discount by user BBX), a shop with configurations is unavailable, i.e. configs; if there is no PRO subscription ($ 475 for half a year), there is no way to fully configure windows.navigator settings. But the combination of parameters allows you to fully recommend it, I also use it myself.
[19:44:16] <Xerl> But it’s worth immediately explaining about driving in: antidetects are not a panacea and the loot button; it is just a tool. Therefore, do not neglect driving in from VNC, Dediks, virtual machines, real systems. It happens that for some reason it goes better in one shop, with something worse, for something it makes no difference at all. So make it a rule: "In the fight against antifraud, all means are good."
I think it is worth explaining right away what a config is in any antidetect and what types of configs exist. A config is a set of files or just code that contains information about the browser and the system (browser javascript parameters, WebGL parameters, font set, etc., Canvas parameters and any others.) Simply put, a config is a snapshot of the system and browser. Using configs reduces the time to configure antidetect, just took, downloaded the config, and you're almost ready to go.
Configs are real and generated. Real ones are those configs that are “copied” from real systems by collecting parameters, and the generated configs are made using the generator program. The minus of the generated configs is that the parameters may be incorrect, not correspond to reality. Currently, the generated configs are in little use at all.
[19:45:38] <Xerl> Very often after the lecture there are questions about what Canvas, WebGL, WebRTC are. Therefore, I will immediately explain this with the simplest option that I have found for all time, so that each person can understand what it is and what it is eaten with.
Canvas is a technology that is used to render the visual elements of web pages. Before 2006, when surfing the web to display a web page, the server had to transfer visual elements of the site to our PC - graphics, tables, etc., which heavily loaded the communication channel (remember the speed of that time) or we had to use Macromedia Flash, to watch a video, or play simple games. But then came Canvas, which is based on JavaScript and now the site does not transmit ready-made elements, but simply shows us the text of the script, which is not executed on the server, but ON OUR PC using our browser and our hardware. Speed increased, server load decreased, opportunities expanded. Canvas refers to 2D graphics. So, systems, depending on various parameters, render elements differently. This allows you to create a fingerprint, as well as determine which browser and OC it belongs to.
[19:47:19] <Xerl> WebGL is a 3D building technology and this technology is based on the OpenGL accelerator, and to be more precise, on OpenGL ES.
WebGL works like this - The website transfers javascript code to our PC, which is processed by our browser in two modes:
1. Software Acceleration
2. Hardware acceleration
Since javascript is run only on the user's PC, the above accelerators will not be used from the server, but from our regular desktop or home PC.
The algorithm is as follows:
1. Peaks are formed
2. Vertex shaders are formed
3. Between the vertices, lines are drawn and the shape of the image appears
4. Add geometry
5. Pixels are formed
6. Pixels are filled with color (Pixel shader)
7. Effects are added (smoothing, transparency, etc.)
And that’s it - the picture is ready. For the user, this will take an instant, but the number of operations that will be carried out is simply colossal and hundreds of different graphic parameters take part in all this. This picture and a set of parameters allows you to create a print.
[19:48:32] <Xerl> WebRTC is a technology that allows you to transfer audio and video streaming data between browsers and mobile applications. Thanks to WebRTC, user browsers can transfer data to each other directly. WebRTC does not need a separate server that stores and processes data. All data is processed directly by the browsers and mobile applications of end users. The danger of WebRTC technology lies in determining your real IP address. Since the connection is direct with another user, browser, website or mobile application, the network settings are ignored. To create audio and video communications, browsers must exchange external and local IP addresses. Therefore, despite the VPN, TOR is determined by the real IP address.
If you use tunnels or socks, then WebRTC will be able to determine your real IP address for the proxy or the IP address of the VPN server if you use the VPN + tunnel / toe chain.
[19:49:57] <Xerl> Any antidetect can and should be used for its anonymity and security in your chain. This, of course, is not a panacea, but I highly recommend adding an antidetect, at least the Sphere, to your security chain.
Tips for securing your security with antidetects:
First, use different configs on different sites. On one, let's say Windows OC, on another OC Linux.
Secondly, periodically change these configs.
Thirdly, store the software itself on an encrypted flash drive or hard drive or container.
For Linken Sphere antidetector (Scope), you can add:
A) Keep the password in your head in order to avoid the possibility of a third party logging into your antidetect account and receiving your configuration, history, cookies.
B) Use in the TOR connection chain.
[19:51:24] <Xerl> The Sphere is a free product from Linken Sphere developers. The advantages of this solution, even in contrast to Antidetects, are that:
1) The product is completely free.
2) The product does not have server bindings, hardware bindings, therefore, it can be used wherever you want
3) The product does not require installation, it is Portable, this is a huge plus in that it is convenient to transfer between systems, convenient to place on an encrypted container, flash drive, disk, and there will be no installation traces to all this.
4) The information about the sessions in this decision is also encrypted, which, if received by third parties, makes it impossible to use.
5) The product has all the necessary substitutions in its arsenal.
[19:52:54] <Xerl> AFF Combine
We pass to the main part of the lecture and consider two antidetects. One iron antidetect - AFF Combine, which combines browser antidetect and Linken Sphere - one of the best browser antidetects.
For all questions about AFF Combine, by the way, you can always contact me in the LAN or Jabber or support, which will solve the problems with installation, with the configuration and configuration of antidetect. Telegram: @AFF_Combine
This antidetect consists of two parts. We will analyze each part in detail: what, why, and why.
So, after installation, open the first part of the antidetect. Run the file "clc.exe". Screenshot: https://prnt.sc/lu5yao
[19:53:53] <Xerl> Press the “Connect” button and your personal copy of the antidetect will be authorized on the server and is fully ready to work. Screenshot: https://prnt.sc/lua3ps
We will analyze in detail all the possible settings.
1 area shows which version of VMware is needed for the full operation of the iron antidetect. To put, of course, only this version. If you click on this inscription, a link will open for downloading Wmware of the desired version. A detailed step-by-step manual for installing a virtual machine on Windows 10 is attached to this antidetect.
The Session Quality area under the number 10 shows the connection quality of your antidetect with the authorization server, and if authorization is successful, it is displayed that the connection to the server is successful: “connected”
[19:55:09] <Xerl> We pass to the following area: "My Tools"
The Share button allows you to make a shared folder for all physical devices and virtual machines. The feature is needed for quick and convenient transfer of files and folders, for example, to your virtual machines. To copy folders you need to use archives.
Button 2 "Syscheck" shows your version of VMware, if it does not match the version you need. When it matches, it shows that everything is “SYSTEM OK”
Button 3 “DNS LP” (DNS Leak Protection) is a useful feature for Windows 10. The fact is that in addition to the DNS server, which you specified in your system or system to drive in, Windows 7, 8.10 still sends everything to all in parallel known to the server system, but uses the response from the server from which information arrived faster. Those. it may not be the DNS server that is specified in the configuration. Therefore, the inclusion of this function is simply necessary for driving and for safety.
Button 4 "Connect / Disconnect" just allows you to connect to the antidetect server for work or vice versa to disconnect from it.
[19:56:43] <Xerl> The next area of "VMware" refers to the iron antidetect, just in this area you can select the components of your virtual machine on VmWare.
Button 5 “Select graphics adapter” allows you to select the video card of your virtual machine from the drop-down list. There are video cards Nvidia, AMD, Intel (Only 5 pieces). I’ll clarify that the system does not just install the name of the video card and driver. Drivers for video cards will soon be available, and therefore, by installing various drivers, the uniqueness of the video card will be even greater, plus Canvas and WebGL will have a different fingerprint when installing different drivers.
Button 6 “Select mainboard / chipset” allows you to select the motherboard of your virtual machine from the drop-down list (the motherboard is emulated). There are 8 Intel and AMD motherboards.
After selecting the motherboard, the processor family is automatically selected, button 7 "Select CPU family". There is an opportunity to choose it yourself. There are 9 processors in total.
[19:57:47] <Xerl> Button 7 "Select network vendor" allows you to select the MAC Address for the virtual machine from the drop-down list under the manufacturer. Only 15 manufacturers. Example: “D-Link, Asus, Apple, TP-link, etc.”
Button 8 “Select network vendor” allows you to select your processor ID from the drop-down list. This feature is not for beginners, and is not yet available at all.
This whole area makes it possible to obtain various real virtual systems: with different video cards, processors, network equipment and use them in turn or simultaneously, if the system requirements of your PC allow this.
[19:58:47] <Xerl> The “Network” area (number 11) corresponds to the quality of the Internet connection and allows you to make some interesting points.
Network Latency Tx / Rx allows you to add latency to receive (Rx) and send data (Tx) in milliseconds.
Net packets loss Tx / Rx allows you to specify in percentage how much data will be lost when transmitting or receiving packets.
In order for this to work, you need to click the switch from OFF to ON.
Why is this even necessary? This allows you to emulate bad internet. Suppose if the Internet with 2G or even 3G, with a bad signal, with bad weather, there will be delays, roughly speaking, as in games there will be high ping, and some amount of data may be lost, again the analogy with games when the Internet “lags” . In conventional devices, this can also be, especially if the Internet is via a USB modem or through a DSL connection or via a satellite dish.
[19:58:57] <Xerl> And the last area (number 12) is just the final one, in this part of the program. It allows you to just patch the Vmware program itself, so that the iron antidetect works (Patch VMware), and patch your virtual machines with the settings that you specify in the VMware area (numbers 5,6,7,8,9).
[20:00:05] <Xerl> The first part of the antidetect was sorted out; we pass to the second. The second part also contains iron and browser antidetect. The second part can be used, like on those virtual machines that we created and patched (the first part of the program), and simply as a browser antidetect on your main system.
Screenshot: https://prnt.sc/lw4ulz
[20:01:02] <Xerl> 1) Button for switching between browser antidetect WEB (Firefox) and iron OS (Windows)
2) This area is intended to add a list of sites that will open when the antidetect is launched. “+” Adds the site, “-” deletes.
3) Button to create a new configuration.
4) Button to save the configuration.
[20:02:06] <Xerl> 5) A button that allows you to select and load your configurations for work.
When loading a configuration, the name of your configuration will be displayed instead of “Add or Open Config”.
6) Button for launching browser antidetect in private mode. This mode does not save browser history, cookies, search history, temporary files.
7) Button to launch the browser antidetect.
[20:03:46] <Xerl> Go to the "Network ID" area. Screenshot: https://prnt.sc/lw6hd2
1) DNS Leak Protection - the same feature as in the first part of the program. If you use the second part of the program on the basis, then the second time it makes no sense to cut. If you are using a virtual machine, then you must enable it.
2) DPI Protection. The Deep Packet Inspection (abbreviated DPI) system performs an in-depth analysis of all packets passing through it and allows you to filter traffic by its contents. Enabling this feature allows you to bypass DPI systems and complicate your security surveillance. More details about this system: https://habr.com/post/111054/ (read at your leisure)
3) Allows you to select a network adapter to replace the MAC address.
4) Actually the substitution of the MAC address. The dice button makes this parameter random, random. You can also manually select the manufacturer (D-Link, Asus, Apple, TP-link, etc.). The Set New button sets the MAC address for the adapter. “Test eth ..” checks for MAC address spoofing.
[20:05:50] <Xerl> Next area is HW ID's.Screenshot: https://prnt.sc/lw6i4y
This area is responsible for replacing the processor in your system. From the drop-down list, you can select various processors for installation, you can manually specify the processor. The “Set” button sets the processor override. You can choose between Intel and AMD processors, set the processor frequency.
[20:06:46] <Xerl> And the main area of the iron antidetect: "Windows ID". Screenshot: https://prnt.sc/lw72qf
We will quickly analyze the main parameters. Let me remind you that dice makes this parameter random, random "SET ALL" - this button sets all the parameters from this area at once.
[20:07:48] <Xerl> Owner (UName) - this parameter sets the username in OC.
Company - this parameter sets the company name in OC. This field may be empty.
Product name - this parameter sets the version of the Windows system and its number. Example: Windows 10 Pro
Edition - this option also applies to the system version. Example: "Home", "Professional", "Enteprise"
System build - this option sets the BUILD build of your system. You can view it by opening "All Programs" -> "Accessories" -> "Utilities" -> "System Information".
[20:08:41] <Xerl> Windows ID / IE ID / MPID - this parameter sets the activation key of your operating system, the unique ID of Internet Explorer and Mediaplayer.
Install Date - these parameters set the date and time of installing your OC on your system.
Windows / Program Files dirs creation date / time - these parameters specify the date and time the Program Files folder was created in your OC.
And the parameters of area “A” in the screenshot set the version and build number of your OC (a similar parameter of System Build), the version of the kernel.
[20:09:51] <Xerl> We pass to the first part of the program - WEB (Firefox), i.e. browser antidetect. Let's start with the proxy section. Screenshot: https://prnt.sc/lw9tuj
[20:12:13] <Xerl> This section allows you to connect Socks, Http, FTP, SSL Proxy and TOR. To enable TOR, you just need to click the inscription “Tor” in the upper right corner of this section. To work with us, it’s enough to use two modes: Socks and SSH.
To connect, we use the IP: Port format, example: “157.205.203.45:19723”.
If Socks / SSH has a Login: Password, then we use the section with the built-in Proxyfier. (Screenshot: http://prntscr.com/lw9w56). Just fill in IP, PORT, Login, Password and click the ">" button
After successfully adding Proxy, you can check the IP using the MaxMind database. To do this, click on the picture “MaxMind” in the upper right corner, and after a few seconds in this section you will see all the necessary information by IP address. (Screenshot: http://prntscr.com/lw9xzi). We pay attention to two parameters: 1) No proxy - this parameter shows whether your IP is defined as a proxy. 2) Low - this parameter displays the level of IP “spam” on MaxMind databases (The smaller the better).
The “Auto TZ” checkbox allows you to automatically set the Timezone in the system (time).
[20:14:31] <Xerl> Configs Section (Screenshot: http://prntscr.com/lwa0jg).
In this section, it will be possible to purchase paid configs. The main feature compared to other antidetects will be that configs will contain cookies, history of visits, logged in social networks. This, firstly, reduces our time for warming up and downloading the session, we don’t need to go to different sites and spend time on it, and secondly, logged in accounts from the side of the Antifraud shop can give us some confidence, and, therefore, the chances of a successful driving in may be higher.
[20:16:04] <Xerl> Go to the next section. (Screenshot: https://prnt.sc/lwa57l)
This section allows you to set the parameter UserAgent'a and language (Languages). For better traffic it is better to use user agents of the latest versions of Firefox browser. As for the language, the last parameter shows the coefficient of the preferred language from 0.1 to 0.9. Betting is best from 0.5 to 0.8. At the end, you need to click to switch to "ON" for the substitution to work.
[20:17:18] <Xerl> We pass to substitutions of Canvas, WebGL and Audio. (Screenshot: http://prntscr.com/lwag5h).
To generate the fingerprint data, you only need to click the "Generate" button. The slider controls the uniqueness of these prints. Without the need to move in a big direction is not worth it. Also in this section you can change the parameter responsible for the video card in WebGL (Unmasked Renderer).
[20:18:17] <Xerl> The next section is related to fonts. Screenshot: https://prnt.sc/lwm3hm
Checkbox Font FP - responsible for replacing the print of fonts. Under it is just a field with a random fingerprint generator.
DF (Document Font) - a check mark is responsible for using document fonts / external CSS fonts in the browser.
The “Use legible fonts” checkbox is responsible for using standard fonts in the browser, below you can specify and use non-standard fonts.
[20:19:15] <Xerl> Section BOM | DOM. Screenshot: http://prntscr.com/lwmauw
This section already refers to the config parameters. Without a strong need to touch them is not worth it.
Actually what can be edited here? BuildID version of Firefox, there is the possibility to pre-warn it, the capacity of Windows (32-bit or 64-bit), the number of cores in the processor (most popular values: 2,4,8), the version of Windows (XP, 7,8, 8.1, 10) .
[20:21:06] <Xerl> And the last interesting section is the "options". Screenshot: https://prnt.sc/lwmwn9
The most necessary parameters for work:
Flash - this checkbox enables or disables Flash in your browser. It is better not to use Flash without the need.
Plugin scan - this checkbox allows you to enable or disable the ability of sites to see your browser plug-ins. Be sure to include.
WebGL - this checkbox enables or disables WebGL. Be sure to include.
JSP Fingerprint - this checkmark includes the ability to get a unique fingerprint browser through the speed of video rendering and errors in the process. Better turn it on.
[20:23:10] <Xerl> WebRTC - this checkbox enables or disables WebRTC.
ClearRTC - this checkmark also applies to WebRTC and is associated with the display of external and internal. IP addresses Better turn it on.
Unlinkable - a parameter for security, it is better not to use it for work. In a nutshell: the parameter prevents the site from seeing Cookies and other data in the browser of other sites, only those related to this site.
Keyb.FP - this checkbox enables or disables the ability of the site to receive the fingerprint of your keyboard. Better turn it on.
[20:24:58] <Xerl> And we move on to the Linken Sphere browser antidetect.
For all questions, you can always, by the way, turn to a support service that will solve installation problems and launch a browser. Telegram: @devtnbrs
So, I open the antidetect, enter the login / password.
First of all, open the general browser settings. They are in the “Edit” tab, then from the drop-down list we find “Preferences”. Screenshot: https://prnt.sc/lkaf5p
[20:26:21] <Xerl> You can read about all the settings and all points of the sphere in the documentation, but in the screenshot I highlighted all the most important and necessary settings for a beginner.
1. This parameter sets the default site, which will open after creating the session. You can install any checker, for example f.vision, whoer.net or the search engine Google, Yandex, Yahoo, or any site in general, which you may think of.
2. This parameter sets the default search engine, ie What kind of search engine will the search go through if you enter in the address bar of the browser.
3. This parameter sets the physical screen size. It is best to put it under the config, i.e. if in the config 1920 by 1080, then in this parameter we set the same values. A very important parameter, it is best to put it every time under the session (config).
4. This parameter sets the substitution of the system time. You can choose two options: either using Javascript, or the system time will change. Choose 2 option (system time).
[20:28:16] <Xerl> 5. This parameter sets whether to use TOR during authorization in anti-detection. Check the box necessarily
6. This parameter sets whether or not to save the password for your account at login. For security, it is better to disable this checkbox.
7. This option allows you to close ports in Web Sockets. Web sockets is a protocol for messaging between a browser and a web server. Simply put, a site can check your open / closed Web Sockets ports.
8. This parameter allows you to enable / disable GPU acceleration in the browser. Simply put, if this function is enabled, then drawing elements and windows is faster. If possible, it is better to enable this item, but if the browser crashes, stops working after that, then it is better to disable this item.
The remaining parameters are directed more than any little thing, and do not greatly affect the work, so you can read about them in the documentation.
Now let's move on to setting up the sessions themselves in the browser, in other words - configs.
In more detail about free and paid configs in this anti-detection and work options we will analyze at the end of the lecture.
[20:29:34] <Xerl> So, let's start by parsing the first area. (Screenshot: https://prnt.sc/lkak5t)
[20:29:38] <Xerl> 1. This parameter allows you to select a session from the list.
2. This parameter is needed to create a new session. To do this, enter the session name in this field.
3. This parameter allows you to write a note for the session. It is useful to indicate all the necessary information about the session, for example, about IP, open ports, whether driving from the session is successful or not, other features. Very useful feature. In order not to get confused in the sessions and to simplify your life for driving analysis, I advise you to indicate all the useful information in this field: Proxy Score, Risk Score, which shops were driven in, which method used the map, the result of driving, etc.
4. This parameter sets the session color in the browser. It is useful to use in order to make it more convenient not to get confused in them.
[20:31:56] <Xerl> 5. This parameter allows you to completely print the session and, if necessary, not copy the canvas, fonts, rect, audiofingerprint prints.
6. This parameter is needed in order to rename the session.
7. This parameter allows you to enable / disable WebGL rendering using the resources of the video card. Disable only if the video card is weak or not at all, such as, for example, on remote servers.
8,9,10. These parameters allow you to enable / disable HTML 5 Storage, paragraph 9 - allows you to save data and use it even after the browser is rebooted, paragraph 10 - allows you to save and use data using the IndexedDB standard for storing large structured data. What you need to know: to drive them, it is better to turn them on, and if the session is for security, it is better to disconnect.
[20:33:13] <Xerl> Go to the next area, i.e. section. (Screenshot: http://prntscr.com/lkb5e2)
[20:34:37] <Xerl> 1. This parameter allows you to enable or disable Canvas spoofing. What is Canvas I explained above. This substitution uniqueizes Canvas, thereby changing this print. The only minus of all antidetects is that the uniqueness of Canvas becomes 100%, and the uniqueness of a real system is about 99% with something. Therefore, you can periodically disable this option if there is a suspicion that because of this, antifraud may not skip driving.
2. This parameter allows you to enable or disable the substitution of Audio fingerprint. The audio footprint in 2019 is no longer as rare as before; It has gained great popularity in antifraud systems recently. Website where you can check the audio print: https://audiofingerprint.openwpm.com/
Antidetect replaces 4 parameters: Fingerprint using DynamicsCompressor (sum of buffer values), Fingerprint using DynamicsCompressor (hash of full buffer), Fingerprint using OscillatorNode, Fingerprint using hybrid of OscillatorNode / DynamicsCompressor method
[20:36:22] <Xerl> 3. This parameter allows you to enable or disable font substitution. Detect appeared a long time ago, is used everywhere. A special plus of the sphere is that you can not only replace the fingerprint, but also use any list of fonts or create your own. The site where you can check the font print: https://browserleaks.com/fonts (two “Fingerprint” parameters)
4. This parameter allows you to enable or disable the substitution of the browser coordinate system (rects). The getClientRects element allows you to get the exact position and pixel size of the desired element, and depending on the system, and more precisely on the system screen resolution, fonts and many other parameters, the results will be different. This detection also appeared a very long time ago and is highly popular. The site where you can check the fingerprint of rects: https://browserleaks.com/rects (Parameter: "Full Hash")
5. This option allows you to enable or disable the use of random plugins. It makes sense to use in free configs or if there are no plugins in the config. But it is best to prescribe them manually if necessary.
[20:37:29] <Xerl> 6. This parameter allows you to enable or disable the storage and encryption of cookies. For your safety, the Must Have item.
7. This option allows you to enable or disable Flash. Flash technology is already obsolete, so in 2019 there is nothing suspicious about the fact that Flash is turned off. For many, it is no longer installed in the system at all. Include only when absolutely necessary.
8. This option allows you to enable or disable fingerprint uniqueization. Those. when you start the session every time they will be new. For security, you can completely use it, for driving in it is absolutely not worth using.
9. This parameter allows you to specify which fingerprints to unify (Canvas, Audio, Plugins, Rects, WebGL, Fonts, Media Devices). This parameter is closely related to the previous one.
10. This parameter blocks the output of the Canvas hash. There is no need to use the parameter. A practical effect on driving has not been noticed.
[20:39:41] <Xerl> Let's move on to the next area. (Screenshot: http://prntscr.com/lkazhi)
[20:40:59] <Xerl> 1. Select the type of connection. Now I will indicate the most necessary and describe them.
No proxy - this type of connection involves the use of your Internet connection, i.e. as if using the most normal browser. It is necessary if you need to use Proxyfier and other programs to use Socks / SSH. But if you use these programs, then a huge plus of the sphere is “killed” in that you can use different sessions at the same time with different socks or SSH tunnels. The only option when at least it might be wise to use this type of connection is if you have a configured router in which it is possible to connect a sock or SSH tunnel, for example, a router from Sedoy.
Tor - this type of connection is an excellent option for surfing sites, i.e. for use in the security chain, which I talked about at the beginning of the lecture.
Socks, SSH Tunnel - these two types of connection are the basis for working with this product. These modes should be used for driving. For each session, you can configure different socks or SSH tunnels and use all the tabs (sessions) at the same time, i.e. work like a machine gun not from one session, but immediately from 3 or 5 or even more.
[20:42:45] <Xerl> 2. Area for specifying SOCKS / SSH and port.
Input Example: 154.250.117.3:6732
3. This item disables Local IP in WebRTC.
4. This area is responsible for the Login / Password in Socks / SSH. If you have a Socks or SSH tunnel has a username / password, then you must definitely enter them in this area, if they are not there, just leave the fields empty.
5. This checkbox enables / disables WebRTC spoofing. If you disable the spoofing, your real WebRTC will be used.
[20:44:12] <Xerl> 5. This checkbox enables / disables WebRTC spoofing. If you disable the spoofing, your real WebRTC will be used.
6. This checkbox is responsible for External IP WebRTC. The IP of the External WebRTC should match your IP Sock or SSH tunnel. The checkbox must be disabled if the IP connection is different from the IP that we get “on the output”. The output IP, by the way, is usually indicated in the history of the service where you take socks, for example in Faceless or Luxsocks.
7. This checkbox enables IPv6 spoofing. Use only if the IPv6 Leak Test item is leaking IP address on your system at the https://browserleaks.com/ip checker. Otherwise, do not include.
8. This checkbox completely disables WebRTC in the session. I clarify that it is WebRTC itself, and not its substitution.
[20:45:12] <Xerl> 9. This feature allows you to install the DNS server manually. When you click the Check DNS button, its validity is checked. It must be used for security, as well as for driving if the DNS country of your Socks or SSH tunnel is different. This parameter is very important, since there are often SSH tunnels or Socks that show the DNS of another country, or your own DNS system (this is what happens by default if this field is empty and the Socks or SSH tunnel does not have its own parameter) , and you catch cancellations due to suspicious activity.
10. Button, which greatly simplifies the work. When you click on it, it checks the validity of the Socks / SSH tunnel and automatically sets the geolocation, session language, time zone, external WebRTC.
[20:47:38] <Xerl> Let's move on to the next area. Screenshot: http://prntscr.com/lkan72
[20:48:05] <Xerl> 1. This section is associated with a UserAgent. In it, you can control UserAgents, i.e. add, edit or delete. The “Chrome”, “Safari”, “MSIE”, “Other” buttons allow you to quickly select UserAgent by browser type. The “Regenerate configure after useragent change” item allows you to change session parameters after changing the UserAgent
2. This section is responsible for the language of the session. Manually registering it is not necessary, it is easier to click the “Check proxy / geo” button and the language will be installed automatically under the country of the Socks / SSH tunnel.
3. This function allows you to block pop-ups on sites in the session, prohibits the creation of pop-ups. Use only if it is really necessary.
[20:50:07] <Xerl> 4. This function should not be included unnecessarily. Simply put, you should enable it then, the site is loading crookedly or is not fully functional.
5. This feature blocks the entry of Russian characters on the site when driving. It’s useful to include, because in which case it does not allow you to enter Russian characters when driving. To enter Russian characters in the URL, of course, this feature does not work.
[20:51:21] <Xerl> Let's move on to the next area. Screenshot: http://prntscr.com/lkat45
[20:52:07] <Xerl> 1. Config manager - free configurations for the sphere. At the moment there are more than 60,000. The downside is that they can be used by all active users, and the selection happens randomly. You can only choose the type of browser and OC when downloading a free config.
2. WebGL Parameters. I already talked about what WebGL is above, this section just allows you to configure all the parameters of WebGL 1 Version and WebGL 2 Versions or disable it completely if necessary.
3. Section "Advanced Settings". One of the most interesting and important sections of the field for me. In it you can edit most of the parameters, add plugins, edit HTTP headers.
[20:53:23] <Xerl> 4. A set of Fonts. In this section, you can create / add or edit font names, i.e. create your own list of fonts that will see the antifraud of the shop in addition to the font print itself, which we examined above.
5. Button simulate window resolution. This function allows you to adjust your actual screen resolution to the session data. The function is necessary when working with mobile configs (Android, Iphone, as well as tablets).
6. Button simulate Touch Screen. The most necessary function when working with mobile configs. It completely simulates the operation of the Touch Screen, just like on mobile devices.
7. This parameter determines the screen length. Example: 1920
8. This parameter determines the width of the screen. Example: 1080
[20:54:59] <Xerl> The next two small areas. Screenshot: http://prntscr.com/lkapz3
1. This area is responsible for replacing the geolocation of your system. Latitude - geographical latitude, longitude - geographical longitude.
2. This area corresponds to the time zone and time.
These two areas do not require manual adjustment. You just need to click the “check proxy / geo” button and the values will be set automatically under your SSH tunnel / Socks.
[20:56:58] <Xerl> Let's move on to the possible options for working with this antidetect.
1. If you have access to the configshop, or you can purchase configs from someone, then take the desired config, add it to the antidetect, configure the connection to SSH / Socks, if necessary Custom DNS, configure the time zone and geo-location, fingerprints you need replace and drive forward.
2. If you don’t have access to the configshop or you don’t have anyone to get configs, then use the free configurations, which are already more than 60,000. After that, as in the first version, set up and drive forward.
You can also manually adjust the necessary parameters in order to make the free configuration more unique.
This can and should be done, because a considerable number of people use the built-in configs, and this can negatively affect the result. But for a beginner, they are more than suitable.
It is also possible not to download a free config, but to write it yourself in a sphere from scratch, but for the first option, for the second, you need to have experience, knowledge of all parameters.
[20:57:54] <Xerl> Useful tools in this Anti-Detect that you can use:
1) Antidetect has a Web Emulator - this function allows you to automatically simulate user behavior by visiting sites in automatic mode for you while you are drinking cold beer relaxing on a chair. In practice, this is necessary to warm up the store before driving, i.e. cookies are typed, a history of visits, or you can type history in the shop you are going to drive into.
2) The Anti-Detect has a function to automatically drive in text. Those. copy the text to the clipboard, press the key combination, and the antidetect imitates manual input. The function is very convenient and useful, but, despite the advanced imitation, the antifraud may not treat this function very well. Therefore, use only when more or less confident that this will not affect the success of driving.
[20:58:36] <Xerl> 3) The Anti-Detector has an Automator - this is a more advanced heater that allows finer and more advanced settings for warming up shops. The downside is that to use this tool, you need to understand and study this tool well, because Writing a script for the machine is not so simple, and even few of all active users in the field can do this.
[21:01:07] <Xerl> And now I will answer all your questions about antidetects or in general in our area of work.
Subscribe to my profile.
Leave feedback in your profile. Jabber for those who have questions or who personally want to chat: wirl@prv.st
[21:03:16] <Serrwrtet> 1. How deep should cookies be?
2. If the Sox checker shows a location other than the Sphere’s automatic geolocation, should the parameters (longitude-latitude) be manually driven in via ZIP?
3. How relevant is the use of an “iron” antidetect in a cart?
4. Does the Sphere have an analogue of DPI Protection?
[21:04:32] <Xerl> 1) If you mean how many pages to visit on the site, then FROM 2-3.
2) Better to bet on the Sox checker.
3) Someone applies, and applies in conjunction with the iron + browser
4) No
[21:05:11] <bloomberg> 1) what browser antidetect would be better than linken sphere or kraken pro? 2) In what cases do I need to replace both the hardware and the browser at the same time?
3) The only minus of all antidetects is that the Canvas uniqueness becomes 100%, and the uniqueness of a real system is about 99% with something, didn’t you understand this?
4) is the sphere updated frequently, because the antifraud doesn’t doze off? 5? Is it possible to drive new or not delayed ones into free shops with free configs?
6) before driving into the shop do you need google cookies, YouTube, etc., and if so, haven't the antifraud seen that they are fresh?
[21:08:09] <Xerl> 1) Browser rather Linken
2) Substitute in all cases (driving, PayPaling, BA, etc.). I mean, there are no special cases here.
3) If you explain in a simple way, then yes, the minus is that the canvas is too unique
4) Now not so often
5) Maybe.
6) A visit to these resources is advisable. Between the options - they are not there and they are fresh, it is better to choose the second. Moreover, this moment can be checked not by cookies
[21:09:14] <macpru> 1) I have CC from phishing page already, is it advisable to buy random config for antidetect for shopping?
Also do we get to learn how to get logs using Azorult stiler next lecture or soon?
[21:11:11] <Xerl> if possible better use config from configshop or configure the config yourself
About amazon and other lecture - i don't know. I'm only learn about Antidetects
[21:11:16] <bloomberg> Is it possible to import a lot of all kinds of different cookies before each drive to show the active user, and only then fill in the cookies of the shop of interest?
[21:12:29] <bloomberg> in working with logs also need a special config?
[21:12:51] <Xerl> you can, I know that they did this when they take cookies and import them in several sessions. Let's just say, by cookie and visited site, detect when almost every site has a metric from Google or Facebook; I think this is the main detection. And here is how the final site will react to this - how lucky.
[21:13:04] <Xerl> bloomberg: No, it's just better to adjust as much as possible to the parameters
[21:16:29] <bloomberg> Do all antifrauds check the canvas? It seems that it’s easier to probably start with the logs, what can you say about this?
[21:16:59] <Boat> Where can I read about AFF Combine?
[21:17:22] <Xerl> in 2020 I think 95%. According to the logs, it’s easier to some extent, but the point here is in cookies, acc and not in the detection of canvas))
[21:18:56] <Boat> If that settings can be accessed?
[21:19:37] <Xerl> you can
[21:20:01] <bloomberg> as I understand it, it’s better to change the iron then, as you described, when you beat at the office, or poker, but they don’t give a damn what kind of processor or video card are there, because anything can be with user?
[21:21:38] <Xerl> I think the main thing here is to keep track of the same, that is, The PC problem will be that there are several such passages in the system and, roughly speaking, your hardware will be "banned"
[21:23:07] <Boat> Everything needs to be tried, and there questions will appear
[21:24:05] <bloomberg> and you have a personal tag you gave or I did not see?
[21:25:24] <revolvervv81> Thank you so much for the lecture !!! At first I was upset that you are not on the list of lecturers .... (like you are not in the Main working conference) ... The main questions will appear when we start working with the Sphere
[21:25:25] <Xerl> in the PM on the forum about this)
[21:25:54] <Boat> Thanks for the lecture, it was intelligible and understandable, finally I realized what Canvas, WebRTC, aWebGL are
[21:25:59] <Xerl> revolvervv81: let's just say that I am now mainly connected with working with antique people, therefore it’s just a purely lecture of the Vedas