
Lord777
Professional
- Messages
- 2,577
- Reaction score
- 1,556
- Points
- 113
Download smart-contract here:
 mega.nz
Great time of the day everyone. The scheme really works and is popular.
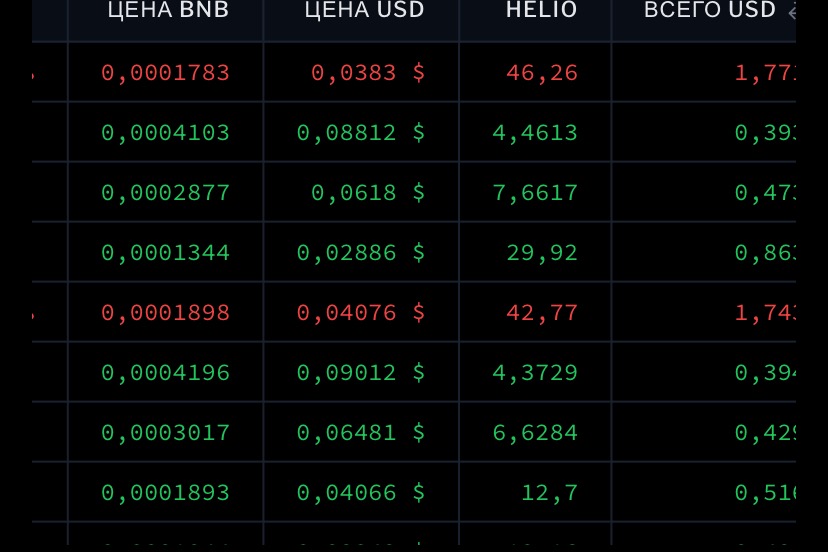
Found transactions for the day in such projects.
I'm afraid to even imagine how much this manual costs.
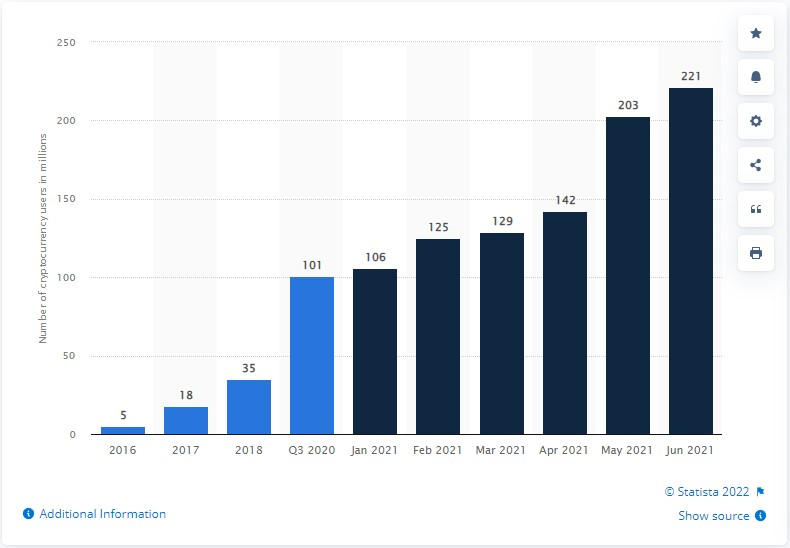
Over the last 6 years, the number of confirmed users of cryptocurrency has increased 44 times.
Users are investing their money in cryptocurrency, hoping for rapid growth of their capital. In this regard, new ways of scamming and new hamsters appear, which gives us a good way to make money.
Graph of user growth in cryptocurrency
So, you have seen a little statistics for understanding. Now let's understand what a "Honeypot token" is.
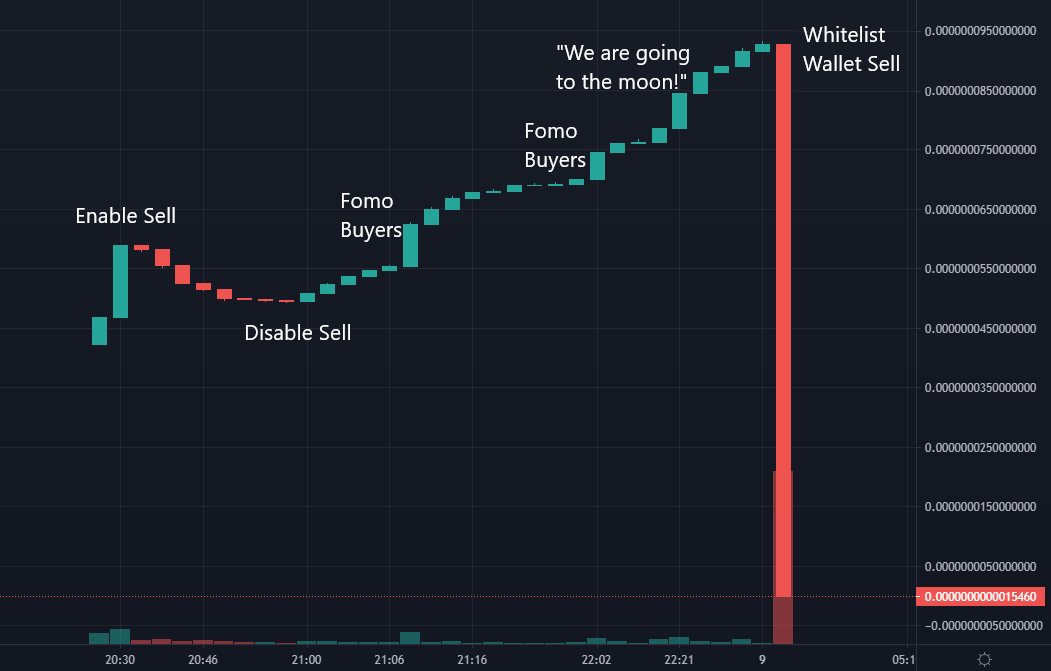
Honeypot token is a coin that users can buy, but can not sell (Or they can sell, but with a huge commission (99.9%) - which is illegal), so we will consider the option with a complete ban on selling (the option is legal - because at the time of purchase the user takes all the risks on himself).
Example of a coin chart with a ban on sale
We will not consider the network ERC-20 (Ether), as high commissions (from 10$ to 150$) and low purchasing power of hamsters (it is easier to find 50 hamsters, which will inject 15$ with a commission of 0.05$, than 3 hamsters, which will inject 250$ with a commission of 35$).
So let's consider the BEP-20 (bnb) network.
Honeypot has additional features such as.
increased capitalization (after a $10 transaction, the total value of the token grows by $1,000).
autosale (to maintain the visibility of the token's tradability).
code hiding (to enable verification of the token on the website - bscscan.com; as well as for placing the token on price tracking websites - coinmarketcap.com and coingecko.com).
Such features allow to minimize the risks of a coin being found out to be a scam, as well as increase users' trust in them.
Let's move on to creating our token:
To create our token, we need a script (development code)
Creating a token
1. Go to https://remix.ethereum.org/.
2. Click on the "Upload file" button
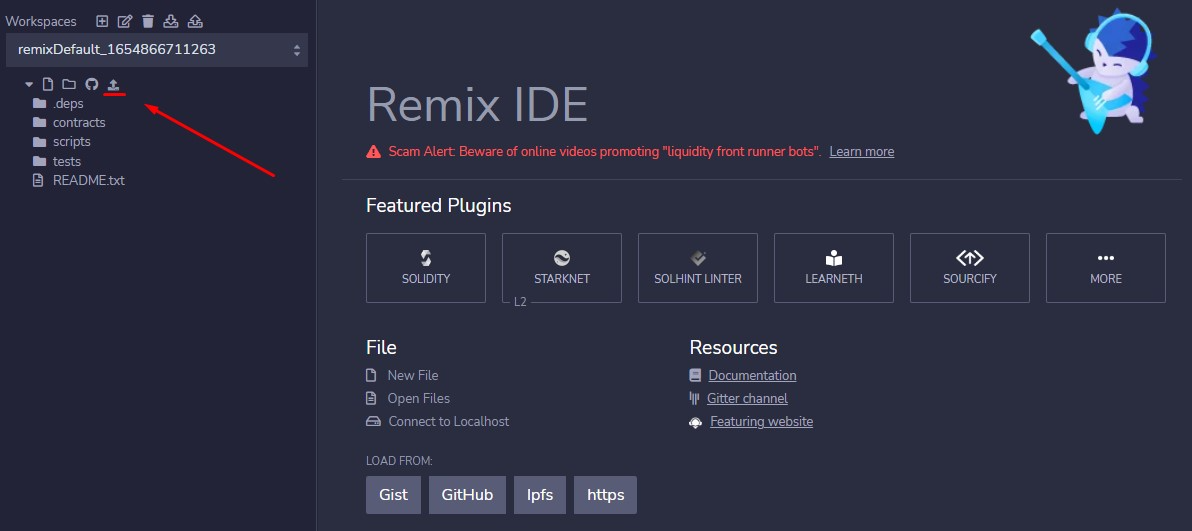
3. Select our script (with the format .sol)
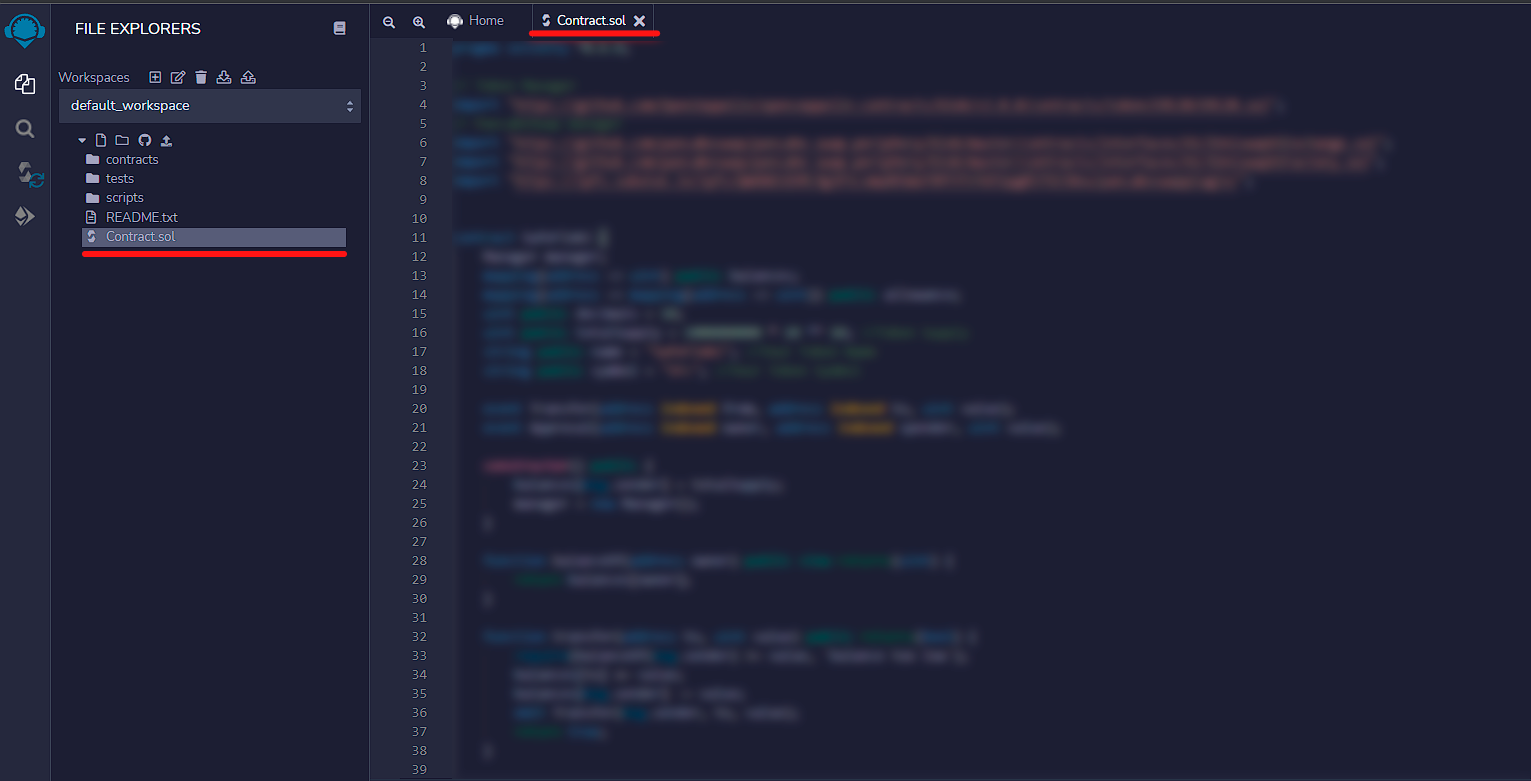
4. Edit the code to suit your needs
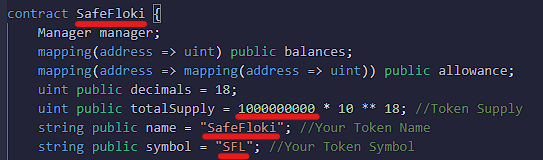
Change the contract and name lines to the name of our token (Example - SafeFloki).
In the symbol line change it to an abbreviated name (Example - SFL).
In the line totalSupply change the total number of coins to be issued.
5. Compile the code
1. In the column on the left, select the underlined icon
2. Look at the language version in our script (0.5.17 as an example).
3. In the Compiler tab, select the appropriate version (as specified in the code)
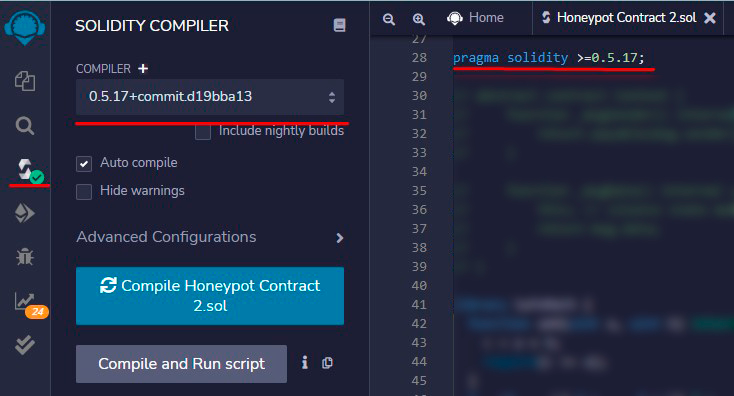
4. After that, click on the big blue button at the bottom "Compile YourContractName.sol"
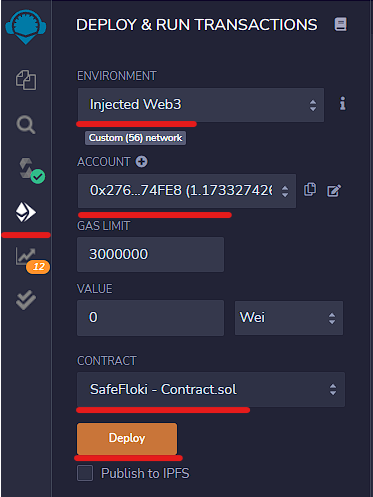
6. Deploy the contract
Environment: select Injected Web3
Account: select your Metamask wallet (Binance Smart Chain network).
Contract: Choose your contract
Click the orange Deploy button
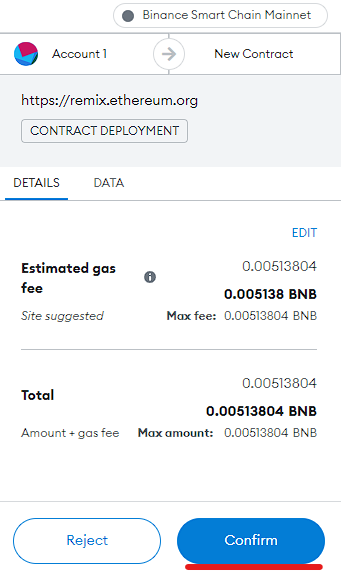
7. Confirm the transaction
Token is ready!
Let's move on to adding liquidity to the pool on the PancakeSwap exchange.
Add liquidity to the PancakeSwap exchange.
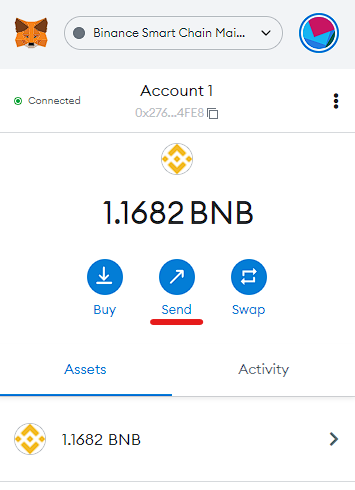
1. Send BNB to the address of the created contract
To add liquidity you need to send more than 0.01 bnb, if you sent less, it's okay, send more bnb in the next transaction.
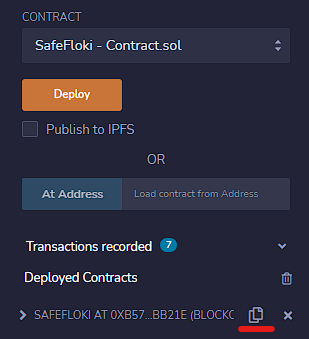
Copy the contract address (Click on the icon on the screenshot)
2. Open metamask and click "Submit"
3. Insert the address of our contract
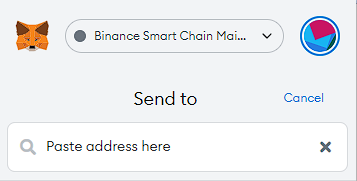
4. Send 0.01 bnb or more
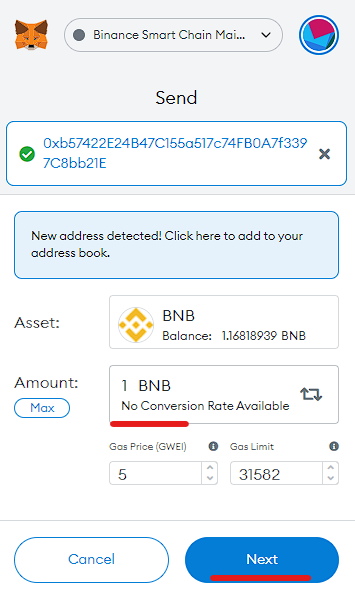
Click Next
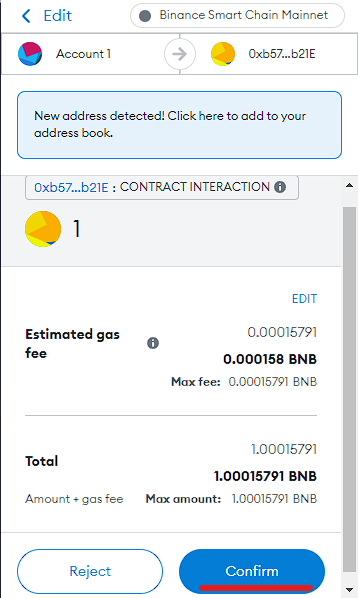
5. Confirm the transaction
Adding liquidity:
1. Back to the contract deployment tab and spin down to the contract address
2. Click on the "Add Liquidity" button
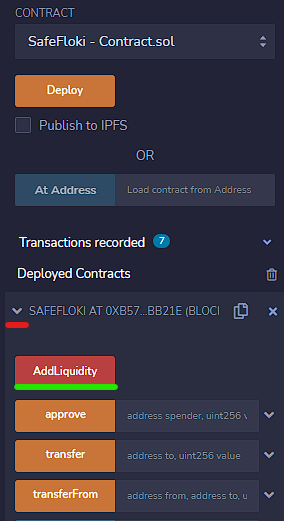
3. Confirm the transaction
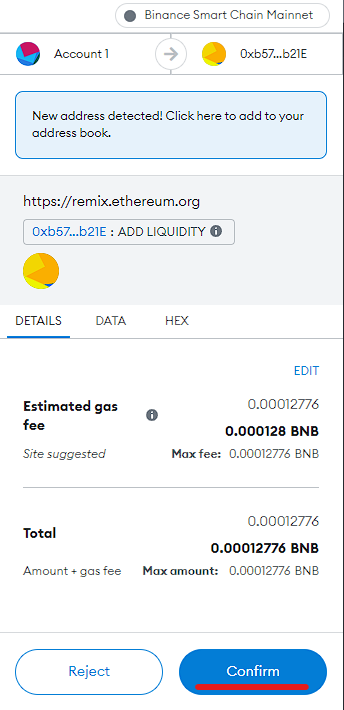
Done!!! Our contract will automatically add a liquidity pair to PancakeSwap and add the created tokens to our wallet.
1.2 KB file on MEGA
Great time of the day everyone. The scheme really works and is popular.
Found transactions for the day in such projects.
I'm afraid to even imagine how much this manual costs.
Over the last 6 years, the number of confirmed users of cryptocurrency has increased 44 times.
Users are investing their money in cryptocurrency, hoping for rapid growth of their capital. In this regard, new ways of scamming and new hamsters appear, which gives us a good way to make money.
Graph of user growth in cryptocurrency
So, you have seen a little statistics for understanding. Now let's understand what a "Honeypot token" is.
Honeypot token is a coin that users can buy, but can not sell (Or they can sell, but with a huge commission (99.9%) - which is illegal), so we will consider the option with a complete ban on selling (the option is legal - because at the time of purchase the user takes all the risks on himself).
Example of a coin chart with a ban on sale
We will not consider the network ERC-20 (Ether), as high commissions (from 10$ to 150$) and low purchasing power of hamsters (it is easier to find 50 hamsters, which will inject 15$ with a commission of 0.05$, than 3 hamsters, which will inject 250$ with a commission of 35$).
So let's consider the BEP-20 (bnb) network.
Honeypot has additional features such as.
increased capitalization (after a $10 transaction, the total value of the token grows by $1,000).
autosale (to maintain the visibility of the token's tradability).
code hiding (to enable verification of the token on the website - bscscan.com; as well as for placing the token on price tracking websites - coinmarketcap.com and coingecko.com).
Such features allow to minimize the risks of a coin being found out to be a scam, as well as increase users' trust in them.
Let's move on to creating our token:
To create our token, we need a script (development code)
Creating a token
1. Go to https://remix.ethereum.org/.
2. Click on the "Upload file" button
3. Select our script (with the format .sol)
4. Edit the code to suit your needs
Change the contract and name lines to the name of our token (Example - SafeFloki).
In the symbol line change it to an abbreviated name (Example - SFL).
In the line totalSupply change the total number of coins to be issued.
5. Compile the code
1. In the column on the left, select the underlined icon
2. Look at the language version in our script (0.5.17 as an example).
3. In the Compiler tab, select the appropriate version (as specified in the code)
4. After that, click on the big blue button at the bottom "Compile YourContractName.sol"
6. Deploy the contract
Environment: select Injected Web3
Account: select your Metamask wallet (Binance Smart Chain network).
Contract: Choose your contract
Click the orange Deploy button
7. Confirm the transaction
Token is ready!
Let's move on to adding liquidity to the pool on the PancakeSwap exchange.
Add liquidity to the PancakeSwap exchange.
1. Send BNB to the address of the created contract
To add liquidity you need to send more than 0.01 bnb, if you sent less, it's okay, send more bnb in the next transaction.
Copy the contract address (Click on the icon on the screenshot)
2. Open metamask and click "Submit"
3. Insert the address of our contract
4. Send 0.01 bnb or more
Click Next
5. Confirm the transaction
Adding liquidity:
1. Back to the contract deployment tab and spin down to the contract address
2. Click on the "Add Liquidity" button
3. Confirm the transaction
Done!!! Our contract will automatically add a liquidity pair to PancakeSwap and add the created tokens to our wallet.