
Hacker
Professional
- Messages
- 1,041
- Reaction score
- 850
- Points
- 113
SSH brings various security enhancements, including user / host authentication, data encryption and data integrity, which makes popular attacks like eavesdropping, DNS / IP spoofing, data forgery, and connection hijacking impossible. etc. For ftp, telnet, or rlogin users who use a protocol that transfers data in cleartext, it is highly recommended that they switch to SSH.
OpenSSH is an open source implementation of the SSH protocol that encrypts a network connection using a suite of programs. If you would like to have SSH on Linux, you can install OpenSSH, which consists of an OpenSSH server and client packages.
OpenSSH server / client packages come with the following utilities:
Installing OpenSSH Server and Client on Linux
If you want to install the OpenSSH server / client and set up the OpenSSH server to start automatically, follow the instructions below, which differ depending on the distribution.
Debian, Ubuntu or Linux Mint
On Debian based systems, immediately after installation, OpenSSH will start automatically at boot. If for some reason the OpenSSH server does not start automatically at system startup, you can run the following command to unambiguously add ssh to boot at system startup.
Fedora and CentOS / RHEL 7
CentOS/RHEL 6
Arch Linux
OpenSSH server setup
If you want to configure the OpenSSH server, you can edit the system-wide configuration file located in / etc / ssh / sshd_config.
There are a couple of OpenSSH options you might be interested in:
By default, sshd listens on port 22 and listens for incoming ssh connections. By changing the default port for ssh, you can prevent various automated hacker attacks.
If your machine has more than one physical network interface, you may want to check which one is associated with sshd, you can use the ListenAddress option to do this. This option helps improve security by restricting incoming SSH only through a specific interface.
The HostKey option defines where the personal host key is located.
Option PermitRootLogin - Whether root can log in via ssh.
Using the AllowUsers option you can selectively disable the ssh service for specific Linux users. Multiple users can be specified, separated by spaces.
After / etc / ssh / sshd_config has been modified, make sure to restart the ssh service.
To restart OpenSSH on Debian, Ubuntu or Linux Mint:
To restart OpenSSH on Fedora, CentOS / RHEL 7, or Arch Linux:
To restart OpenSSH on CentOS / RHEL 6:
How to connect to SSH
Connecting to SSH from Linux
Linux users do not need to install additional software.
Connecting to SSH from Windows
For Windows, many people recommend and use PuTTY successfully. I have nothing against this program, but I prefer and recommend Cygwin myself.
Cygwin is not just an SSH client. It is a powerful combine that supports many Linux commands. For example, it is very easy to create SSL certificates in Cygwin (just like in Linux). In Windows, you need to dance with a tambourine to create self-signed certificates. Cygwin is very convenient to use cURL (you don't need to install anything separately), etc. Those who lack the command line and Linux programs on Windows will find an outlet for themselves in Cygwin.
Installing Cygwin is straightforward. Go to the official website and download the 32-bit or 64-bit version.
A tiny file is downloaded - this is the installer. The installer is graphical. Although it contains a large number of options, they are all fairly simple and many are familiar from other graphical installers. If something is not clear, just click "Next". Perhaps only the following window can be confusing:

All items available for installation are presented here. We don't need to understand them right now. Since the most requested ones are already marked for installation. And if something is missing in the future, then you can easily install the necessary one.
SSH connection (common for Linux and Windows)
Linux users open a console, Windows users type in Cygwin.
SSH needs the following information to connect:
Two of these parameters SSH can assume: username and port number. If no port is specified, the default port is assumed. If no user is specified, then the same name is used as in the system from which the connection is made. For example, the host address for the connection is 192.168.1.36. If I type
I see the following
Since I am connecting to the host for the first time, it is an unknown host. They ask me if I want to continue. I type yes:
Okay, host 192.168.1.36 has been added to the list of familiar hosts. I am prompted for a password for user Alex. Since there is no such user on the server with SSH, but I press Ctrl + C (to break) and enter the command along with the username of the remote system. The user is entered before the address of the remote machine and is separated from the address by the @ symbol. The @ symbol in English is read as at and can be translated as "in". Those. mial@192.168.1.36 can be interpreted as "user mial on machine 192.168.1.36".

The Alex @ MiAl-PC invitation was replaced by the mial @ mint invitation. This means that we are already on a remote machine, that is, we already have a connection. If you need to specify a port (if it differs from the standard one), then the port must be specified after the -p switch. For example like this:
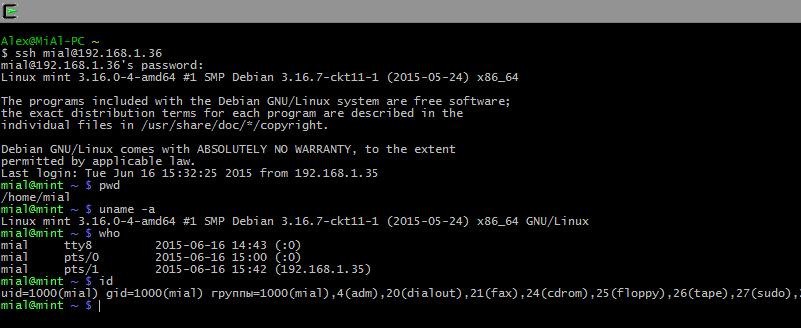
After connecting, we are greeted with something like this:
It follows that the remote machine is Linux Mint, with kernel 3.16, 64-bit version. Also important information about the time of the last login and the IP address from which the connection originated. If the time and IP are unfamiliar to you, and you are the only user, then your system is compromised and you need to take appropriate action.
Let's type a few commands to make sure where we are and who we are: pwd, uname -a, etc.:
To end the session (disconnect), type
Or press Ctrl + D.
First, we need to create rsa keys. If you are a Linux user, then you are fine. If you are a Windows user, but you did not listen to my advice and chose PuTTY, then you have a problem and think for yourself how to solve it. If you have Cygwin, then everything is also fine.
If you managed to log in to the remote system, log out. Then type
We are asked for the file name, no need to enter anything, the default name will be used. The password is also asked. I do not enter a password.
Now on the remote machine, we need to create a .ssh directory. The execution of the command on a remote machine will be described below. For now, just copy the command, remembering to change the IP address and username to your own:
Now we need to copy the contents of the id_rsa.pub file to the remote machine. It is very easy to do this (do not forget to change the data to your own):

Now we just log in and no longer ask us for a password. And so now it will always be.
Executing commands on a remote server without creating a shell session
In addition to opening a shell session on a remote system, ssh also allows individual commands to be executed on the remote system. For example, to run the tree command on a remote host named remote-sys and display the results on the local system, you would do this:
My real-life example:

Using this technique, you can do interesting things, such as executing the ls command on the remote system and redirecting the output to a file on the local system:
Real example:

Note the single quotes in the above command. This is because we do not want the path expansion to be done on the local machine; since we need this execution on a remote system. Also, if we want to redirect standard output to a file on a remote machine, we can put the redirect statement and the filename inside single quotes:
Sending stdout from local machine to remote ssh
An equally interesting version of command execution is shown a little above:
Opening a graphics program located on a remote computer
The next trick requires two Linux computers. Unfortunately, not even Cygwin can handle this trick. Moreover, both Linux'a must be with a graphical user interface.
Tunneling with SSH
Among other things, what happens when a connection is made to a remote host via SSH is the creation of an encrypted tunnel that forms between the local and remote systems. Typically, this tunnel is used to ensure that commands typed on the local machine are safely transmitted to the remote machine, and the result is also safely sent back.
In addition to this basic function, SSH allows most types of traffic to be routed over an encrypted tunnel, creating a kind of VPN (virtual private network) between the local and remote systems.
Perhaps the most commonly used of these features is the ability to broadcast X Window System traffic. On a system running an X server (these are machines that have a graphical user interface), it is possible to run an X client program (graphical application) on a remote system and see the results of its work on the local system. This is easy to do. For example, I want to connect to the remote host remote-sys and on that I want to run the xload program. At the same time, I will be able to see the graphical output of this program on the local computer. This is done like this:
Real example:
Those. SSH is started with the -X switch. And then the program just starts. Take a look at the screenshot.

I am on Kali Linux. I am successfully logging into the remote computer via SSH. After that, I ran the gedit program. This program may not even be present on Kali Linux, but it certainly is in Linux Mint, to which I connected. I can see the result of this program on the screen as if the program was running locally. But again, I want you to understand this, there is no running gedit program on the local computer. If I want to save the result of the work of gedit (or any other program opened in this way), then it turns out that it works in the environment of the remote computer, sees its file system, etc. This is convenient when you want to configure the remote computer using a graphical interface ...
You will learn how to transfer an image from the entire desktop in the same article later, in the section "How to configure VNC over SSH".
On some systems, this "focus" requires the use of the -Y option instead of the -X option.
Copy from / to remote computer (scp and sftp) sscp
The OpenSSH package also includes two programs that use an encrypted SSH tunnel to copy files over the network. The first program, scp ("copy safe"), is used more often, as is the similar cp program for copying files. The most noticeable difference is that the source of the file can be a remote host followed by a colon and the location of the file. For example, if we want to copy a document named document.txt from our home directory to the remote-sys system in the current working directory on our local system, we can do this:
Real example:

To copy a file from a local machine to a remote one:
Real example:
In the send command:
Memo:
To copy a file from B to A when logged in to B:
Copying a file from B to A when logged in to A:
sftp
The second program for file copying over SSH is sftp. As its name suggests, it is a safe substitute for ftp programs. sftp works like the original ftp program. However, instead of sending in clear text, it uses an encrypted SSH tunnel. An important advantage of sftp over ftp is that it does not require a running FTP server on the remote host. It only requires an SSH server. This means that any remote machine that is connected via an SSH client can also be used as an FTP-like server. Here's an example session:
The SFTP protocol is supported by many graphical file managers found in Linux distributions. Using both Nautilus (GNOME) and Konqueror (KDE), we can enter URIs (links) starting with sftp: // into the navigation bar and work with files located on a remote system running an SSH server.
It is of course possible to bring up NFS over an ssh tunnel to achieve this, but it would be too overkill to use once. Hence the question: is there a way to edit a file located on another computer via ssh?
This is when vim (short for "Vi IMproved" - improved Vi) can help. vim can be thought of as "vi on steroids", with extensible features that greatly enhance the default vi environment. The extensibility of vim is achieved through the use of "plugins". One of these plugins is netrw, which enables reading and writing files over the network. netrw supports a variety of application layer protocols including ftp, http, scp, rsync, and rcp.
If you want to edit a remote file over ssh using vim, you can do this.
Real example command:
Notice the double slash "/" for the root directory on the remote host. The above vim command will open a file hosted on the remote host for editing. Behind the scenes, vim uses scp to retrieve the requested file from the remote host, places the file in / tmp, and finally opens it up for editing.
When you try to save the changes to the file, the changes are first applied to the local copy in / tmp, which is then uploaded via scp to the remote host.
Since networking is handled behind the scenes by the netrw plugin, you can edit any remote file transparently using the traditional vi interface.
Note, this trick does not work in Cygwin - only in real Linux.
How to compare files on a remote computer (run diff command) via SSH
diff is a command line utility that compares the contents of two files (or directories) and shows how they differ line by line. It is very easy to use diff when both files are located on the local host. But what if (one or both) of the input files are located on a remote host? You can use SSH to compare these files over the network. Here's how to apply diff command to remote files over SSH.
The diff utility accepts a single operand in stdin form (represented by "-"), and you can use this feature to achieve the purpose of using diff over SSH as follows.

The above command will ask you for the SSH password for the remote host. After entering the correct password, the command will read the contents of the remote file via SSH and then pipe it to the diff utility for comparison with the local file.
Another method for comparing the contents of a file over SSH is the clear use of input redirection. To use this second method, you must first enable wireless ssh login to the remote host (s). Assuming it's done, you can do the following:
To compare (diff) a local file and a remote file:

To compare (diff) two remote files:
Note that the latter commands will fail if remote hosts require you to enter an SSH password to access. Also remember that the above input redirection is not supported by the sh shell. Use a bash shell or something compatible.
How to set up VNC over ssh
By its very nature, VNC is not a secure protocol. A well-known security risk for VNC is that the connection to the VNC server is made over the network over an unencrypted channel. Those. anyone can steal an established VNC session. To protect against VNC sniffing, you should try additional out-of-band encryption mechanisms, either under or over the VNC connection.
One such mechanism is setting up a VNC session over an SSH tunnel. In this tutorial, I will describe how to set up VNC over SSH on Linux.
I assume that you already have a VNC server somewhere on the network that we will be connecting to.
To create an SSH tunnel to a remote host running a VNC server, the remote host must also have SSH running. Therefore, first, install the OpenSSH server on a remote host (how to do this is described in the first part).
The next step is to create an SSH tunnel from the local host to the remote host. To do this, run the following command. Here 5900 is the port number that the remote VNC server is listening on.
After entering the SSH password and successfully logging in, an SSH tunnel will be established between 127.0.0.1:5900 and remote_host: 5900.
You can now go ahead and run the VNC client on your localhost. In your VNC client, connect to 127.0.0.1:5900 instead of the remote VNC server. Then the VNC traffic will be redirected through the SSH tunnel between you and the remote VNC server and, therefore, it will be safe from packet sniffing.

How to enable X11 forwarding using ssh
X11 forwarding is a mechanism that allows the graphical interface of X11 programs running on a remote Linux server to be displayed on the local client machine. Behind the scenes, the X11 output of a remotely running program is authorized to be sent to the localhost over an X11 connection between the client and the remote server. SSH has options to securely tunnel such X11 connections so that the X11 forwarding session is encrypted and encapsulated. If you want to set up X11 forwarding over SSH, see this tutorial.
X11 forwarding does not require the remote server host to have a complete X11 system installed. However, the server host needs at least xauth installed. xauth is a utility that maintains the Xauthority configuration used by the server and client to authenticate X11 sessions. To install xauth, do the following on the remote server.
For Debian etc. (4.0) and later and Ubuntu 7.04 and later:
For Debian lenny (5.0) and up and Ubuntu 7.10 and up:
Then enable X11 redirection in sshd and start sshd as follows.
The above setting will enable X11 forwarding on the entire server host system. If you instead want to enable X11 forwarding on a per user basis, you can use a per user specific ssh config file (e.g. $ HOME / .ssh / config). Thus, you can only use X11 forwarding when you are running ssh on a specific user account.
Unlike a remote server host, a local client machine needs an X11 system installed to display the remote running X11 program. If everything is so, then in this case you can open ssh connections from the local machine to the remote server as follows.
Once logged in, you can normally run any X11 program on the remote server, and its output will be displayed on the local client machine.
OpenSSH is an open source implementation of the SSH protocol that encrypts a network connection using a suite of programs. If you would like to have SSH on Linux, you can install OpenSSH, which consists of an OpenSSH server and client packages.
OpenSSH server / client packages come with the following utilities:
- OpenSSH сервер: sshd (SSH daemon)
- OpenSSH client: scp (secure remote copy), sftp (secure file transfer), slogin / ssh (secure remote login), ssh-add (private key addition), ssh-agent (authentication agent), ssh-keygen (authentication key management ).
Installing OpenSSH Server and Client on Linux
If you want to install the OpenSSH server / client and set up the OpenSSH server to start automatically, follow the instructions below, which differ depending on the distribution.
Debian, Ubuntu or Linux Mint
Code:
$ sudo apt-get install openssh-server openssh-clientOn Debian based systems, immediately after installation, OpenSSH will start automatically at boot. If for some reason the OpenSSH server does not start automatically at system startup, you can run the following command to unambiguously add ssh to boot at system startup.
Code:
$ sudo update-rc.d ssh defaultsFedora and CentOS / RHEL 7
Code:
$ sudo yum -y install openssh-server openssh-clients
$ sudo systemctl start sshd service
$ sudo systemctl enable sshd.service
CentOS/RHEL 6
Code:
$ sudo yum -y install openssh-server openssh-clients
$ sudo service sshd start
$ sudo chkconfig sshd on
Arch Linux
Code:
$ sudo pacman -Sy openssh
$ sudo systemctl start sshd service
$ sudo systemctl enable sshd.service
OpenSSH server setup
If you want to configure the OpenSSH server, you can edit the system-wide configuration file located in / etc / ssh / sshd_config.
There are a couple of OpenSSH options you might be interested in:
Code:
Port 22By default, sshd listens on port 22 and listens for incoming ssh connections. By changing the default port for ssh, you can prevent various automated hacker attacks.
Code:
ListenAddress 192.168.1.1If your machine has more than one physical network interface, you may want to check which one is associated with sshd, you can use the ListenAddress option to do this. This option helps improve security by restricting incoming SSH only through a specific interface.
Code:
HostKey /etc/ssh/ssh_host_keyThe HostKey option defines where the personal host key is located.
Code:
PermitRootLogin noOption PermitRootLogin - Whether root can log in via ssh.
Code:
AllowUsers alice bobUsing the AllowUsers option you can selectively disable the ssh service for specific Linux users. Multiple users can be specified, separated by spaces.
After / etc / ssh / sshd_config has been modified, make sure to restart the ssh service.
To restart OpenSSH on Debian, Ubuntu or Linux Mint:
Code:
$ sudo /etc/init.d/ssh restartTo restart OpenSSH on Fedora, CentOS / RHEL 7, or Arch Linux:
Code:
$ sudo systemctl restart sshd.serviceTo restart OpenSSH on CentOS / RHEL 6:
Code:
$ sudo service sshd restartHow to connect to SSH
Connecting to SSH from Linux
Linux users do not need to install additional software.
Connecting to SSH from Windows
For Windows, many people recommend and use PuTTY successfully. I have nothing against this program, but I prefer and recommend Cygwin myself.
Cygwin is not just an SSH client. It is a powerful combine that supports many Linux commands. For example, it is very easy to create SSL certificates in Cygwin (just like in Linux). In Windows, you need to dance with a tambourine to create self-signed certificates. Cygwin is very convenient to use cURL (you don't need to install anything separately), etc. Those who lack the command line and Linux programs on Windows will find an outlet for themselves in Cygwin.
Installing Cygwin is straightforward. Go to the official website and download the 32-bit or 64-bit version.
A tiny file is downloaded - this is the installer. The installer is graphical. Although it contains a large number of options, they are all fairly simple and many are familiar from other graphical installers. If something is not clear, just click "Next". Perhaps only the following window can be confusing:
All items available for installation are presented here. We don't need to understand them right now. Since the most requested ones are already marked for installation. And if something is missing in the future, then you can easily install the necessary one.
SSH connection (common for Linux and Windows)
Linux users open a console, Windows users type in Cygwin.
SSH needs the following information to connect:
- IP or hostname
- port number
- Username
- user password
Two of these parameters SSH can assume: username and port number. If no port is specified, the default port is assumed. If no user is specified, then the same name is used as in the system from which the connection is made. For example, the host address for the connection is 192.168.1.36. If I type
Code:
ssh 192.168.1.36I see the following
Code:
Alex@MiAl-PC ~
$ ssh 192.168.1.36
The authenticity of host '192.168.1.36 (192.168.1.36)' can't be established.
ECDSA key fingerprint is SHA256:sIxZeSuiivoEQ00RXAQHxylxuEA8SC5r/YPhL8wfp8s.
Are you sure you want to continue connecting (yes/no)?
Since I am connecting to the host for the first time, it is an unknown host. They ask me if I want to continue. I type yes:
Code:
Warning: Permanently added '192.168.1.36' (ECDSA) to the list of known hosts.
Alex@192.168.1.36's password:
Okay, host 192.168.1.36 has been added to the list of familiar hosts. I am prompted for a password for user Alex. Since there is no such user on the server with SSH, but I press Ctrl + C (to break) and enter the command along with the username of the remote system. The user is entered before the address of the remote machine and is separated from the address by the @ symbol. The @ symbol in English is read as at and can be translated as "in". Those. mial@192.168.1.36 can be interpreted as "user mial on machine 192.168.1.36".
Code:
ssh mial@192.168.1.36The Alex @ MiAl-PC invitation was replaced by the mial @ mint invitation. This means that we are already on a remote machine, that is, we already have a connection. If you need to specify a port (if it differs from the standard one), then the port must be specified after the -p switch. For example like this:
Code:
ssh mial@192.168.1.36 -p 10456After connecting, we are greeted with something like this:
Code:
Linux mint 3.16.0-4-amd64 #1 SMP Debian 3.16.7-ckt11-1 (2015-05-24) x86_64
The programs included with the Debian GNU/Linux system are free software;
the exact distribution terms for each program are described in the
individual files in /usr/share/doc/*/copyright.
Debian GNU/Linux comes with ABSOLUTELY NO WARRANTY, to the extent
permitted by applicable law.
Last login: Tue Jun 16 15:32:25 2021 from 192.168.1.35
It follows that the remote machine is Linux Mint, with kernel 3.16, 64-bit version. Also important information about the time of the last login and the IP address from which the connection originated. If the time and IP are unfamiliar to you, and you are the only user, then your system is compromised and you need to take appropriate action.
Let's type a few commands to make sure where we are and who we are: pwd, uname -a, etc.:
To end the session (disconnect), type
Code:
exitOr press Ctrl + D.
Login to SSH without entering a password
First, it's just more convenient. Secondly, it is safer.First, we need to create rsa keys. If you are a Linux user, then you are fine. If you are a Windows user, but you did not listen to my advice and chose PuTTY, then you have a problem and think for yourself how to solve it. If you have Cygwin, then everything is also fine.
If you managed to log in to the remote system, log out. Then type
Code:
ssh-keygen -t rsaWe are asked for the file name, no need to enter anything, the default name will be used. The password is also asked. I do not enter a password.
Now on the remote machine, we need to create a .ssh directory. The execution of the command on a remote machine will be described below. For now, just copy the command, remembering to change the IP address and username to your own:
Code:
ssh mial@192.168.1.36 mkdir .sshNow we need to copy the contents of the id_rsa.pub file to the remote machine. It is very easy to do this (do not forget to change the data to your own):
Code:
cat .ssh/id_rsa.pub | ssh mial@192.168.1.36 'cat >> .ssh/authorized_keys'Now we just log in and no longer ask us for a password. And so now it will always be.
Executing commands on a remote server without creating a shell session
In addition to opening a shell session on a remote system, ssh also allows individual commands to be executed on the remote system. For example, to run the tree command on a remote host named remote-sys and display the results on the local system, you would do this:
Code:
ssh remote-sys treeMy real-life example:
Code:
ssh mial@192.168.1.36 treeUsing this technique, you can do interesting things, such as executing the ls command on the remote system and redirecting the output to a file on the local system:
Code:
ssh remote-sys 'ls *' > dirlist.txtReal example:
Code:
ssh mial@192.168.1.36 'ls *' > dirlist.txt
cat dirlist.txt
Note the single quotes in the above command. This is because we do not want the path expansion to be done on the local machine; since we need this execution on a remote system. Also, if we want to redirect standard output to a file on a remote machine, we can put the redirect statement and the filename inside single quotes:
Code:
ssh remote-sys 'ls * > dirlist.txt'Sending stdout from local machine to remote ssh
An equally interesting version of command execution is shown a little above:
Code:
cat .ssh/id_rsa.pub | ssh mial@192.168.1.36 'cat >> .ssh/authorized_keys'- The cat command reads and displays the contents of the .ssh / id_rsa.pub file on the local machine line by line.
- | (pipe) passes what should appear on stdout to another command.
- Instead of a command that should have processed the lines passed to it, a connection is made to the remote system (ssh mial@192.168.1.36).
- The remote system receives lines for which the cat >> .ssh / authorized_keys command is provided. Those. the contents of standard output are written line by line to the .ssh / authorized_keys file on the remote machine.
Opening a graphics program located on a remote computer
The next trick requires two Linux computers. Unfortunately, not even Cygwin can handle this trick. Moreover, both Linux'a must be with a graphical user interface.
Tunneling with SSH
Among other things, what happens when a connection is made to a remote host via SSH is the creation of an encrypted tunnel that forms between the local and remote systems. Typically, this tunnel is used to ensure that commands typed on the local machine are safely transmitted to the remote machine, and the result is also safely sent back.
In addition to this basic function, SSH allows most types of traffic to be routed over an encrypted tunnel, creating a kind of VPN (virtual private network) between the local and remote systems.
Perhaps the most commonly used of these features is the ability to broadcast X Window System traffic. On a system running an X server (these are machines that have a graphical user interface), it is possible to run an X client program (graphical application) on a remote system and see the results of its work on the local system. This is easy to do. For example, I want to connect to the remote host remote-sys and on that I want to run the xload program. At the same time, I will be able to see the graphical output of this program on the local computer. This is done like this:
Code:
ssh -X remote-sys
xload
Real example:
Code:
ssh -X mial@192.168.1.36
gedit
Those. SSH is started with the -X switch. And then the program just starts. Take a look at the screenshot.
I am on Kali Linux. I am successfully logging into the remote computer via SSH. After that, I ran the gedit program. This program may not even be present on Kali Linux, but it certainly is in Linux Mint, to which I connected. I can see the result of this program on the screen as if the program was running locally. But again, I want you to understand this, there is no running gedit program on the local computer. If I want to save the result of the work of gedit (or any other program opened in this way), then it turns out that it works in the environment of the remote computer, sees its file system, etc. This is convenient when you want to configure the remote computer using a graphical interface ...
You will learn how to transfer an image from the entire desktop in the same article later, in the section "How to configure VNC over SSH".
On some systems, this "focus" requires the use of the -Y option instead of the -X option.
Copy from / to remote computer (scp and sftp) sscp
The OpenSSH package also includes two programs that use an encrypted SSH tunnel to copy files over the network. The first program, scp ("copy safe"), is used more often, as is the similar cp program for copying files. The most noticeable difference is that the source of the file can be a remote host followed by a colon and the location of the file. For example, if we want to copy a document named document.txt from our home directory to the remote-sys system in the current working directory on our local system, we can do this:
Code:
scp remote-sys:document.txt .
document.txt 100% 177 0.2KB/s 00:00
Real example:
Code:
# delete the file on the local machine, if any
rm dirlist.txt
# create a file on the remote machine
ssh mial@192.168.1.36 'ls * > dirlist.txt'
# check if it exists
ssh mial@192.168.1.36 'ls -l'
# copy it to the local machine
scp mial@192.168.1.36: dirlist.txt.
# check its contents
cat dirlist.txt
To copy a file from a local machine to a remote one:
Code:
scp file-local remote-sys :.Real example:
Code:
# create a new file
touch nfile.txt
# send the file
scp nfile.txt mial@192.168.1.36:.
nfile.txt 100% 0 0.0KB/s 00:00
# check if the file exists on the remote machine
ssh mial@192.168.1.36 'ls -l'
In the send command:
- nfile.txt - file name,
- mial@192.168.1.36 - username and remote host,
- ... (dot) means that the file should be copied to the current working directory on the remote server, while the file name will remain the same, i.e. nfile.txt
Memo:
To copy a file from B to A when logged in to B:
Code:
scp /path/to/file username@a:/path/to/destinationCopying a file from B to A when logged in to A:
Code:
scp username@b:/path/to/file /path/to/destinationsftp
The second program for file copying over SSH is sftp. As its name suggests, it is a safe substitute for ftp programs. sftp works like the original ftp program. However, instead of sending in clear text, it uses an encrypted SSH tunnel. An important advantage of sftp over ftp is that it does not require a running FTP server on the remote host. It only requires an SSH server. This means that any remote machine that is connected via an SSH client can also be used as an FTP-like server. Here's an example session:
Code:
Alex@MiAl-PC ~
$ sftp mial@192.168.1.36
Connected to 192.168.1.36.
sftp> ls
dirlist.txt newfile.txt
nfile.txt temp
Video Documents
Downloads Images
Music Public
Desktop Templates
sftp> lls
dirlist.txt nfile.txt
sftp> ls temp
temp / TakeMeHome
sftp> cd temp/
sftp> get TakeMeHome
Fetching /home/mial/temp/TakeMeHome to TakeMeHome
sftp> bye
The SFTP protocol is supported by many graphical file managers found in Linux distributions. Using both Nautilus (GNOME) and Konqueror (KDE), we can enter URIs (links) starting with sftp: // into the navigation bar and work with files located on a remote system running an SSH server.
It is of course possible to bring up NFS over an ssh tunnel to achieve this, but it would be too overkill to use once. Hence the question: is there a way to edit a file located on another computer via ssh?
This is when vim (short for "Vi IMproved" - improved Vi) can help. vim can be thought of as "vi on steroids", with extensible features that greatly enhance the default vi environment. The extensibility of vim is achieved through the use of "plugins". One of these plugins is netrw, which enables reading and writing files over the network. netrw supports a variety of application layer protocols including ftp, http, scp, rsync, and rcp.
If you want to edit a remote file over ssh using vim, you can do this.
Code:
$ sudo apt-get install vim
$ vim scp://user@remote_host//home/user/path/file
Real example command:
Code:
vim scp://root@192.168.1.37//root/prs.txtNotice the double slash "/" for the root directory on the remote host. The above vim command will open a file hosted on the remote host for editing. Behind the scenes, vim uses scp to retrieve the requested file from the remote host, places the file in / tmp, and finally opens it up for editing.
When you try to save the changes to the file, the changes are first applied to the local copy in / tmp, which is then uploaded via scp to the remote host.
Since networking is handled behind the scenes by the netrw plugin, you can edit any remote file transparently using the traditional vi interface.
Note, this trick does not work in Cygwin - only in real Linux.
How to compare files on a remote computer (run diff command) via SSH
diff is a command line utility that compares the contents of two files (or directories) and shows how they differ line by line. It is very easy to use diff when both files are located on the local host. But what if (one or both) of the input files are located on a remote host? You can use SSH to compare these files over the network. Here's how to apply diff command to remote files over SSH.
The diff utility accepts a single operand in stdin form (represented by "-"), and you can use this feature to achieve the purpose of using diff over SSH as follows.
Code:
$ ssh user@remote_host "cat remote_file.txt" | diff — local_file.txtThe above command will ask you for the SSH password for the remote host. After entering the correct password, the command will read the contents of the remote file via SSH and then pipe it to the diff utility for comparison with the local file.
Another method for comparing the contents of a file over SSH is the clear use of input redirection. To use this second method, you must first enable wireless ssh login to the remote host (s). Assuming it's done, you can do the following:
To compare (diff) a local file and a remote file:
Code:
$ diff local_file.txt <(ssh user@remote_host 'cat remote_file.txt')To compare (diff) two remote files:
Code:
$ diff <(ssh user@remote_host 'cat remote_file.txt') <(ssh user2@remote_host2 'cat remote_file2.txt')Note that the latter commands will fail if remote hosts require you to enter an SSH password to access. Also remember that the above input redirection is not supported by the sh shell. Use a bash shell or something compatible.
How to set up VNC over ssh
By its very nature, VNC is not a secure protocol. A well-known security risk for VNC is that the connection to the VNC server is made over the network over an unencrypted channel. Those. anyone can steal an established VNC session. To protect against VNC sniffing, you should try additional out-of-band encryption mechanisms, either under or over the VNC connection.
One such mechanism is setting up a VNC session over an SSH tunnel. In this tutorial, I will describe how to set up VNC over SSH on Linux.
I assume that you already have a VNC server somewhere on the network that we will be connecting to.
To create an SSH tunnel to a remote host running a VNC server, the remote host must also have SSH running. Therefore, first, install the OpenSSH server on a remote host (how to do this is described in the first part).
The next step is to create an SSH tunnel from the local host to the remote host. To do this, run the following command. Here 5900 is the port number that the remote VNC server is listening on.
Code:
$ ssh user@remote_host -L 5900:127.0.0.1:5900After entering the SSH password and successfully logging in, an SSH tunnel will be established between 127.0.0.1:5900 and remote_host: 5900.
You can now go ahead and run the VNC client on your localhost. In your VNC client, connect to 127.0.0.1:5900 instead of the remote VNC server. Then the VNC traffic will be redirected through the SSH tunnel between you and the remote VNC server and, therefore, it will be safe from packet sniffing.
Code:
gvncviewer 127.0.0.1How to enable X11 forwarding using ssh
X11 forwarding is a mechanism that allows the graphical interface of X11 programs running on a remote Linux server to be displayed on the local client machine. Behind the scenes, the X11 output of a remotely running program is authorized to be sent to the localhost over an X11 connection between the client and the remote server. SSH has options to securely tunnel such X11 connections so that the X11 forwarding session is encrypted and encapsulated. If you want to set up X11 forwarding over SSH, see this tutorial.
X11 forwarding does not require the remote server host to have a complete X11 system installed. However, the server host needs at least xauth installed. xauth is a utility that maintains the Xauthority configuration used by the server and client to authenticate X11 sessions. To install xauth, do the following on the remote server.
For Debian etc. (4.0) and later and Ubuntu 7.04 and later:
Code:
$ sudo apt-get install xbase-clientsFor Debian lenny (5.0) and up and Ubuntu 7.10 and up:
Code:
$ sudo apt-get install xauthThen enable X11 redirection in sshd and start sshd as follows.
Code:
$ sudo vim /etc/ssh/sshd_config
X11Forwarding yes
$ sudo /etc/init.d/sshd restart
The above setting will enable X11 forwarding on the entire server host system. If you instead want to enable X11 forwarding on a per user basis, you can use a per user specific ssh config file (e.g. $ HOME / .ssh / config). Thus, you can only use X11 forwarding when you are running ssh on a specific user account.
Code:
$ vim $HOME/.ssh/config file
ForwardX11 yes
Unlike a remote server host, a local client machine needs an X11 system installed to display the remote running X11 program. If everything is so, then in this case you can open ssh connections from the local machine to the remote server as follows.
Code:
$ ssh -X user@remote_serverOnce logged in, you can normally run any X11 program on the remote server, and its output will be displayed on the local client machine.