Hacker
Professional
- Messages
- 1,041
- Reaction score
- 850
- Points
- 113
Why do I need SSH for carding?
Every system administrator or network engineer at least once in his practice has encountered a situation when you need to get access from the public Internet to the resources of your work network, hidden behind NAT and protected by a firewall.
Of course, you can set up an encrypted site-to-site tunnel or PPTP to solve this problem.
Or use a third-party application for organizing remote access, such as TeamViewer. However, there is a simpler solution, which will take literally one minute to implement. In addition, this solution does not require any third-party software, except for the OpenSSH package included by default in 90% of Linux/Unix distributions.
After reading this article, you will learn how, in addition to implementing normal remote access, you can organize a socks proxy, publish a service, link several resources behind NAT through the double tunneling method, and much more.
How SSH tunneling works
SSH tunnel or SSH Port Forwarding, as man calls it (1) ssh is an optional protocol functionality that works on top of the familiar regular SSH session. An SSH tunnel allows you to send a TCP packet from one side of an SSH connection to the other side and translate the IP header according to a predefined rule during transmission.
Understanding how an SSH tunnel works is very simple: if you represent it as a point-to-point connection. Just like in PPP, any packet that hits one end of the connection,
it will be transmitted and received at the other end of the tunnel. Then, depending on the destination address specified in the IP header, the packet will either be processed by the receiving side of the tunnel (if the packet is intended directly to it), or it will be routed further into the network (if the destination is another network node).
The main difference between an SSH tunnel and a PPP connection is that only TCP traffic can be wrapped in an SSH tunnel. (Note: There are a few hacks on how to send UDP over a TCP socket inside an SSH tunnel, but this solution is beyond the scope of this article.)
The second difference is that in a point-to-point connection, incoming traffic can be initiated from either side, whereas for an SSH tunnel, you must explicitly set the "entry point" for traffic. The "entry point" is a parameter of the <address>format:<port> that specifies which socket to open to enter the tunnel (from the local or remote side of the SSH session).
In addition to the entry point, you must also specify a <address>rule:<port>, which should be used to rewrite the header (more precisely, the address and destination port) of the TCP packet during transmission. The entry point can be set from either end of the tunnel. The –L (local) and –R (remote) keys are responsible for this parameter. Local and remote refer to the tunnel sides from the point of view of the originator side, that is, the host that sets up the SSH session.
So far, it looks a little confusing, so let's look at a specific example.
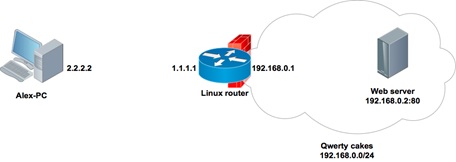
Direct SSH tunnel - we provide access to the server behind NAT
Alex works as a system administrator for a small apple pie company called Qwerty Cakes. The entire company's network is located in the same broadcast domain 192.168.0.0 / 24. For Internet access, a Linux-based software router is used, the address of which is 192.168.0.1 on the company's network side and 1.1.1.1 on the Internet side. The OpenSSD daemon is up and running on the router, which is available via socket 1.1.1.1: 22.
Alex comes home and after dinner sets up the next connection to the company's router:

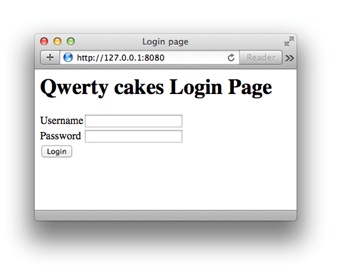
What happened? Alex set up an SSH session between the addresses 2.2.2.2 and 1.1.1.1, while opening a local" entry point " to the tunnel 127.0.0.1: 8080 on his home computer:
Any TCP packet that reaches the 127.0.0.1:8080 socket from Alex's computer will be sent over the point-to-point connection inside the SSH session, and the destination address in the TCP header will be overwritten from 127.0.0.1 to 192.168.0.2, and the port from 8080 to 80.
Now, to get to the portal of his company, Alex just needs to type in the browser:
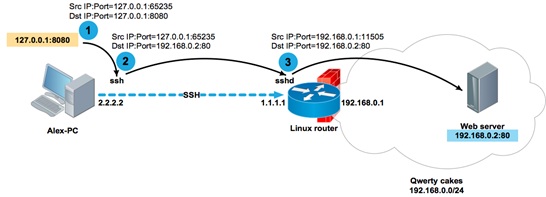
How do network packets pass through an SSH tunnel?
Let's take a closer look at what happened to a TCP packet during its passage through the SSH tunnel:
1. A TCP packet with a source address of 127.0.0.1 and a destination address and port of 127.0.0.1:8080 hit the socket 127.0.0.1:8080 opened by the ssh process;
2. The ssh process received the packet, copied the destination address and port to 192.168.0.2: 80 in accordance with the translation rule, and sent it inside the SSH session to the remote party 1.1.1.1;
3. The sshd process on the router 1.1.1.1 received the packet and, after viewing the destination address, sent it to the host 192.168.0.2, while rewriting the source address from 127.0.0.1 to the address of its own interface 192.168.0.1, so that the recipient, who does not know anything about the existence of the SSH tunnel, returned the packet to the router, and did not send it to its own localhost 127.0.0.1.
In this example, if the portal or any other resource that Alex needs to access was located on the router itself (for example, at 192.168.0.1:80), the command would look like this:

If the service is available at the localhost address (for example, a local SQL server), then you can also access it:
Constructs like -L 127.0.0.1:80:127.0.0.1:80 may look rather strange at first glance. But there is nothing complicated about them, if you remember that the decision to route a packet is made on the remote side of the tunnel. You need to remember the basic rule: the second pair <address>:<port> is handled by the remote side of the tunnel.
Therefore, a packet with the destination address 127.0.0.1 in the translation rule will be processed by the second party of the SSH session, and nothing else.
As you probably already guessed, the tunnel entry point can be created not only on the loopback interface. If you want to make the tunnel accessible not only to the local host, but also to other network participants, then you can specify the real interface address as the socket address.
Alex's computer Alex-PC has two network interfaces with addresses 2.2.2.2 and 10.0.0.5. When establishing a session, ssh opens the socket 10.0.0.5: 8080 on Alex-PC. Now Alex can access the 192.168.0.2:80 portal from his laptop with the address 10.0.0.4 and from his entire home network 10.0.0.0 / 24.
Reverse SSH tunnel - expose your resources to the Internet
As I said earlier, the tunnel entry point can be opened not only from the originator of the ssh session, but also from the remote side, that is, from the one to which we are installing the ssh session. To do this, use the-R parameter instead of the-L parameter. Why is this necessary?
For example, so that you can publish a local service for remote access.
The apache Web server available at 127.0.0.1 with a test copy of the company's portal is running on Alex's laptop. Alex needs to give access to the Web server to his colleagues to test the interface. In general, for such purposes, it would be a good idea for Alex to implement a more reliable test sandbox. But since our Alex is nothing more than a virtual character in this article, he sets up a session between his laptop and the Linux router to demonstrate how the SSH tunnel works.

As you can see, on the router, the sshd process has opened a local socket 8080
Let's see what happens to a TCP packet sent from computer 192.168.0.200 towards the test portal published at 192.168.0.1: 8080:
1. A TCP packet with source address 192.168.0.200 and destination address and port 192.168.0.1:8080 will reach socket 192.168.0.1:8080 opened by the sshd process;
2. The sshd process, after receiving the packet, will rewrite the destination address and port from 192.168.0.1:8080 to 127.0.0.1:80 in accordance with the translation rule and send it inside the SSH session to the originator 2.2.2.2;
3. The ssh process on Alex's laptop, after receiving the packet and viewing its destination address, will rewrite the sender's address from 192.168.0.200 to its loopback address, and send it to the local socket 127.0.0.1: 80 opened by the apache process.
As you can see, the broadcast rules are very simple. The host that opens the socket for the tunnel translates the destination address and port according to the translation rule. The host on the opposite side of the tunnel replaces the source address and port according to its routing table. The routing table is necessary, firstly, in order to send the packet in the desired direction, and, secondly, in order to replace the source address with the interface address from which the packet will be sent.
One important note that I left at the end of the article.
If you use localhost instead of the real interface address when opening a tunnel entry point, then you can omit it, thus shortening the command with
This important syntax feature will be useful in the following example.
Double tunneling
Let's look at a slightly more complex example. The SQL-Tester user who is behind the NAT needs to access the database on the SQL server, which is also behind the NAT. SQL-Tester cannot establish a direct connection to the server, because there are no corresponding broadcasts in the server's NAT network. However, you can set up an SSH session with the intermediate server 3.3.3.3 from both hosts.
From the SQL server, we establish an SSH connection to the server 3.3.3.3 and open port 13306 on the loopback interface of the server 3.3.3.3, referring to the local SQL service running on the local socket 127.0.0.1:3306 of the SQL server:
Now, from the SQL-Tester client host, we establish a connection to 3.3.3.3 and open port 3306 on the client's loopback interface, which, in turn, refers to 127.0.0.1:13306 on the 3.3.3.3 server, which ... refers to 127.0.0.1:3306 on the SQL server. It's simple.
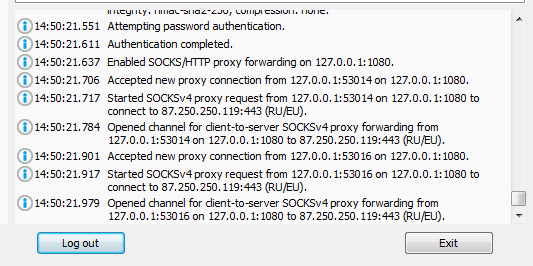
Dynamic Tunnel-SSH as a Socks proxy
Unlike tunnels with explicit translation rules, a dynamic tunnel works on a completely different principle. Instead of specifying an unambiguous mapping like address ort for each address and destination port, you open a socket on the local side of the SSH session, which turns your host into a proxy server running on the SOCKS4/SOCKS5 protocol. Let's analyze
Example:
Creating a dynamic tunnel socket 127.0.0.1: 5555 on the client host inside the SSH session to the 2.2.2.2 server
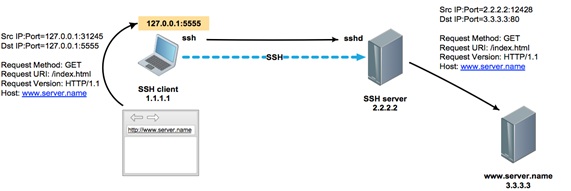
We check that the port is open
And we register a proxy in the settings of the browser or any other software that supports SOCKS proxy.
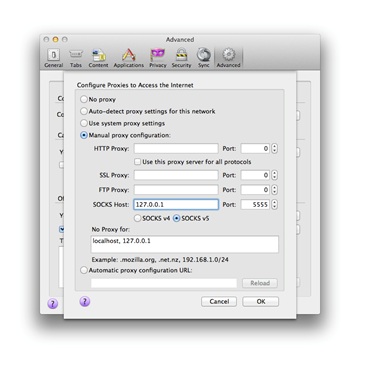
Now all browser traffic will go through the SOCKS proxy inside the encrypted SSH connection between hosts 1.1.1.1 and 2.2.2.2.
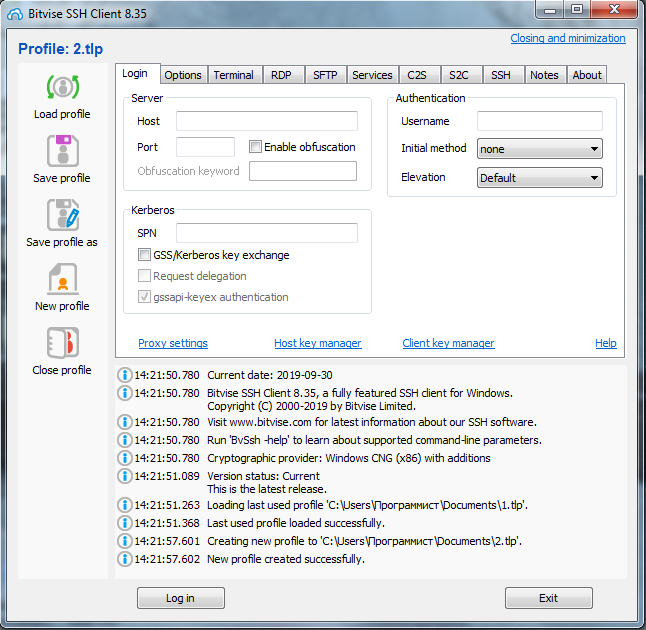
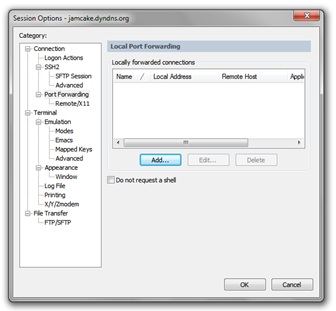
How to use SSH in Microsoft Windows?
After reading this article, you may decide that all the advantages of SSH tunnels are available only to users of Unix-like systems. However, this is not the case. Almost all Windows terminal clients running over SSH have tunneling support.
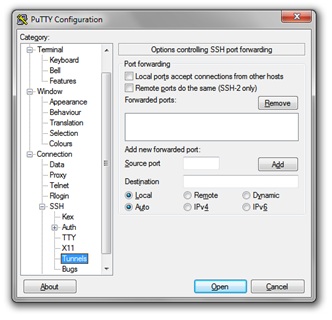
Putty
GeSecureCRT
For some time now, it is possible to use Windows not only as an SSH client. It is possible to install an SSH server on Windows.
When should I use SSH tunnels?
Of course, to create permanent tunnels on combat servers, you need to use special software. But for a quick solution to the problem of port forwarding, troubleshooting, getting fast remote access, and generally solving a specific problem “here and now”, the use of SSH tunnels is often a good help.
You can use them to build entire networks, tunnels within tunnels, and combine tunnel types. This can allow you to quickly get access to places where it would seem impossible to get.
Every system administrator or network engineer at least once in his practice has encountered a situation when you need to get access from the public Internet to the resources of your work network, hidden behind NAT and protected by a firewall.
Of course, you can set up an encrypted site-to-site tunnel or PPTP to solve this problem.
Or use a third-party application for organizing remote access, such as TeamViewer. However, there is a simpler solution, which will take literally one minute to implement. In addition, this solution does not require any third-party software, except for the OpenSSH package included by default in 90% of Linux/Unix distributions.
After reading this article, you will learn how, in addition to implementing normal remote access, you can organize a socks proxy, publish a service, link several resources behind NAT through the double tunneling method, and much more.
How SSH tunneling works
SSH tunnel or SSH Port Forwarding, as man calls it (1) ssh is an optional protocol functionality that works on top of the familiar regular SSH session. An SSH tunnel allows you to send a TCP packet from one side of an SSH connection to the other side and translate the IP header according to a predefined rule during transmission.
Understanding how an SSH tunnel works is very simple: if you represent it as a point-to-point connection. Just like in PPP, any packet that hits one end of the connection,
it will be transmitted and received at the other end of the tunnel. Then, depending on the destination address specified in the IP header, the packet will either be processed by the receiving side of the tunnel (if the packet is intended directly to it), or it will be routed further into the network (if the destination is another network node).
The main difference between an SSH tunnel and a PPP connection is that only TCP traffic can be wrapped in an SSH tunnel. (Note: There are a few hacks on how to send UDP over a TCP socket inside an SSH tunnel, but this solution is beyond the scope of this article.)
The second difference is that in a point-to-point connection, incoming traffic can be initiated from either side, whereas for an SSH tunnel, you must explicitly set the "entry point" for traffic. The "entry point" is a parameter of the <address>format:<port> that specifies which socket to open to enter the tunnel (from the local or remote side of the SSH session).
In addition to the entry point, you must also specify a <address>rule:<port>, which should be used to rewrite the header (more precisely, the address and destination port) of the TCP packet during transmission. The entry point can be set from either end of the tunnel. The –L (local) and –R (remote) keys are responsible for this parameter. Local and remote refer to the tunnel sides from the point of view of the originator side, that is, the host that sets up the SSH session.
So far, it looks a little confusing, so let's look at a specific example.
Direct SSH tunnel - we provide access to the server behind NAT
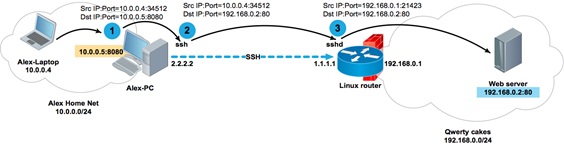
Alex works as a system administrator for a small apple pie company called Qwerty Cakes. The entire company's network is located in the same broadcast domain 192.168.0.0 / 24. For Internet access, a Linux-based software router is used, the address of which is 192.168.0.1 on the company's network side and 1.1.1.1 on the Internet side. The OpenSSD daemon is up and running on the router, which is available via socket 1.1.1.1: 22.
Alex comes home and after dinner sets up the next connection to the company's router:
What happened? Alex set up an SSH session between the addresses 2.2.2.2 and 1.1.1.1, while opening a local" entry point " to the tunnel 127.0.0.1: 8080 on his home computer:
Code:
alex@Alex-PC:~$ sudo lsof -nPi | grep 8080
ssh 3153 alex 4u IPv4 9862 0t0 TCP 27.0.0.1:8080 (LISTEN)
Any TCP packet that reaches the 127.0.0.1:8080 socket from Alex's computer will be sent over the point-to-point connection inside the SSH session, and the destination address in the TCP header will be overwritten from 127.0.0.1 to 192.168.0.2, and the port from 8080 to 80.
Now, to get to the portal of his company, Alex just needs to type in the browser:
How do network packets pass through an SSH tunnel?
Let's take a closer look at what happened to a TCP packet during its passage through the SSH tunnel:
1. A TCP packet with a source address of 127.0.0.1 and a destination address and port of 127.0.0.1:8080 hit the socket 127.0.0.1:8080 opened by the ssh process;
2. The ssh process received the packet, copied the destination address and port to 192.168.0.2: 80 in accordance with the translation rule, and sent it inside the SSH session to the remote party 1.1.1.1;
3. The sshd process on the router 1.1.1.1 received the packet and, after viewing the destination address, sent it to the host 192.168.0.2, while rewriting the source address from 127.0.0.1 to the address of its own interface 192.168.0.1, so that the recipient, who does not know anything about the existence of the SSH tunnel, returned the packet to the router, and did not send it to its own localhost 127.0.0.1.
Code:
alex@Alex-PC:~$ ssh -L
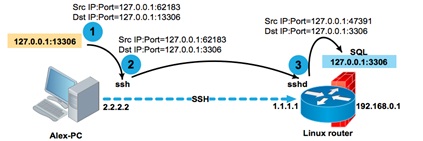
127.0.0.1:8080:192.0.0.2:80 alex@1.1.1.1In this example, if the portal or any other resource that Alex needs to access was located on the router itself (for example, at 192.168.0.1:80), the command would look like this:
Code:
alex@Alex-PC:~$ ssh -L 127.0.0.1:8080:192.0.0.1:80 alex@1.1.1.1If the service is available at the localhost address (for example, a local SQL server), then you can also access it:
Code:
alex@Alex-PC:~$ ssh -L
127.0.0.1:13306:127.0.0.1:3306 alex@1.1.1.1
Constructs like -L 127.0.0.1:80:127.0.0.1:80 may look rather strange at first glance. But there is nothing complicated about them, if you remember that the decision to route a packet is made on the remote side of the tunnel. You need to remember the basic rule: the second pair <address>:<port> is handled by the remote side of the tunnel.
Therefore, a packet with the destination address 127.0.0.1 in the translation rule will be processed by the second party of the SSH session, and nothing else.
As you probably already guessed, the tunnel entry point can be created not only on the loopback interface. If you want to make the tunnel accessible not only to the local host, but also to other network participants, then you can specify the real interface address as the socket address.
Code:
alex@Alex-PC:~$ ssh -L
10.0.0.5:8080:192.0.0.2:80 alex@1.1.1.1
Alex's computer Alex-PC has two network interfaces with addresses 2.2.2.2 and 10.0.0.5. When establishing a session, ssh opens the socket 10.0.0.5: 8080 on Alex-PC. Now Alex can access the 192.168.0.2:80 portal from his laptop with the address 10.0.0.4 and from his entire home network 10.0.0.0 / 24.
Reverse SSH tunnel - expose your resources to the Internet
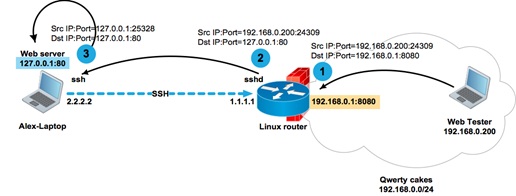
As I said earlier, the tunnel entry point can be opened not only from the originator of the ssh session, but also from the remote side, that is, from the one to which we are installing the ssh session. To do this, use the-R parameter instead of the-L parameter. Why is this necessary?
For example, so that you can publish a local service for remote access.
The apache Web server available at 127.0.0.1 with a test copy of the company's portal is running on Alex's laptop. Alex needs to give access to the Web server to his colleagues to test the interface. In general, for such purposes, it would be a good idea for Alex to implement a more reliable test sandbox. But since our Alex is nothing more than a virtual character in this article, he sets up a session between his laptop and the Linux router to demonstrate how the SSH tunnel works.
As you can see, on the router, the sshd process has opened a local socket 8080
Code:
alex@Router:~$
sudo lsof -nPi | grep 8080
sshd
17233 alex 9u IPv4
95930 0t0 TCP 192.168.0.1:8080 (LISTEN)
Let's see what happens to a TCP packet sent from computer 192.168.0.200 towards the test portal published at 192.168.0.1: 8080:
1. A TCP packet with source address 192.168.0.200 and destination address and port 192.168.0.1:8080 will reach socket 192.168.0.1:8080 opened by the sshd process;
2. The sshd process, after receiving the packet, will rewrite the destination address and port from 192.168.0.1:8080 to 127.0.0.1:80 in accordance with the translation rule and send it inside the SSH session to the originator 2.2.2.2;
3. The ssh process on Alex's laptop, after receiving the packet and viewing its destination address, will rewrite the sender's address from 192.168.0.200 to its loopback address, and send it to the local socket 127.0.0.1: 80 opened by the apache process.
As you can see, the broadcast rules are very simple. The host that opens the socket for the tunnel translates the destination address and port according to the translation rule. The host on the opposite side of the tunnel replaces the source address and port according to its routing table. The routing table is necessary, firstly, in order to send the packet in the desired direction, and, secondly, in order to replace the source address with the interface address from which the packet will be sent.
One important note that I left at the end of the article.
If you use localhost instead of the real interface address when opening a tunnel entry point, then you can omit it, thus shortening the command with
Code:
alex@Alex-PC:~$ ssh -L 127.0.0.1:8080:192.0.0.1:80 alex@1.1.1.1
before
alex@Alex-PC:~ssh -L
8080:192.0.0.1:80 alex@1.1.1.1
This important syntax feature will be useful in the following example.
Double tunneling
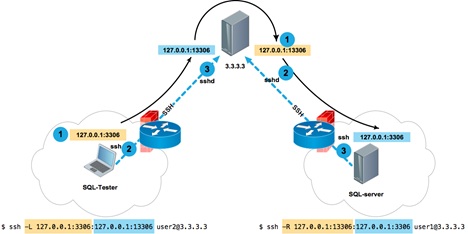
Let's look at a slightly more complex example. The SQL-Tester user who is behind the NAT needs to access the database on the SQL server, which is also behind the NAT. SQL-Tester cannot establish a direct connection to the server, because there are no corresponding broadcasts in the server's NAT network. However, you can set up an SSH session with the intermediate server 3.3.3.3 from both hosts.
From the SQL server, we establish an SSH connection to the server 3.3.3.3 and open port 13306 on the loopback interface of the server 3.3.3.3, referring to the local SQL service running on the local socket 127.0.0.1:3306 of the SQL server:
Code:
dbuser@SQL-server:~$ ssh -R 13306:127.0.0.1:3306
user1@3.3.3.3
Now, from the SQL-Tester client host, we establish a connection to 3.3.3.3 and open port 3306 on the client's loopback interface, which, in turn, refers to 127.0.0.1:13306 on the 3.3.3.3 server, which ... refers to 127.0.0.1:3306 on the SQL server. It's simple.
Code:
tester@SQL-Tester:~$ ssh -L
3306:127.0.0.1:13306 user2@3.3.3.3
Dynamic Tunnel-SSH as a Socks proxy
Unlike tunnels with explicit translation rules, a dynamic tunnel works on a completely different principle. Instead of specifying an unambiguous mapping like address
ort for each address and destination port, you open a socket on the local side of the SSH session, which turns your host into a proxy server running on the SOCKS4/SOCKS5 protocol. Let's analyzeExample:
Creating a dynamic tunnel socket 127.0.0.1: 5555 on the client host inside the SSH session to the 2.2.2.2 server
Code:
user@client:~$ ssh -D 5555 user@2.2.2.2We check that the port is open
Code:
user@client:~$ sudo lsof -nPi | grep 5555
ssh
7284 user 7u
IPv4 0x74fcb9e03a5ef5b1 0t0 TCP 127.0.0.1:5555 (LISTEN)
And we register a proxy in the settings of the browser or any other software that supports SOCKS proxy.
Now all browser traffic will go through the SOCKS proxy inside the encrypted SSH connection between hosts 1.1.1.1 and 2.2.2.2.
How to use SSH in Microsoft Windows?
After reading this article, you may decide that all the advantages of SSH tunnels are available only to users of Unix-like systems. However, this is not the case. Almost all Windows terminal clients running over SSH have tunneling support.
Putty
GeSecureCRT
For some time now, it is possible to use Windows not only as an SSH client. It is possible to install an SSH server on Windows.
When should I use SSH tunnels?
Of course, to create permanent tunnels on combat servers, you need to use special software. But for a quick solution to the problem of port forwarding, troubleshooting, getting fast remote access, and generally solving a specific problem “here and now”, the use of SSH tunnels is often a good help.
You can use them to build entire networks, tunnels within tunnels, and combine tunnel types. This can allow you to quickly get access to places where it would seem impossible to get.