
Windows is a comprehensive operating system with many hidden features. In this article, we'll talk about how to use it to its fullest.
Windows 10 is the most popular desktop operating system in the world. Although Windows 11 is out now, most of us will still have to work with the top 10 for a long time to come. And even if you use it every day, you will find a lot of new things for yourself in this article.
You may not consider yourself a power user or you just recently switched from macOS to Windows. Regardless of what brings you here, our tips will help you get the most from Windows 10. Some of the hidden features of the OS were also available in older versions of Windows, while others are new to this iteration.
Secret Start Menu
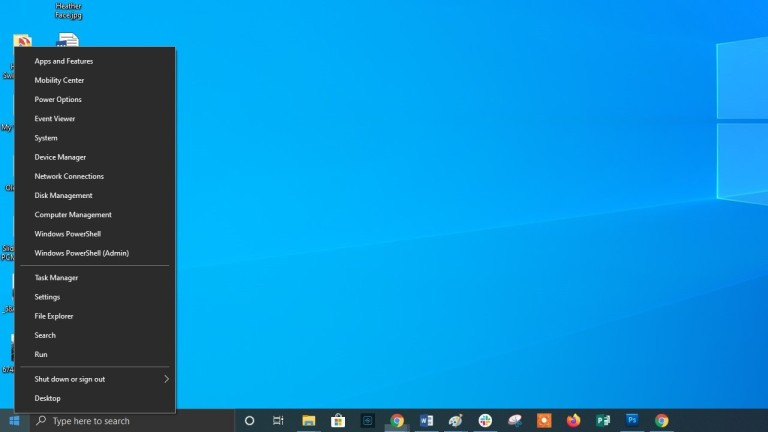
If you are a fan of older versions of Windows (before the addition of interactive flash tiles), you can access the nostalgic Start menu. To do this, right-click on the Windows icon in the lower left corner of the screen. You will be presented with a text menu with a list of familiar destinations, including applications and functions, search and launch programs. All of these options are available through the standard Start menu interface, but you can access them faster here.
Show Desktop Button
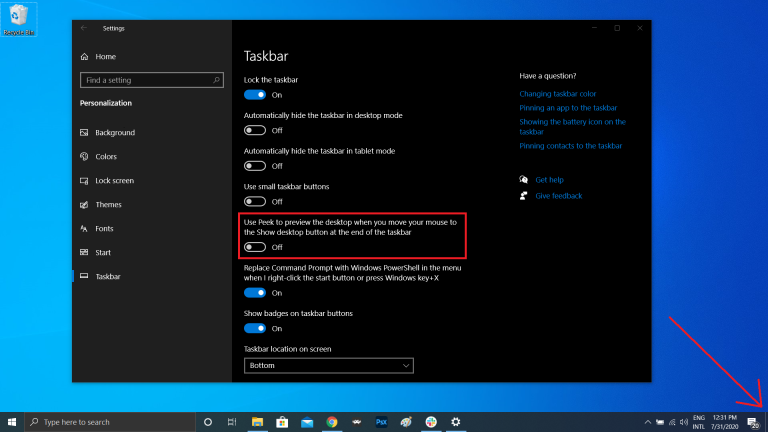
You don't have to minimize all open windows individually to view your desktop. There is a secret button in the lower right corner of the taskbar. Can't you see her? It is outside the current date and time. There is a small piece of the "invisible button" there. By clicking on it, the user can instantly minimize all open windows; clicking on it again will bring them back to the screen.
You can also minimize all windows by hovering over this button, rather than clicking it. Navigate to the following path: "Settings"> "Personalize"> "Panel of problems", and then activate the option "Show desktop when you hover the pointer over the button "Show Desktop" at the end of the taskbar".
Advanced search in Windows 10
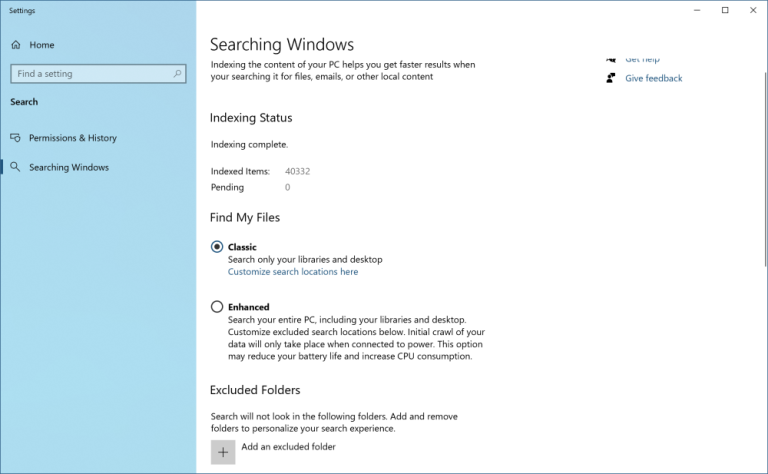
If the standard Windows search takes too long, narrow down the scope. You can do this by going to the following path: Settings > Search > Windows Search. Set the search value to "Classic" - this will mean that you are looking only in libraries and on the OS desktop. An advanced search covers the entire system and can take a fair amount of time. You can narrow your search by selecting specific folders or unchecking directories where you definitely don't need to search.
Remove screen clutter
Windows 7 users should be aware of this little trick. If you have many windows open at the same time, you can clean up this clutter by grabbing the top of any of them and shaking them. This will minimize all other windows. "Shake" again - and all the minimized windows will reappear before your eyes.
Quick shutdown
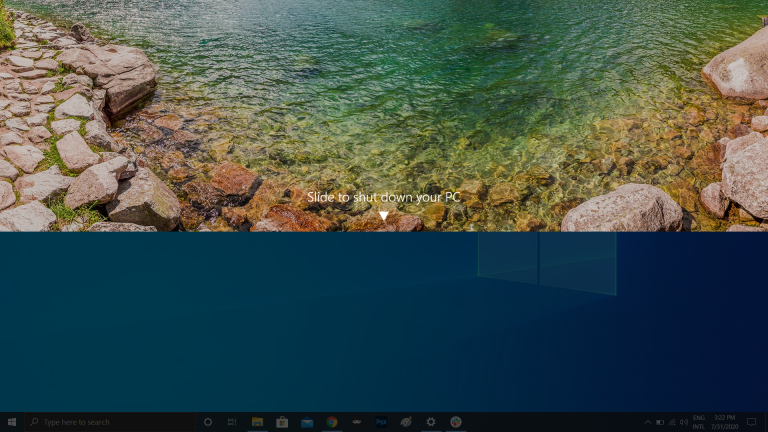
Those who have a Windows 10 tablet or laptop with a touchscreen can take advantage of the quick shutdown feature. Users just need to swipe down on the screen. However, standard Windows 10 PCs have a similar option. There are several ways to activate it, but creating a desktop shortcut is probably the best one.
Right-click on the desktop and choose New > Shortcut. In the pop-up window, enter "SlideToShutDown" as the location of the file. Rename the file and click on the "Finish" button to create a clickable shortcut on your desktop. Now right click on the file and go to its properties. Select a keyboard shortcut that will activate this shortcut and click on the "Apply" button.
Now you can double-click the shortcut or enter a keyboard shortcut to activate it and bring up a special window on the screen. Use your mouse to drag it to the bottom of the screen - this will instantly turn off your computer. It is worth remembering that this is a complete shutdown of the PC, not sleep mode.
"God 'mode"
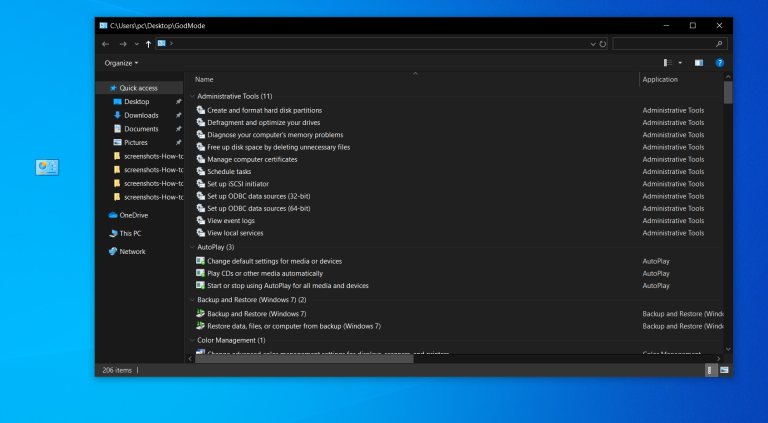
This mode will not be of interest to regular users, but if you are an IT pro or well versed in computers, you can access all Windows Control Panels from one folder. Right-click on the desktop and select: New > Folder. Rename the new folder with the given code snippet:
GodMode. {ED7BA470-8E54-465E-825C-99712043E01C}
To switch to "God mode" (or in the Windows Master Control Panel - its official name), double-click the left mouse button on the created folder.
Dock window

Most people have to perform several tasks at the same time. Windows 10 can make your life easier by letting you pin certain windows to different parts of the screen. Take any window and drag it to the left or right border of the screen. It will occupy this side of your display. You can also move the window to any of the four corners to dock it there. Similarly, in a selected part of the screen, by combining the Windows key and any of the directional arrows, the user can move the window he needs. For example, use the Win + Left arrow key combination to move the directory to the left of the screen. Then use the combination "Win + up or down arrow", and the window will be moved to the corner you want.
Fast navigation between virtual desktops
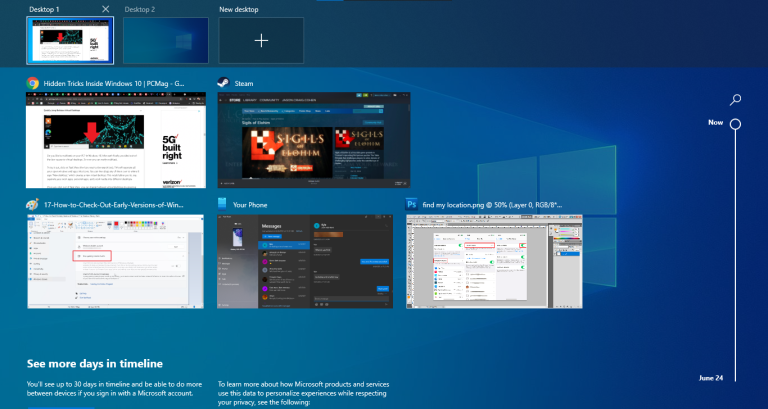
Quickly switch between multiple virtual desktops when you need to use work apps and social media at the same time, but on different operating systems. Click on the task viewer icon on the taskbar (the one that looks like a small rectangle) to see all open windows.
You can drag any of them to the option called Create New Desktop. Once a new virtual desktop is created, you can switch between it and your OS by pressing the Windows + Ctrl + Right / Left arrow key combination.
Command line customization
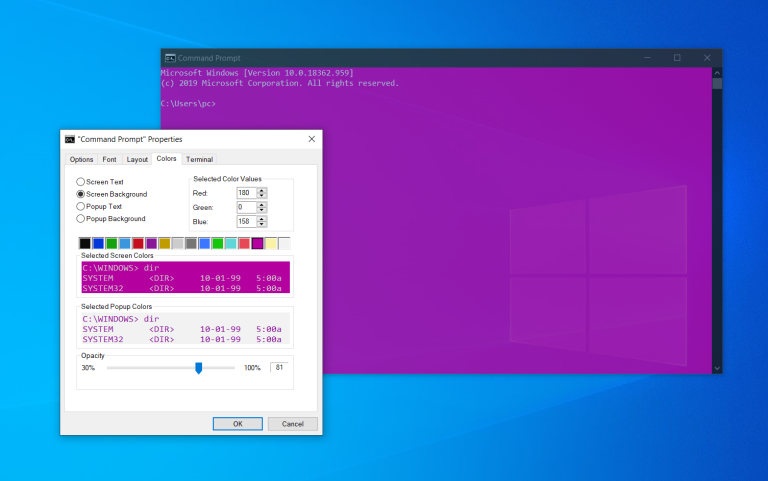
If you enjoy digging under the hood of Windows using the command line, you'll be glad to know that you can customize this tool. Open a command prompt, right-click on the top pane of the window and go to its properties to personalize the program's interface.
In the command line properties, you can change the controls, font, layout, color, and appearance of the cursor. You can also make the window itself transparent by opening the "Color" tab and moving the slider next to the "Opacity" parameter to the desired side. This allows the user to do programming and watch the desktop at the same time.
Silent notifications with Focus Assist
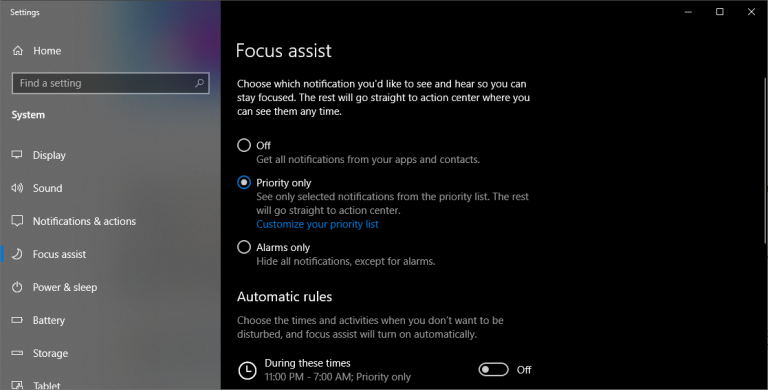
Focus Assist ("The focus of attention") provides you with control over the notifications that you receive on your screen. Navigate to the following path: Settings > System > Focus and turn off the most annoying notifications so you can work in peace. You can even set this feature to turn on at a specified time to only skip certain notifications.
Nearby Sharing Option
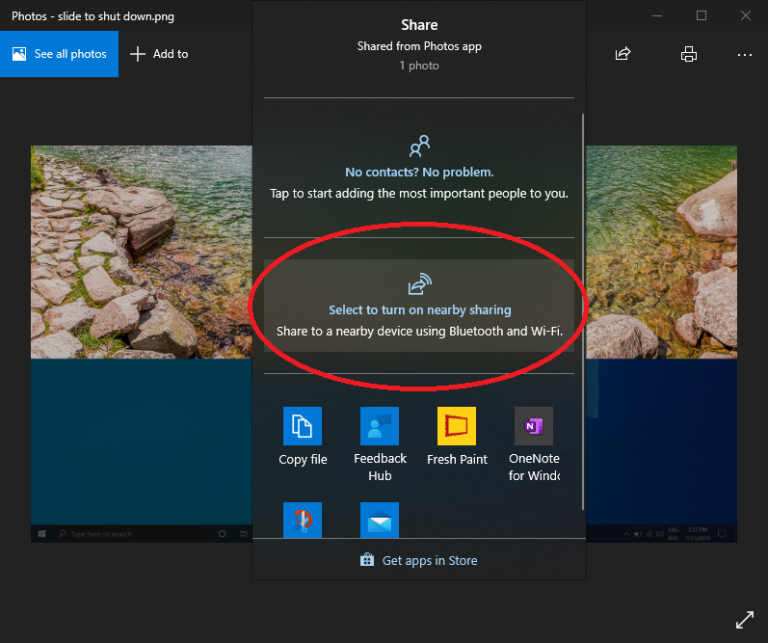
You can share a public document or a photo directly with nearby devices (on the same principle runs AirDrop from Apple's). Click the Sharing icon in the document or photo toolbar to open the menu you want, and then select the Enable Nearby Sharing option to send files to another device. Control this feature by going to Settings > System > Sharing to turn it on and off. You can also choose a file to share with other users or your devices.
Recording text with dictation
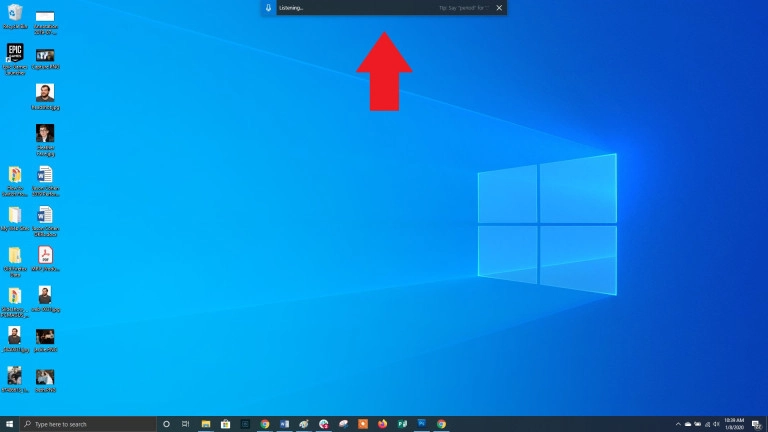
Microsoft spends a lot of time developing speech recognition tools, especially Windows and Office. You can use the key combination "Win + H" to open a special window for recording your voice through the computer microphone. The speech will be displayed in the current text box. Of course, you still have to add punctuation marks manually, but you can save time when typing, sending emails and social media posts.
Dark and light themes
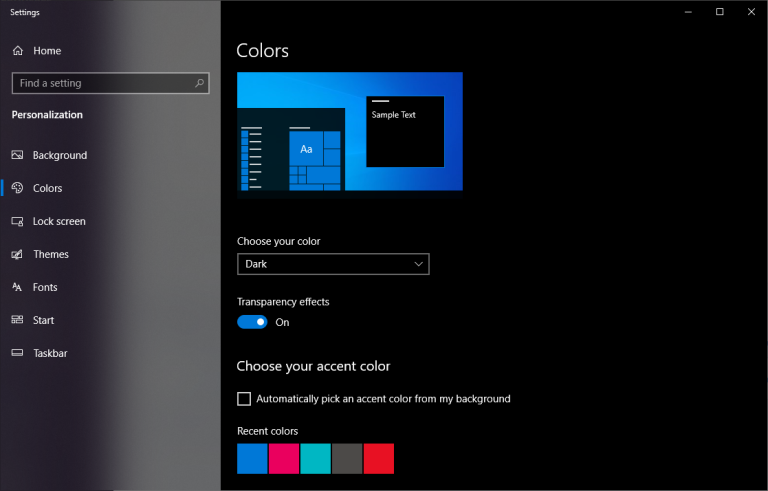
Windows 10 gives the user full control over the color gamut of his OS. Go to the following path: "Settings" > "Personalization" > "Color" - here you can choose a dark or light theme. They change the color of the Start menu, taskbar, file explorer, settings menu, and any other compatible programs.
Moreover, it is possible to set one theme for system menus and another for third-party applications. Prefer brighter colors? There are theme templates to choose from to help your OS look stylish and expressive.
"Cloudy" clipboard

We all use the Windows Clipboard to cut and paste files, but did you know you can save multiple items at once and send them to different devices? Use the key combination "Win + V" to view the last cut files saved in the clipboard. Go to the following path: "Settings "> "System" > "Clipboard" to configure this option. You must sign in to your Microsoft account to use the same clipboard on different devices at the same time.
Updated screen capture tool

For many years, tools "Scissors" was the only one software for screen capture, built-in Windows, but the application Snip & Sketch changed the principle of making screenshots in Windows 10. Use a combination of all "key the Shift + Win + the S " to choose between rectangular, arbitrary form, window or full screen screenshot. What's more, the tool has a built-in image editor that is completely independent of Microsoft Paint.
Sandbox testing of files and applications
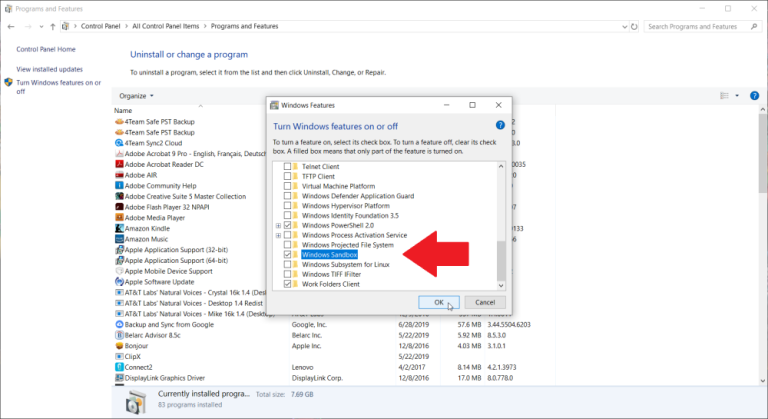
Windows 10 Pro users have additional software to help protect against dangerous apps and files. If you open Windows Sandbox from Control Panel, you will create a virtual instance of Windows inside your OS. There you can open all files and programs that you are not completely sure about before installing them on your PC. Once you exit the sandbox, its contents will disappear without harming your computer.
Xbox Game Bar
Use the Win + G keyboard shortcut to open the Xbox Game Bar, which allows you to record and stream game sessions, control audio, monitor CPU usage, connect third-party accounts, and view your Xbox Friends list.
You can go to Settings > Games and choose the keyboard shortcuts you want to turn the microphone on and off, capture a screen, set a timer recording, and more while playing. There are also settings for the recording of the gameplay itself, the ability to enable a mode with increased performance and activate network monitoring.
Pause downloading updates
We all know that updates are very important to the OS. They include the latest features and fixes for Windows security issues. But sometimes you really want such notifications to leave you alone, so that you do not see continuous pop-ups about the upcoming system update. Navigate to the following path: Settings > Updates and Security > Windows Update to temporarily pause the download of updates.
Cloud reset
Want to reset your PC in Windows 10? The cloud-based factory reset feature from Microsoft helps users when the system crashes when there is no disk or USB drive to restore the OS. This option allows you to reinstall Windows to roll back the system to its former state. Unfortunately, files and installed programs will be removed during the rollback. This option can be found in the following path: Settings > Updates and Security > System Restore.
Using kaomoji and special characters
Entering the key combination "Win + period (.)" Opens an extended menu with emoticons, kaomoji (created from Unicode characters) and a wide range of different characters.
Performing calculations and measurements
Windows has a few built-in applications that may look useless at first, but they have incredible hidden features. For example, the Calculator application can calculate the difference in years between two dates, as well as convert values in almost any measurement system, including time, energy, temperature, mass, and even currency.
The Alarms & Clock application can calculate the time difference between two points on the map (even in the future). Open the program, go to the "Clock" tab and click on the plus sign at the bottom to add the desired locations. Click on the compare icon to open the timeline. As you scroll the timeline, the time will change at different points on the map, which will allow you to accurately track the difference in time.
View file extensions
By default, Windows hides the file extension. To view it, you need to open the properties of a specific element. But you can customize your OS to show you the file extension automatically. Open Explorer, in its settings go to the "View" tab. Scroll down to the "Hide extension for known file types" option and uncheck this option. Click on the "Apply" button for the changes to take effect. Now you will be able to see file extensions right after their name.
A source
Windows 10 is the most popular desktop operating system in the world. Although Windows 11 is out now, most of us will still have to work with the top 10 for a long time to come. And even if you use it every day, you will find a lot of new things for yourself in this article.
You may not consider yourself a power user or you just recently switched from macOS to Windows. Regardless of what brings you here, our tips will help you get the most from Windows 10. Some of the hidden features of the OS were also available in older versions of Windows, while others are new to this iteration.
Secret Start Menu
If you are a fan of older versions of Windows (before the addition of interactive flash tiles), you can access the nostalgic Start menu. To do this, right-click on the Windows icon in the lower left corner of the screen. You will be presented with a text menu with a list of familiar destinations, including applications and functions, search and launch programs. All of these options are available through the standard Start menu interface, but you can access them faster here.
Show Desktop Button
You don't have to minimize all open windows individually to view your desktop. There is a secret button in the lower right corner of the taskbar. Can't you see her? It is outside the current date and time. There is a small piece of the "invisible button" there. By clicking on it, the user can instantly minimize all open windows; clicking on it again will bring them back to the screen.
You can also minimize all windows by hovering over this button, rather than clicking it. Navigate to the following path: "Settings"> "Personalize"> "Panel of problems", and then activate the option "Show desktop when you hover the pointer over the button "Show Desktop" at the end of the taskbar".
Advanced search in Windows 10
If the standard Windows search takes too long, narrow down the scope. You can do this by going to the following path: Settings > Search > Windows Search. Set the search value to "Classic" - this will mean that you are looking only in libraries and on the OS desktop. An advanced search covers the entire system and can take a fair amount of time. You can narrow your search by selecting specific folders or unchecking directories where you definitely don't need to search.
Remove screen clutter
Windows 7 users should be aware of this little trick. If you have many windows open at the same time, you can clean up this clutter by grabbing the top of any of them and shaking them. This will minimize all other windows. "Shake" again - and all the minimized windows will reappear before your eyes.
Quick shutdown
Those who have a Windows 10 tablet or laptop with a touchscreen can take advantage of the quick shutdown feature. Users just need to swipe down on the screen. However, standard Windows 10 PCs have a similar option. There are several ways to activate it, but creating a desktop shortcut is probably the best one.
Right-click on the desktop and choose New > Shortcut. In the pop-up window, enter "SlideToShutDown" as the location of the file. Rename the file and click on the "Finish" button to create a clickable shortcut on your desktop. Now right click on the file and go to its properties. Select a keyboard shortcut that will activate this shortcut and click on the "Apply" button.
Now you can double-click the shortcut or enter a keyboard shortcut to activate it and bring up a special window on the screen. Use your mouse to drag it to the bottom of the screen - this will instantly turn off your computer. It is worth remembering that this is a complete shutdown of the PC, not sleep mode.
"God 'mode"
This mode will not be of interest to regular users, but if you are an IT pro or well versed in computers, you can access all Windows Control Panels from one folder. Right-click on the desktop and select: New > Folder. Rename the new folder with the given code snippet:
GodMode. {ED7BA470-8E54-465E-825C-99712043E01C}
To switch to "God mode" (or in the Windows Master Control Panel - its official name), double-click the left mouse button on the created folder.
Dock window
Most people have to perform several tasks at the same time. Windows 10 can make your life easier by letting you pin certain windows to different parts of the screen. Take any window and drag it to the left or right border of the screen. It will occupy this side of your display. You can also move the window to any of the four corners to dock it there. Similarly, in a selected part of the screen, by combining the Windows key and any of the directional arrows, the user can move the window he needs. For example, use the Win + Left arrow key combination to move the directory to the left of the screen. Then use the combination "Win + up or down arrow", and the window will be moved to the corner you want.
Fast navigation between virtual desktops
Quickly switch between multiple virtual desktops when you need to use work apps and social media at the same time, but on different operating systems. Click on the task viewer icon on the taskbar (the one that looks like a small rectangle) to see all open windows.
You can drag any of them to the option called Create New Desktop. Once a new virtual desktop is created, you can switch between it and your OS by pressing the Windows + Ctrl + Right / Left arrow key combination.
Command line customization
If you enjoy digging under the hood of Windows using the command line, you'll be glad to know that you can customize this tool. Open a command prompt, right-click on the top pane of the window and go to its properties to personalize the program's interface.
In the command line properties, you can change the controls, font, layout, color, and appearance of the cursor. You can also make the window itself transparent by opening the "Color" tab and moving the slider next to the "Opacity" parameter to the desired side. This allows the user to do programming and watch the desktop at the same time.
Silent notifications with Focus Assist
Focus Assist ("The focus of attention") provides you with control over the notifications that you receive on your screen. Navigate to the following path: Settings > System > Focus and turn off the most annoying notifications so you can work in peace. You can even set this feature to turn on at a specified time to only skip certain notifications.
Nearby Sharing Option
You can share a public document or a photo directly with nearby devices (on the same principle runs AirDrop from Apple's). Click the Sharing icon in the document or photo toolbar to open the menu you want, and then select the Enable Nearby Sharing option to send files to another device. Control this feature by going to Settings > System > Sharing to turn it on and off. You can also choose a file to share with other users or your devices.
Recording text with dictation
Microsoft spends a lot of time developing speech recognition tools, especially Windows and Office. You can use the key combination "Win + H" to open a special window for recording your voice through the computer microphone. The speech will be displayed in the current text box. Of course, you still have to add punctuation marks manually, but you can save time when typing, sending emails and social media posts.
Dark and light themes
Windows 10 gives the user full control over the color gamut of his OS. Go to the following path: "Settings" > "Personalization" > "Color" - here you can choose a dark or light theme. They change the color of the Start menu, taskbar, file explorer, settings menu, and any other compatible programs.
Moreover, it is possible to set one theme for system menus and another for third-party applications. Prefer brighter colors? There are theme templates to choose from to help your OS look stylish and expressive.
"Cloudy" clipboard
We all use the Windows Clipboard to cut and paste files, but did you know you can save multiple items at once and send them to different devices? Use the key combination "Win + V" to view the last cut files saved in the clipboard. Go to the following path: "Settings "> "System" > "Clipboard" to configure this option. You must sign in to your Microsoft account to use the same clipboard on different devices at the same time.
Updated screen capture tool
For many years, tools "Scissors" was the only one software for screen capture, built-in Windows, but the application Snip & Sketch changed the principle of making screenshots in Windows 10. Use a combination of all "key the Shift + Win + the S " to choose between rectangular, arbitrary form, window or full screen screenshot. What's more, the tool has a built-in image editor that is completely independent of Microsoft Paint.
Sandbox testing of files and applications
Windows 10 Pro users have additional software to help protect against dangerous apps and files. If you open Windows Sandbox from Control Panel, you will create a virtual instance of Windows inside your OS. There you can open all files and programs that you are not completely sure about before installing them on your PC. Once you exit the sandbox, its contents will disappear without harming your computer.
Xbox Game Bar
Use the Win + G keyboard shortcut to open the Xbox Game Bar, which allows you to record and stream game sessions, control audio, monitor CPU usage, connect third-party accounts, and view your Xbox Friends list.
You can go to Settings > Games and choose the keyboard shortcuts you want to turn the microphone on and off, capture a screen, set a timer recording, and more while playing. There are also settings for the recording of the gameplay itself, the ability to enable a mode with increased performance and activate network monitoring.
Pause downloading updates
We all know that updates are very important to the OS. They include the latest features and fixes for Windows security issues. But sometimes you really want such notifications to leave you alone, so that you do not see continuous pop-ups about the upcoming system update. Navigate to the following path: Settings > Updates and Security > Windows Update to temporarily pause the download of updates.
Cloud reset
Want to reset your PC in Windows 10? The cloud-based factory reset feature from Microsoft helps users when the system crashes when there is no disk or USB drive to restore the OS. This option allows you to reinstall Windows to roll back the system to its former state. Unfortunately, files and installed programs will be removed during the rollback. This option can be found in the following path: Settings > Updates and Security > System Restore.
Using kaomoji and special characters
Entering the key combination "Win + period (.)" Opens an extended menu with emoticons, kaomoji (created from Unicode characters) and a wide range of different characters.
Performing calculations and measurements
Windows has a few built-in applications that may look useless at first, but they have incredible hidden features. For example, the Calculator application can calculate the difference in years between two dates, as well as convert values in almost any measurement system, including time, energy, temperature, mass, and even currency.
The Alarms & Clock application can calculate the time difference between two points on the map (even in the future). Open the program, go to the "Clock" tab and click on the plus sign at the bottom to add the desired locations. Click on the compare icon to open the timeline. As you scroll the timeline, the time will change at different points on the map, which will allow you to accurately track the difference in time.
View file extensions
By default, Windows hides the file extension. To view it, you need to open the properties of a specific element. But you can customize your OS to show you the file extension automatically. Open Explorer, in its settings go to the "View" tab. Scroll down to the "Hide extension for known file types" option and uncheck this option. Click on the "Apply" button for the changes to take effect. Now you will be able to see file extensions right after their name.
A source