
Carding Forum
Professional
- Messages
- 2,788
- Reaction score
- 1,320
- Points
- 113
Hello everyone, after a long absence I am returning to work and continuing the New Year's marathon, not even trying to write an article a day. By the way, I do not recommend anyone, and even forbid smoking shikha, the regime is fucked right away 
So, let's begin: Let's look at an example on a car auction.
First, you need to understand the keeper shell, for this, go to In-Line Studio and click Open editor.
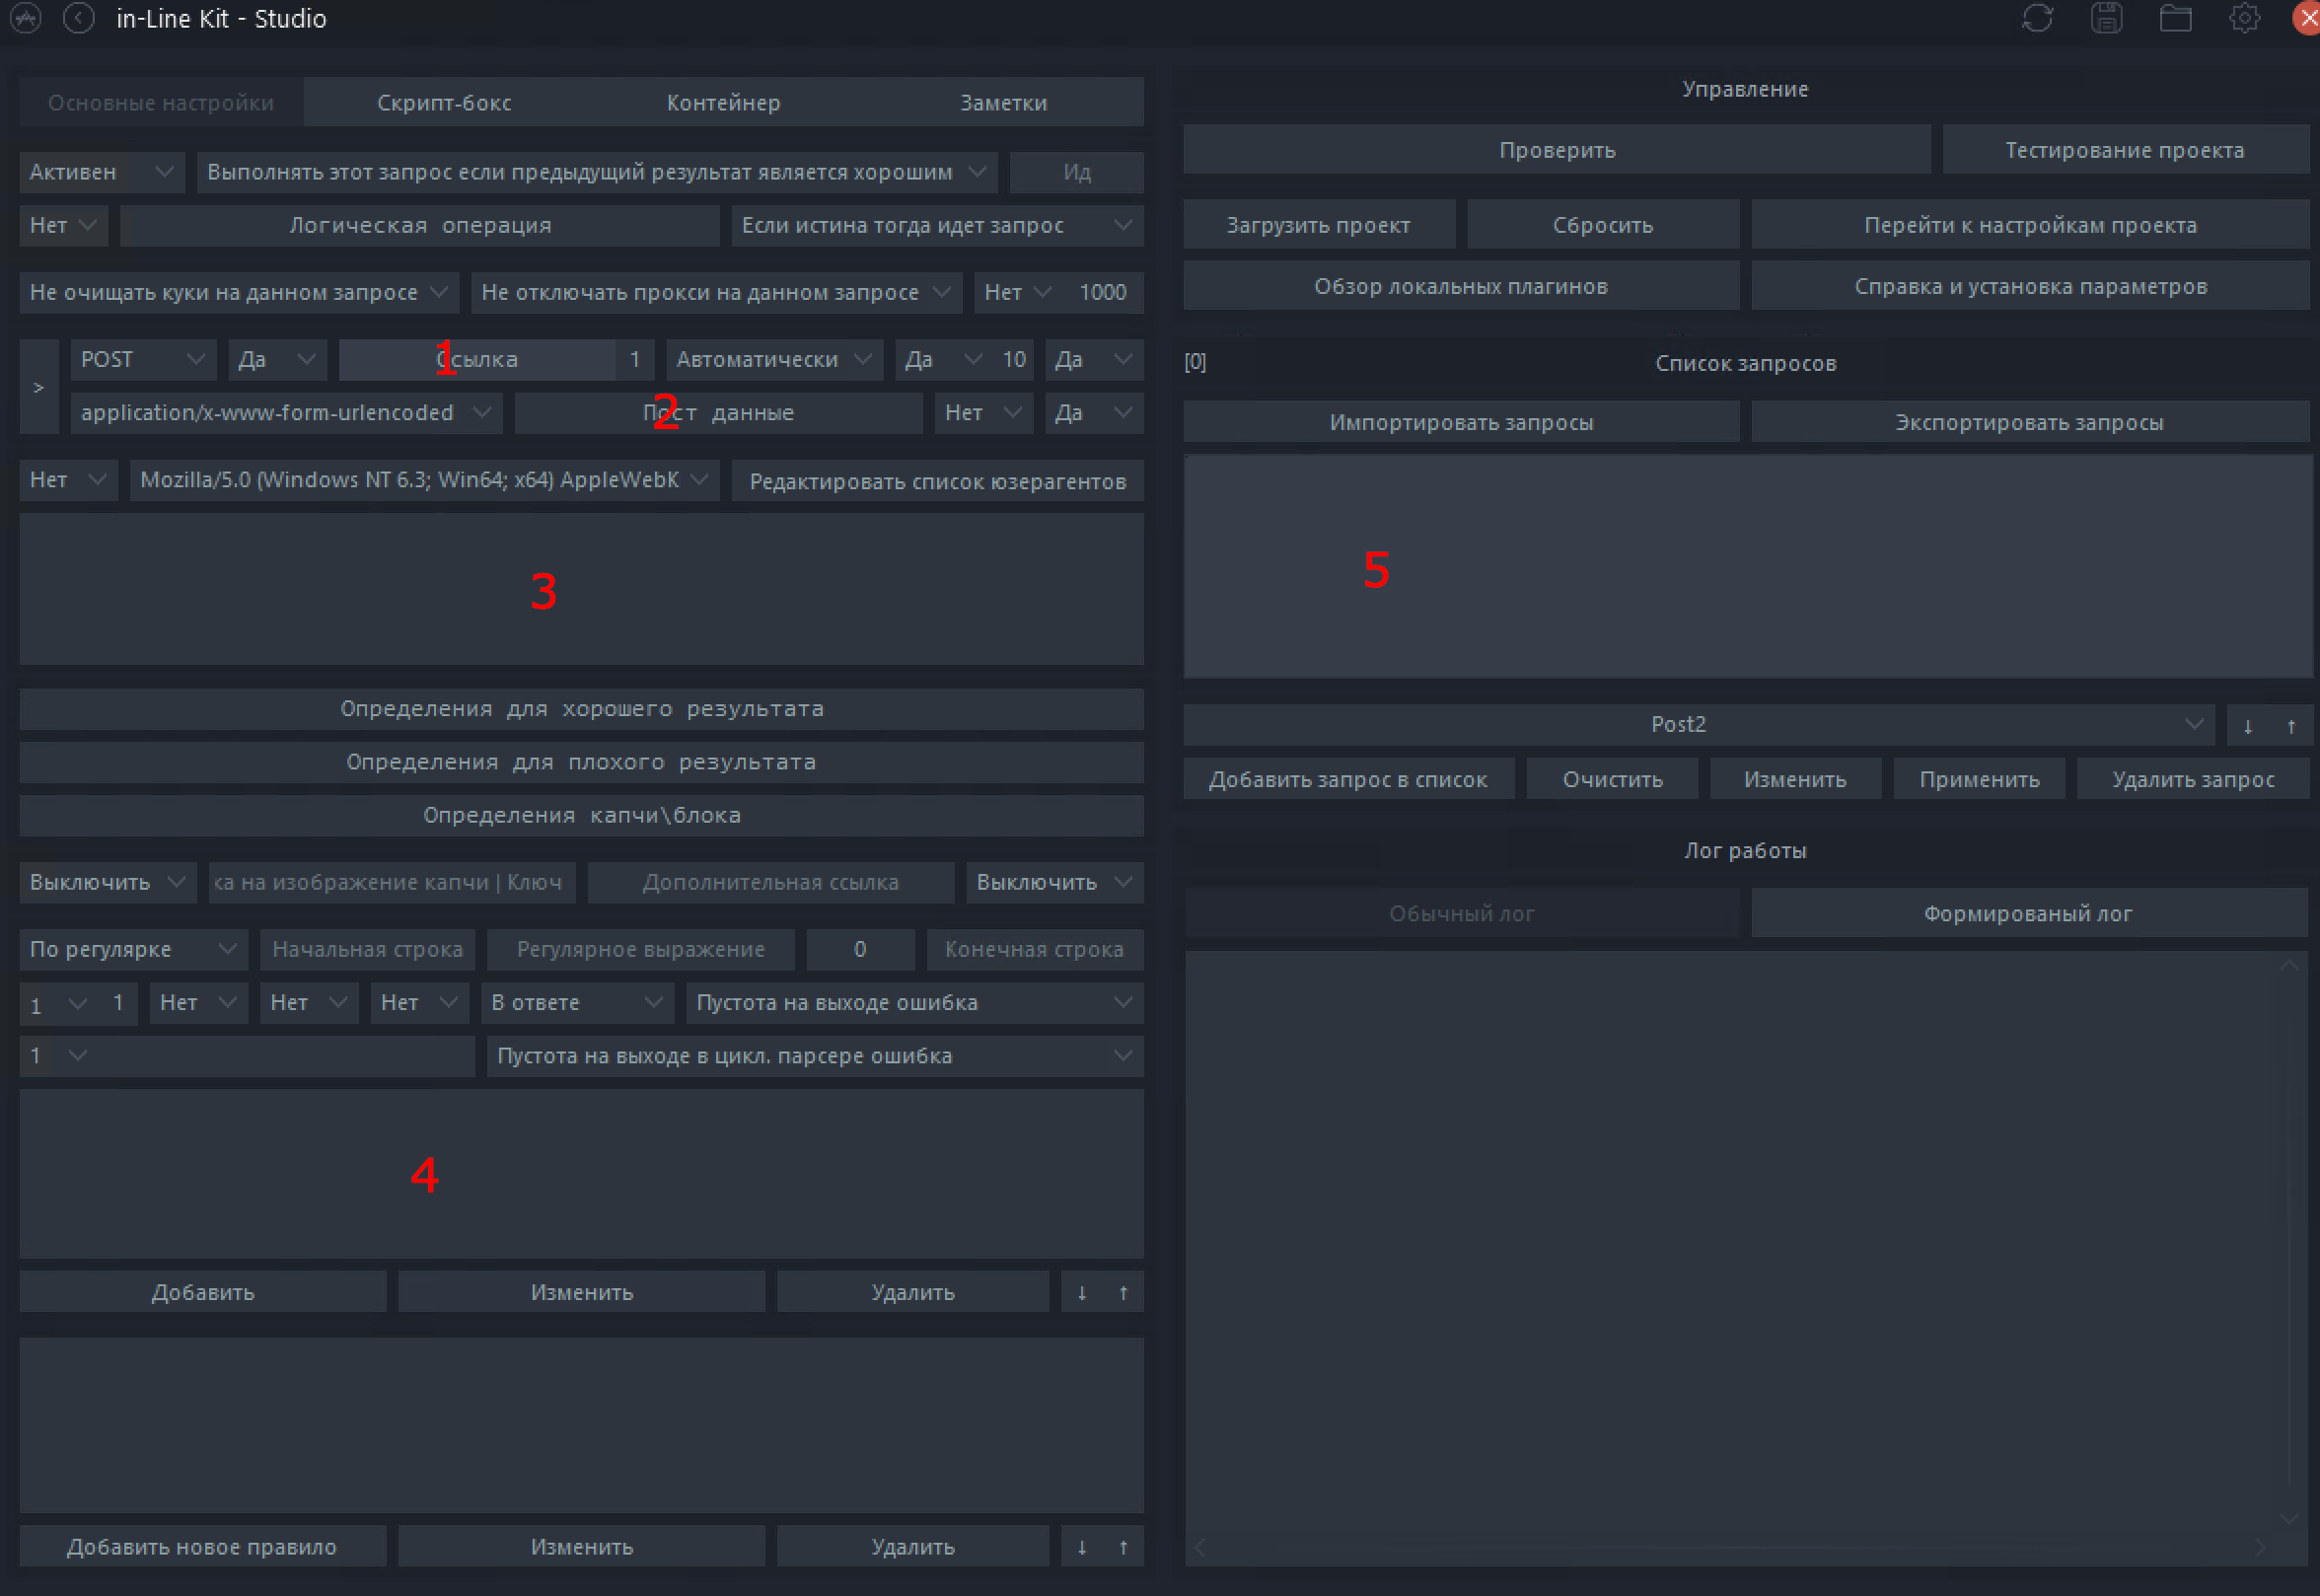
1 - Link where we make a request (POST/GET/OPTIONS...)
2 - Post data, a field in which we will need to transfer our data, email, password, login, etc.
3 - Headers, additional information for the request. They give the server information to understand our request.
4 - Field in which we will parse values for further use in requests or in the log. (Tokens, balances, accounts, etc.)
5 - List of our requests.
Let's move on to practice:
I will use the site https://www.capitalautoauction.com/
as an example . Open Google Chrome and go to the site, then open the developer panel with the F12 button and go to the Network tab.
First, we need to get a Get request, with the developer window open, refresh the page of our site.
Scroll to the very top and find our request


1 - Link where we make a request (POST/GET/OPTIONS...)
2 - Headers
We transfer data to the keeper, but not all.

1 - We put Get here because we have a request without sending data
2 - We put any symbol here, it is needed so that we can see the insides of the response to our request, in the future we will need to erase all data from this field.
3 - After everything is done, instead of Authorization we set our name like "Get1" and click this button. After double-clicking we can open the request we need for editing.

Don't forget to enable redirects
We go to the site and do the same thing, only now with the Log In button

We transfer it to the keeper by clicking on the Add request to the list button and you will have another request with the same name

Let's do it, double-click to open our second Get1 and transfer the data to the query using the example of the first Get1

Don't forget to enable redirects
1 - Link from the request
2 - Here we also needed the referer header since we were moving from the main page.
3 - Change the name and click Apply
Now you need to remove the request to send email and password data.
First:

1 - Click the Clear button
2 - Check the box here so that our request is not lost during the redirect.
Enter random values

And we press the Log In button, after which we look in the Network tab and find our request (usually at the very top)


1 - Request
2 - Now this is a Post request since we passed some data
3 - Here is the body of our request
We go to Keeper and create another request as we created Get1 before.

1 - Link from our post request
2 - Post data, to get them go to the Payload tab and click view source

copy the whole line

and transfer it to the keeper in Post data

3 - Headers, the screenshot doesn't show all the headers, so here they are https://pastebin.com/RinnXR1m
4 - Change the name, move the request to Inactive and Apply the changes.

In the data post we noticed a value such as _token:

Now we need to get it, for this

1 - Click the Check button
2 - Open the Format Log
3 - Click on the result of the last request, in our case it is Get2
4 - Double-click on this field, after which a text file with the server response will open
In the text editor, press Ctrl+F and look for our _token

Copy the values

Now let's move on to editing the Get2 request.
We insert it


1 - According to the standard, the keeper will automatically pull up the symbol that closes the value, but you need to check

2 - Click Add
3 - Apply
Now click Check and see the result

1 - Check
2 - Open the regular log
3 - And we see that our parser successfully received the _token value
Now we need to make a full Post request, go to it by double-clicking

1 - Check
2 - Open the regular log
3 - And we see that our parser successfully received the _token value
Now we need to make a full Post request, go to it by double-clicking

Our parser data is stored in the variable |PARS|[1]
Our email data is stored in |LOGIN|, if you need to automatically trim domains, then write |LOGIN|ND|
Password data is stored in |PWD|

_token=|PARS|[1]&email=|LOGIN|&password=|PWD|
We transfer from the text editor to our request, replacing the old text with the new one.

1 - Delete the old text and insert the text with our data from the text editor
2 - Set the value to Active
Now let's go back to the site, if we enter the random email and password again, we will see the server's response that the data is incorrect

copy this line
Go to the keeper to the Post1 request and paste the copied text into the definition of a bad result and click the Apply button

After that, click here


1 - Enter a random email and password via : or ; example tito48ud503@gmail.com:coney1980
:coney1980
2 - Click Check
Look in the Log and see that the bad account detection was successful

So we are on the right track, to make sure of this we can open the log by double-clicking on it and find our definition of a bad account

It is advisable to have a good account from the service we want to bruteforce in advance, if we don't have one, I'll show you how I do it.
I don't recommend doing this because you can kill the proxy, it's better to already have a good one.
Don't forget to erase 1 from Get1

Hello

Click yes

Hello

We exhibit

We are closing
Hello


for convenience, we name our project and set the value to yes, so that we can see the errors of the project

1 - Save
2 - Return to the editor
Hello


Load the database, proxy and click Start
After Project Errors Appeared

Click here

Further

We scroll through the text editor and see

The site complains that we are fucking it, copying it

Above we look at which request the error is in

Close the project and go to this request.
In our case, this is the Post1 request, open the request, insert it into the captcha/block definition, apply and test again, using the Project Testing button.
After some time, project errors were found.

let's go see
Request Post1

The data that was used at the time of the error

We take them and go to the site

Congratulations

we found a good account
Now we will set a definition for a good account, for this we return to the text editor with project errors and look for the text Logout which is on the screenshot
Copy this value

and go to the project editor, open the Post1 request and paste the copied text into the Definition for a good account

click apply
Go here


1 - Insert data from a good account
2 - Click Check
3 - See PROFITT!!!
Everything was described very briefly and in a compressed format, of course there are many subtleties, but I tried to present the essence in a brief format.
So, we wrote a project for a simple site, but as it turned out, we bruteforce Fullz+dob+dl, which is pretty good)


So, let's begin: Let's look at an example on a car auction.
First, you need to understand the keeper shell, for this, go to In-Line Studio and click Open editor.
1 - Link where we make a request (POST/GET/OPTIONS...)
2 - Post data, a field in which we will need to transfer our data, email, password, login, etc.
3 - Headers, additional information for the request. They give the server information to understand our request.
4 - Field in which we will parse values for further use in requests or in the log. (Tokens, balances, accounts, etc.)
5 - List of our requests.
Let's move on to practice:
I will use the site https://www.capitalautoauction.com/
as an example . Open Google Chrome and go to the site, then open the developer panel with the F12 button and go to the Network tab.
First, we need to get a Get request, with the developer window open, refresh the page of our site.
Scroll to the very top and find our request
1 - Link where we make a request (POST/GET/OPTIONS...)
2 - Headers
We transfer data to the keeper, but not all.
1 - We put Get here because we have a request without sending data
2 - We put any symbol here, it is needed so that we can see the insides of the response to our request, in the future we will need to erase all data from this field.
3 - After everything is done, instead of Authorization we set our name like "Get1" and click this button. After double-clicking we can open the request we need for editing.
Don't forget to enable redirects
We go to the site and do the same thing, only now with the Log In button
We transfer it to the keeper by clicking on the Add request to the list button and you will have another request with the same name
Let's do it, double-click to open our second Get1 and transfer the data to the query using the example of the first Get1
Don't forget to enable redirects
1 - Link from the request
2 - Here we also needed the referer header since we were moving from the main page.
3 - Change the name and click Apply
Now you need to remove the request to send email and password data.
First:
1 - Click the Clear button
2 - Check the box here so that our request is not lost during the redirect.
Enter random values
And we press the Log In button, after which we look in the Network tab and find our request (usually at the very top)
1 - Request
2 - Now this is a Post request since we passed some data
3 - Here is the body of our request
We go to Keeper and create another request as we created Get1 before.
1 - Link from our post request
2 - Post data, to get them go to the Payload tab and click view source
copy the whole line
and transfer it to the keeper in Post data
3 - Headers, the screenshot doesn't show all the headers, so here they are https://pastebin.com/RinnXR1m
4 - Change the name, move the request to Inactive and Apply the changes.
In the data post we noticed a value such as _token:
Now we need to get it, for this
1 - Click the Check button
2 - Open the Format Log
3 - Click on the result of the last request, in our case it is Get2
4 - Double-click on this field, after which a text file with the server response will open
In the text editor, press Ctrl+F and look for our _token
Copy the values
Now let's move on to editing the Get2 request.
We insert it
1 - According to the standard, the keeper will automatically pull up the symbol that closes the value, but you need to check
2 - Click Add
3 - Apply
Now click Check and see the result
1 - Check
2 - Open the regular log
3 - And we see that our parser successfully received the _token value
Now we need to make a full Post request, go to it by double-clicking
1 - Check
2 - Open the regular log
3 - And we see that our parser successfully received the _token value
Now we need to make a full Post request, go to it by double-clicking
Our parser data is stored in the variable |PARS|[1]
Our email data is stored in |LOGIN|, if you need to automatically trim domains, then write |LOGIN|ND|
Password data is stored in |PWD|
_token=|PARS|[1]&email=|LOGIN|&password=|PWD|
We transfer from the text editor to our request, replacing the old text with the new one.
1 - Delete the old text and insert the text with our data from the text editor
2 - Set the value to Active
Now let's go back to the site, if we enter the random email and password again, we will see the server's response that the data is incorrect
copy this line
Go to the keeper to the Post1 request and paste the copied text into the definition of a bad result and click the Apply button
After that, click here
1 - Enter a random email and password via : or ; example tito48ud503@gmail.com:coney1980
:coney1980
2 - Click Check
Look in the Log and see that the bad account detection was successful
So we are on the right track, to make sure of this we can open the log by double-clicking on it and find our definition of a bad account
It is advisable to have a good account from the service we want to bruteforce in advance, if we don't have one, I'll show you how I do it.
I don't recommend doing this because you can kill the proxy, it's better to already have a good one.
Don't forget to erase 1 from Get1
Hello
Click yes
Hello
We exhibit
We are closing
Hello
for convenience, we name our project and set the value to yes, so that we can see the errors of the project
1 - Save
2 - Return to the editor
Hello
Load the database, proxy and click Start
After Project Errors Appeared
Click here
Further
We scroll through the text editor and see
The site complains that we are fucking it, copying it
Above we look at which request the error is in
Close the project and go to this request.
In our case, this is the Post1 request, open the request, insert it into the captcha/block definition, apply and test again, using the Project Testing button.
After some time, project errors were found.
let's go see
Request Post1
The data that was used at the time of the error
We take them and go to the site
Congratulations
we found a good account
Now we will set a definition for a good account, for this we return to the text editor with project errors and look for the text Logout which is on the screenshot
Copy this value
and go to the project editor, open the Post1 request and paste the copied text into the Definition for a good account
click apply
Go here
1 - Insert data from a good account
2 - Click Check
3 - See PROFITT!!!
Everything was described very briefly and in a compressed format, of course there are many subtleties, but I tried to present the essence in a brief format.
So, we wrote a project for a simple site, but as it turned out, we bruteforce Fullz+dob+dl, which is pretty good)