
BadB
Professional
- Messages
- 2,476
- Reaction score
- 2,501
- Points
- 113
First, we'll need to download and install the free version of Proxifier (you can do this here). Important – you need the standard version, not Portable.
After that, we buy a subscription to the service 911.re and download their client. You can download it on the website, or follow the direct link here. Password for the archive - 911.re
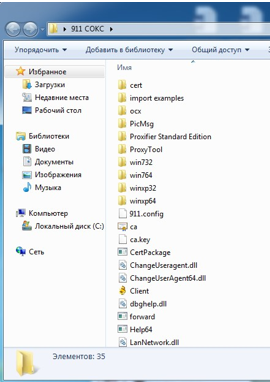
Unpack the archive to a folder on the desktop:
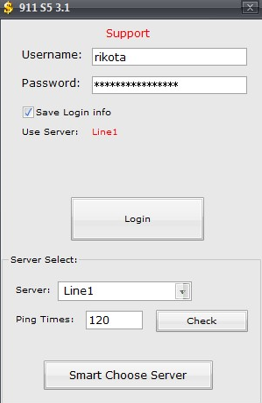
Run the client file, we see the authorization window. Enter your data, click "Login":
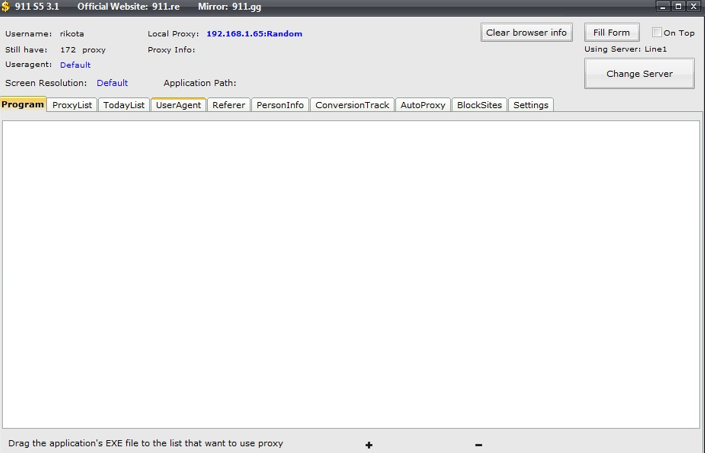
After authorization, we see the main window of the program 911:
Go to the settings tab (the most extreme one on the right side):
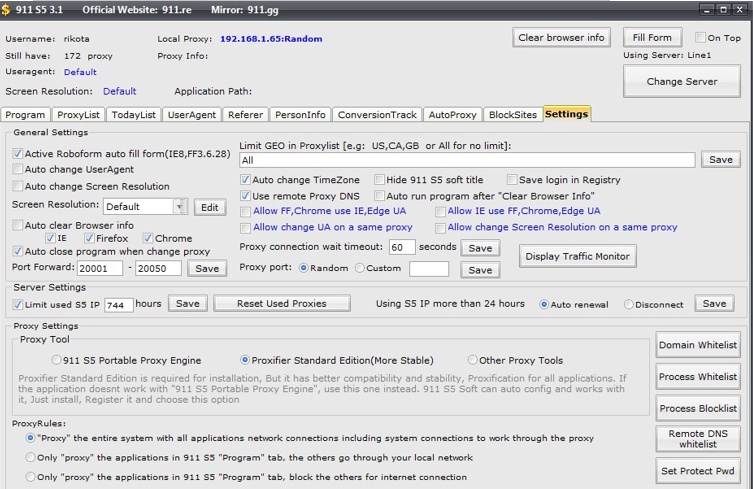
Setting all parameters as shown in the screenshot.
Next, go to the Program tab, click on the "+ " icon.»:
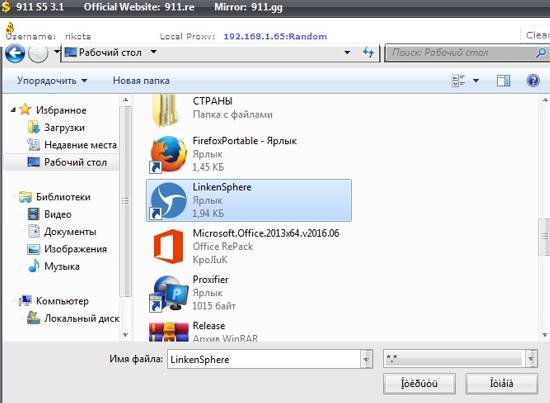
And select the Linken Sphere icon.
After that, you can go to the Proxy list tab and select the proxy parameters you need.
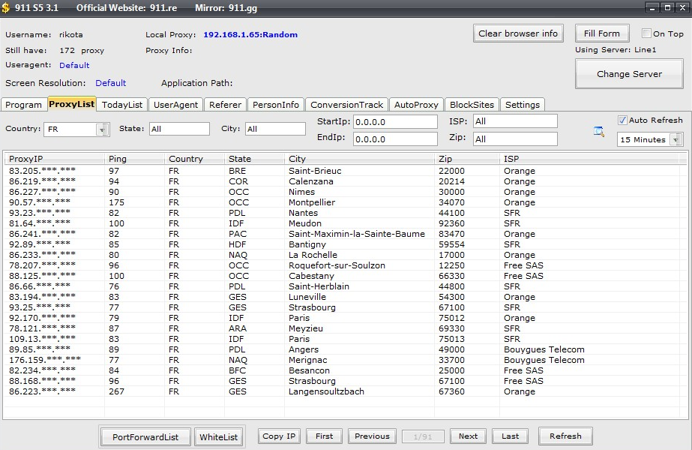
In order to select "socks", you need to click on it 2 times with the left mouse button. I advise you to look for the sock with the lowest "ping" value after selecting the parameters you need.
After selecting the sock you need, you will open a proxy Server. In it, you should click "Continue Evaluation".
After all of the above, you can proceed to setting up the Sphere itself.
First you need to run the Linken Sphere program via a shortcut on the desktop
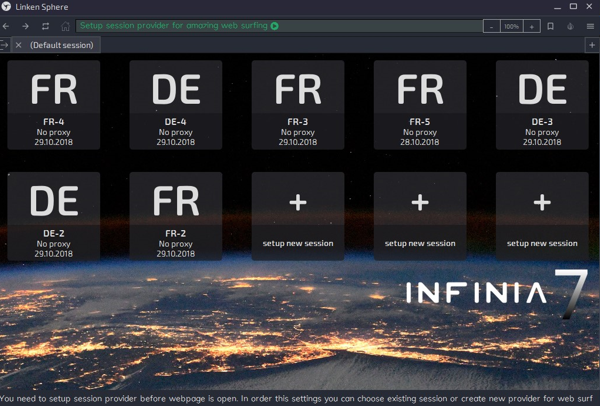
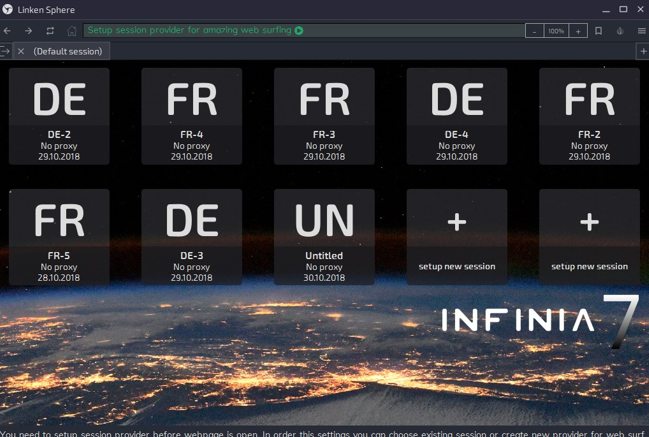
After logging in, we are taken to the main screen of sessions. As an example, you can see the sessions I created here.
In order to create a new session, you need to click on the " + " icon - setup new session.
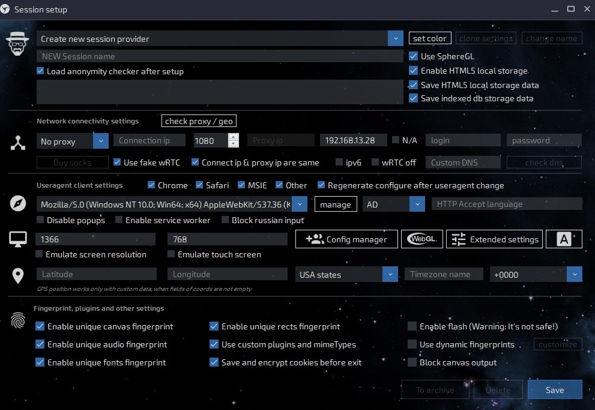
This is the session settings window. Let's analyze it in a little more detail.
After inventing and entering a session name in the "NEW Session name" window, the first thing you always do is click "Check proxy / geo". If you set up the 911 program using my method, then your sock is already on and ready to go. After clicking on "proxy/geo check", you will see something like this:
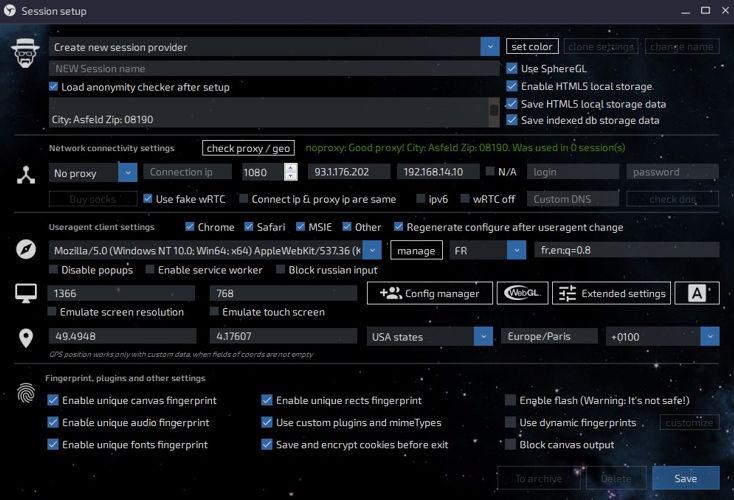
Now let's look at what happened:
1. You have set the "Language different" parameter where the FR parameter is set. This parameter is responsible for emulating the language that is set in your session. It is installed under the country of your "socks".
2. You have set the time and time zone in accordance with the socks you selected.
3. You have set up a geo-location in accordance with your " sock»
Let's move on to setting up CH for your computer.
If you use logs from Stiller in your work, then you will have the system file in the folder with your log. On different stealers, the name of this file is different, but the essence is the same.
We will look at the configuration using the example of logs from the AzoRult Stiller, as It is the most popular one.

There are several files that we are interested in configuring for CH. The first one is the ip file:
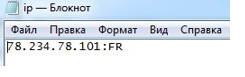
As many of you have already guessed, this is the ip address of our victim - we will select our "socks" for it.
The two main rules are:
1. Your chosen socks must be as close to the CH as possible.
2. It should not be included in the black lists.
How do I find out from the ip address where our CH is coming from? To do this, we need to go to the site https://www.ipqualityscore.com/free-ip-lookup-proxy-vpn-test
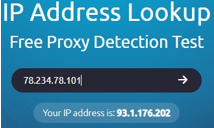
In the ip address lookup window, enter the desired ip address and press enter.
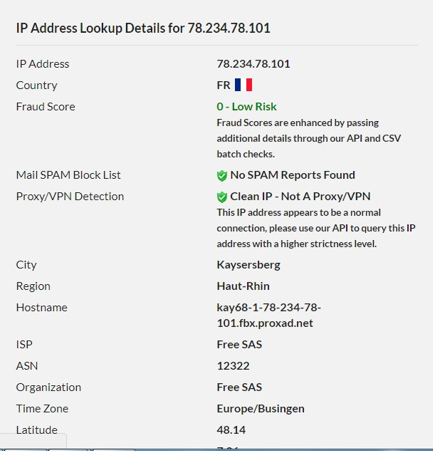
In this window, we get the name of the City/Of the state/The provider of our CH and already under this data we select our "sock". We try to match it to the city. If it didn't work out for the city, then for the region. If everything is really bad and CH is from somewhere in the ass of the world, then choose the provider - "ISP".
Next, we are interested in the system file.
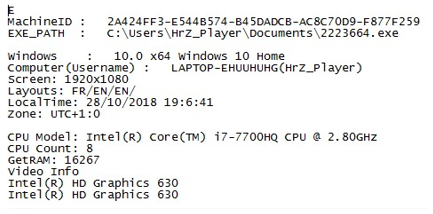
It contains a lot of information about the CH computer, but we only need a few parameters:
1. The OS Version - in our case, it is Windows 10.
2. Screen Resolution-as we see 1920x1080.
3. To All this, all that remains is to find out the browser that is installed in our СР.
To do this, we need to go to the browser/Cookies folder:
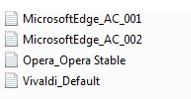
Here we see files with cookies from different browsers you may have one, for example, Opera. If there are several - we look at the largest one in size-and we will use it to configure it for СР.
After we know:
1. The OS Version (in my case, it's Win 10)
2. The name of the browser that KH most often uses (in my case, it's Vivaldi)
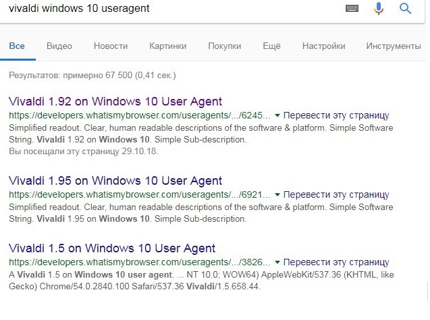
We need to find the User-agent for our OS and our browser. To do this, we will need google.com, in which we write something like this request:
We follow the link to the "developers" site, while trying to choose the newest version of the browser - this is clear from the numbers - the higher the numbers, the newer the version.

This is our user-agent. Copy it and go back to the Linken Sphere program:
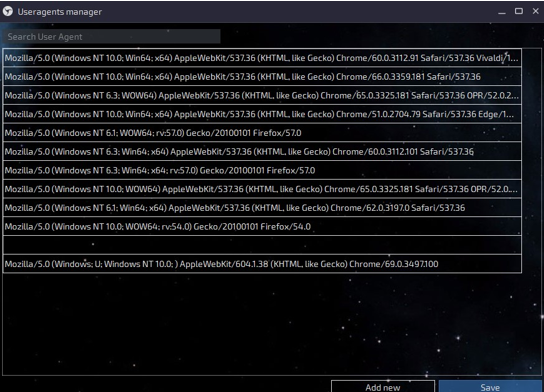
Click on the "Manage" button, then the "Add new" button, then paste our copied user agent into a new line, click save
Select the desired user agent from the list.
Set the screen resolution under СР (from the system file), click Emulate screen resolution

Next, click on the Icon with the inscription "WEBGL", we see this window:
In this window, select the parameter "WebGL 2" from the list and click on the "generate from user agent" button, click "save".
This completes the configuration for CH and, in the main window of the program, from the bottom right, we can click "save".
After that, a browser window will open and the site will open in it whoer.net, where we will see the result of our configuration for CH, namely the OS version and browser version:
After that, we will only need to import the cookies of our "CH" and you can start working - to do this, press the keyboard shortcut Ctrl+Alt+X.
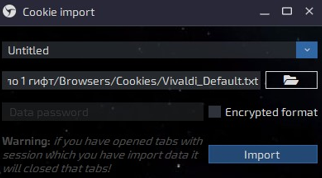
Select our session from the list by the name that we gave it in the beginning and click on the folder icon:
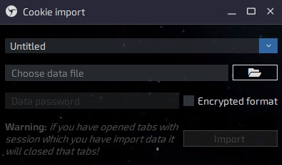
Select the file with our cookies in file Explorer and click open:

In this window, click "import":
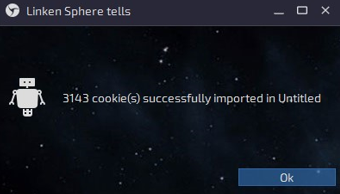
After that, we will receive a message like this, which tells us about the success of importing cookies and we can start working:
In this window, select our session (in my case it is Untlitied) and click on it.
This completes the setup of the Linken Sphere program with the service 911.re finished.
After that, we buy a subscription to the service 911.re and download their client. You can download it on the website, or follow the direct link here. Password for the archive - 911.re
Unpack the archive to a folder on the desktop:
Run the client file, we see the authorization window. Enter your data, click "Login":
After authorization, we see the main window of the program 911:
Go to the settings tab (the most extreme one on the right side):
Setting all parameters as shown in the screenshot.
Next, go to the Program tab, click on the "+ " icon.»:
And select the Linken Sphere icon.
After that, you can go to the Proxy list tab and select the proxy parameters you need.
In order to select "socks", you need to click on it 2 times with the left mouse button. I advise you to look for the sock with the lowest "ping" value after selecting the parameters you need.
After selecting the sock you need, you will open a proxy Server. In it, you should click "Continue Evaluation".
After all of the above, you can proceed to setting up the Sphere itself.
First you need to run the Linken Sphere program via a shortcut on the desktop
After logging in, we are taken to the main screen of sessions. As an example, you can see the sessions I created here.
In order to create a new session, you need to click on the " + " icon - setup new session.
This is the session settings window. Let's analyze it in a little more detail.
After inventing and entering a session name in the "NEW Session name" window, the first thing you always do is click "Check proxy / geo". If you set up the 911 program using my method, then your sock is already on and ready to go. After clicking on "proxy/geo check", you will see something like this:
Now let's look at what happened:
1. You have set the "Language different" parameter where the FR parameter is set. This parameter is responsible for emulating the language that is set in your session. It is installed under the country of your "socks".
2. You have set the time and time zone in accordance with the socks you selected.
3. You have set up a geo-location in accordance with your " sock»
Let's move on to setting up CH for your computer.
If you use logs from Stiller in your work, then you will have the system file in the folder with your log. On different stealers, the name of this file is different, but the essence is the same.
We will look at the configuration using the example of logs from the AzoRult Stiller, as It is the most popular one.
There are several files that we are interested in configuring for CH. The first one is the ip file:
As many of you have already guessed, this is the ip address of our victim - we will select our "socks" for it.
The two main rules are:
1. Your chosen socks must be as close to the CH as possible.
2. It should not be included in the black lists.
How do I find out from the ip address where our CH is coming from? To do this, we need to go to the site https://www.ipqualityscore.com/free-ip-lookup-proxy-vpn-test
In the ip address lookup window, enter the desired ip address and press enter.
In this window, we get the name of the City/Of the state/The provider of our CH and already under this data we select our "sock". We try to match it to the city. If it didn't work out for the city, then for the region. If everything is really bad and CH is from somewhere in the ass of the world, then choose the provider - "ISP".
Next, we are interested in the system file.
It contains a lot of information about the CH computer, but we only need a few parameters:
1. The OS Version - in our case, it is Windows 10.
2. Screen Resolution-as we see 1920x1080.
3. To All this, all that remains is to find out the browser that is installed in our СР.
To do this, we need to go to the browser/Cookies folder:
Here we see files with cookies from different browsers you may have one, for example, Opera. If there are several - we look at the largest one in size-and we will use it to configure it for СР.
After we know:
1. The OS Version (in my case, it's Win 10)
2. The name of the browser that KH most often uses (in my case, it's Vivaldi)
We need to find the User-agent for our OS and our browser. To do this, we will need google.com, in which we write something like this request:
We follow the link to the "developers" site, while trying to choose the newest version of the browser - this is clear from the numbers - the higher the numbers, the newer the version.
This is our user-agent. Copy it and go back to the Linken Sphere program:
Click on the "Manage" button, then the "Add new" button, then paste our copied user agent into a new line, click save
Select the desired user agent from the list.
Set the screen resolution under СР (from the system file), click Emulate screen resolution
Next, click on the Icon with the inscription "WEBGL", we see this window:
In this window, select the parameter "WebGL 2" from the list and click on the "generate from user agent" button, click "save".
This completes the configuration for CH and, in the main window of the program, from the bottom right, we can click "save".
After that, a browser window will open and the site will open in it whoer.net, where we will see the result of our configuration for CH, namely the OS version and browser version:
After that, we will only need to import the cookies of our "CH" and you can start working - to do this, press the keyboard shortcut Ctrl+Alt+X.
Select our session from the list by the name that we gave it in the beginning and click on the folder icon:
Select the file with our cookies in file Explorer and click open:
In this window, click "import":
After that, we will receive a message like this, which tells us about the success of importing cookies and we can start working:
In this window, select our session (in my case it is Untlitied) and click on it.
This completes the setup of the Linken Sphere program with the service 911.re finished.
") ive been trying to set up linken browser and for some reason even though my socks are live the browser cant connect to web? every other browser i use runs fine..just this one? any thoughts would be appreciated, thx
ive been trying to set up linken browser and for some reason even though my socks are live the browser cant connect to web? every other browser i use runs fine..just this one? any thoughts would be appreciated, thx