
Hacker
Professional
- Messages
- 1,041
- Reaction score
- 857
- Points
- 113
The content of the article
Read
How Google is fighting malware
Combating Potentially Harmful Applications with Machine Learning at Google: Datasets and Models is the Android security team's story of how Google Play Protect works, which detects malicious applications on Google Play and on users' smartphones. Several points:
Huawei and Paid Bootloader Unlock
Bootloader unlocking is still possible for Huawei and Honor devices, but it'll cost you - an interesting note on the suffering of Huawei smartphone owners wanting to unlock their device's bootloader.
In May of this year, Huawei officially announced that it would no longer provide codes to unlock the bootloaders of its smartphones (as well as smartphones of its Honor sub-brand). The bootloader is responsible for checking the integrity and digital signature of the OS kernel, as well as the ability to flash the device, so that those who did not manage to get their unlock code now cannot install custom firmware on it or even get root rights using Magisk.
It turned out, however, that just recently the FunkyHuawei service, which produces utilities for restoring damaged smartphones and changing their region, began to provide the ability to unlock the bootloader of all Huawei models, including the latest ones. But there is one caveat: the cost of the unlock code is $ 55, and it is tied to the IMEI of the device, which means it cannot be reused.
In the comments to the article, jokes have already appeared that FunkyHuawei belongs to Huawei itself and thus it is trying to earn extra money from users. All jokes, but the question of where the service gets the unlock codes is very serious. Either it is really Huawei, or the codes are simply stolen from it, or the algorithm for generating them is so weak that it was possible to pick it up. All three options are not in the company's favor.
How to use Frida to bypass packers
How-to Guide: Defeating an Android Packer with FRIDA - An introductory article on using Frida to help analyze a virus.
Given: a malicious application with a suspicious file inside a package and a small, heavily obfuscated dex executable. Analysis of the logcat launch logs shows that the application creates and loads another dex file (packed in JAR) during operation, which means that, most likely, the first executable file is just a loader (or rather, a packer), and the one found previously suspicious file - encrypted application code. When the application is loaded, the packer decrypts the file and loads it. But there is one problem - immediately after downloading, the decrypted file is deleted and cannot be analyzed.
Unfortunately, decompilation and static analysis of the packer do nothing - it is too obfuscated and almost unusable for reading. However, running the application under the strace trace utility shows that the deletion is being done via a system call unlink.
The end idea is to redefine the function code with Frida unlinkso that it doesn't delete anything. In this case, the researcher can simply get the decrypted dex file from the device and analyze it. Intercept function code for Frida:

Trace listing showing the creation and deletion of a file with decrypted application code
For developer
Kotlin tricks
Kotlin fun and education on Twitter - Creator of the Kotlin Academy and author of the book "Android
Development with Kotlin" Marcin Moskala talks about interesting tricks you can do in Kotlin.

In Kotlin fun, this is a reserved keyword, but can be used by enclosing it in backticks or capitalizing it. The same rules apply for any other keywords.
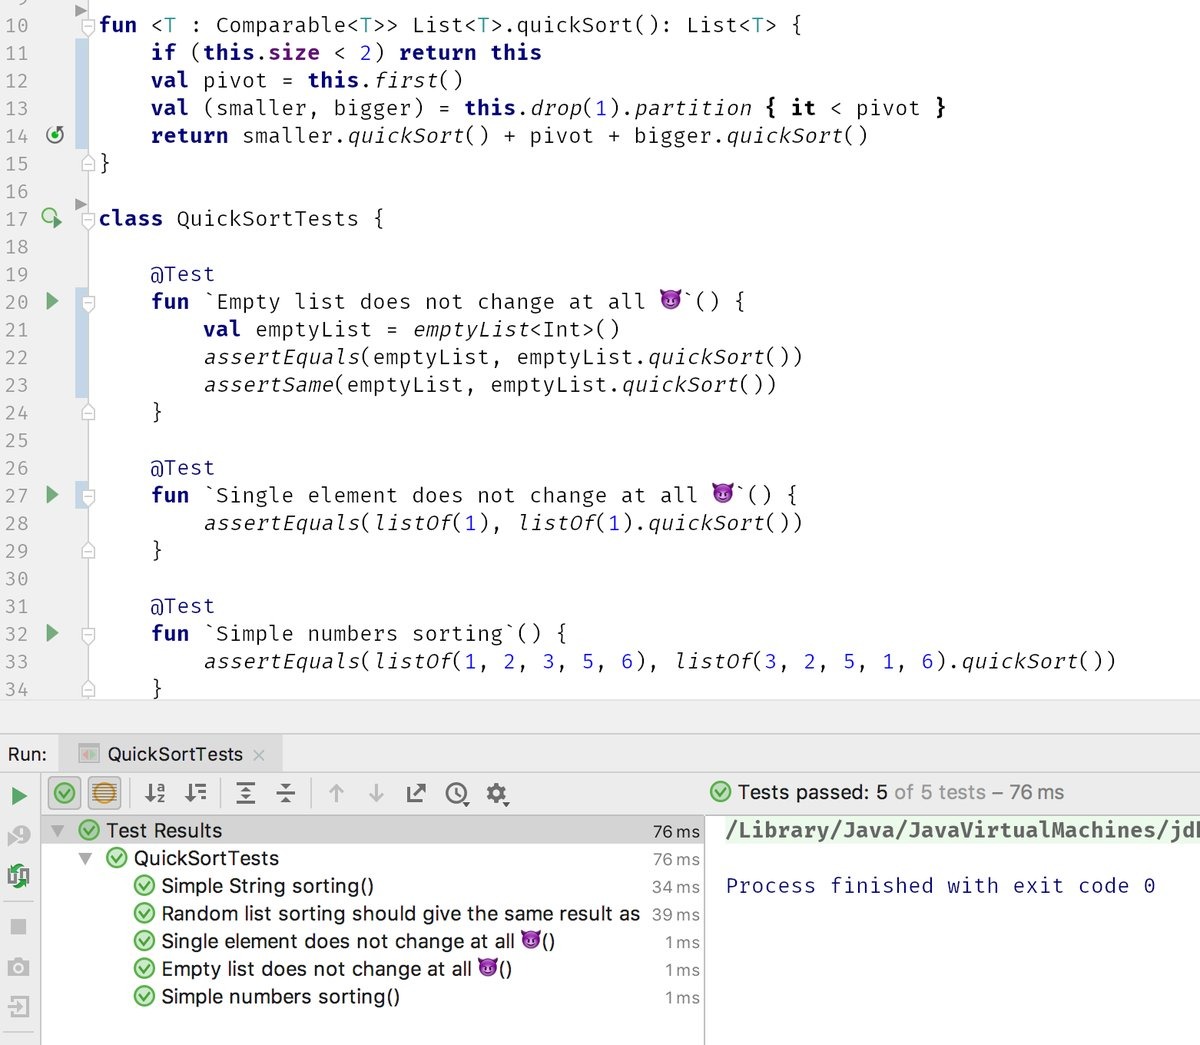
By using backticks, you can go even further and include not only keywords, but also spaces and even smilies in the names.
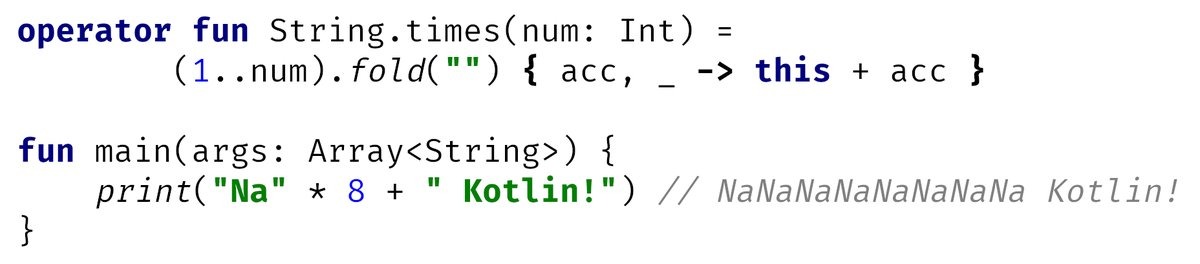
Like many other languages, Kotlin supports operator overloading.

FoldIs one of the most powerful collection operations. It combines all the elements of the collection using the specified function. For example, using is foldvery easy to add or multiply all the elements. But more interesting things can be done.
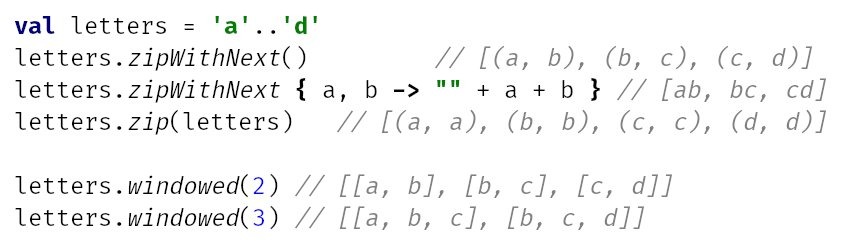
A few more useful functions for performing operations on several consecutive elements.
Profiling application network functions
Various methods to debug HTTP traffic in Android applications - An article on how to profile network functions of an application. The author suggests using five different methods.
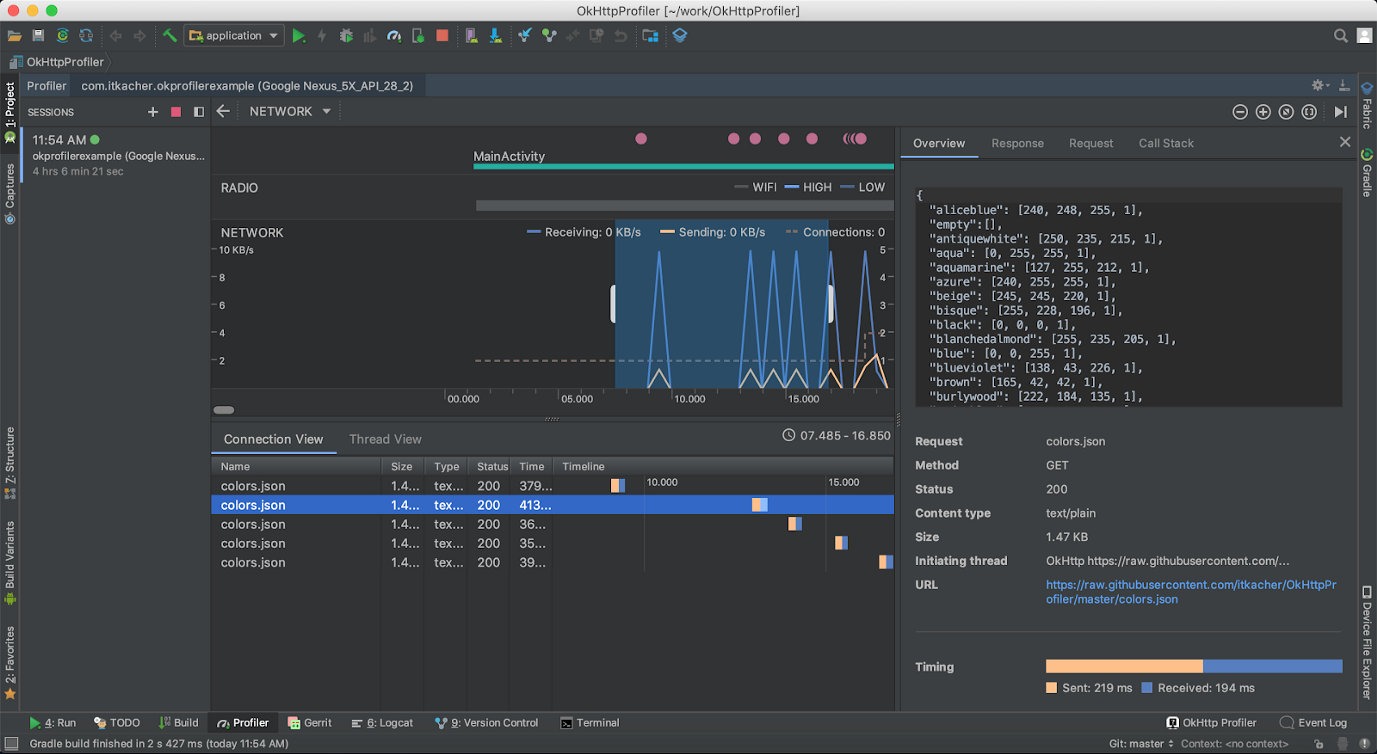
Network Profiler in Android Studio
Don't use arrays in data classes
What you didn't know about arrays in Kotlin is an informative and helpful note on why you shouldn't use arrays in data classes in Kotlin.
Data classes in Kotlin are a very useful language element that allows you to quickly create classes without burdening yourself with writing the same type of code. Take the following code for example:
It declares a data class NumArray with two fields. This is just one line of code, but as a result you will get a class with already implemented getters, setters and equals (), hash (), toString () functions. You don't have to write them yourself, and it makes life a lot easier.
But there is one problem: if you create two identical objects of this class and try to compare them, you will get a negative answer:
So the automatically generated equals () method doesn't work? In fact, this is not the case. The fact is that there is a bug in the JVM that leads to the fact that the comparison of arrays and collections is done differently. Collections are compared structurally, that is, element-by-element, and when comparing arrays, the correct answer will be only if it really is the same array, and not two with the same set of elements.
Therefore, instead of arrays, it is better to use lists:
Parallelism vs concurrency
Concurrent Coroutines - Concurrency is not Parallelism is one of the best articles for anyone looking to understand what Kotlin coroutines are. Instead of talking about state machines and mathematical algorithms, the author says that you just need to understand the difference between the concepts of concurrency and parallelism.
Rob Pike, one of the developers of Unix, Plan 9, and the Go language, puts it this way: concurrency is when you deal with a lot of things at the same time, and parallelism is when you do a lot of things at the same time. Let's demonstrate this statement with code:
Here, two coroutins are launched, each of which falls asleep for one second, and then returns a certain number. The main coroutin waits for the completion of both child coroutines and prints the sum of the two returned numbers to the screen.
The application completes its work in exactly one second, which is absolutely logical. But there is one important nuance: it works in one thread. When one of the child coroutines is blocked (in this case using delay, but in a real application because of waiting for data from the network or from the disk), the main coroutine continues its work. This is the case when the application "deals" with many things, rather than doing them at the same time.
But we can fix the code so that it actually does several things at the same time:
This code runs each coroutine in a separate thread (Dispatchers.Main is the main thread of the application, Dispatchers.Default is one of the background threads), and yes, now the application is doing several things at the same time.
In this example, such a replacement is not useful, but in a real application, heavy calculations can be sent to background threads, and it is more efficient to run code waiting for data from the network or from disk (or just often sleeping) in the main thread. In the end, nginx, one of the most productive web servers, is single-threaded (more precisely, it uses one thread per core, but this does not change the essence).
Kotlin coroutin tricks
Advanced Kotlin Coroutines tips and tricks - Another article on coroutines, this time with tips for using.
1. Problems with Java API. Let's take the following example:
The implication is that this code will launch a coroutine, which will wait for a connection for exactly one second and then be aborted.
But this will not happen, because it will socket.accept()block the coroutine stream until someone actually connects.
You can work around this problem with suspendCancellableCoroutine. Let's create a small helper function:
And let's change our example slightly:
Now everything works as it should.
2. launch vs. async. These are the two most used coroutine builders in Kotlin. Both generate a new coroutine, but work slightly differently:
Human readable logcat
How To Customize Logcat Appearance in Android Studio is a short note on how to colorize the logcat output in Android Studio for easier reading. To do this, just go to the settings, type logcat in the search, and you will see a list of logging levels from Debug to Assert. Choose one of them, uncheck the Inherit values from checkbox and select the desired colors in the Foregraund, Background and others options.
The author of the article suggests the following color scheme:
Tools
- Read
- How Google Fights
- Huawei Malware and Paid Bootloader Unlocking
- How to Use Frida to Bypass Packers For
- Developers
- Kotlin Tricks
- Profiling Application Network Functions
- Don't Use Arrays in Data Classes
- Parallelism vs concurrency
- Kotlin Coroutine Tricks
- Readable logcat
- Tools
- Libraries
Read
How Google is fighting malware
Combating Potentially Harmful Applications with Machine Learning at Google: Datasets and Models is the Android security team's story of how Google Play Protect works, which detects malicious applications on Google Play and on users' smartphones. Several points:
- Google analyzes not only applications from Google Play, but also any APK files found on the Internet.
- For each application, static and dynamic analysis procedures are launched, which reveal certain patterns: requested permissions, application behavior in certain circumstances.
- The data obtained from static and dynamic analyzers is transferred to an AI trained to detect certain types of malicious applications: SMS fraud, phishing, and privilege escalation.
- In addition to data about the applications themselves, Google also collects and aggregates data about the application from Google Play: the average rating of the developer's applications, ratings, the number of installations and uninstallations; this information is also transmitted to the AI.
- Based on all of this data, the AI makes a decision about whether an application can be potentially malicious.
- Google is constantly improving its AI by feeding it data from newly discovered malware.
Huawei and Paid Bootloader Unlock
Bootloader unlocking is still possible for Huawei and Honor devices, but it'll cost you - an interesting note on the suffering of Huawei smartphone owners wanting to unlock their device's bootloader.
In May of this year, Huawei officially announced that it would no longer provide codes to unlock the bootloaders of its smartphones (as well as smartphones of its Honor sub-brand). The bootloader is responsible for checking the integrity and digital signature of the OS kernel, as well as the ability to flash the device, so that those who did not manage to get their unlock code now cannot install custom firmware on it or even get root rights using Magisk.
It turned out, however, that just recently the FunkyHuawei service, which produces utilities for restoring damaged smartphones and changing their region, began to provide the ability to unlock the bootloader of all Huawei models, including the latest ones. But there is one caveat: the cost of the unlock code is $ 55, and it is tied to the IMEI of the device, which means it cannot be reused.
In the comments to the article, jokes have already appeared that FunkyHuawei belongs to Huawei itself and thus it is trying to earn extra money from users. All jokes, but the question of where the service gets the unlock codes is very serious. Either it is really Huawei, or the codes are simply stolen from it, or the algorithm for generating them is so weak that it was possible to pick it up. All three options are not in the company's favor.
How to use Frida to bypass packers
How-to Guide: Defeating an Android Packer with FRIDA - An introductory article on using Frida to help analyze a virus.
Given: a malicious application with a suspicious file inside a package and a small, heavily obfuscated dex executable. Analysis of the logcat launch logs shows that the application creates and loads another dex file (packed in JAR) during operation, which means that, most likely, the first executable file is just a loader (or rather, a packer), and the one found previously suspicious file - encrypted application code. When the application is loaded, the packer decrypts the file and loads it. But there is one problem - immediately after downloading, the decrypted file is deleted and cannot be analyzed.
Unfortunately, decompilation and static analysis of the packer do nothing - it is too obfuscated and almost unusable for reading. However, running the application under the strace trace utility shows that the deletion is being done via a system call unlink.
The end idea is to redefine the function code with Frida unlinkso that it doesn't delete anything. In this case, the researcher can simply get the decrypted dex file from the device and analyze it. Intercept function code for Frida:
Code:
console.log ("[*] FRIDA started");
console.log ("[*] skip native unlink function");

var unlinkPtr = Module.findExportByName (null, 'unlink');

Interceptor.replace (unlinkPtr, new NativeCallback (function () {
    console.log ("[*] unlink () encountered, skipping it.");
}, 'int', []));
Trace listing showing the creation and deletion of a file with decrypted application code
For developer
Kotlin tricks
Kotlin fun and education on Twitter - Creator of the Kotlin Academy and author of the book "Android
Development with Kotlin" Marcin Moskala talks about interesting tricks you can do in Kotlin.
In Kotlin fun, this is a reserved keyword, but can be used by enclosing it in backticks or capitalizing it. The same rules apply for any other keywords.
By using backticks, you can go even further and include not only keywords, but also spaces and even smilies in the names.
Like many other languages, Kotlin supports operator overloading.
FoldIs one of the most powerful collection operations. It combines all the elements of the collection using the specified function. For example, using is foldvery easy to add or multiply all the elements. But more interesting things can be done.
A few more useful functions for performing operations on several consecutive elements.
Profiling application network functions
Various methods to debug HTTP traffic in Android applications - An article on how to profile network functions of an application. The author suggests using five different methods.
- Android Profiler - included with Android Studio. It shows the amount of incoming and outgoing data, latency, and even allows you to look at the data itself (if the application is using HttpURLConnection or OkHttp). By default, the network profiler is disabled. To enable it, you need to go to the Run → Edit Configurations menu, open the Profiling tab and check the Enable advanced profiling box. After that, it will appear in the standard profiler window (launched through the bottom panel of Android Studio).
- OkHttp Profiler plugin - Android Studio plugin for debugging OkHttp requests. Can display JSON as a tree and generate models for the GSON parser. Disadvantage: Requires plugin installation and application modification.
- Stetho is an application debugging tool using the Chrome DevTools. In addition to tools for analyzing layots and databases, it includes a powerful network profiler. Requires library installation and application modification.
- Charles Proxy is a desktop proxy with a built-in sniffer and many additional functions: socket monitoring, network packet modification, request generator and much more. Requires setting up a proxy on the emulator / phone and installing an SSL certificate (in case you need to debug HTTPS traffic). In addition, it costs $ 50 (there is a trial version).
- AppSpector - Profiling tools for Android and iOS. Allows you to view logs, explore databases and network requests. Application modification and registration on the site are required. Management is only through the developer's website, so there is a question about data privacy.
Network Profiler in Android Studio
Don't use arrays in data classes
What you didn't know about arrays in Kotlin is an informative and helpful note on why you shouldn't use arrays in data classes in Kotlin.
Data classes in Kotlin are a very useful language element that allows you to quickly create classes without burdening yourself with writing the same type of code. Take the following code for example:
Code:
data class NumArray (val name: String, val values: IntArray)It declares a data class NumArray with two fields. This is just one line of code, but as a result you will get a class with already implemented getters, setters and equals (), hash (), toString () functions. You don't have to write them yourself, and it makes life a lot easier.
But there is one problem: if you create two identical objects of this class and try to compare them, you will get a negative answer:
Code:
val n1 = NumArray ("1", intArrayOf (1,2,3,4))
val n2 = NumArray ("1", intArrayOf (1,2,3,4))
val result = n1 == n2
println ("result = $ result")
So the automatically generated equals () method doesn't work? In fact, this is not the case. The fact is that there is a bug in the JVM that leads to the fact that the comparison of arrays and collections is done differently. Collections are compared structurally, that is, element-by-element, and when comparing arrays, the correct answer will be only if it really is the same array, and not two with the same set of elements.
Therefore, instead of arrays, it is better to use lists:
Code:
data class NumList (val name: String, val values: List <Int>))Parallelism vs concurrency
Concurrent Coroutines - Concurrency is not Parallelism is one of the best articles for anyone looking to understand what Kotlin coroutines are. Instead of talking about state machines and mathematical algorithms, the author says that you just need to understand the difference between the concepts of concurrency and parallelism.
Rob Pike, one of the developers of Unix, Plan 9, and the Go language, puts it this way: concurrency is when you deal with a lot of things at the same time, and parallelism is when you do a lot of things at the same time. Let's demonstrate this statement with code:
Code:
fun main () = runBlocking <Unit> {
    val time = measureTimeMillis {
        val one = async {doSomethingUsefulOne ()}
        val two = async {doSomethingUsefulTwo ()}
        println ("The answer is $ {one.await () + two.await ()}")
    }
    println ("Completed in $ time ms")
}

suspend fun doSomethingUsefulOne (): Int {
    delay (1000L)
    return 13
}

suspend fun doSomethingUsefulTwo (): Int {
    delay (1000L)
    return 29
}
Here, two coroutins are launched, each of which falls asleep for one second, and then returns a certain number. The main coroutin waits for the completion of both child coroutines and prints the sum of the two returned numbers to the screen.
The application completes its work in exactly one second, which is absolutely logical. But there is one important nuance: it works in one thread. When one of the child coroutines is blocked (in this case using delay, but in a real application because of waiting for data from the network or from the disk), the main coroutine continues its work. This is the case when the application "deals" with many things, rather than doing them at the same time.
But we can fix the code so that it actually does several things at the same time:
Code:
val time = measureTimeMillis {
    val one = async (Dispatchers.Default) {doSomethingUsefulOne ()}
    val two = async (Dispatchers.Default) {doSomethingUsefulTwo ()}
    println ("The answer is $ {one.await () + two.await ()}")
}
This code runs each coroutine in a separate thread (Dispatchers.Main is the main thread of the application, Dispatchers.Default is one of the background threads), and yes, now the application is doing several things at the same time.
In this example, such a replacement is not useful, but in a real application, heavy calculations can be sent to background threads, and it is more efficient to run code waiting for data from the network or from disk (or just often sleeping) in the main thread. In the end, nginx, one of the most productive web servers, is single-threaded (more precisely, it uses one thread per core, but this does not change the essence).
Kotlin coroutin tricks
Advanced Kotlin Coroutines tips and tricks - Another article on coroutines, this time with tips for using.
1. Problems with Java API. Let's take the following example:
Code:
runBlocking (Dispatchers.IO) {
    withTimeout (1000) {
        val socket = ServerSocket (42)
        socket.accept ()
    }
}
The implication is that this code will launch a coroutine, which will wait for a connection for exactly one second and then be aborted.
But this will not happen, because it will socket.accept()block the coroutine stream until someone actually connects.
You can work around this problem with suspendCancellableCoroutine. Let's create a small helper function:
Code:
public suspend inline fun <T: Closeable ?, R> T.useCancellably (
        crossinline block: (T) -> R
): R = suspendCancellableCoroutine {cont ->
    cont.invokeOnCancellation {this? .close ()}
    cont.resume (use (block))
}
And let's change our example slightly:
Code:
runBlocking (Dispatchers.IO) {
    withTimeout (1000) {
        val socket = ServerSocket (42)
        socket.useCancellably {it.accept ()}
    }
}
Now everything works as it should.
2. launch vs. async. These are the two most used coroutine builders in Kotlin. Both generate a new coroutine, but work slightly differently:
- any unhandled exception in the launch block will be treated as unhandled at all and will drop the application; an exception in an async block can be handled outside of that block;
- launch will prevent parent coroutins from terminating until child coroutines launched with launch have completed;
- async allows you to return a value, launch does not.
Human readable logcat
How To Customize Logcat Appearance in Android Studio is a short note on how to colorize the logcat output in Android Studio for easier reading. To do this, just go to the settings, type logcat in the search, and you will see a list of logging levels from Debug to Assert. Choose one of them, uncheck the Inherit values from checkbox and select the desired colors in the Foregraund, Background and others options.
The author of the article suggests the following color scheme:
- ASSERT: #bb2b2f;
- The DEBUG: #1194d6;
- The ERROR: #db332f;
- The INFO: #0c890d;
- The VERBOSE: #a8a8a8;
- WARNING: #bb7000.
Tools
- frida-snippets - A set of Frida scripts for Android, iOS and Windows;
- MagiskFrida - script to start the Frida server on boot using Magisk;
- ADBHoney - honeypot emulating the ADB daemon available on port 5555;
- ish - application for starting Linux environment in iOS (uses x86 emulation and translation of system calls Linux → XNU);
- androix-migration - the script for automatic migration from support libraries to AndroidX, according to the author, works better than a similar converter in Android Studio;
- autoplay is a Gradle plugin to automatically publish apps to Google Play.