
Tomcat
Professional
- Messages
- 2,687
- Reaction score
- 1,026
- Points
- 113
Good day forum members, today I wanted to collect all the information about creating a machine for work, with minimal investment and the highest quality, as far as possible. Our goal is not to create a fake agent on top of ours and hide possible leaks, but to create a good, high-quality, new personality. (Our virtual machine must at least pass the Pafish test, like the vaunted antidetect)
We will build our machine on VirtualBox, after installation we need to configure it.
Step 1. Installing VirtualBox
- Download VirtualBox from the official website (https://www.virtualbox.org/wiki/Downloads)
- Perform a clean installation of the latest version of VirtualBox.
Clean means - you must first uninstall any other versions of VirtualBox and reboot Windows to complete the uninstallation. This ensures that old VirtualBox files do not remain in the system memory and on the disk. Unfortunately, the VirtualBox installation sometimes cannot perform a complete uninstallation without a reboot, so reboot after uninstallation.
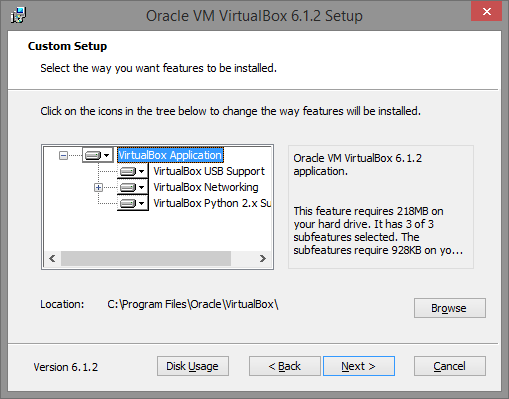
- Start the installation and select the VirtualBox components to install, as shown in the image below.
Step 2: Create a VM with the necessary settings
In this example, we install and configure VirtualBox on a x64 PC with a fully patched Windows 8.1.
Create a new virtual machine (in this example, it will be called "vm0", but you can call it whatever you like) and configure it as follows:
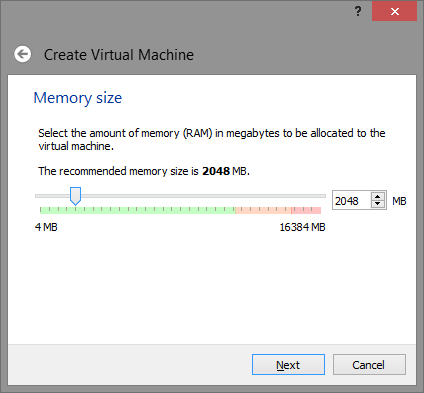
Note: 2048 MB is not mandatory, you can change or reduce this value at your discretion.
Configuring a virtual disk
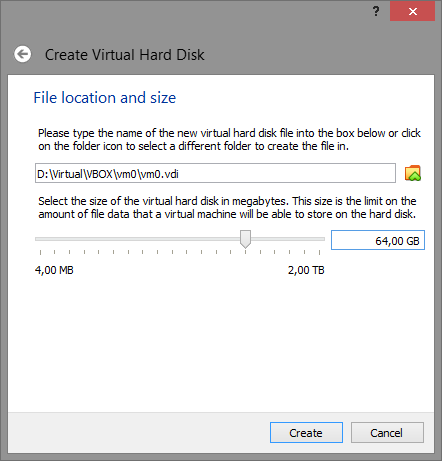
Note: 64GB is not a requirement and is used as an example only, however again some unconvincing malware will try to detect a VM based on the hard drive size, so make sure to specify a reasonable size (>32GB).
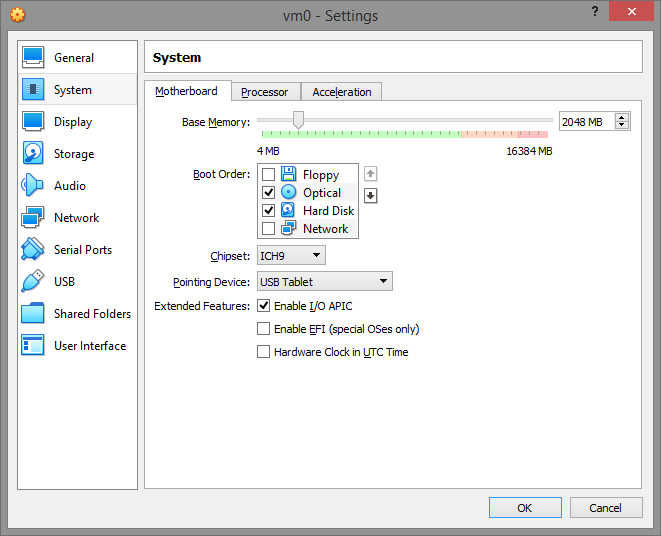
Once the VM (in our case vm0) is created, open its setup and make some changes.
System
On the Motherboard tab, make sure the I/O APIC is enabled. If you plan to use EFI, read Appendix A: Using an EFI VM.
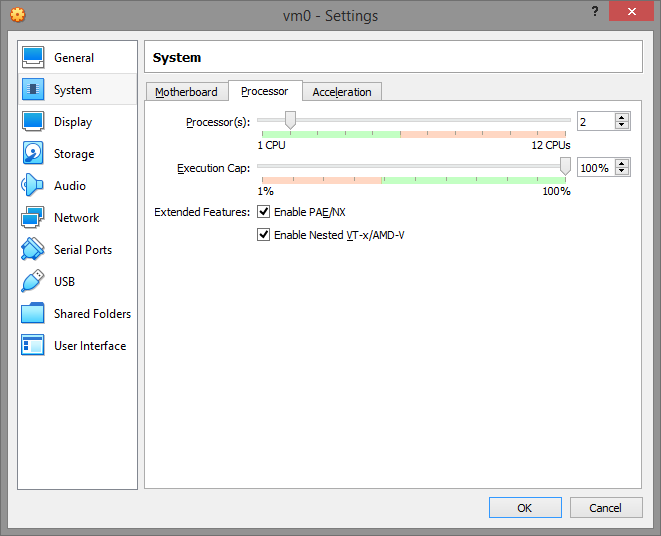
In the Processor tab, make sure PAE/NX is enabled. Also note that your VM should have at least TWO CPUs because again, the number of CPUs used by malware to determine the execution of the VM. So give the VM at least two CPUs.
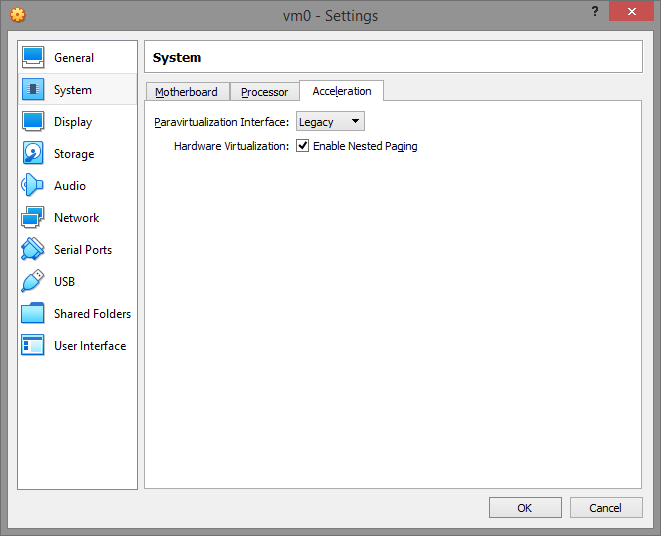
On the Acceleration tab, set the paravirtualization interface to Legacy and enable VT-x/Nested Paging. The "default" paravirtualization interface gives the VM the ability to detect the VirtualBox hypervisor by the "hypervisor present bit" and the hypervisor name using the cpuid instruction. Switching the paravirtualization interface to "Legacy" effectively disables these vm-detect-friendly malware.
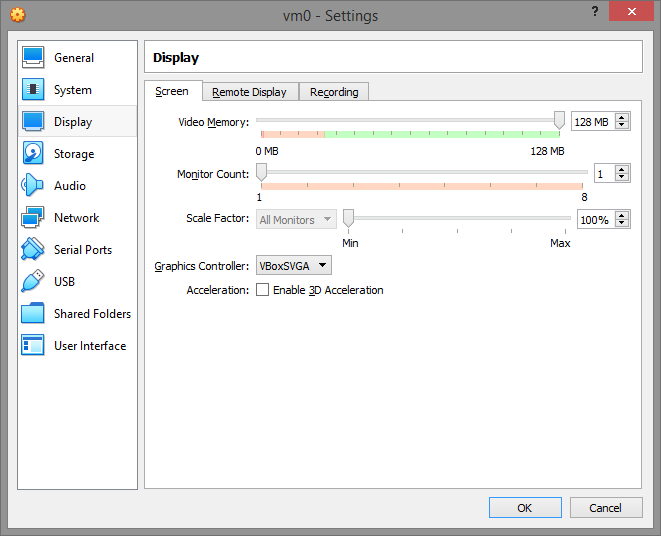
Display
In the Display tab, disable 3D/2D acceleration
Memory
The storage configuration will look like this
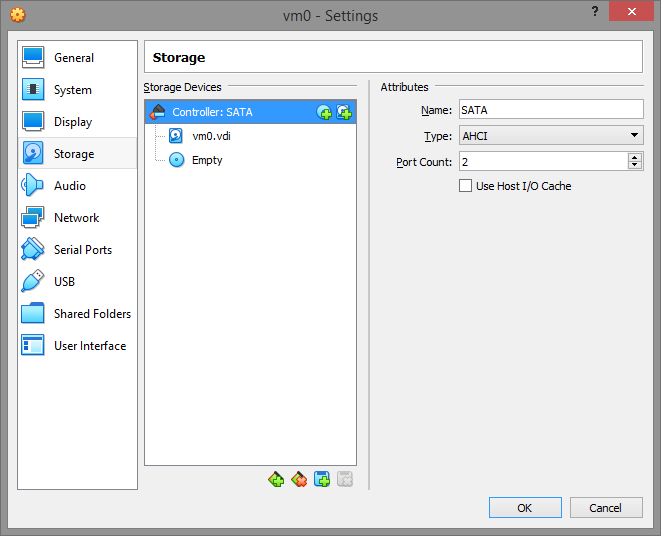
You can use an IDE controller instead of SATA, but we'll assume you'll use SATA by default next time.
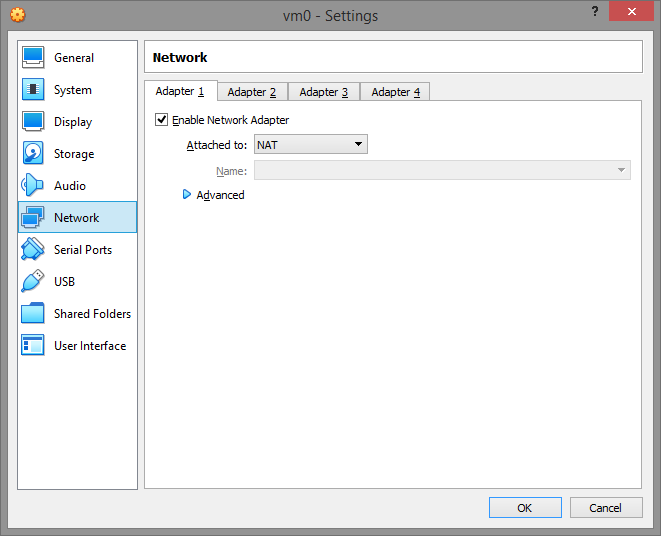
Network
Enable NAT for the virtual machine so you can use FTP-like programs to communicate with it, and the machine has access to the Internet (if you have it)
After all the settings are set, click OK.
Now it's time to mask our virtual machine. Close VirtualBox and save the repository developed for these purposes (https://github.com/hfiref0x/VBoxHardenedLoader/tree/master/Binary) to any convenient location, for me it will be "C:\VBoxLdr". Go to the folder we downloaded and open data\hidevm_ahci.cmd using Notepad.
We will need to change 2 lines.
set vboxman="C:\Program Files\Oracle\VirtualBox\vboxmanage.exe" (The first line is the location of VirtualBox, I have a standard location, so I do not change it)
set vmscfgdir=C:\VBoxLdr\data\ (The second line is the location of the hidevm_ahci.cmd file, in my case I changed from D:\Virtual\VBOX\Settings\ → C:\VBoxLdr\data)
after the changes, save the file and open the command line (Win + R, then type cmd in the window that opens). Go to the C:\VBoxLdr\data folder (cd C:\VBoxLdr\data) and run the hidevm_ahci.cmd file
Note: if VirtualBox opens for you, close it.
After the program is finished, type (cd C:\VBoxLdr) and run the loader.exe file.
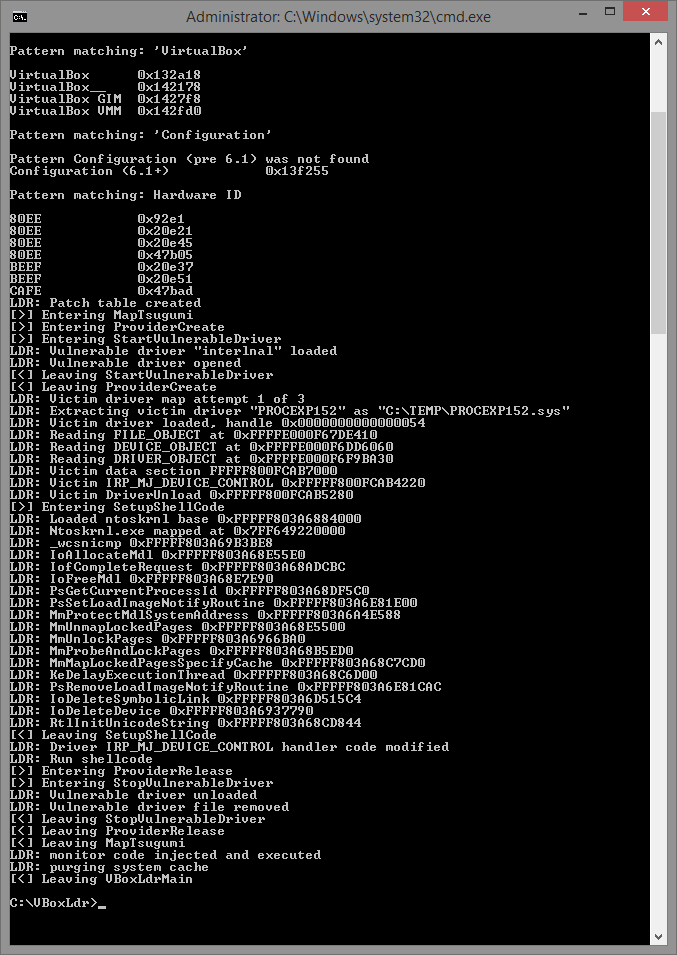
Note: the loader.exe file must be launched after each computer reboot.
After the program has finished, you can close the command line and launch our Virtual Machine.
We need to install Windows, it is very important to install the American or European version (Never install repacks with Russian language support). There is plenty of such stuff in American and European torrent boards and other places.
If you did everything correctly and your virtual machine starts, then go to the Internet and download the Pafish test (https://github.com/a0rtega/pafish)
We should have as many possible completes as possible, and as few failed ones as possible)))
Now let's collect our set of tools for work:
1. Ccleaner Premium
2. BleachBit
3. Technitium MAC Address Changer
4. ProxyFire + 911.re
Then it's a small matter, Change the MAC address, completely clean the virtual machine, set up a bundle of ProxyFire + 911.re and also with its help close WebRTC into itself, and not worry about possible leaks. I also advise you to install 2 browsers, for example Fox (for mail, proxy checking, etc., etc.) + Google (working). As a result, we get Almost free (you only need to buy a proxy) and a fairly high-quality machine that perfectly masks virtualization tools and for most fraud we are an ordinary buyer sitting on a home computer Somewhere in Florida.
(Note: do not forget about the search engine, because you most likely downloaded the tools without a proxy and VPN, you will automatically have some Yandex, etc., this is completely unacceptable, in my opinion, Yahoo or Google will work well)
We will build our machine on VirtualBox, after installation we need to configure it.
Step 1. Installing VirtualBox
- Download VirtualBox from the official website (https://www.virtualbox.org/wiki/Downloads)
- Perform a clean installation of the latest version of VirtualBox.
Clean means - you must first uninstall any other versions of VirtualBox and reboot Windows to complete the uninstallation. This ensures that old VirtualBox files do not remain in the system memory and on the disk. Unfortunately, the VirtualBox installation sometimes cannot perform a complete uninstallation without a reboot, so reboot after uninstallation.
- Start the installation and select the VirtualBox components to install, as shown in the image below.
Step 2: Create a VM with the necessary settings
In this example, we install and configure VirtualBox on a x64 PC with a fully patched Windows 8.1.
Create a new virtual machine (in this example, it will be called "vm0", but you can call it whatever you like) and configure it as follows:
Note: 2048 MB is not mandatory, you can change or reduce this value at your discretion.
Configuring a virtual disk
Note: 64GB is not a requirement and is used as an example only, however again some unconvincing malware will try to detect a VM based on the hard drive size, so make sure to specify a reasonable size (>32GB).
Once the VM (in our case vm0) is created, open its setup and make some changes.
System
On the Motherboard tab, make sure the I/O APIC is enabled. If you plan to use EFI, read Appendix A: Using an EFI VM.
In the Processor tab, make sure PAE/NX is enabled. Also note that your VM should have at least TWO CPUs because again, the number of CPUs used by malware to determine the execution of the VM. So give the VM at least two CPUs.
On the Acceleration tab, set the paravirtualization interface to Legacy and enable VT-x/Nested Paging. The "default" paravirtualization interface gives the VM the ability to detect the VirtualBox hypervisor by the "hypervisor present bit" and the hypervisor name using the cpuid instruction. Switching the paravirtualization interface to "Legacy" effectively disables these vm-detect-friendly malware.
Display
In the Display tab, disable 3D/2D acceleration
Memory
The storage configuration will look like this
You can use an IDE controller instead of SATA, but we'll assume you'll use SATA by default next time.
Network
Enable NAT for the virtual machine so you can use FTP-like programs to communicate with it, and the machine has access to the Internet (if you have it)
After all the settings are set, click OK.
Now it's time to mask our virtual machine. Close VirtualBox and save the repository developed for these purposes (https://github.com/hfiref0x/VBoxHardenedLoader/tree/master/Binary) to any convenient location, for me it will be "C:\VBoxLdr". Go to the folder we downloaded and open data\hidevm_ahci.cmd using Notepad.
We will need to change 2 lines.
set vboxman="C:\Program Files\Oracle\VirtualBox\vboxmanage.exe" (The first line is the location of VirtualBox, I have a standard location, so I do not change it)
set vmscfgdir=C:\VBoxLdr\data\ (The second line is the location of the hidevm_ahci.cmd file, in my case I changed from D:\Virtual\VBOX\Settings\ → C:\VBoxLdr\data)
after the changes, save the file and open the command line (Win + R, then type cmd in the window that opens). Go to the C:\VBoxLdr\data folder (cd C:\VBoxLdr\data) and run the hidevm_ahci.cmd file
Note: if VirtualBox opens for you, close it.
After the program is finished, type (cd C:\VBoxLdr) and run the loader.exe file.
Note: the loader.exe file must be launched after each computer reboot.
After the program has finished, you can close the command line and launch our Virtual Machine.
We need to install Windows, it is very important to install the American or European version (Never install repacks with Russian language support). There is plenty of such stuff in American and European torrent boards and other places.
If you did everything correctly and your virtual machine starts, then go to the Internet and download the Pafish test (https://github.com/a0rtega/pafish)
We should have as many possible completes as possible, and as few failed ones as possible)))
Now let's collect our set of tools for work:
1. Ccleaner Premium
2. BleachBit
3. Technitium MAC Address Changer
4. ProxyFire + 911.re
Then it's a small matter, Change the MAC address, completely clean the virtual machine, set up a bundle of ProxyFire + 911.re and also with its help close WebRTC into itself, and not worry about possible leaks. I also advise you to install 2 browsers, for example Fox (for mail, proxy checking, etc., etc.) + Google (working). As a result, we get Almost free (you only need to buy a proxy) and a fairly high-quality machine that perfectly masks virtualization tools and for most fraud we are an ordinary buyer sitting on a home computer Somewhere in Florida.
(Note: do not forget about the search engine, because you most likely downloaded the tools without a proxy and VPN, you will automatically have some Yandex, etc., this is completely unacceptable, in my opinion, Yahoo or Google will work well)
Last edited by a moderator:
 Final Answer:
 No, you do NOT need a VPN if you're using a residential SOCKS5 proxy
 Why?
Why? In 2025, the best setup is:
 Why You Should Drop the VPN Altogether
 While this flow:
 Tools That Work Without a VPN
 What to Do If You Need Extra Protection
 Which Proxy Providers Work Best?