Windows 7 main, Must Have Soft, Carding Soft

Tomcat

Professional
Messages
1,008
Reputation
3
Reaction score
146
Points
63

Chapter 1: Windows 7 main, Must Have Soft, Carding Soft (Prepare your anus)​

November 08, 2017
dbac2ac409b99b8edd71a.png


Let's start learning!​

It is based on the idea of maximum simplicity and maximum money saving. If you are pinned to buy some software, services, or something else and you have extra money for it - the author is only happy for you. But newcomers do not have such an opportunity, given the current dollar exchange rate and the situation with work.
Perhaps it will seem to someone that this article contains a lot of water, or unnecessary information.
In the article, we start from the maximum savings, but do not forget about the minimum security. There will be no purchases of VPN, Dedicated servers, software at first. We have no money for this. But we will have to buy cards, socks, SSH tunnels, since the extraction of this material will be discussed in another article. In the future, there will be articles about hacking a store, or about extracting SSH tunnels, soon such articles will appear here.
For the reader:
If you decide to take up carding, then you need a passable knowledge of the English language, computer skills at the level of an experienced user and, most importantly, a desire with patience. Good luck.

Part 1: Windows 7 main
The first thing to start with is creating a working machine. First, we need a laptop with at least an i3, 4gb Ram processor. It is a laptop, not a desktop PC, since a laptop is much safer than a PC for a number of reasons (more on that at the end of the article). If you don't have a laptop, that's okay, but get one.
We'll start by installing the original Windows 7 image, without any cracks or anything else. To do this, follow this link: http://rutracker.org/forum/viewtopic.php?t=4529698

Download Windows 7 Ultimate x64. Before proceeding with the installation, make sure to write all the necessary drivers for your device (on which you will install Windows) to any removable media.

Reinstalling Windows is necessary so that you have a clean system at your disposal and we set it up from scratch. From the moment you start installing Windows, your device will no longer be suitable for anything other than illegal work. If you work somewhere else where you need the Internet, buy another device, or forget about any social networks and so on.

The original image is needed so that in the future there are no problems with installing additional libraries that will be needed in the work. Leave the various assemblies to the students, as the assembly is often truncated, and various services are removed from it, which may be useful in the future. The authors of the assemblies add their software and utilities to these assemblies, which we do not need at the stage of work.
So format your hard drive and install fresh Windows and drivers and read on. If you are not able to install Windows on your laptop yourself, further reading will not help you. Go get some PC experience.

Part 2: Must Have Soft
After installation, any system requires minimal configuration and mandatory software, without which work is impossible. In our case, the set of software will be minimal.
Download Google Chrome immediately after installation. Not Firefox or Opera, but Google Chrome - https://www.google.ru/chrome/browser/
Now a little about setting up Windows itself (Chrome will wait).
Right-click on the Start bar and select Properties. Uncheck the checkbox: Use Aero Peek ..., click Apply, and then click the Notification Area -> Customize button and select the Always display checkbox ... This is necessary in order to see quickly and without problems what is running in the tray , and see instant notifications.
I also recommend choosing the settings in the Start panel settings: Use small icons and Taskbar buttons -> Do not group.

After downloading Chrome, go to the main software, which you need to download and install:
1. WinRar - http://www.rarlab.com/download.htm - software for working with archives. Must Have.
2. TotalCommander - http://www.ghisler.com/download.htm - file manager, as well as Must Have software for working with various information. Without it, no way in the future.
3. Notepad ++ - https://notepad-plus-plus.org/download/v6.8.3.html is the best text editor. After installing it, do the following:
Options - Settings - File Association and add files with extensions as in the screenshot to Registered. In the future, we will only use Notepad ++ for editing files and other things.
4.uTorrent - http://www.utorrent.com/intl/ - torrent rocking chair, without it anywhere.
Don't forget to uncheck the boxes:
5. KeePass - http://keepass.info/download.html is a useful program for storing passwords. It is important to use different passwords everywhere, and it is also better to generate them using the program itself. These passwords are harder to crack.
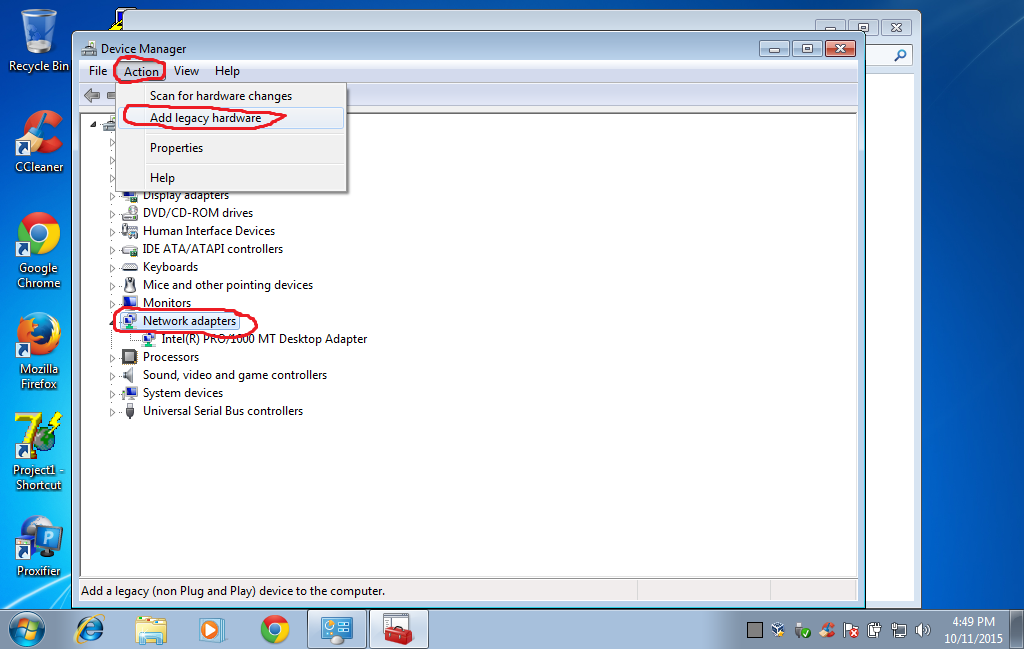
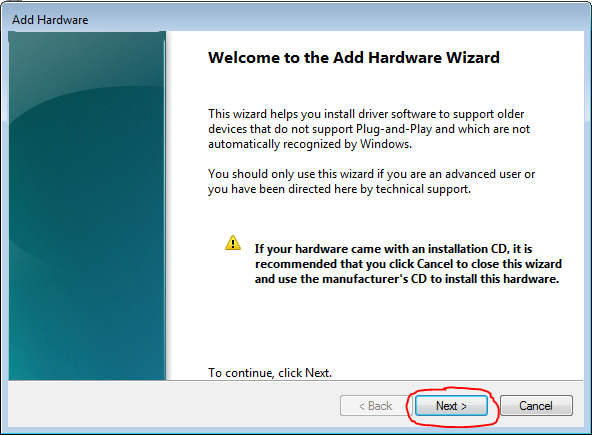
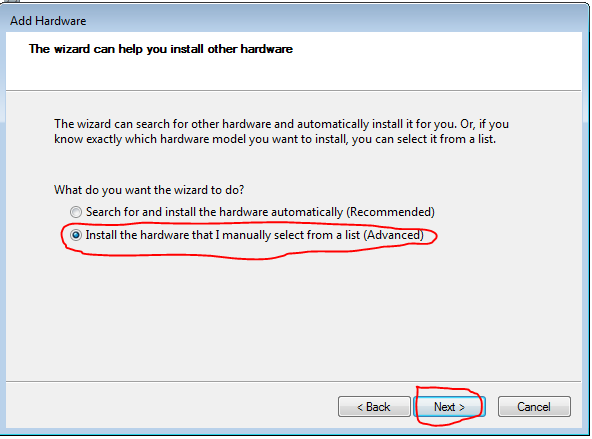
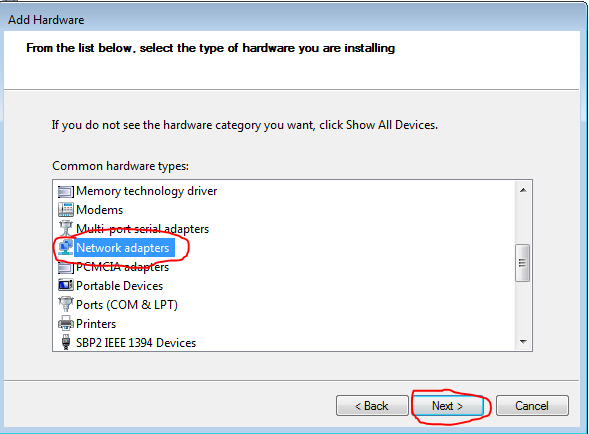
6. Oracle VM VirtualBox - https://www.virtualbox.org/wiki/Downloads - virtual machine for further work. There is a lot of debate about choosing VMWare or VirtualBox, but I prefer VirtualBox, so we will use it.
7. DAEMON Tools Lite 10 - http://www.daemon-tools.cc/rus/downloads - a program for working with images. An extremely useful thing.

This concludes with Must Have Soft. We put only this, do not forget to uncheck the suggestions for installing additional software. We don't use any keygens or cracks. In most cases, the software is free, or not very annoying with the offer to buy it. You don't need to put anything in addition, just this.

Part 3: Carding Soft (Prepare your anus)
After we have installed all the necessary software for minimal work with a PC, we switch to the software that we need to interact with the carding community. Since we use the homeless option and do not have extra money, we will create our security with minimal effort.

To visit forums and, in general, any platforms related to carding, download the Tor Browser - https://www.torproject.org/projects/torbrowser.html.en
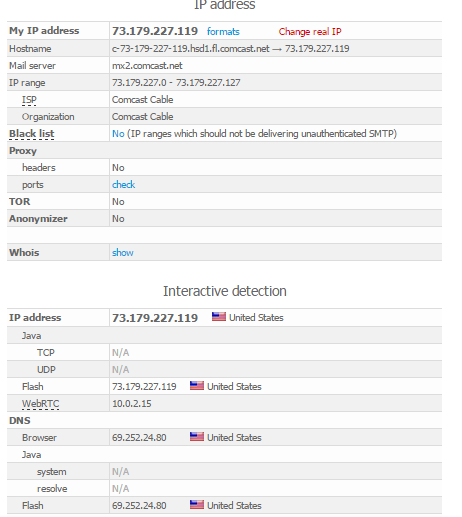
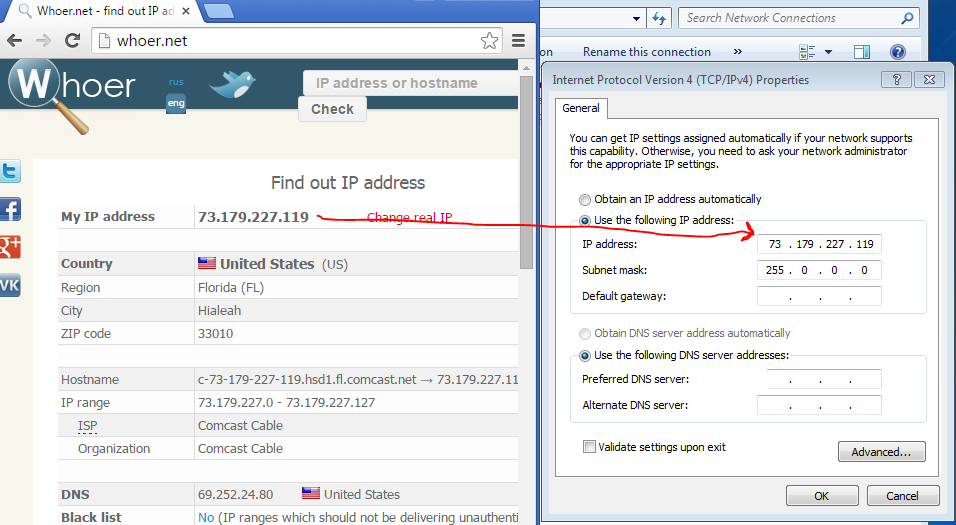
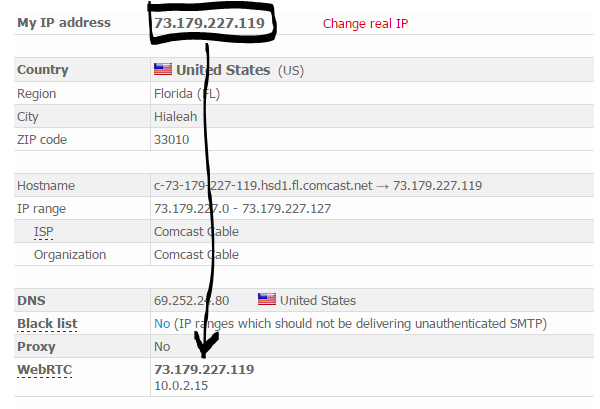
After installation, go to http://www.whoer.net and take a look. Should not be fired anywhere.
With the help of this browser, we register on all forums that we need, and use only it. Importantly, when registering, most forums ask you to enter your email address. Use the service directly from TOR Browser: https://10minutemail.com/10MinuteMail/index.html
This is a 10 minute email. In general, try to use it for any registrations. And in order not to forget your password, do not forget to generate and save passwords using the KeePass program that we downloaded earlier. The main thing is not to leave any traces about yourself on the forums. Even if the base is removed, all the hackers will have: MD5 hash of your complex password, some left email (which you also used with TOR Browser), and left IP addresses, again because of TOR Browsera.

Do not under any circumstances neglect using this browser to surf the internet if you are carding. Particularly smart ones who will shout that this browser is under FBI / CIA / MI6 / ETC ... send in the direction of santa claus pipiski. We do not give a fuck about who this browser is, we would not shine our IP yet. And since we are newbies, few people are interested in us.

Now let's move on to an equally important aspect - a means of communication. We will have to communicate with people. Jabber is best suited for this business. Forget about Skype, ICQ, Viber, Telegram and more. If the right person does not have Jabber, we don't need him, let him go to hell.

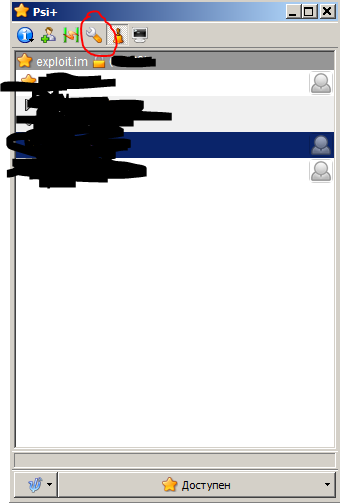
We use the Jabber client Psi + - http://psi-plus.com/wiki/ru:downloads#%D0%...D0%B2%D1%8B_psi - a handy thing with a bunch of useful plugins. Let's dwell on its setting in more detail.

After installation, we need to create an account and select the server on which our account will run:
In the server field, specify - exploit.im
The choice falls on him, since at the moment he is the most relevant and reliable (in the opinion of the author).
Now let's move on to setting up.
aeb72829744a4e4c357ba.png

The first thing we need to configure is OTR (Off-the-Record Messaging (OTR)), a cryptographic protocol for instant messaging systems created in 2004 by Nikita Borisov and Ian Goldberg.
Everything is simple here:
>> Settings -> Plugins -> Off-The-Record messaging plugin -> Activate the checkbox -> Click on the settings icon -> Generate a new key.
In the picture I have depicted everything, even a child can figure it out.
At this stage, we will not bother with PGP, in most cases few people use it. For now, enough OTR. To activate OTR, when working with a new contact, click on the icon:
fdc9ac1504f0aff57fb87.png

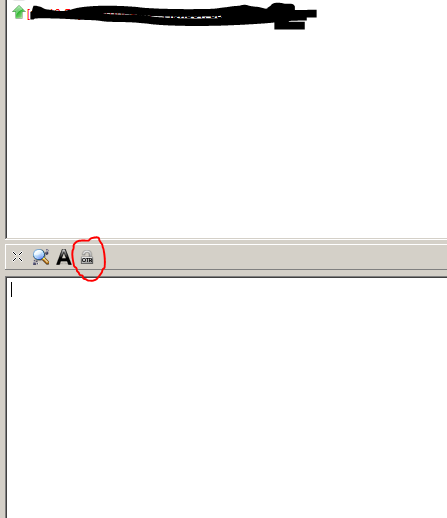
And choose Start Private Chat.
Oddly enough, before this is enough for work. Psi + and TorBrowser. VPN, TrueCrypt and so on, we will put in other articles, since now we have nothing to hide, and our first work will be connected only with electronic things and stuff. When we start hacking, uploading and muddying something else, then we'll talk about encryption in more detail. It's a waste of time for a beginner to bother with this.

Now let's configure a little more, turn off the virtual machine, and go to configure.
Go to the tab: General -> Advanced -> Shared Clipboard -> Bidirectional.
Go to the tab: System -> Processor -> Processors and select 2 cores
Go to the tab: Display -> Video -> Video memory -> change to 128MB. Also put the checkboxes Enable 2D acceleration and Enable 3D acceleration.
Go to the tab: Shared folders -> Click on add, also activate Auto-connect. Specify the folder on any disk, this will be a shared folder through which we will upload files to our virtual machine.
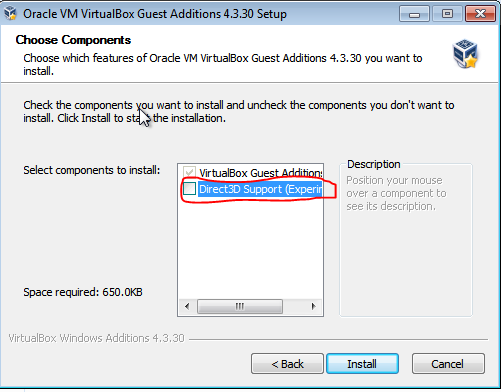
We also need to install the Guest OS Add-ons. To do this, click on Devices -> Connect ...
Just click Next -> Next, but don't forget to check DirectSupport 3D, then No -> Ok:
36e3fb12b74efcb8a551a.png

That's all for now, let's move on to the next chapter.
 

Tomcat

Professional
Messages
1,008
Reputation
3
Reaction score
146
Points
63

Prepare Your Carding, Fingerprint.​

77e1b8d2de1118f349d62.png


Part 4: Prepare Your Carding
We return to our main system (not a virtual machine), and start downloading everything into one folder. Let's call it: Work2015
First, the software:
1. Proxifier - https://www.proxifier.com/download.htm - a proxification program that will allow us to change our IP address.
2. Putty - http://www.chiark.greenend.org.uk/~sgtatha...y/download.html - a client for working with tunnels.
3. CCleaner - https://www.piriform.com/ccleaner - cleaner for everything and everyone. Let it be, come in handy
4. Vbivotron - https://www.sendspace.com/file/n9nhv6 - converts text from the clipboard to manual input. It works easily, I don't remember where I found it, but it's crap useful, so let it be too.
5. WinRar - http://www.rarlab.com/download.htm - software for working with archives. Must Have. The virtual machine also needs software to work with archives. Let it stand.

After downloading, we drop our Work2015 folder into the Shared folder with our virtual machine, which we created before and copy the whole thing to our hard disk (to the virtual hard disk, in my case it is C: /). And then we do the installation.
You don't need to install Putty, just drop the shortcut to your desktop. Vbivotron does not need to be installed either, just send the shortcut to your desktop.
When installing CCleaner, do not forget to uncheck the boxes with suggestions for installing additional software
...

After installation, download the following browsers:
1. Opera
2. Chrome
3. Firefox

Install them and restart your computer.
You should end up with something like this:
61db5485e9ca227c38146.png


Now let's move on to being an American. We return to our main system (not a virtual machine), and register in good socks services, and services for the sale of tunnels. Attention! Good proxies are the ones from which the drives pass. Good service means, for example, https://vipsocks.club
I use it myself)

Don't forget to use TorBrowser and KeePass to create passwords.

After you have settled down, throw in some money and buy any USA socks.
You will get something like this: 212.129.55.243:49472
f642accce8655f073e3a2.png


Click Continiue ..., go to Profile -> Proxy Servers -> Add and enter our SOCKS5. Also, do not forget to select SOCKS5 in the Protocol section.
6712d40208a02524aa8a2.png


Save, now go to Profile -> Name Resolution -> uncheck Detect DNS settings automaticly and tick Resolve hostnames through proxy.
22658b5a75ec848c367b1.png


Click Ok, launch the browser and go to http://whoer.net/extended
You should end up with something like this:
0074e55f41a16c40c06f9.png


We also change the time for the soks, and everything should be in openwork. We are almost American.
There is little left to do, many are firing the so-called WebRTC, and instead of USA it shows UA / RU, or something else, but not USA. Especially dumb students just block it. But if you think logically, what the hell does an ordinary user know about WebRTC, let alone block it? Superfluous left.

There are three ways to solve the problem:
1. Block it using your browser. It is possible, but stupidly and pale.
2. Show just the value a la: 10.0.2.15. It is possible, but I have not yet determined how strongly this affects the anti-fraud, so I will not advise you.
3. Show the IP of our socks. The most logical and optimal. Therefore, we will go exactly this way.

Let's get started. We open our virtual machine, and we do all the actions on it. We do not touch the main car.
First, we need a Firewall, we will use the standard one that is in Windows 7.
Go to Control Panel \ System and Security \ Windows Firewall and click on Advanced Settings.
25d80bbd1311132b65ccf.png


Next click: Windows Firewall Propeties
4045fad25df268724eb68.png


Then, in three tabs, such as Domain Profile, Private Profile, Public Profile, change the value of the Outbound Connections field to Block and click Apply.
1b404c9d3da07501da550.png


Now go back to Control Panel \ System and Security \ Windows Firewall -> Advanced Settings. Click on Outbounding rules and click New Rule.
53e6a1a24363ed97c7606.png


Select the item Port -> Next
a1527b63a029117a806ca.png


Select TCP and All remote ports -> Next
f9ffcd748bd7a8667936c.png


Next, select Allow the connections -> Next
In the next step, we just leave everything unchanged.
8e7e20f91eed404328cd5.png


We come up with a name for our rule, in my case it is Rule123 -> and click Finish.
d35d50318654444ebc040.png


We close the windows, and go along the following path: Control Panel \ Hardware and Sound and click Device Manager
bb7ce8cce4c639f4c8b63.png


The device manager will open, there we first select Network adapters -> press the Actions button -> Add legacy hardware
2cb13f56fa4653bd4928b.png


A window appears in which you must click Next
98f62023c801a5e5ff46c.png


On the next tab, select Install the hardware that I manually ...
eb3c6ddab6e715523be4b.png


Select Network adapters from the list of equipment and click Next
b055f680d9b08a76caaa8.png


Select Microsoft from the Manufacturer list, then select Microsoft Loopback adapter from the Network Adapter list.
566c0e0be90f3230790e7.png


In the next window, just click Next, wait a bit, and click Finish
6062b3c7e1914c1e850c7.png


We close all windows, and now we go along the path Control Panel \ Network and Internet \ Network Connections and find there our adapter, which we created before.
f1cc0275f7304fec66760.png


Right-click on it and select Propeties, then select Internet Protocol Version 4 and select Propeties
96e9e146a95169da88a91.png


We select Use the following IP adress and there we register the IP of our socks, which shows us whoer. In the Subnet mask field, write the value 255.0.0.0
c2bdfb920085e3f563cbf.png


We close the whole thing, now we run the command line on behalf of the Administrator. To do this, click Start -> in the search field, type cmd, and right-click, selecting Run as administrator.
64a5da10e4368c614f8ff.png


In the command line, write the following command: ipconfig without quotes, and write the value of the Default gateway field. In my case it is 10.0.2.2
8b9a83ce9de56ed9a3c1a.png


Now, in the same command line, we write the following:
route add (IP address of our socks with whoer) mask 255.255.255.255 (Default gateway) metric 1

In my case, it looks like this:
route add 73.179.227.119 mask 255.255.255.255 10.0.2.2 metric 1
After you have registered, press Enter, and close the command line.
We go to http://whoer.net/ and get WebRTC under the IP of our socks.
6a65f4455a913e2328f6f.png

If socks died, or you changed it, then just restart the computer, insert a new sock into the proxifier, register a new IP in our created network adapter, and execute the command in the command line as administrator
route add (IP address of our socks with whoer) mask 255.255.255.255 (Default gateway) metric 1
This completes the basic settings of the virtual machine. When cloning our system, we will select the Generate new Mac addresses checkbox, so be careful, your Default Gateway may change, so do not forget about the ipconfig command to learn a new one.

Part 5: Fingerprint
Now there is a tendency that in addition to your IP address, various stores / merchants / services collect additional information about you based on the browser. This data is called fingerprints, or in Russian Fingerprints. Each browser leaves its own unique imprint, and if you do not change Windows and browser, then the office will detect you even after changing IP and cleaning all coockies.

There are several solutions to this problem:
1. Solution for the poor: after driving in, you simply demolish the Windows (you delete the fully configured system, not its copies), and perform all the settings again. Re-throwing all the software, downloading browsers and setting everything up from scratch. Long, dreary, but cheap.

2. Solution for the middle class: use Dedicated files. Each Dedicated Server is unique, as is the system with the browser. Therefore, on the one hand, this is a good decision. But Dediks are expensive nowadays (if you don't brute yourself), and are often used in various offices. And the one who used them can clean everything after themselves, and the checker in the service for selling Dedicated computers will not give it out. The solution is so-so, but it can be borne in mind.

3. Solution for the rich: buy an antidetect browser, which are now sold in large quantities (only I counted 4 sellers). The solution is so-so, but people like it.

4. Solution for the smart: if you have a gray matter in your head, then you can simply collect information on which prints your office (on which you are working) is shooting you, download the Chromium / FireFox sources and rewrite them. Unfortunately, within the framework of this article, we will not consider editing the sources and bypassing popular fingerprints, since this will be 2 times larger in size than our current article. But I'll tell you a secret - usually editing takes about a week (with coffee breaks). So if you suffer, then all this can be done. Then I'll write a little about Chromium, how to add great features and workarounds to it (if I don't forget).

5. Solution for stupid: everything is simple here, if the office fills you, then you can simply refuse it

6. Solution for pseudo-smart: you can download various plugins / extensions that block most fingerprints. Doubtful idea, but you can try.

This concludes the second chapter. railway
 
Top