
Carding Forum
Professional
- Messages
- 2,788
- Reaction score
- 1,323
- Points
- 113

Scanning a site for vulnerabilities is a necessary measure, which, together with an analysis of the source code, allows you to assess the level of its protection against threats of compromise. You can scan a web resource using specialized tools.
Nikto, W3af (written in Python 2.7, whose support has ended) or Arachni (no longer supported since February) are the most popular solutions presented in the free segment. Of course, there are others, for example, Wapiti, which we decided to stop at.
Wapiti works with the following types of vulnerabilities:
- file expansion (local and remote, fopen, readfile);
- injection (PHP / JSP / ASP / SQL injection and XPath injection);
- XSS (Cross Site Scripting) (Reflected and Persistent);
- detection and execution of commands (eval (), system (), passtru ());
- CRLF injection (split HTTP responses, session fixation);
- XXE (XML External Entity) embedding;
- SSRF (Server Side Request Forgery);
- use of known potentially dangerous files (thanks to the Nikto database);
- weak .htaccess configurations that can be bypassed;
- the presence of backup files that disclose confidential information (disclosure of the source code);
- Shellshock;
- open redirects;
- non-standard HTTP methods that can be allowed (PUT).
Possibilities:
- support for proxies HTTP, HTTPS and SOCKS5;
- authentication using several methods: Basic, Digest, Kerberos or NTLM;
- the ability to limit the scan area (domain, folder, page, URL);
- automatic removal of one of the parameters in the URL;
- multiple precautions against infinite scan cycles (example: ifor, limiting values for a parameter);
- the ability to set a priority for learning URLs (even if they are not in the crawl area);
- the ability to exclude some URLs from crawling and attacks (for example: URL logout);
- importing cookies (getting them using the wapiti-getcookie tool);
- the ability to activate / deactivate the verification of SSL certificates;
- ability to extract URL from JavaScript (very simple JS interpreter);
- interaction with HTML5;
- several options for controlling the behavior and restrictions of the crawler;
- setting the maximum time for the scanning process;
- adding some custom HTTP headers or setting custom User-Agent.
Additional features:
- creation of reports on vulnerabilities in various formats (HTML, XML, JSON, TXT);
- suspending and resuming a scan or attack (session mechanism using SQLite3 databases);
- highlighting in the terminal to highlight vulnerabilities;
- different logging levels;
- quick and easy way to activate / deactivate attack modules.
Installation
The current version of Wapiti can be installed in 2 ways:- download the source from the official site and run the installation script, after installing Python3;
- using pip3 install wapiti3 command.
The Wapiti will then be ready to go.
Working with the tool
To demonstrate how Wapiti works, we will use a specially prepared stand sites.vulns.pentestit.ru (an internal resource) containing various vulnerabilities (Injection, XSS, LFI / RFI) and other shortcomings of web applications.The information is provided for informational purposes only. Do not break the law!
Basic command to start the scanner:
Code:
# wapiti -u <target> <options>At the same time, there is a rather detailed help with a huge number of launch options, for example:
Code:
--scope - scopeIf you specify the scope parameter along with the URL for crawling, then you can adjust the site's crawl area by specifying both a separate page and all pages that can be found on the site.
-s and -x are options to add or remove specific URLs. These parameters are useful when you need to add or remove a specific URL during the crawl process.
--skip - the specified parameter with this switch will be scanned, but will not be attacked. Useful if there are any dangerous parameters that should be excluded during scanning.
--verify-ssl - enable or disable certificate verification.
The Wapiti scanner is modular. However, to run specific modules, from among those that are automatically connected during the scanner's operation, you need to use the -m switch and list the necessary ones separated by commas. If the key is not used, then all modules will work by default. In its simplest form, it will look like this:
Code:
# wapiti -u [URL]http://sites.vulns.pentestit.ru/[/URL] -m sql, xss, xxeThis usage example means that we will only use the SQL, XSS and XXE modules when scanning the target. In addition, you can filter the operation of modules depending on the desired method. For example -m “xss: get, blindsql: post, xxe: post”. In this case, the xss module will be applied to requests submitted by the GET method, and the blibdsql module will apply to POST requests, and so on. By the way, if some module that was included in the list was not required during scanning or works for a very long time, then pressing the Ctrl + C combination you can skip using the current module by selecting the corresponding item in the interactive menu.
Wapiti supports passing requests through a proxy server using the -p switch and authenticating to the target site using the -a parameter. You can also specify the type of authentication: Basic, Digest, Kerberos and NTLM. The latter two may require the installation of additional modules. In addition, you can insert any headers into requests (including an arbitrary User-Agent) and much more.
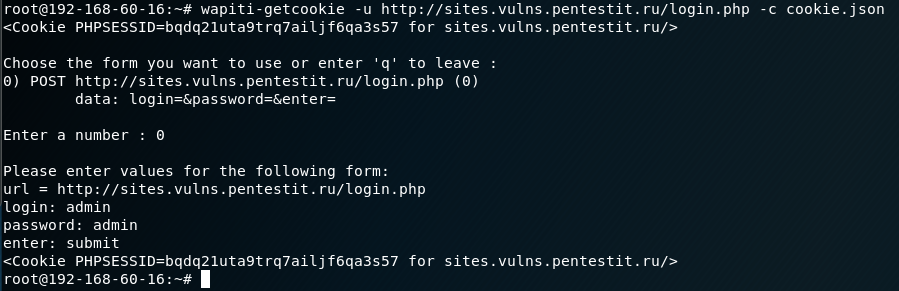
The wapiti-getcookie tool can be used to use authentication. We use it to generate a cookie that Wapiti will use when scanning. Cookies are formed using the command:
Code:
# wapiti-getcookie -u http://sites.vulns.pentestit.ru/login.php -c cookie.jsonIn the process of working in an interactive mode, we answer questions and indicate the necessary information such as: login, password, etc.
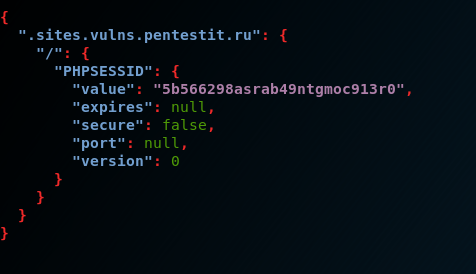
At the output, we get a file in JSON format. Another option is to add all the necessary information via the -d parameter:
Code:
# wapiti-getcookie - http://sites.vulns.pentestit.ru/login.php -c cookie.json -d "username = admin & password = admin & enter = submit"The result will be similar:
When considering the main functionality of the scanner, the final request for testing a web application in our case was:
Code:
# wapiti --level 1 -u http://sites.vulns.pentestit.ru/ -f html -o /tmp/vulns.html -m all --color -с cookie.json --scope folder --flush- session -A 'Pentestit Scans' -p http: // myproxy: 3128where, among other parameters:
-f and -o - format and path for saving the report;
-m - connection of all modules - not recommended, because will affect testing time and report size;
--color - highlight found vulnerabilities depending on their severity according to the version of Wapiti itself;
-c - use the cookie generated by wapiti-getcookie;
--scope - select target for attack. Selecting the folder option will scan and attack every URL starting from the base one. Base URL must have a forward slash (no filename);
--flush-session - allows you to re-scan, which will not take into account the previous results;
-A - own User-Agent;
-p - proxy server address, if necessary.
A little about the report
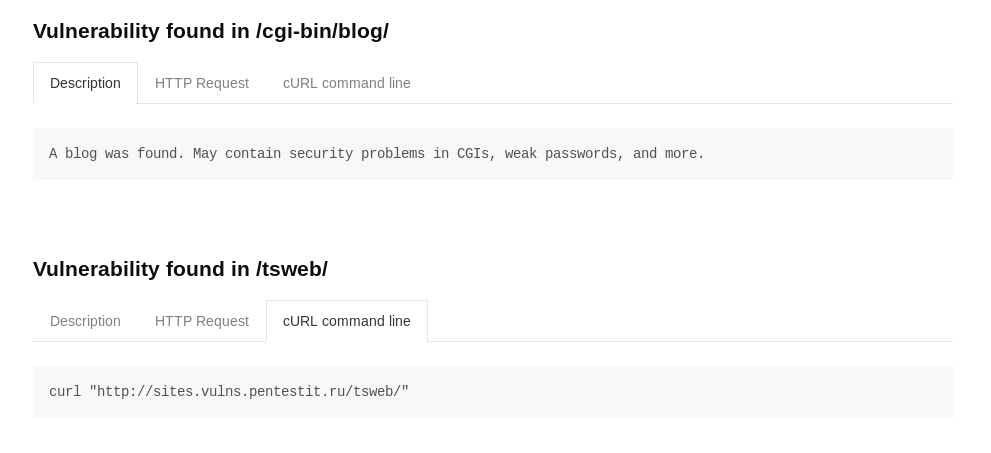
The scan result is presented in the form of a detailed report on all detected vulnerabilities in HTML-page format, in an understandable and easy-to-read form. The report will indicate the categories and number of vulnerabilities found, their description, requests, curl commands and advice on how to fix them. For the convenience of navigation, a link will be added to the names of the categories, by clicking on which you can go to it: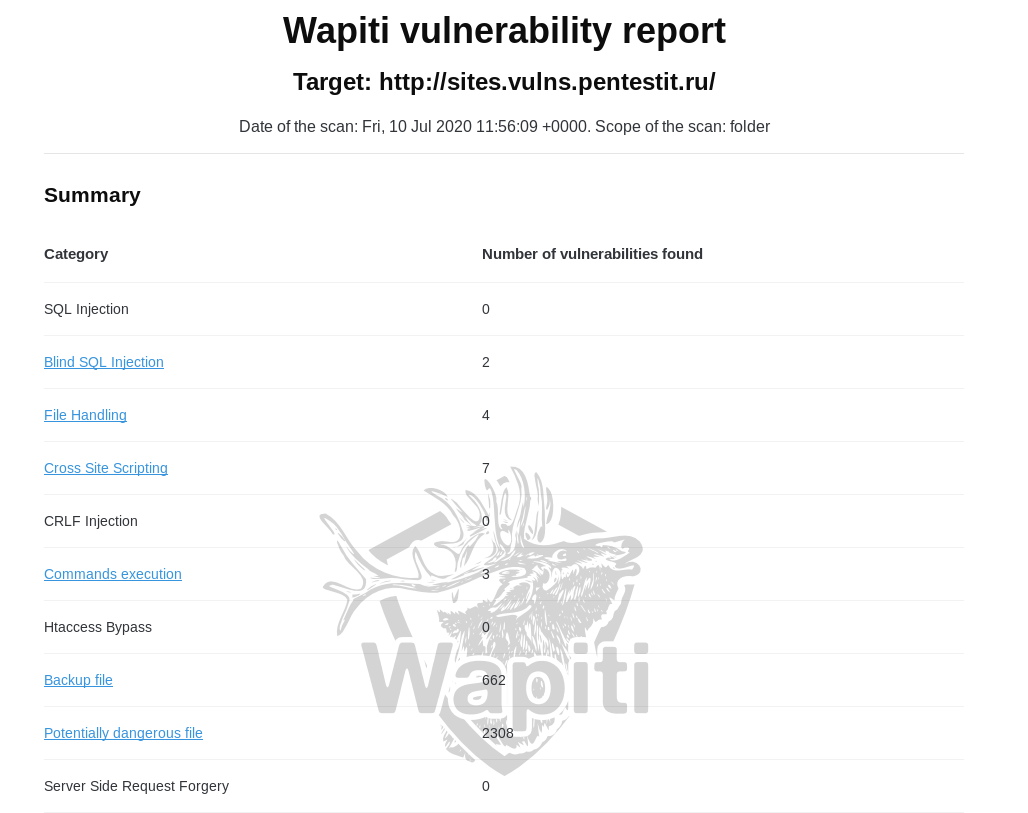
A significant drawback of the report is the absence of a web application map as such, without which it will not be clear whether all addresses and parameters have been analyzed. There is also a possibility of false positives. In our case, the report includes “backup files” and “potentially dangerous files”. Their number does not correspond to reality, since there were no such files on the server:
Possibly, incorrectly working modules will be corrected over time. Another drawback of the report is the lack of coloring of the vulnerabilities found (depending on their severity), or at least their division into categories. The only way we can indirectly understand about the criticality of the found vulnerability is to use the --color parameter during scanning, and then the found vulnerabilities will be colored in different colors:

But in the report itself, such a coloring is not provided.
Vulnerabilities
SQLi
The scanner partially coped with the search for SQLi. When searching for SQL vulnerabilities on pages where authentication is not required, no problems arise: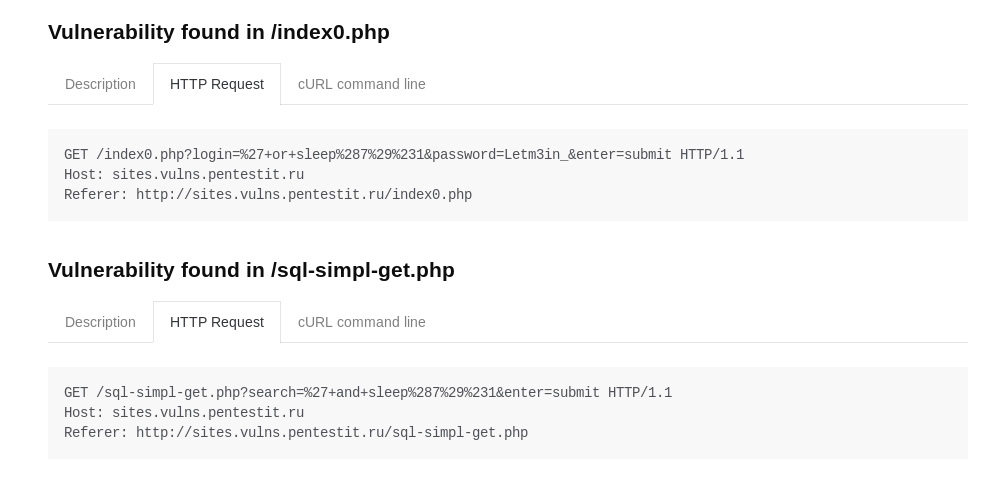
It was not possible to find a vulnerability on pages accessible only after authentication, even with the use of valid cookies, since most likely after successful authentication a "session exit" will be made and the cookie will become invalid. If the deauthorization function were executed as a separate script responsible for processing this procedure, then it would be possible to completely exclude it through the -x parameter, and thereby prevent it from being triggered. Otherwise, it will not be possible to exclude its processing. This is not a problem of a specific module, but of a tool as a whole, but because of this nuance, it was not possible to detect several injections in the closed area of the resource.
XSS
The scanner did an excellent job with the task and found all prepared vulnerabilities:
LFI / RFI
The scanner found all inherent vulnerabilities: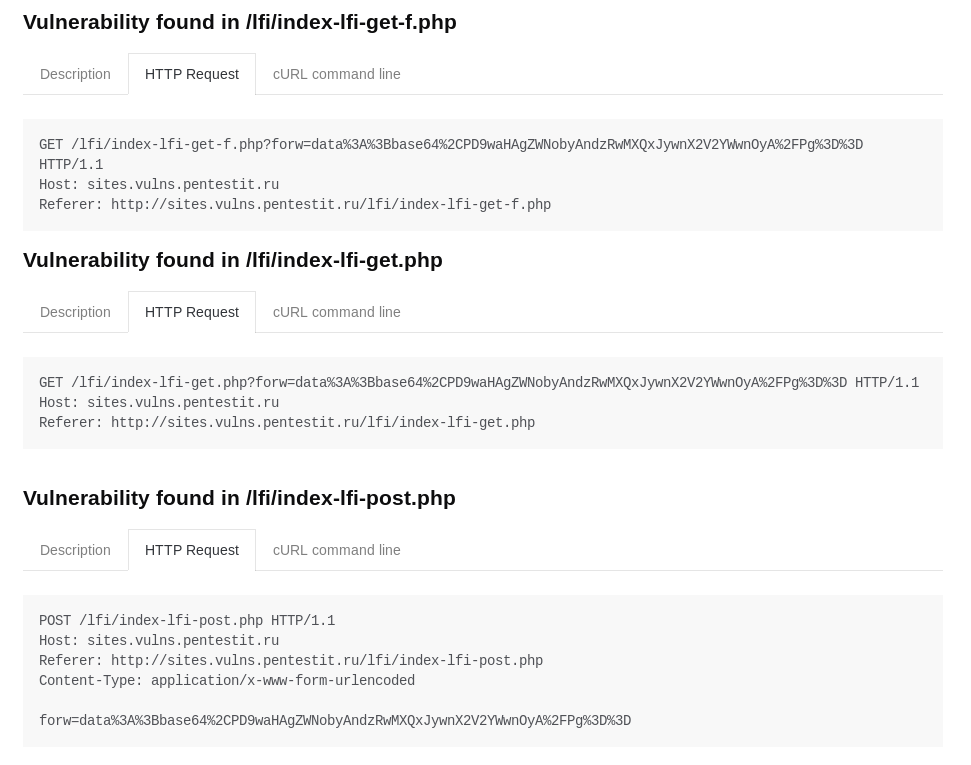
In general, despite false positives and missing vulnerabilities, Wapiti, as a free tool, shows pretty good results. In any case, it is worth recognizing that the scanner is quite powerful, flexible and multifunctional, and most importantly, it is free, therefore it has the right to use it, helping administrators and developers to receive basic information about the security state of a web application.