Carder
Professional
- Messages
- 2,620
- Reaction score
- 2,043
- Points
- 113
Your favorite porn site won't open again? And all because Zharov and Gorelkin did not like the next porn actors, maybe? It happens. And it also happens that a site with films or music does not open. Or just a newspaper or magazine website. Everything can be in our country. This is censorship. And if you do not want your “uncle” to decide for you what is good and what is bad, censorship can be bypassed. This is done simply using a VPN. Which is still allowed in the Russian Federation.
I would like to remind you that:
In this article I will tell you how to set up your own VPN absolutely free, and even in the clouds with the ability to change countries. For dark deeds, it will not work - you need a phone number and a work card. But to circumvent censorship, such a measure is just right. Moreover, often, everything works a little faster through VPN, since RKN cannot properly adjust DPI, and traffic through VPN will bypass the myopic eye of our authorities.
The fact is that the giants of the cloud service - Microsoft Azure, Amazon AWS provide an opportunity to try their services absolutely free of charge. I will say right away that all these services are really great and very convenient for implementing projects of any size. We, using the trial period, will simply set up the VPN server.
You can lift anything you want - the choice of OS is huge. But you can read about all this without me on the Internet. I'll just tell you how to register for services and set up a simple but very powerful VPN called WireGuard.
WireGuard is ideal for the user. All low-level decisions are made in the specification, so the process of preparing a typical VPN infrastructure takes only a few minutes. It is almost impossible to nafakapit in configuration
But let's start by registering with the cloud giants.
To work with SSH, we need a full set of PuTTY, so it's better to download the MSI package with an installer right away, which will install everything and create a new group in the main menu.
My screenshots will be in English for a reason. If you indicate a different country when registering, even if your card and phone number, in the event of a dispute with the authorities, it will be much more difficult for valiant employees to get an image of your disk, since at least they will have to prove that you are a Russian person and all this data will be checked for months.
First you need a Microsoft ID. This is the usual Microsoft account. Accounts from Skype or Hotmail or other MS services will do. If it is not there, go to https://account.microsoft.com/
Then go to https://azure.microsoft.com/ and select Start Free.
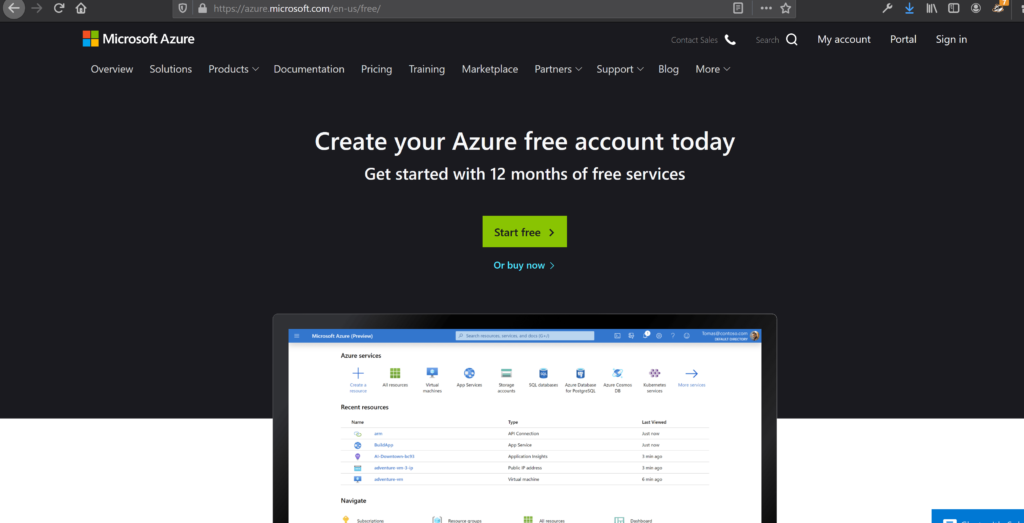
We see the following. Microsoft gives us $ 200 and a year of freebies. All you need to do is fill out the form and confirm the payment method. The money will be debited only to verify that the card is working. Also the phone number will be checked by SMS. I indicated the country Slovakia, used the Kiwi card and Tele2 number, everything went without problems.
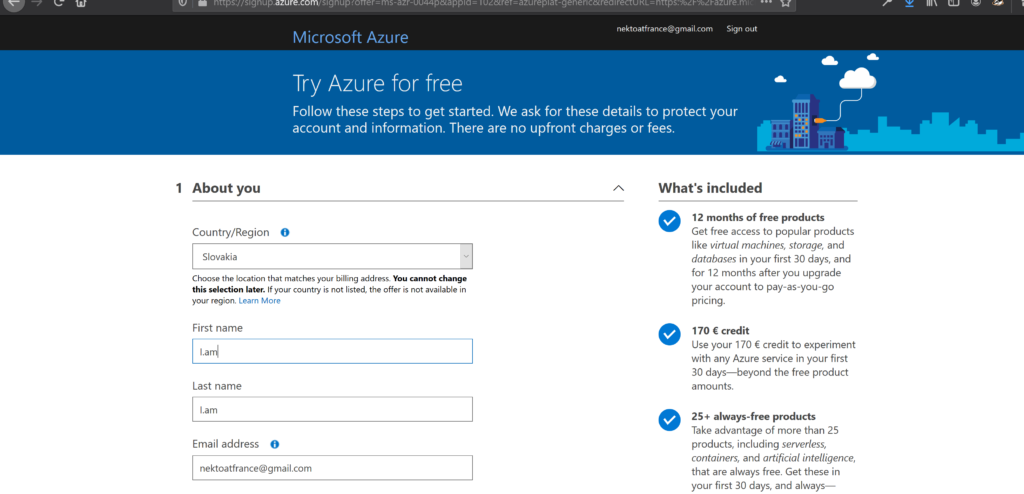
We go through the registration and get into such a menu
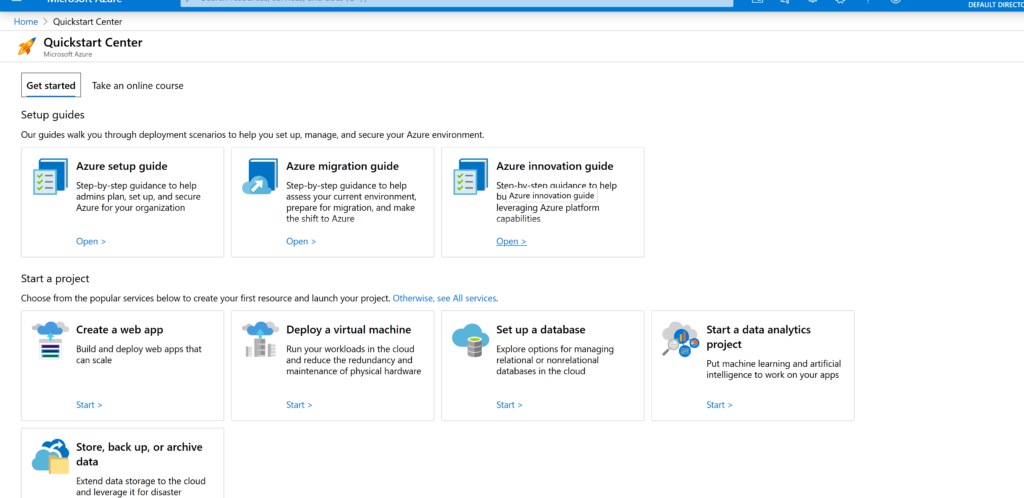
This is just a reference. You can read, or you can go straight to the point. At the top of the screen, press Home and see the following:
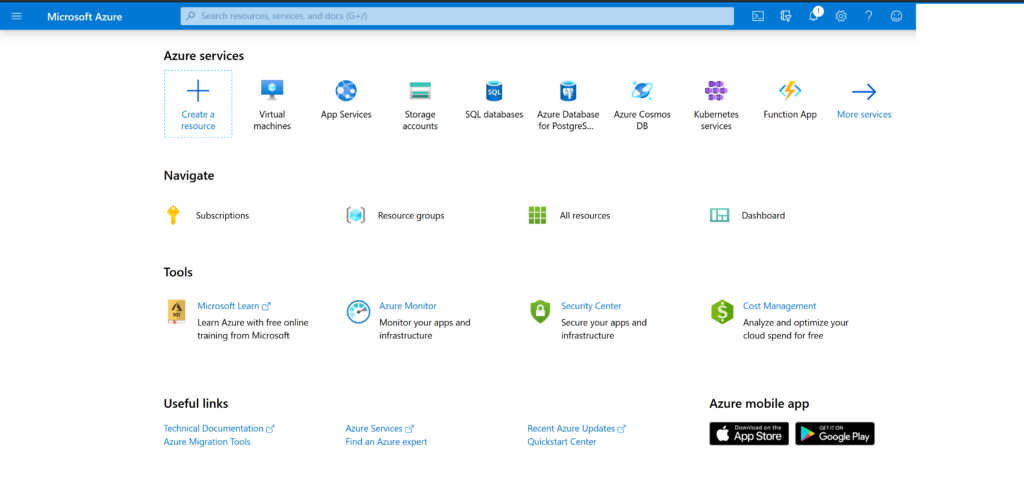
Click Create Virtual Machine. That is, we create our own virtual machine. We don't need to touch anything else here.
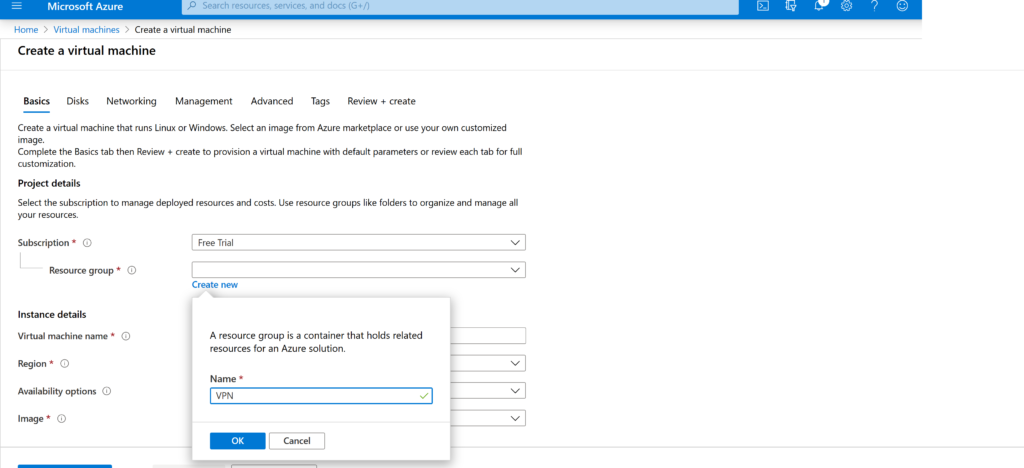
In this menu, we name the group of virtual machines, select the country and configuration. Not all countries are available in the trial version. I recommend choosing Northern Europe.
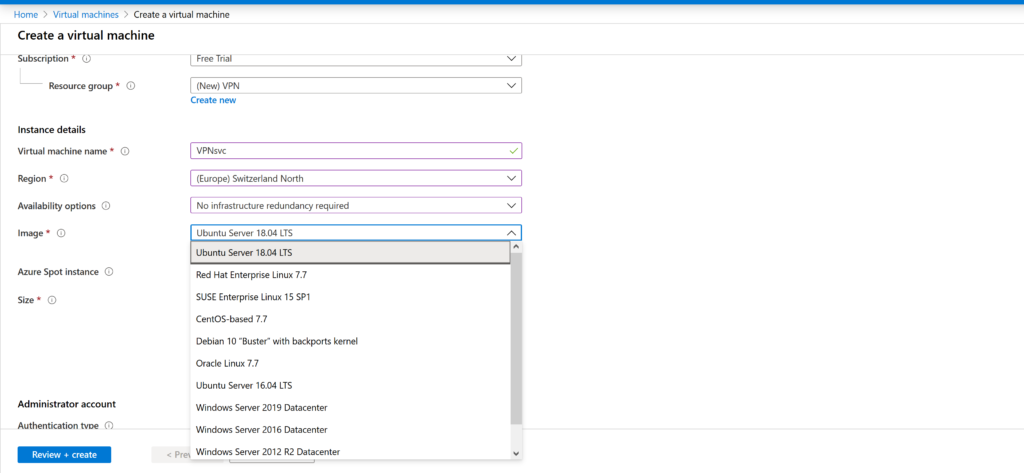
We name our instance. We choose OS Ubuntu 19.04. Below we see Change type. Click there. The cheapest configuration will work for us, but since we are given $ 200 a year, we can choose something more expensive. Indeed, in addition to VPN, the machine can always be used for other experiments. Code on it, for example, or test something.
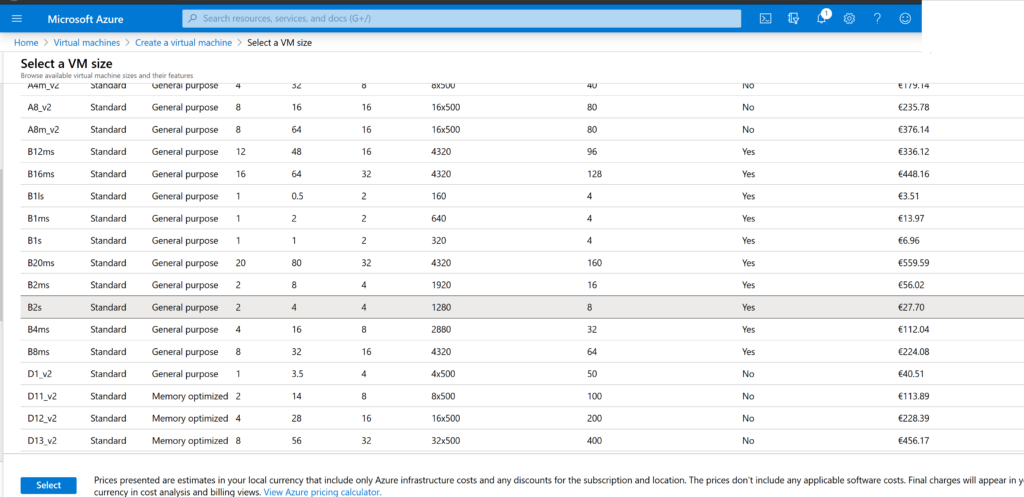
Having chosen a suitable virtual machine, we return to the previous menu.
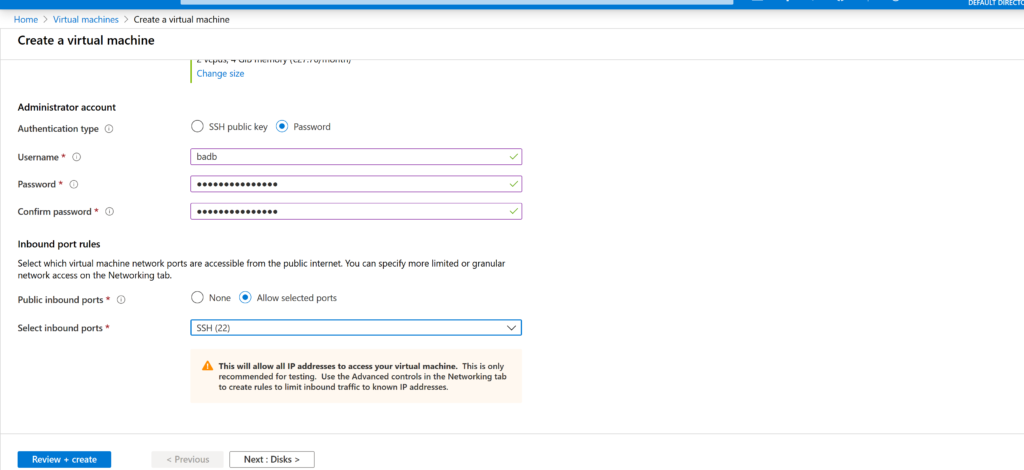
It remains only to set the login and password for the new machine and set the firewall rules. Open SSH and feel free to click Review & Create.
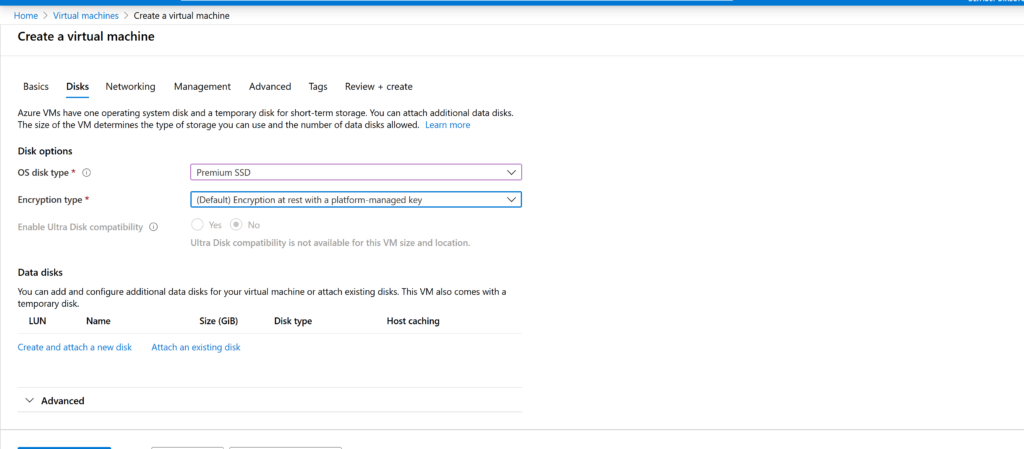
Then the choice of disk will follow - choose an SSD, you can take more space, but you won't need much for a VPN.
This will be followed by setting up network interfaces.

Install everything as in the image.
Further the same.
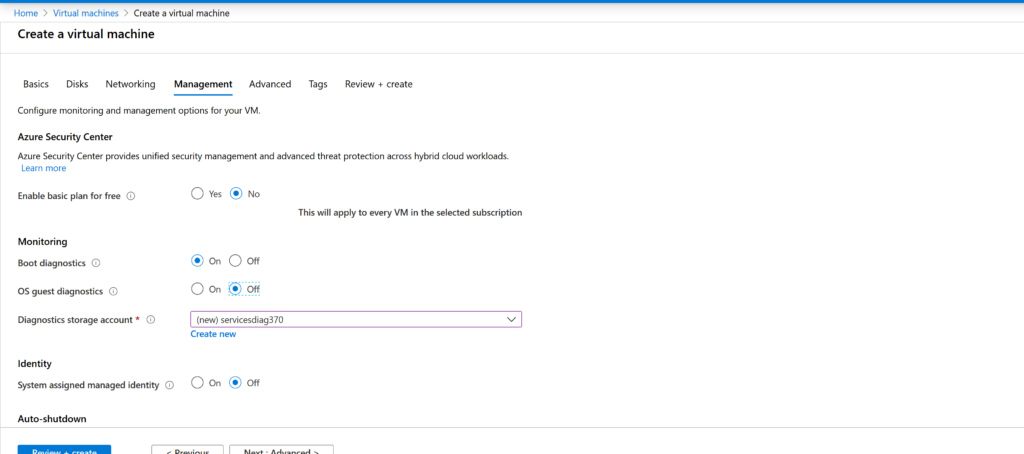
After that, the creation of your virtual machine will begin.
When finished, you will see an image like this.
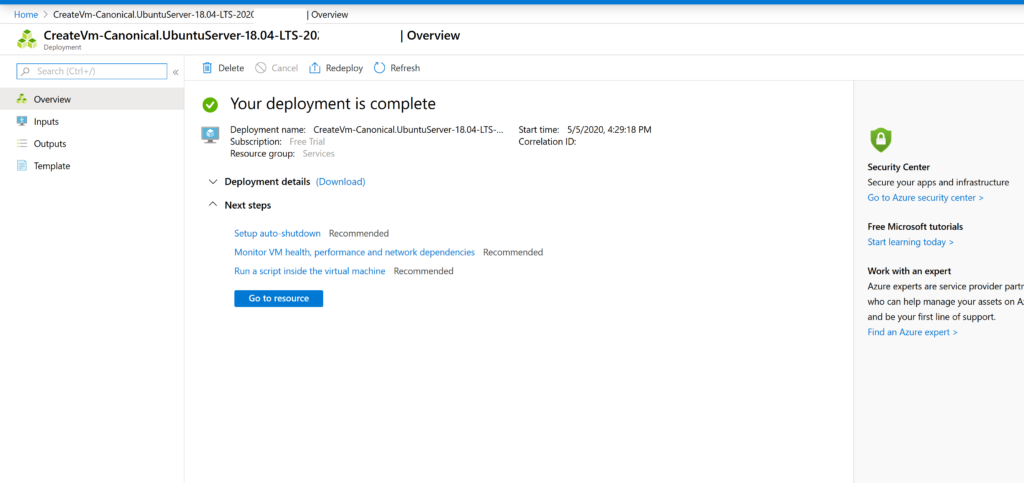
Your virtual machine is ready! Click Go to Resource.
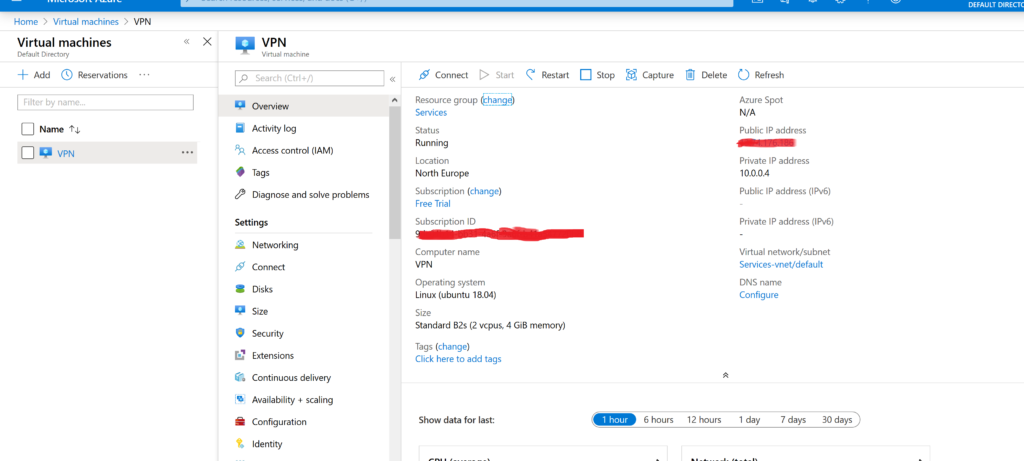
Another important step is to configure the Firewall to allow our traffic. Click Networking.
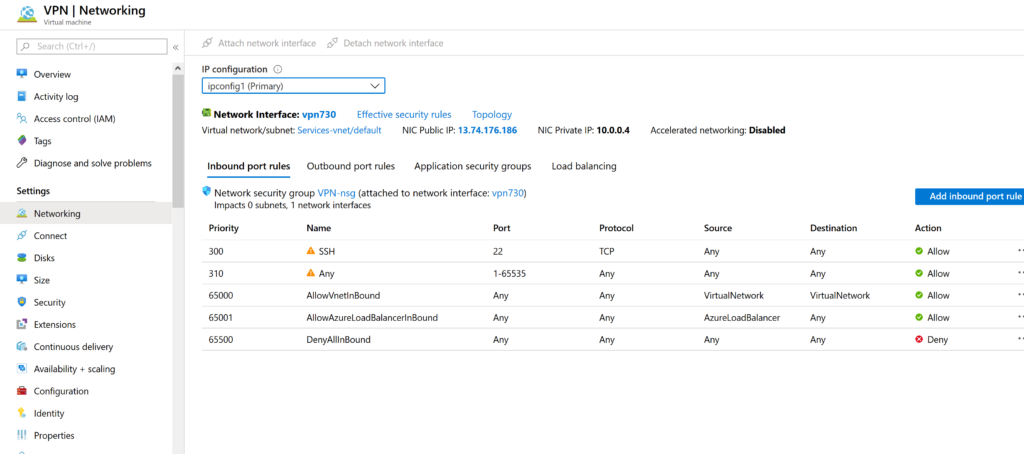
This is the Firewall settings menu, our task is to completely disable it so that nothing interferes with packet circulation. Click Add Inbound Rule and create a rule as in the following illustration.
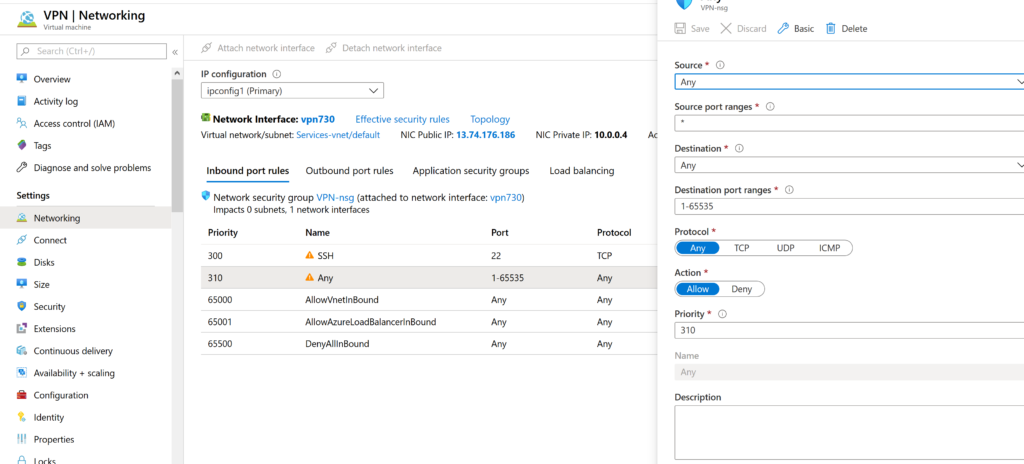
We keep the rule. We return to the previous menu. You are now ready to connect and configure WireGuard.
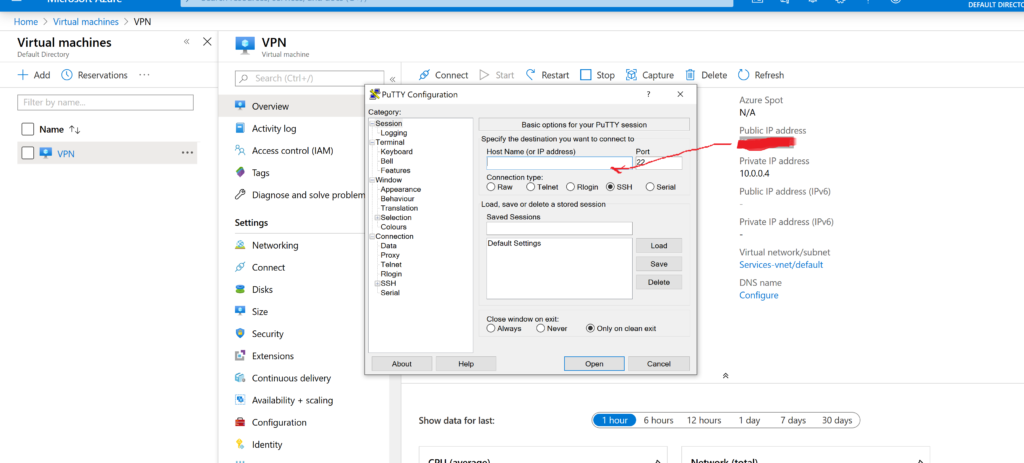
We open Putty and register the IP of our machine there. It would also not be superfluous to keep it. Click Connect and in the window that opens, enter your username and password specified earlier. All is ready. We pass to the end of the article.
You need to open a browser and go to the address: https://aws.amazon.com
Click on the "Register" button
Fill in the data and click on the "Continue" button
Fill in contact information.
Card number, expiration date and name of the cardholder.
At this stage, the phone number is confirmed and $ 1 is directly debited from the payment card. A 4-digit code is displayed on the computer screen, and a call from Amazon comes to the specified phone. During a call, you must dial the code shown on the screen.
Choosing - Basic plan (free)
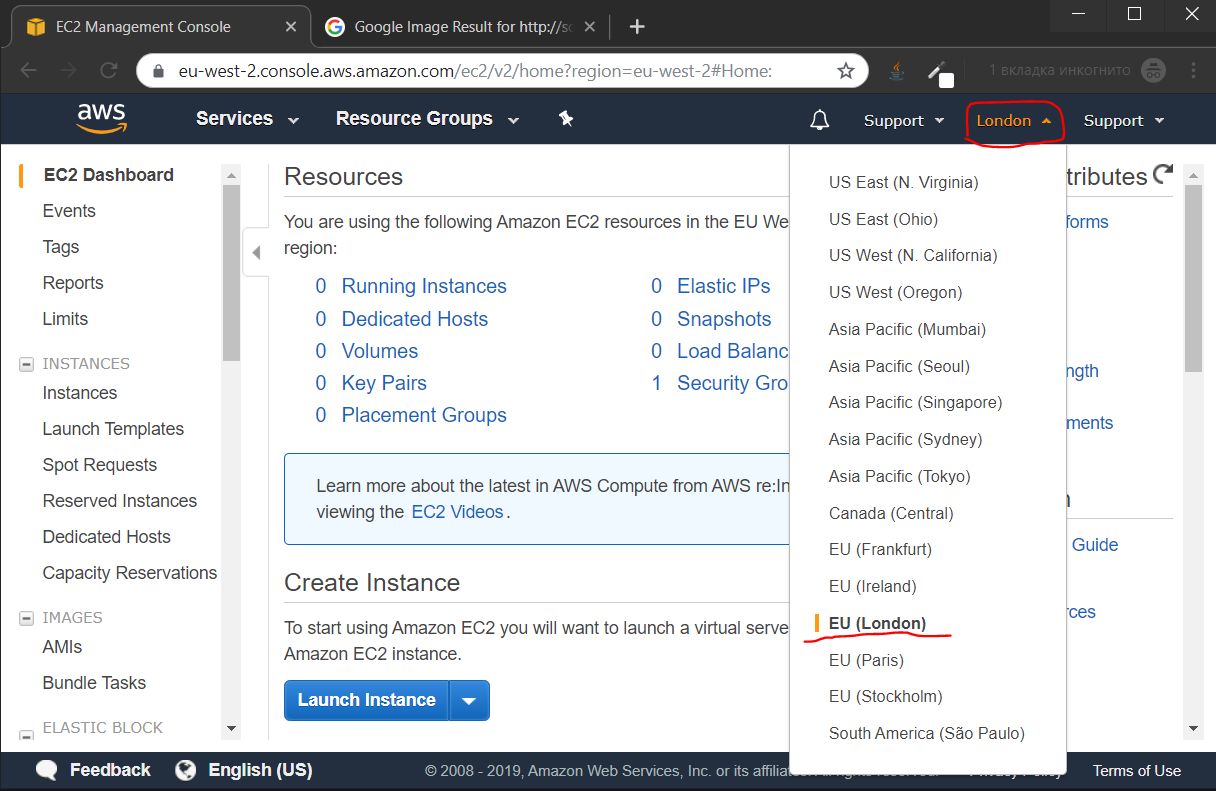
Before choosing a data center, it is recommended to test the speed of access to the nearest data centers via https://speedtest.net, in my location the following results are:


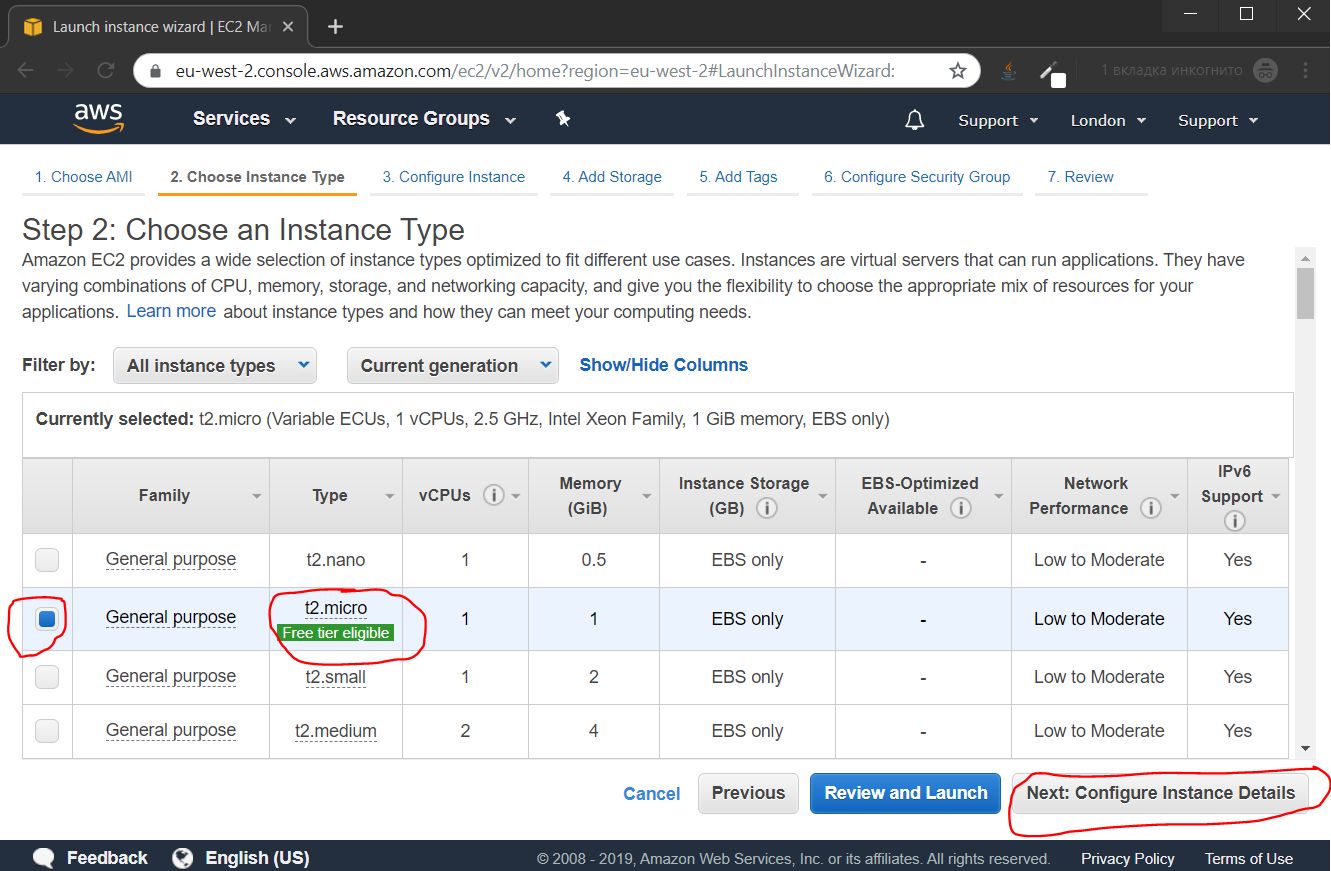
By default, the t2.micro instance is selected, and we need it, just click the Next button: Configure Instance Detalis
In the future, we will connect a permanent public IP to our instance, so at this stage we disable auto-assignment of a public IP, and click the Next: Add Storage button

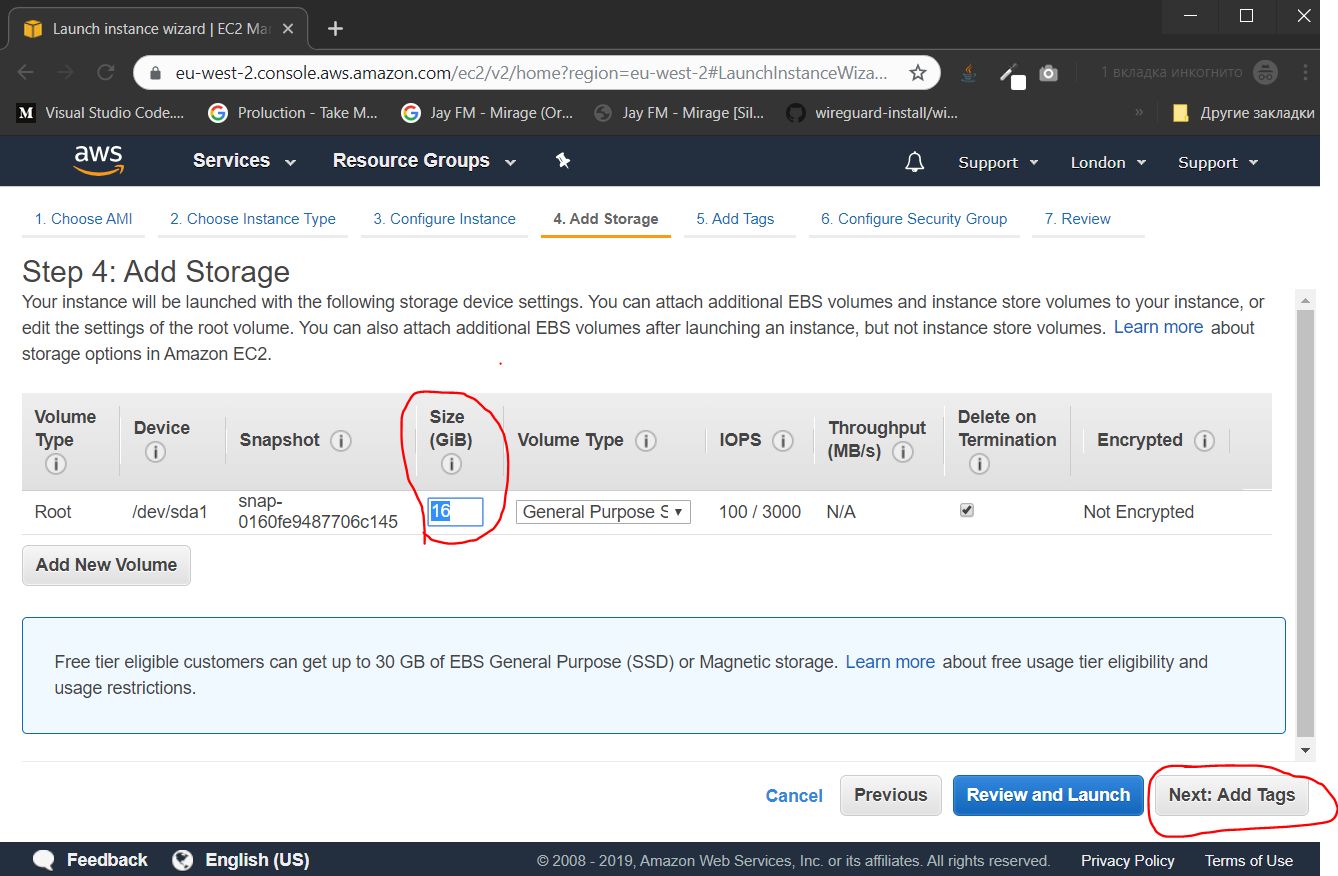
We indicate the size of the "hard disk". For our purposes, 16 gigabytes is enough, and click the Next: Add Tags button
If we created several instances, then they could be grouped by tags to facilitate administration. In this case, this functionality is superfluous, we immediately click the Next button: Configure Security Gorup

In this step, we configure the firewall by opening the correct ports. The set of open ports is called the “Security Group”. We must create a new security group, give it a name, description, add a UDP (Custom UDP Rule) port, in the Rort Range field, we must assign a port number from the ynamic port range 49152-65535. In this case, I chose the port number 54321.
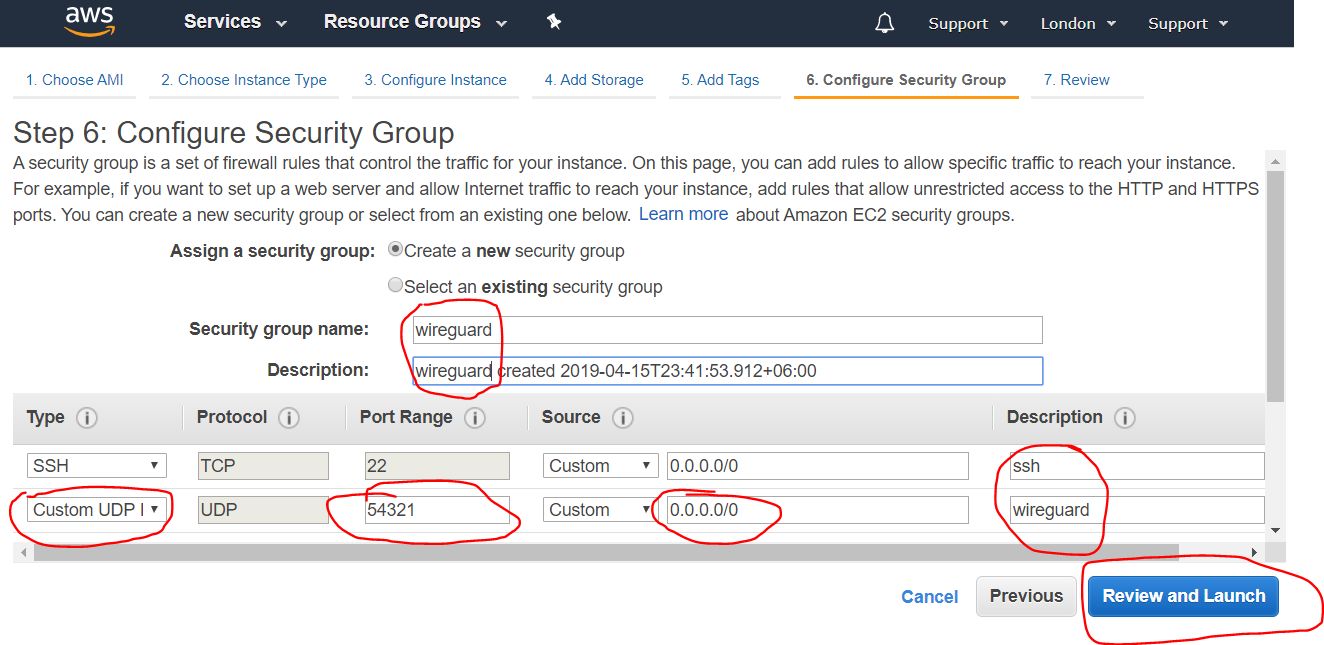
After filling in the necessary data, click on the Review and Launch button
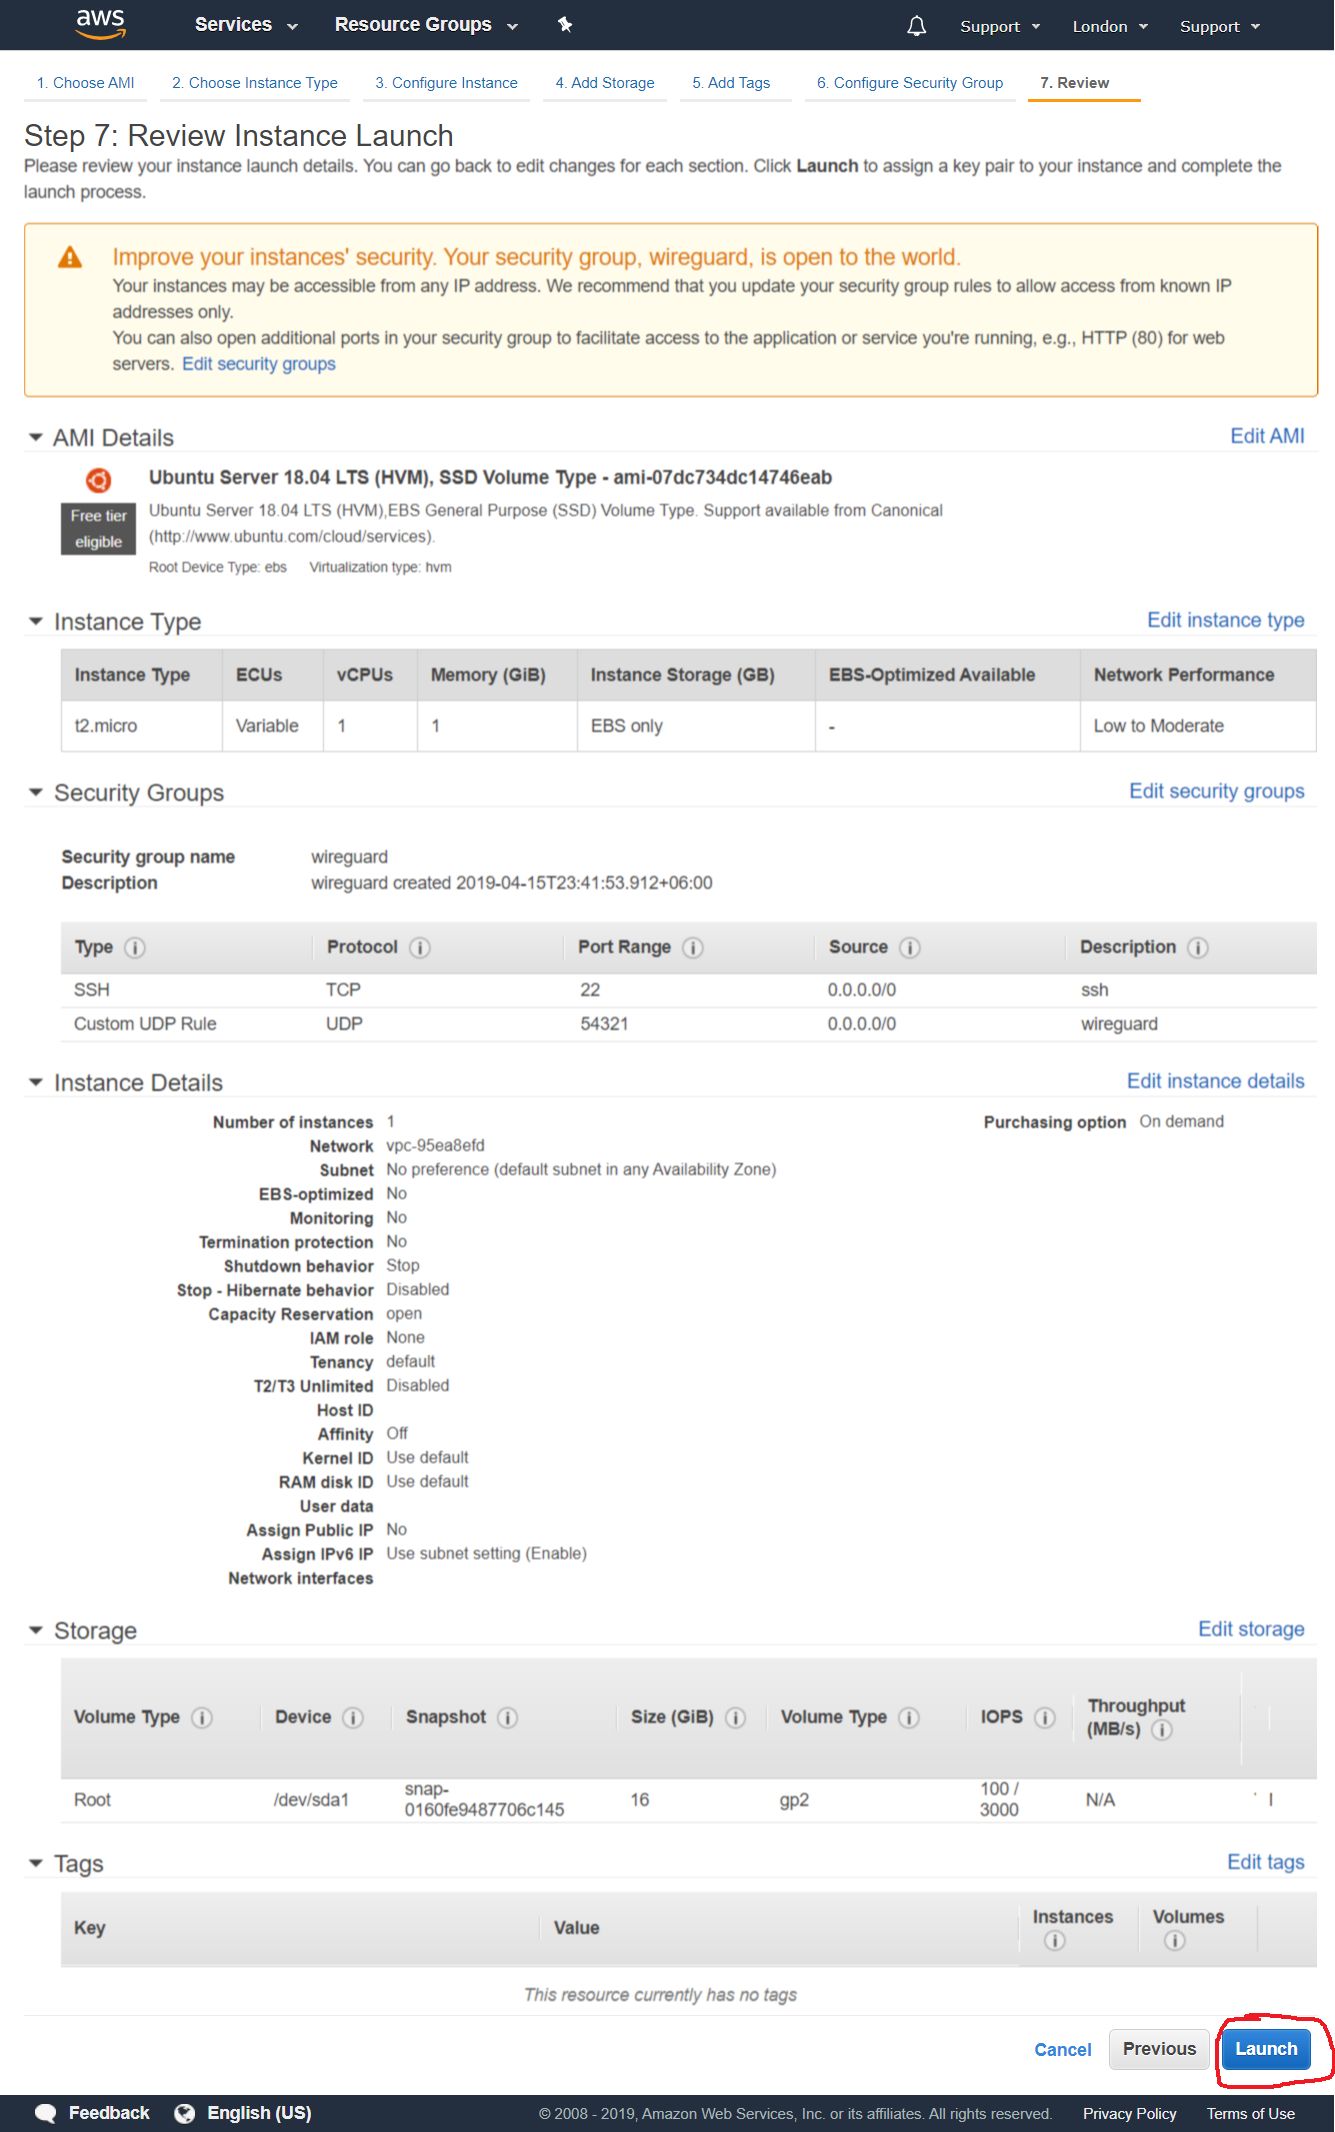
This page provides an overview of all the settings of our instance, check if all the settings are in order, and press the Launch button
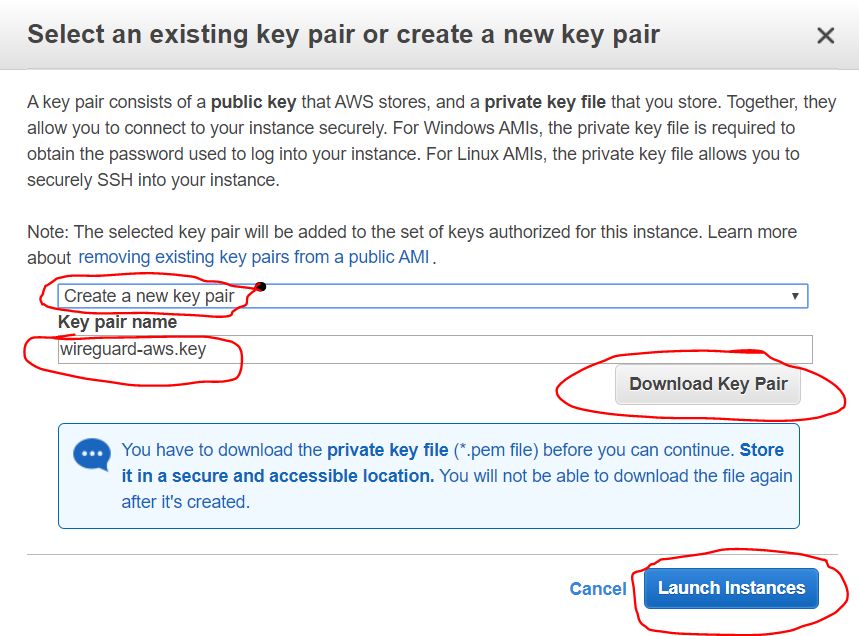
Then a dialog box appears, offering to either create or add an existing SSH key, with which we will later be remotely connected to our instance. We select the “Create a new key pair” option to create a new key. Set its name and click the Download Key Pair button to download the generated keys. Save them to a safe place on your local computer disk. After downloading - click the Launch Instances button
Shown here is the step of saving the generated keys from the previous step. After we clicked the Download Key Pair button , the key is saved as a certificate file with the * .pem extension. In this case, I named it wireguard-awskey.pem
Next, we see a message about the successful launch of the instance we just created. We can go to the list of our instances by clicking on the View instances button

Next, we need to create a permanent external IP address through which we will connect to our VPN server. To do this, in the navigation pane on the left side of the screen, select Elastic IPs from the NETWORK & SECTURITY category and click the Allocate new address button

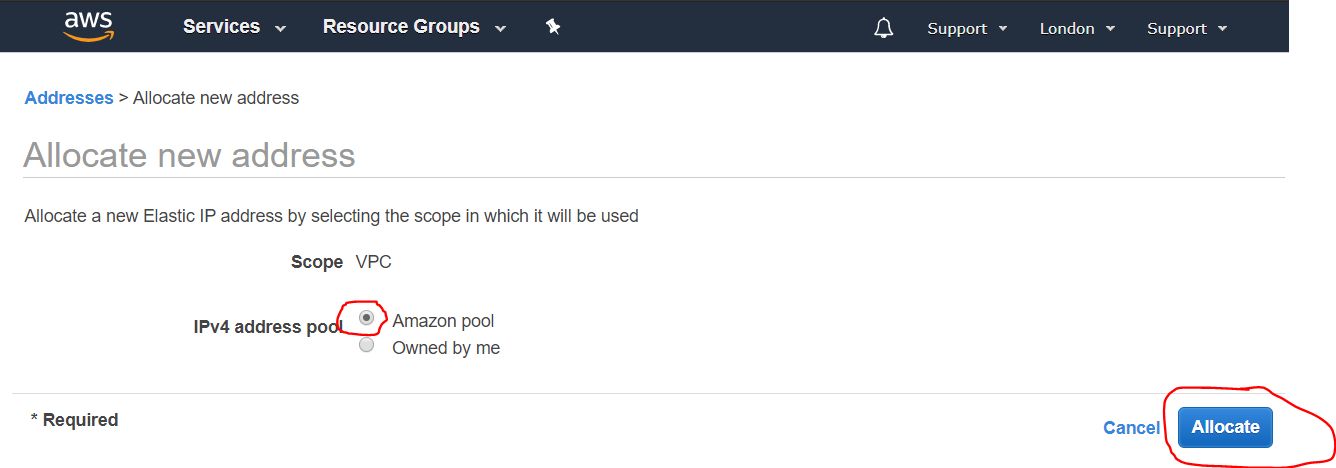
In the next step, we need the Amazon pool option to be enabled (enabled by default), and click on the Allocate button
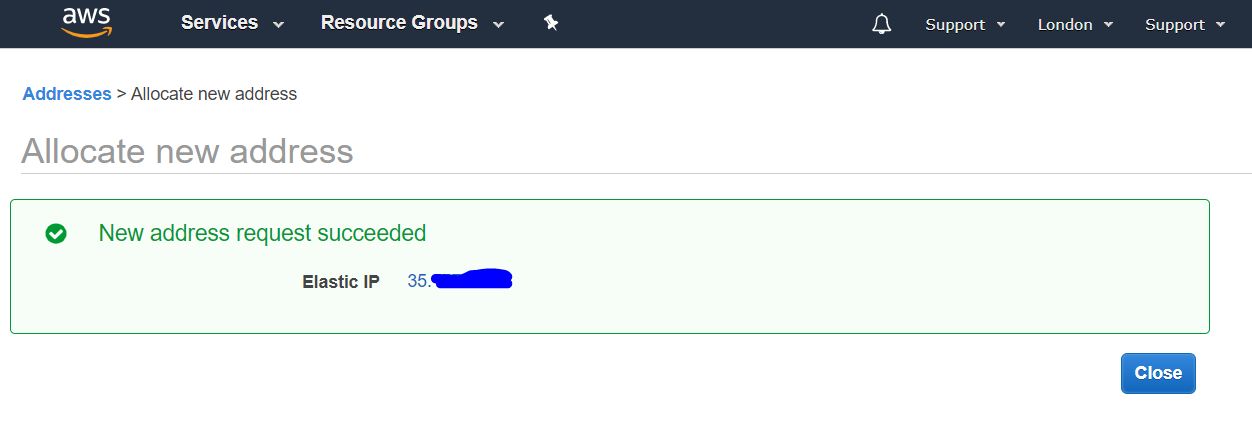
The next screen will display the external IP address we received. It is recommended to remember it, or even better write it down. it will be useful to us more than once in the process of further configuring and using the VPN server. In this guide, I use the IP address 4.3.2.1 as an example. As you wrote down the address, click on the Close button
Next, we are presented with a list of our permanent public IP addresses (elastics IP).

In this list, we select the IP address we received, and click the right mouse button to bring up the drop-down menu. In it, select the Associate address item in order to assign it to the instance we created earlier.

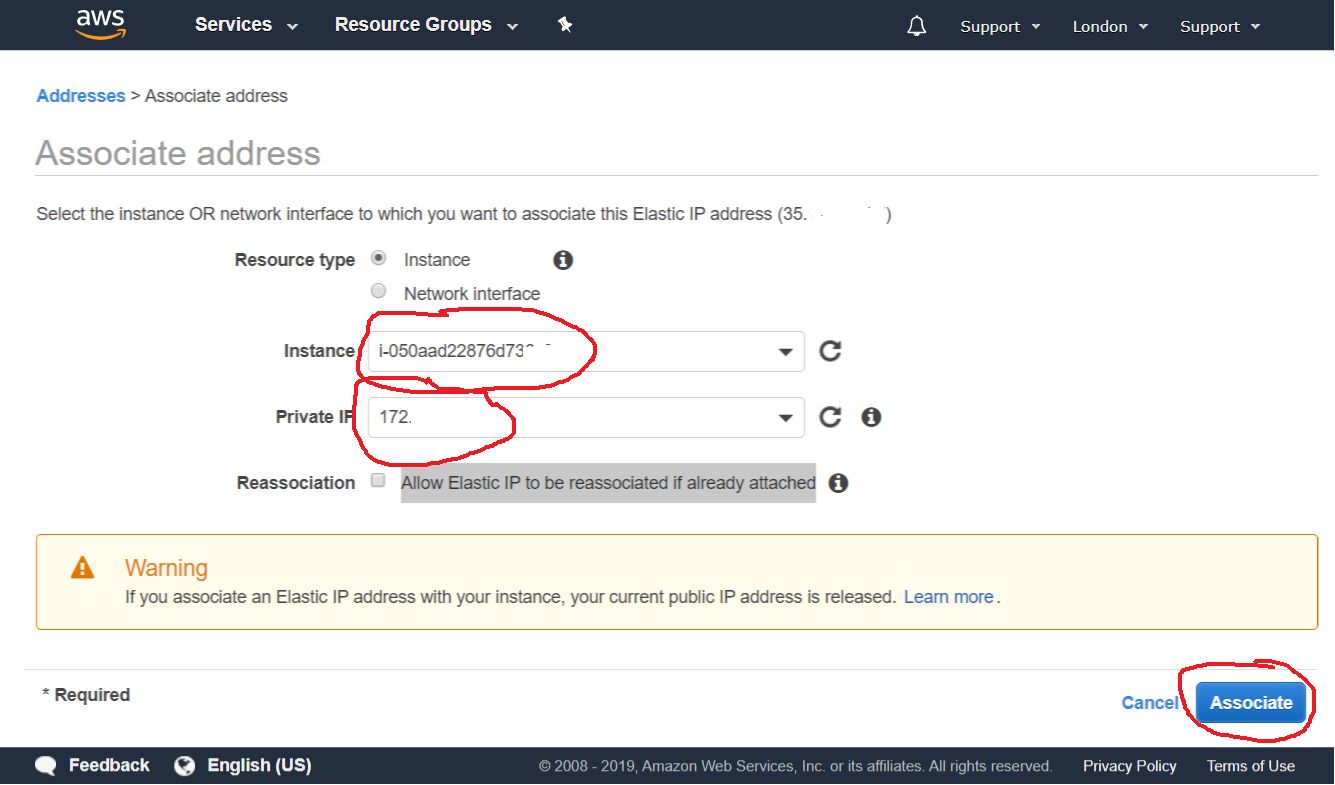
At the next step, select our instance from the drop-down list, and click the Associate button
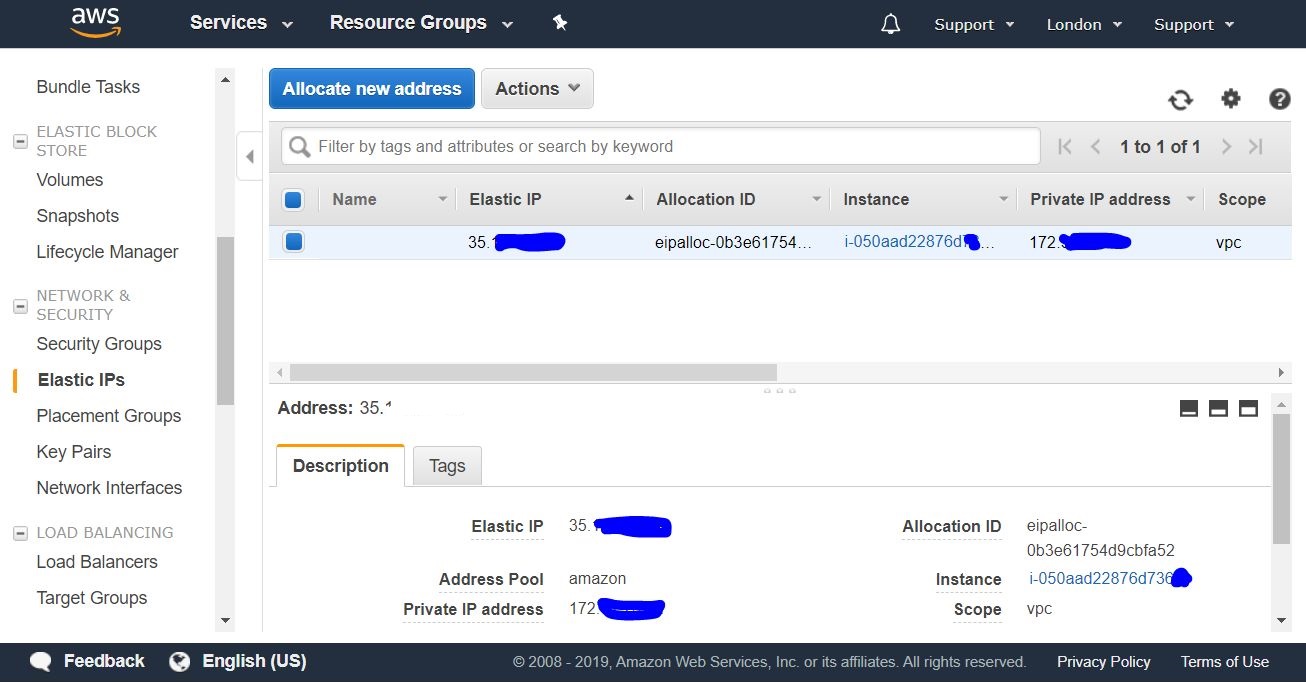
After that, we can see that our instance and its private IP address are bound to our permanent public IP address.
Now we can connect to our newly created instance from outside, from our computer via SSH.
To connect to a Windows computer, you first need to download and install the Putty .3.1.1 program. Importing a private key for Putty
After installing Putty, you need to run the PuTTYgen utility that comes with it to import the certificate key in PEM format into a format suitable for use in the Putty program. To do this, in the top menu, select the item Conversions-> Import Key

Next, select the key that we saved earlier, in our case its name is wireguard-awskey.pem
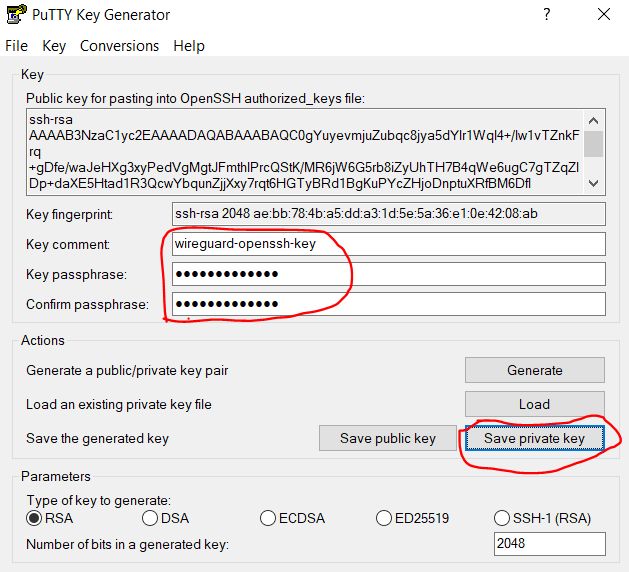
At this step, we need to provide a comment for this key (description) and set a password and confirmation for security. It will be requested every time you connect. Thus, we protect the key with a password from inappropriate use. The password can be omitted, but it is less secure if the key falls into the wrong hands. Then press the button Save private key
A file save dialog box opens and we save our private key as a file with an extension .ppksuitable for use in the Putty program.
Specify the name of the key (in our case wireguard-awskey.ppk) and click the Save button.
Open the Putty program, select the Session category (it is open by default) and in the Host Name field, enter the public IP address of our server, which we received in step 2.2.3. In the Saved Session field, enter an arbitrary name for our connection (in my case wireguard-aws-london), and then click the Save button to save the changes we made.

Further in the Connection category, select the Data subcategory and in the Auto-login username field enter the ubuntu username - this is the standard user of an instance on AWS with Ubuntu.

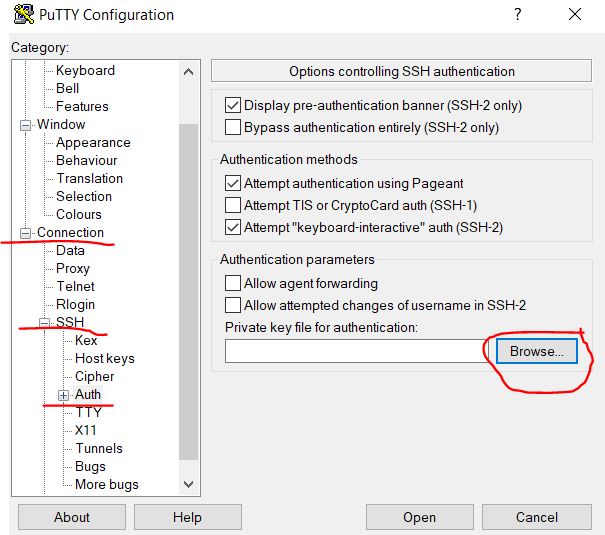
Then go to the Connection / SSH / Auth subcategory and next to the Private key file for authentication field click on the Browse ... button to select the file with the key certificate.
We indicate the key that we imported earlier at step 3.1.1.4, in our case it is the wireguard-awskey.ppk file, and click the Open button.
Returning to the Session category page, click the Save button again to save the changes we made earlier in the previous steps (3.1.2.2 - 3.1.2.4). And then click the Open button to open the remote SSH connection we created and configured.

At the next step, at the first attempt to connect, we are given a warning that we do not have trust configured between the two computers, and asks whether to trust the remote computer. We click the Yes button, thereby adding it to the list of trusted hosts.
After that, a terminal window opens, where you are asked for the password for the key, if you set it earlier in step 3.1.1.3. When you enter the password, nothing appears on the screen. If you made a mistake, you can use the Backspace key.

After successfully entering the password, a welcome text is displayed in the terminal, which informs us that the remote system is ready to execute our commands.
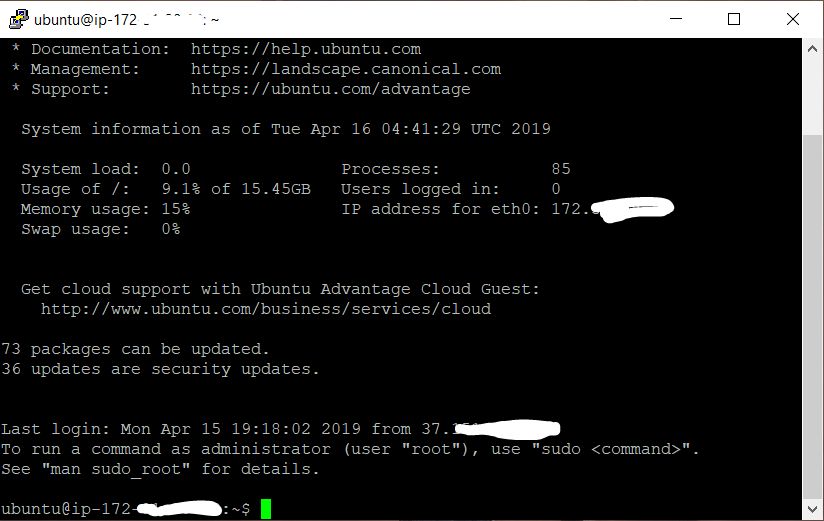
The instance is ready. You can start installing WireGuard.
To configure the WireGuard server, we will use the open source easy-wg-quick solution. This script automatically generates configuration files and makes it easy to manipulate settings. First you need to install the wireguard itself and some additional utilities.
On first launch, the script will by default create a configuration file for the server and for one client, as well as display a QR code that can be scanned in the WireGuard mobile application to immediately get all the necessary settings.
To add settings for one more client (laptop, for example), you need to run the same command again, specifying the name of the new profile:
For example, a corresponding wgclient_win10.conf file will be created for the profile name win10. Its contents can be viewed with the cat command, which is useful when configuring the WireGuard client in the future.
After adding all the necessary profiles, it remains only to add the WireGuard server to autorun and enable it:
To view current connections use this command:
Clients for Windows, Android, iOS and other operating systems can be downloaded from the WireGuard website. With mobile versions, everything is simple - just scan the QR code. Or, as for all other clients, manually copy the settings from the wgclient _ *. Conf files.
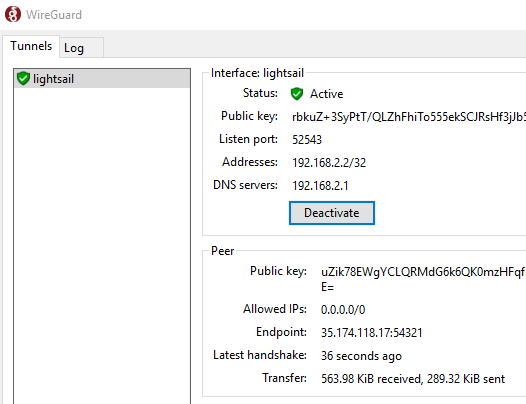
In the case of a Windows client, in the menu of the lower left button, select Add empty tunnel, insert the entire contents of the conf file in a new window, specify the name of the profile (Name). Optionally, you can enable the kill-switch function to block any traffic outside the VPN connection. Finally, you need to Save and Activate the connection.
WireGuard works great for Android too. In the case of easy-wg-quick, simply scan the QR code from the terminal screen.

Also, one cannot fail to note the support of WireGuard in the latest models of Mikrotik routers. We will definitely tell you how to set up transparent routing of everything in your home using WireGuard and Mikrotik.
The current models of Keenetic routers with firmware version 3.3 or later also support WireGuard VPN connections - you need to install the component of the same name. To import connection settings, you need to save the contents of the wgclient _ *. Conf file (see above) into a text document, and then, in the " Other connections" section , load the parameters from this file. The router will create a new connection based on them, which must be activated with the switch on the left side of the list.
To work correctly, you need to make a few small changes (by the way, after each action, do not forget to click the "Save" button at the bottom of the web interface). First, enable the checkbox Use to log on to the Internet". Secondly, change the Allowed subnets field to 0.0.0.0/0. Third, in the "Connection Priorities" section, drag the newly created connection above all the others.
After that, all clients connected to the router will, by default, access the Internet through a VPN tunnel. If you need access only for some devices, then it is better to create a separate profile.
Finally, let us recall the "popular" wisdom: hope for a VPN, but don't make a mistake yourself. Simply put, care and digital hygiene must always be followed. You don't need to connect to completely suspicious networks, and you shouldn't forget about the basic rules. There are not so many of them: install OS and software updates on time, use two-factor authentication, carefully select the programs used, check the reasonableness of software requests for access to various device resources, get a modern antivirus. All this applies to smartphones, tablets, laptops, and desktops.
Clouds are very powerful tools for work. The most complex solutions can be built on them. Making a VPN server out of a cloud machine is a fly shooting at sparrows. But this is precisely why cloud providers are lenient about this.
WireGuard, in turn, is a modern, very simple and fast VPN service that supports many modern types of encryption and is gaining popularity.
I would like to remind you that:
No paid servers. Do it yourself this time. Completely free.Article 19 of the Universal Declaration of Human Rights states:
Everyone has the right to freedom of opinion and expression; this right includes the freedom to freely adhere to one's beliefs and the freedom to seek, receive and impart information and ideas by any means and regardless of state borders
In this article I will tell you how to set up your own VPN absolutely free, and even in the clouds with the ability to change countries. For dark deeds, it will not work - you need a phone number and a work card. But to circumvent censorship, such a measure is just right. Moreover, often, everything works a little faster through VPN, since RKN cannot properly adjust DPI, and traffic through VPN will bypass the myopic eye of our authorities.
The fact is that the giants of the cloud service - Microsoft Azure, Amazon AWS provide an opportunity to try their services absolutely free of charge. I will say right away that all these services are really great and very convenient for implementing projects of any size. We, using the trial period, will simply set up the VPN server.
You can lift anything you want - the choice of OS is huge. But you can read about all this without me on the Internet. I'll just tell you how to register for services and set up a simple but very powerful VPN called WireGuard.
WireGuard is ideal for the user. All low-level decisions are made in the specification, so the process of preparing a typical VPN infrastructure takes only a few minutes. It is almost impossible to nafakapit in configuration
But let's start by registering with the cloud giants.
To work with SSH, we need a full set of PuTTY, so it's better to download the MSI package with an installer right away, which will install everything and create a new group in the main menu.
Microsoft Azure
Many people completely undeservedly bypass Azure. And in vain. Compared to AWS, everything is much simpler. There are much fewer checks and controls. Registration is generally in two steps. On Azure, I set up a VPN in 15 minutes. And this is how I did it.My screenshots will be in English for a reason. If you indicate a different country when registering, even if your card and phone number, in the event of a dispute with the authorities, it will be much more difficult for valiant employees to get an image of your disk, since at least they will have to prove that you are a Russian person and all this data will be checked for months.
First you need a Microsoft ID. This is the usual Microsoft account. Accounts from Skype or Hotmail or other MS services will do. If it is not there, go to https://account.microsoft.com/
Then go to https://azure.microsoft.com/ and select Start Free.

We see the following. Microsoft gives us $ 200 and a year of freebies. All you need to do is fill out the form and confirm the payment method. The money will be debited only to verify that the card is working. Also the phone number will be checked by SMS. I indicated the country Slovakia, used the Kiwi card and Tele2 number, everything went without problems.

We go through the registration and get into such a menu

This is just a reference. You can read, or you can go straight to the point. At the top of the screen, press Home and see the following:

Click Create Virtual Machine. That is, we create our own virtual machine. We don't need to touch anything else here.

In this menu, we name the group of virtual machines, select the country and configuration. Not all countries are available in the trial version. I recommend choosing Northern Europe.

We name our instance. We choose OS Ubuntu 19.04. Below we see Change type. Click there. The cheapest configuration will work for us, but since we are given $ 200 a year, we can choose something more expensive. Indeed, in addition to VPN, the machine can always be used for other experiments. Code on it, for example, or test something.

Having chosen a suitable virtual machine, we return to the previous menu.

It remains only to set the login and password for the new machine and set the firewall rules. Open SSH and feel free to click Review & Create.

Then the choice of disk will follow - choose an SSD, you can take more space, but you won't need much for a VPN.
This will be followed by setting up network interfaces.

Install everything as in the image.
Further the same.

After that, the creation of your virtual machine will begin.
When finished, you will see an image like this.

Your virtual machine is ready! Click Go to Resource.

Another important step is to configure the Firewall to allow our traffic. Click Networking.

This is the Firewall settings menu, our task is to completely disable it so that nothing interferes with packet circulation. Click Add Inbound Rule and create a rule as in the following illustration.

We keep the rule. We return to the previous menu. You are now ready to connect and configure WireGuard.

We open Putty and register the IP of our machine there. It would also not be superfluous to keep it. Click Connect and in the window that opens, enter your username and password specified earlier. All is ready. We pass to the end of the article.
Amazon AWS
1. Registering an AWS account
To register a free AWS account, you need a real phone number and a paying credit card Visa or Mastercard. I recommend using virtual cards that Yandex.Money or Qiwi wallet provides for free . To check the validity of the card, 1 $ is debited during registration, which is later returned.You need to open a browser and go to the address: https://aws.amazon.com
Click on the "Register" button
Fill in the data and click on the "Continue" button
Fill in contact information.
Card number, expiration date and name of the cardholder.
At this stage, the phone number is confirmed and $ 1 is directly debited from the payment card. A 4-digit code is displayed on the computer screen, and a call from Amazon comes to the specified phone. During a call, you must dial the code shown on the screen.
Choosing - Basic plan (free)

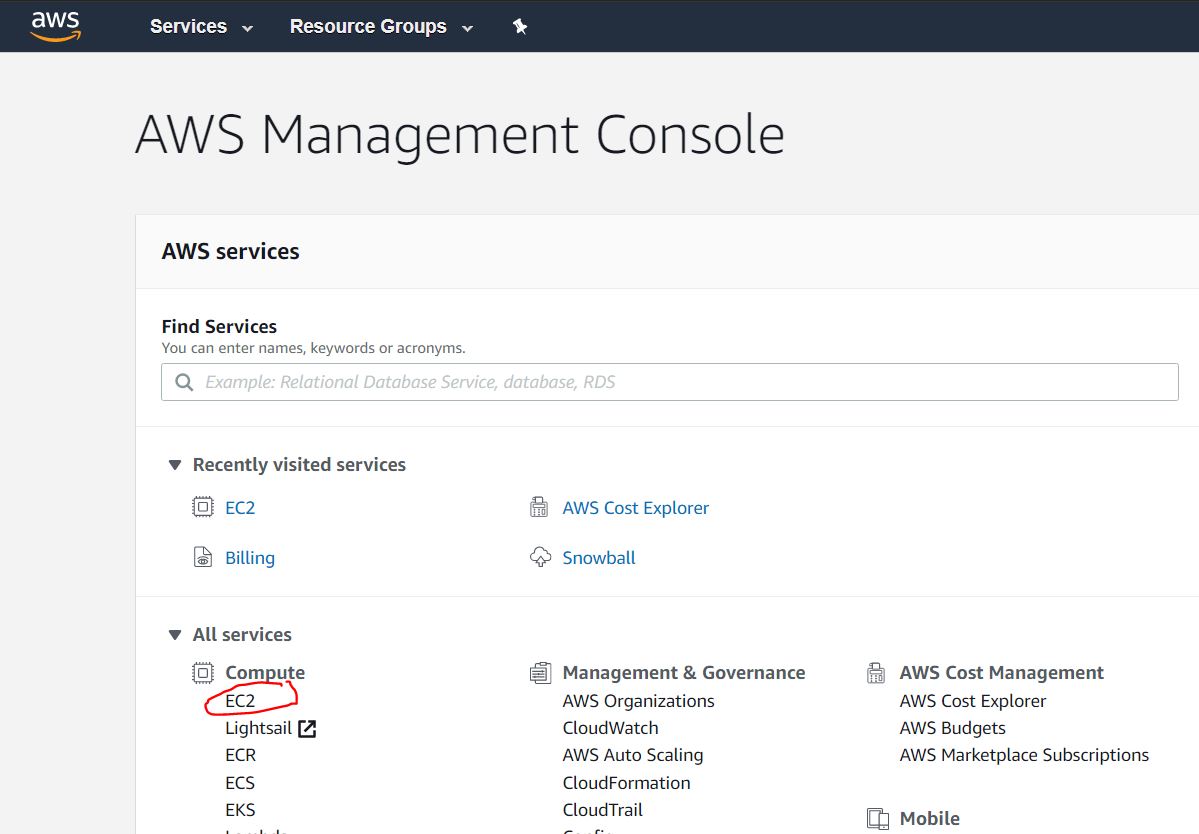
Before choosing a data center, it is recommended to test the speed of access to the nearest data centers via https://speedtest.net, in my location the following results are:
- Singapore
- Paris
- Frankfurt
- Stockholm
- London
2. Create an AWS instance


By default, the t2.micro instance is selected, and we need it, just click the Next button: Configure Instance Detalis

In the future, we will connect a permanent public IP to our instance, so at this stage we disable auto-assignment of a public IP, and click the Next: Add Storage button

We indicate the size of the "hard disk". For our purposes, 16 gigabytes is enough, and click the Next: Add Tags button

If we created several instances, then they could be grouped by tags to facilitate administration. In this case, this functionality is superfluous, we immediately click the Next button: Configure Security Gorup

In this step, we configure the firewall by opening the correct ports. The set of open ports is called the “Security Group”. We must create a new security group, give it a name, description, add a UDP (Custom UDP Rule) port, in the Rort Range field, we must assign a port number from the ynamic port range 49152-65535. In this case, I chose the port number 54321.

After filling in the necessary data, click on the Review and Launch button
This page provides an overview of all the settings of our instance, check if all the settings are in order, and press the Launch button

Then a dialog box appears, offering to either create or add an existing SSH key, with which we will later be remotely connected to our instance. We select the “Create a new key pair” option to create a new key. Set its name and click the Download Key Pair button to download the generated keys. Save them to a safe place on your local computer disk. After downloading - click the Launch Instances button

Shown here is the step of saving the generated keys from the previous step. After we clicked the Download Key Pair button , the key is saved as a certificate file with the * .pem extension. In this case, I named it wireguard-awskey.pem
Next, we see a message about the successful launch of the instance we just created. We can go to the list of our instances by clicking on the View instances button

Next, we need to create a permanent external IP address through which we will connect to our VPN server. To do this, in the navigation pane on the left side of the screen, select Elastic IPs from the NETWORK & SECTURITY category and click the Allocate new address button

In the next step, we need the Amazon pool option to be enabled (enabled by default), and click on the Allocate button

The next screen will display the external IP address we received. It is recommended to remember it, or even better write it down. it will be useful to us more than once in the process of further configuring and using the VPN server. In this guide, I use the IP address 4.3.2.1 as an example. As you wrote down the address, click on the Close button

Next, we are presented with a list of our permanent public IP addresses (elastics IP).

In this list, we select the IP address we received, and click the right mouse button to bring up the drop-down menu. In it, select the Associate address item in order to assign it to the instance we created earlier.

At the next step, select our instance from the drop-down list, and click the Associate button

After that, we can see that our instance and its private IP address are bound to our permanent public IP address.

Now we can connect to our newly created instance from outside, from our computer via SSH.
3. Connecting to an AWS instance
SSH is a secure protocol for remote control of computer devices.To connect to a Windows computer, you first need to download and install the Putty .3.1.1 program. Importing a private key for Putty
After installing Putty, you need to run the PuTTYgen utility that comes with it to import the certificate key in PEM format into a format suitable for use in the Putty program. To do this, in the top menu, select the item Conversions-> Import Key

Next, select the key that we saved earlier, in our case its name is wireguard-awskey.pem
At this step, we need to provide a comment for this key (description) and set a password and confirmation for security. It will be requested every time you connect. Thus, we protect the key with a password from inappropriate use. The password can be omitted, but it is less secure if the key falls into the wrong hands. Then press the button Save private key

A file save dialog box opens and we save our private key as a file with an extension .ppksuitable for use in the Putty program.
Specify the name of the key (in our case wireguard-awskey.ppk) and click the Save button.
Open the Putty program, select the Session category (it is open by default) and in the Host Name field, enter the public IP address of our server, which we received in step 2.2.3. In the Saved Session field, enter an arbitrary name for our connection (in my case wireguard-aws-london), and then click the Save button to save the changes we made.

Further in the Connection category, select the Data subcategory and in the Auto-login username field enter the ubuntu username - this is the standard user of an instance on AWS with Ubuntu.

Then go to the Connection / SSH / Auth subcategory and next to the Private key file for authentication field click on the Browse ... button to select the file with the key certificate.

We indicate the key that we imported earlier at step 3.1.1.4, in our case it is the wireguard-awskey.ppk file, and click the Open button.
Returning to the Session category page, click the Save button again to save the changes we made earlier in the previous steps (3.1.2.2 - 3.1.2.4). And then click the Open button to open the remote SSH connection we created and configured.

At the next step, at the first attempt to connect, we are given a warning that we do not have trust configured between the two computers, and asks whether to trust the remote computer. We click the Yes button, thereby adding it to the list of trusted hosts.
After that, a terminal window opens, where you are asked for the password for the key, if you set it earlier in step 3.1.1.3. When you enter the password, nothing appears on the screen. If you made a mistake, you can use the Backspace key.

After successfully entering the password, a welcome text is displayed in the terminal, which informs us that the remote system is ready to execute our commands.

The instance is ready. You can start installing WireGuard.
WireGuard setup
All is ready. We are in ours in the terminals of our machines, it remains only to configure them. It's simple. Dial after me.
Code:
sudo apt-get update
sudo apt-get upgrade
sudo apt-get install software-properties-common
sudo add-apt-repository ppa: wireguard / wireguard
sudo apt-get update
sudo apt-get install wireguard-dkms linux-headers - $ (uname -r)
To configure the WireGuard server, we will use the open source easy-wg-quick solution. This script automatically generates configuration files and makes it easy to manipulate settings. First you need to install the wireguard itself and some additional utilities.
Code:
sudo apt-get install wireguard-tools mawk grep iproute2 qrencode
wget https://raw.githubusercontent.com/burghardt/easy-wg-quick/master/easy-wg-quick
chmod + x easy-wg-quick
On first launch, the script will by default create a configuration file for the server and for one client, as well as display a QR code that can be scanned in the WireGuard mobile application to immediately get all the necessary settings.
Code:
./easy-wg-quickTo add settings for one more client (laptop, for example), you need to run the same command again, specifying the name of the new profile:
Code:
./easy-wg-quick profile_nameFor example, a corresponding wgclient_win10.conf file will be created for the profile name win10. Its contents can be viewed with the cat command, which is useful when configuring the WireGuard client in the future.
Code:
cat ./wgclient_win10.confAfter adding all the necessary profiles, it remains only to add the WireGuard server to autorun and enable it:
Code:
cp wghub.conf /etc/wireguard/wghub.confsystemctl enable wg-quick @ wghubsystemctl start wg-quick @ wghubTo view current connections use this command:
Code:
wg showClients for Windows, Android, iOS and other operating systems can be downloaded from the WireGuard website. With mobile versions, everything is simple - just scan the QR code. Or, as for all other clients, manually copy the settings from the wgclient _ *. Conf files.

In the case of a Windows client, in the menu of the lower left button, select Add empty tunnel, insert the entire contents of the conf file in a new window, specify the name of the profile (Name). Optionally, you can enable the kill-switch function to block any traffic outside the VPN connection. Finally, you need to Save and Activate the connection.
WireGuard works great for Android too. In the case of easy-wg-quick, simply scan the QR code from the terminal screen.
Also, one cannot fail to note the support of WireGuard in the latest models of Mikrotik routers. We will definitely tell you how to set up transparent routing of everything in your home using WireGuard and Mikrotik.
The current models of Keenetic routers with firmware version 3.3 or later also support WireGuard VPN connections - you need to install the component of the same name. To import connection settings, you need to save the contents of the wgclient _ *. Conf file (see above) into a text document, and then, in the " Other connections" section , load the parameters from this file. The router will create a new connection based on them, which must be activated with the switch on the left side of the list.
To work correctly, you need to make a few small changes (by the way, after each action, do not forget to click the "Save" button at the bottom of the web interface). First, enable the checkbox Use to log on to the Internet". Secondly, change the Allowed subnets field to 0.0.0.0/0. Third, in the "Connection Priorities" section, drag the newly created connection above all the others.
After that, all clients connected to the router will, by default, access the Internet through a VPN tunnel. If you need access only for some devices, then it is better to create a separate profile.
Finally, let us recall the "popular" wisdom: hope for a VPN, but don't make a mistake yourself. Simply put, care and digital hygiene must always be followed. You don't need to connect to completely suspicious networks, and you shouldn't forget about the basic rules. There are not so many of them: install OS and software updates on time, use two-factor authentication, carefully select the programs used, check the reasonableness of software requests for access to various device resources, get a modern antivirus. All this applies to smartphones, tablets, laptops, and desktops.
Clouds are very powerful tools for work. The most complex solutions can be built on them. Making a VPN server out of a cloud machine is a fly shooting at sparrows. But this is precisely why cloud providers are lenient about this.
WireGuard, in turn, is a modern, very simple and fast VPN service that supports many modern types of encryption and is gaining popularity.

