Carder
Professional
- Messages
- 2,616
- Reaction score
- 1,940
- Points
- 113
Before reading the article, please be patient, as the article itself is very voluminous and it will take quite a bit of time to set up.
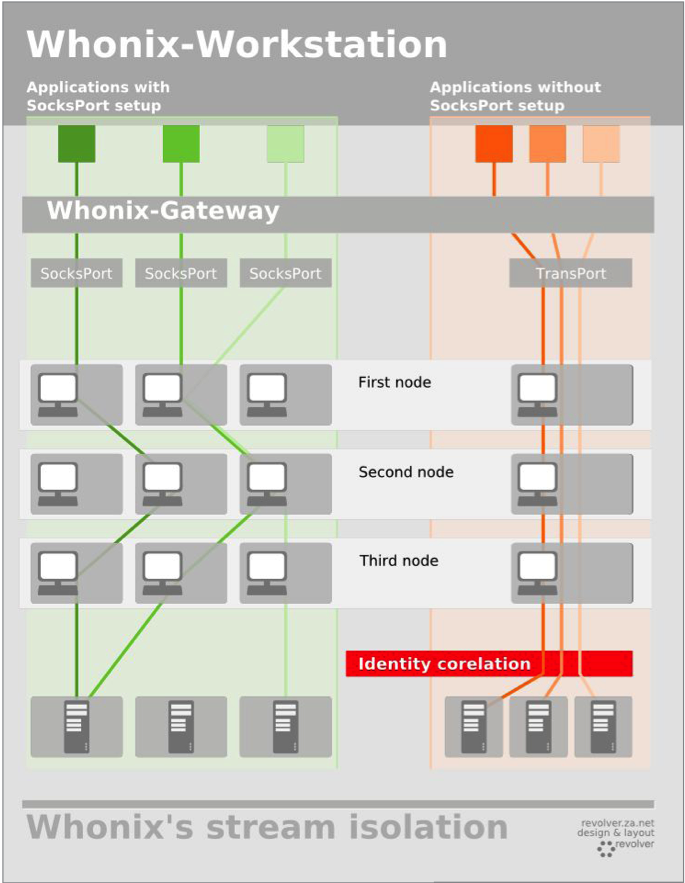
So let's get started! What is Whonix? First, it is a Debian-based distribution, which consists of 2 parts. The first is the Whonix Gateway, which runs through TOR and forwards absolutely all local traffic. The second part is a completely isolated image that is configured in such a way that it only works through the Whonix Gateway.
Thus, Whonix Workstation does not have access to our main hardware and does not know the original IP address of the connection, which allows us to remain anonymous and not burn the IP address even if this very workstation is hacked.
Among the features of this distribution, the ability of each application to work on Whonix Workstation through the new TOR chain stands out, which perfectly mixes all traffic and makes us more invisible on the network.
Whonix is also most often compared to Tails, since both of these distributions were originally created for the anonymity of their users.
If you do not delve into the technical features of each of the distributions, then for a typical user, the fundamental difference between them will be that Tails is intended for use from USB-FLash drives (it is not recommended to put it on a virtual machine), and Whonix in most cases is put on a virtual machine. Also, the key difference is that Tails is "Amnesty", that is, it forgets absolutely everything after a reboot, while Whonix is not. Whonix, in turn, is more flexible in the settings of various "Chains" in particular, here you can find VPN - > Tor, VPN - > > Tor - > > VPN, VPN-Tor - > > > Proxy/SSH, and you can come up with a lot more. In Tails, this can't be done. In Tails, all traffic goes directly through the tor. In other words, you won't be able to put a VPN in front of the tor, only after.
How to install Whonix
1) the best way for us is to install Whonix on a virtual machine. This article will discuss exactly this method. This is the easiest and most convenient way for a carder to install Whonix. Our virtualization program will be VirtualBox. Almost any operating system can be used as a Host OS.
2) Qubes-Whonix. This is the second, also quite common way to send traffic through Whonix. The so-called Qubes OS is used as the host operating system, and Whonix-Gateway is installed as a virtual machine through the built-in virtualization tools in Qubes OS.
3) KVM Virtualization. The third method is to install Whonix. The qemu-kvm virtualizer or similar is used.
4) is it Possible to physically separate virtual machines, Whonix Gateway and Whonix Workstation
Installing Whonix
First you need to download Virtualbox. How to install this software, you can read in our article "Virtualbox-configuration and Use". Then download Whonix Gateway and Whonix Workstation from the official website.
Open virtualbox, click File - > Import Appliance. Select the downloaded Whonix Gateway image, click "Next". A window will appear with the settings, we leave everything by default, except for the RAM column, this column can be changed if desired. Click "Import" and wait.
We perform the same operation for Whonix Workstation. It is advisable to allocate at least 1024 MB of RAM for this image, since this is our working environment and all applications run on it.
After we have created two virtual machines and they are successfully displayed in Virtualbox - we start configuring them.
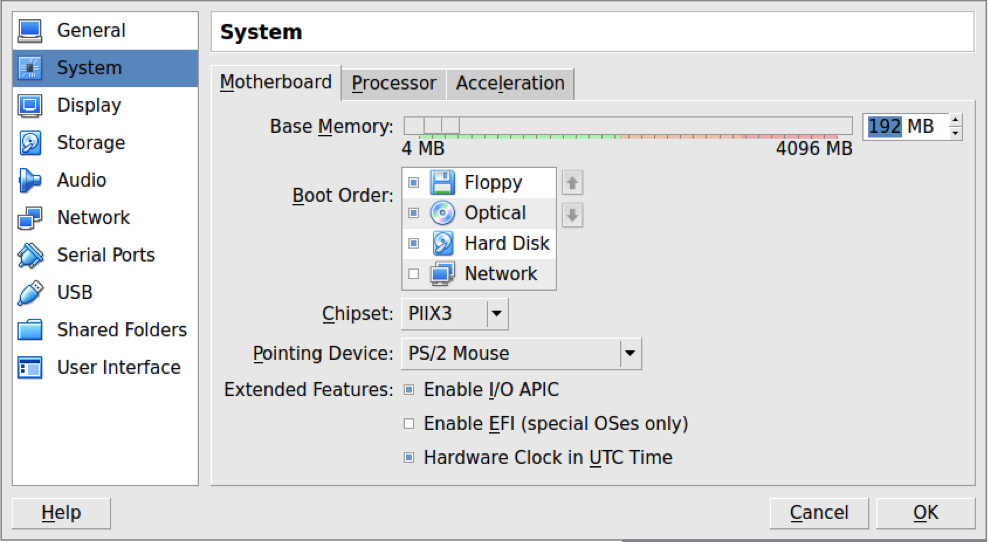
Press the left mouse button on the Whonix Gateway -> Settings -> System. On this page, we need to change the startup parameters. In the first place, we should have "Hard Disk", in the second "Optical". Then uncheck "Floppy" and "Optical" and leave it only opposite "Hard Disk". Now open the "Storage" tab, there on the Controller we put a tick "Use Host I/O Cache". We do exactly the same operation with the second virtual machine.
First launch of Whonix
Mandatory launch procedure: first Whonix Gateway, then Whoenix Workstation, and nothing else. Because if you run a Working environment in front of the gateway, then all our traffic will go from the main machine and this will lead to a leak of our IP (even if the VPN IP), as well as to a leak of our hardware indicators in case of hacking Whonix Workstation.
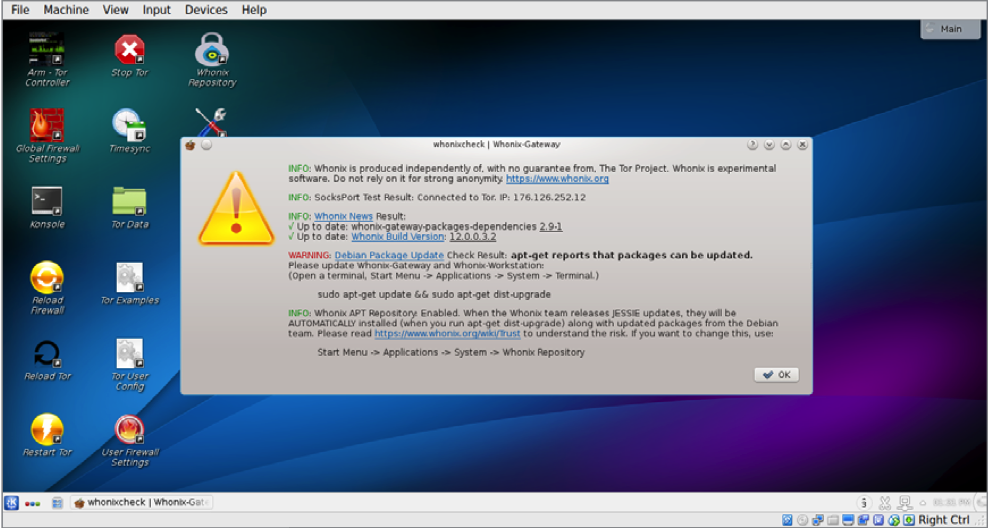
When you first launch Whonix Gateway, the agreement window will appear in front of you. After reading it, click "Understand" twice. It should be marked "Iam Ready to Enable Tor", wait for "Next" several times, then "Yes. Automatically install updates from the Whonix team", click "Next", select "Whonix Stable Repository" and then to the end (the same Windows will be when you start Whonix Workstation), so we do the same actions for the second image. After that, the so-called whonix check should automatically start on both virtual machines.
Whonixcheck-checks the system for connection to repositories and the TOR network. If there are any problems, we will see an inscription "Warning" indicating the problem of updating the system or connecting to the TOR.
Now open the gateway console and enter the following OS update code:
You will need to enter your password.
Standard username-user
Password from user-changeme
Root password-changeme
After entering the password, we expect a full system update. If an update error occurs, enter this command again.
If the update was successful, launch whonixcheck from the desktop shortcut or use the "whonixcheck" command in the console. If it says "success" everywhere, then our system is ready to work. If there is a "Warning", then we update the system again.
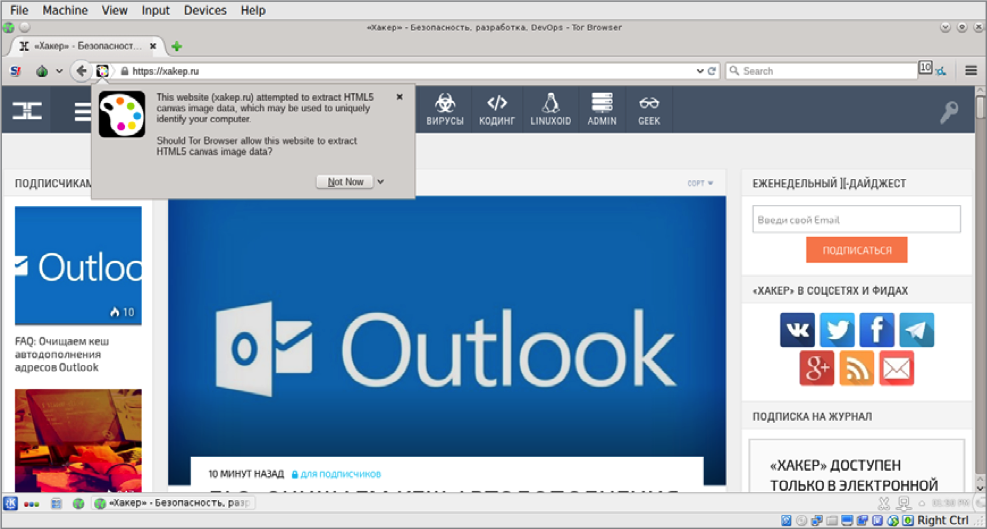
Now on the Workstation, we need to download/update the tor Browser. Launch Tor Browser Downloader from the shortcut on the slave. the table or enter the update-torbrowser in the terminal. The process will start and you will be asked to select the tor version of the Browser to download. After downloading-install TOR Browser by clicking on the ' Yes ' button or write "y" in the terminal and press enter.
To change the password, enter the following code in the console:
Enter a standard password. Now we are working as root and can change the password:
Enter our password for "ROOT" twice. Now we also change it for "USER".
Enter our password twice. Now the user password has changed.
We perform this operation on both virtual machines and do not forget that our passwords are different for our own security.
Now we update the Locales with the following code:
A graphical window appears in the console. Navigate up and down using the arrow keys on the keyboard. Looking for it . Mark by pressing the space bar. By pressing Tab, we switch to. Now select the default language in the system. We can keep English (which I recommend to you) or change it to Russian.
Install the software packages with the following command:
htop-Console task manager
git - Git
nmap port Scanner
psi-plus-Jabber client. You can use pidgin instead
etherape - software for graphical monitoring of network traffic
We also recommend installing this group of packages for optimal performance
Configuring the Work Station for your work
The first thing we need is RDP connection software. We will use rdesktop. Enter two commands in the console.
Then install the software itself
To connect to a remote computer, use the command
-z Enables stream compression
-P Caching
-g Sets the window geometry
- u user Name on the server
- p Password on the server.
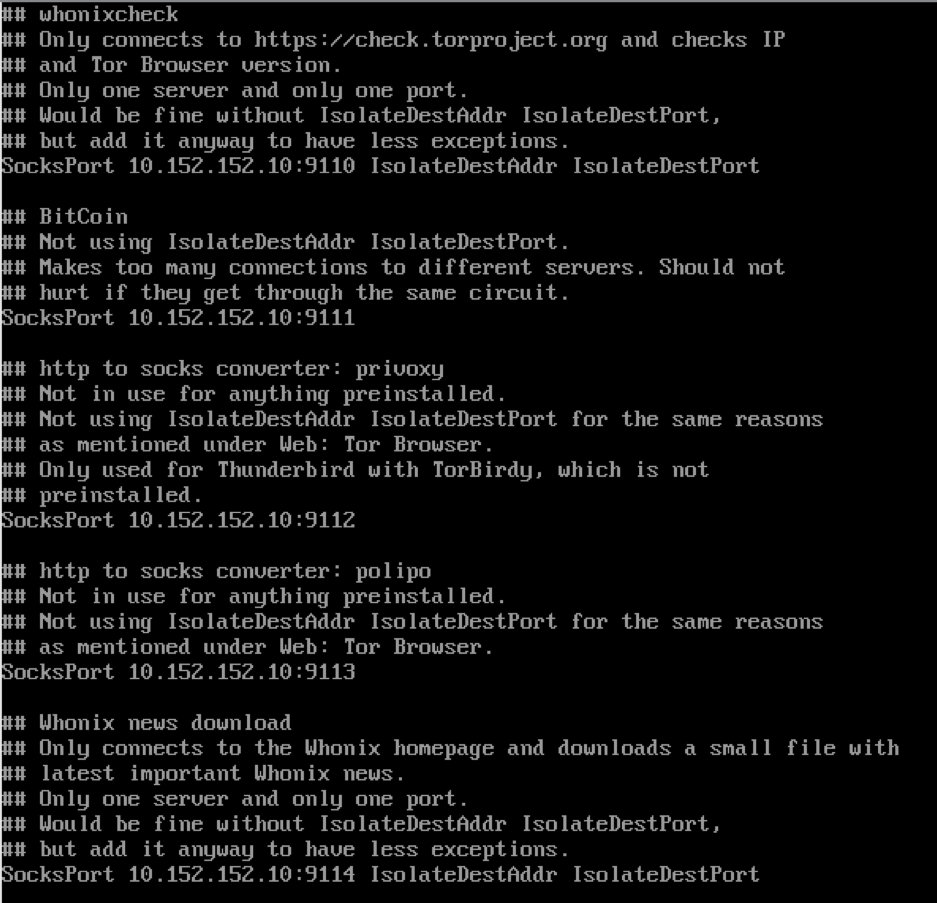
The implementation of chains of anonymity
There are many chains for maintaining anonymity, but let's first start with the most convenient and practical one for us.
First of all, we need to be aware of the concept of our profession and therefore we need to think through a secure chain of our traffic in order to protect ourselves.
It looks something like this: we install a vpn on the main machine and already connect to the Whonix Gateway, that is, our gateway to TOR is not from a personal IP address, but from the server address of our VPN, which allows us to hide the connection to the onion network from the provider. Then we connect from Whonix Workstation to the remote computer. If this is a rented RDP on which we have Antidetect, whether it is a sphere or any other, then we change our ipishnik for any reason by connecting via an ssh tunnel or socks4, socks5 proxy. That is, the entire chain briefly looks like this:
Our IP VPN is TOR-RDP-SOCKS5 / SSH. This chain is more than reliable for driving in gifts or clothing items. Since do not forget that we hide our main hardware by connecting to RDP not directly but through an isolated Whonix image.
At the same time, if you think that this is not enough, then you can also connect to the VPN on the Work Station. To do this, we need to download the ".ovpn" configuration file from our VPN provider. Tor cannot work over UDP, so the VPN provider must provide us with a configuration file that works with the VPN server over TCP. The config file should contain the line "proto tcp " instead of"proto udp". Connecting to the VPN
Don't forget to change the file path
In this way, we will connect to the VPN server and when working with Firefox, we will have a clean IP address without the "TOR"tag. Now almost all our app traffic goes through VPN - > Tor - > > VPN - > > > Internet. Why "almost all apps"? Because Whonix is designed in such a way that some applications will bypass this VPN on the Work Station and connect directly to Tor. At the same time, access to the TOR network will still be via our VPN on the main machine.
Tips for working with Whonix
So let's get started! What is Whonix? First, it is a Debian-based distribution, which consists of 2 parts. The first is the Whonix Gateway, which runs through TOR and forwards absolutely all local traffic. The second part is a completely isolated image that is configured in such a way that it only works through the Whonix Gateway.
Thus, Whonix Workstation does not have access to our main hardware and does not know the original IP address of the connection, which allows us to remain anonymous and not burn the IP address even if this very workstation is hacked.
Among the features of this distribution, the ability of each application to work on Whonix Workstation through the new TOR chain stands out, which perfectly mixes all traffic and makes us more invisible on the network.
Whonix is also most often compared to Tails, since both of these distributions were originally created for the anonymity of their users.
If you do not delve into the technical features of each of the distributions, then for a typical user, the fundamental difference between them will be that Tails is intended for use from USB-FLash drives (it is not recommended to put it on a virtual machine), and Whonix in most cases is put on a virtual machine. Also, the key difference is that Tails is "Amnesty", that is, it forgets absolutely everything after a reboot, while Whonix is not. Whonix, in turn, is more flexible in the settings of various "Chains" in particular, here you can find VPN - > Tor, VPN - > > Tor - > > VPN, VPN-Tor - > > > Proxy/SSH, and you can come up with a lot more. In Tails, this can't be done. In Tails, all traffic goes directly through the tor. In other words, you won't be able to put a VPN in front of the tor, only after.
How to install Whonix
1) the best way for us is to install Whonix on a virtual machine. This article will discuss exactly this method. This is the easiest and most convenient way for a carder to install Whonix. Our virtualization program will be VirtualBox. Almost any operating system can be used as a Host OS.
2) Qubes-Whonix. This is the second, also quite common way to send traffic through Whonix. The so-called Qubes OS is used as the host operating system, and Whonix-Gateway is installed as a virtual machine through the built-in virtualization tools in Qubes OS.
3) KVM Virtualization. The third method is to install Whonix. The qemu-kvm virtualizer or similar is used.
4) is it Possible to physically separate virtual machines, Whonix Gateway and Whonix Workstation
Installing Whonix
First you need to download Virtualbox. How to install this software, you can read in our article "Virtualbox-configuration and Use". Then download Whonix Gateway and Whonix Workstation from the official website.
Open virtualbox, click File - > Import Appliance. Select the downloaded Whonix Gateway image, click "Next". A window will appear with the settings, we leave everything by default, except for the RAM column, this column can be changed if desired. Click "Import" and wait.
We perform the same operation for Whonix Workstation. It is advisable to allocate at least 1024 MB of RAM for this image, since this is our working environment and all applications run on it.
After we have created two virtual machines and they are successfully displayed in Virtualbox - we start configuring them.
Press the left mouse button on the Whonix Gateway -> Settings -> System. On this page, we need to change the startup parameters. In the first place, we should have "Hard Disk", in the second "Optical". Then uncheck "Floppy" and "Optical" and leave it only opposite "Hard Disk". Now open the "Storage" tab, there on the Controller we put a tick "Use Host I/O Cache". We do exactly the same operation with the second virtual machine.
First launch of Whonix
Mandatory launch procedure: first Whonix Gateway, then Whoenix Workstation, and nothing else. Because if you run a Working environment in front of the gateway, then all our traffic will go from the main machine and this will lead to a leak of our IP (even if the VPN IP), as well as to a leak of our hardware indicators in case of hacking Whonix Workstation.
When you first launch Whonix Gateway, the agreement window will appear in front of you. After reading it, click "Understand" twice. It should be marked "Iam Ready to Enable Tor", wait for "Next" several times, then "Yes. Automatically install updates from the Whonix team", click "Next", select "Whonix Stable Repository" and then to the end (the same Windows will be when you start Whonix Workstation), so we do the same actions for the second image. After that, the so-called whonix check should automatically start on both virtual machines.
Whonixcheck-checks the system for connection to repositories and the TOR network. If there are any problems, we will see an inscription "Warning" indicating the problem of updating the system or connecting to the TOR.
Now open the gateway console and enter the following OS update code:
Code:
sudo apt-get update && sudo apt-get upgrade -y && sudo apt-get dist-upgrade -yYou will need to enter your password.
Standard username-user
Password from user-changeme
Root password-changeme
After entering the password, we expect a full system update. If an update error occurs, enter this command again.
If the update was successful, launch whonixcheck from the desktop shortcut or use the "whonixcheck" command in the console. If it says "success" everywhere, then our system is ready to work. If there is a "Warning", then we update the system again.
Now on the Workstation, we need to download/update the tor Browser. Launch Tor Browser Downloader from the shortcut on the slave. the table or enter the update-torbrowser in the terminal. The process will start and you will be asked to select the tor version of the Browser to download. After downloading-install TOR Browser by clicking on the ' Yes ' button or write "y" in the terminal and press enter.
To change the password, enter the following code in the console:
Code:
sudo -iEnter a standard password. Now we are working as root and can change the password:
Code:
passwd rootEnter our password for "ROOT" twice. Now we also change it for "USER".
Code:
passwd userEnter our password twice. Now the user password has changed.
We perform this operation on both virtual machines and do not forget that our passwords are different for our own security.
Now we update the Locales with the following code:
Code:
sudo dpkg-reconfigure localesA graphical window appears in the console. Navigate up and down using the arrow keys on the keyboard. Looking for it . Mark by pressing the space bar. By pressing Tab, we switch to. Now select the default language in the system. We can keep English (which I recommend to you) or change it to Russian.
Install the software packages with the following command:
Code:
sudo apt-get install htop git openvpn openssl nmap psi-plus etherape openssh-clienthtop-Console task manager
git - Git
nmap port Scanner
psi-plus-Jabber client. You can use pidgin instead
etherape - software for graphical monitoring of network traffic
Code:
openssh-client — SSH ClientWe also recommend installing this group of packages for optimal performance
Code:
sudo apt-get install build-essential pkg-config make automake autoconfConfiguring the Work Station for your work
The first thing we need is RDP connection software. We will use rdesktop. Enter two commands in the console.
Code:
sudo apt updateThen install the software itself
Code:
sudo apt install rdesktopTo connect to a remote computer, use the command
Code:
rdesktop-z-P -GW-u USERNAME -p PASSWORD SERVER_IP-z Enables stream compression
-P Caching
-g Sets the window geometry
- u user Name on the server
- p Password on the server.
The implementation of chains of anonymity
There are many chains for maintaining anonymity, but let's first start with the most convenient and practical one for us.
First of all, we need to be aware of the concept of our profession and therefore we need to think through a secure chain of our traffic in order to protect ourselves.
It looks something like this: we install a vpn on the main machine and already connect to the Whonix Gateway, that is, our gateway to TOR is not from a personal IP address, but from the server address of our VPN, which allows us to hide the connection to the onion network from the provider. Then we connect from Whonix Workstation to the remote computer. If this is a rented RDP on which we have Antidetect, whether it is a sphere or any other, then we change our ipishnik for any reason by connecting via an ssh tunnel or socks4, socks5 proxy. That is, the entire chain briefly looks like this:
Our IP VPN is TOR-RDP-SOCKS5 / SSH. This chain is more than reliable for driving in gifts or clothing items. Since do not forget that we hide our main hardware by connecting to RDP not directly but through an isolated Whonix image.
At the same time, if you think that this is not enough, then you can also connect to the VPN on the Work Station. To do this, we need to download the ".ovpn" configuration file from our VPN provider. Tor cannot work over UDP, so the VPN provider must provide us with a configuration file that works with the VPN server over TCP. The config file should contain the line "proto tcp " instead of"proto udp". Connecting to the VPN
Code:
sudo openvpn --config <path_k_. ovpn><path_k_. ovpn>Don't forget to change the file path
In this way, we will connect to the VPN server and when working with Firefox, we will have a clean IP address without the "TOR"tag. Now almost all our app traffic goes through VPN - > Tor - > > VPN - > > > Internet. Why "almost all apps"? Because Whonix is designed in such a way that some applications will bypass this VPN on the Work Station and connect directly to Tor. At the same time, access to the TOR network will still be via our VPN on the main machine.
Tips for working with Whonix
- To surf the Internet, it is recommended to use the already installed Tor Browser and not download it from external repositories.
- Don't delete apps that you didn't install yourself - this may cause errors in the system.
- Be careful when performing apt-get autoremove, sometimes for unknown reasons, important Whonix packages or configs that are needed for normal operation are deleted.
- It is not advisable to change repositories from Stable to Testing for system updates. You will have to do apt-get dist-upgrade, which can lead to a system crash.
- If you need to install a package that is not in the Stable repositories, then we search on the official program site, download and build it manually, or we search for the ".deb" package on the Debian site, download and install it via dpkg-i.