Tomcat
Professional
- Messages
- 2,695
- Reaction score
- 1,063
- Points
- 113
The content of the article
- Theory
- GNSS
- Frequencies
- Triangulation and trilateration
- TTFF
- Practice
- Equipment
- GPS-SDR-SIM
- iPhone
- What to pay attention to
- Conclusions
Do not repeat the actions described in the article near airports and other objects that are highly dependent on geopositioning! Work on the air requires special permission and must be carried out in compliance with safety precautions.
THEORY
GNSS
The Global Navigation Satellite System (GNSS) allows users of the system to determine their location. GNSS is a network of different satellite and ground systems. The most famous of them are the American GPS and the Russian GLONASS. You can also remember Galileo (EU countries) and BeiDou (China), but they are much less common.Three main groups of devices are used to determine location: space-based, user-based and other ground-based (control segment).
Space devices are, as you might guess, satellites. Each system has its own satellites flying in different orbits. Satellites broadcast data at different frequencies and at different time intervals so as not to interfere with each other.
Ground systems are responsible for synchronizing time, correct information on satellites, adjusting orbits and checking the key functions of the satellite - what if it breaks down?
The user segment is the client devices that determine their location using GNSS. The simplest example is a regular GNSS receiver in your phone.
To determine a location, any end device must receive data from the satellite and somehow process it. The process of processing signals and determining location is called triangulation (although there are other methods).
Frequencies
Depending on the specific satellite system, GNSS uses different frequencies to transmit data. Let's go over the three giants, their frequencies and the purpose of these frequencies.GNSS operates on three main bands: L1, L2 and L5. They all appeared sequentially, as improved versions of the navigation system. This is all called the “L-band”, or the decimeter wave range. The range describes frequencies from 1 to 2 GHz or from 1000 to 2000 MHz. Several navigation systems can operate on one band at once: for example, GPS, GLONASS and Galileo work simultaneously in the L1 band.
L1 is the oldest band, used by almost all satellite navigation systems. Since it is ancient, almost all receivers can receive it. The only negative is that the signal in this frequency range has a low ability to bend around obstacles and pass through them (walls of buildings, foliage of trees or too thick clouds).
L2 appeared as a replacement for L1. The signal in this band bends around obstacles better, and you can catch it even in hard-to-reach places. This band is considered new, so it is usually used in conjunction with L1.
L5 is the latest technology, used primarily for aviation purposes, although civilian receivers can sometimes work with it too.
More about bands and frequencies
GPS operates in all three bands, while alternative navigation systems have not yet occupied all available frequencies. L1 is home to GPS (1575.42 MHz), GLONASS (1602 MHz) and Galileo (1575.42 MHz). In L2, GPS operates at 1227.6 MHz, and GLONASS at 1246 MHz. L5 has Galileo (1207.14 MHz and 1176.45 MHz) and GPS (only one frequency - 1176.45 MHz).The frequencies for civilian and military applications are different, and in today's article we will only consider civilian options. In addition, the signal for military use is much more accurate, but it is encrypted to prevent use by unfriendly armies.
Lane assignments may vary depending on the navigation system.
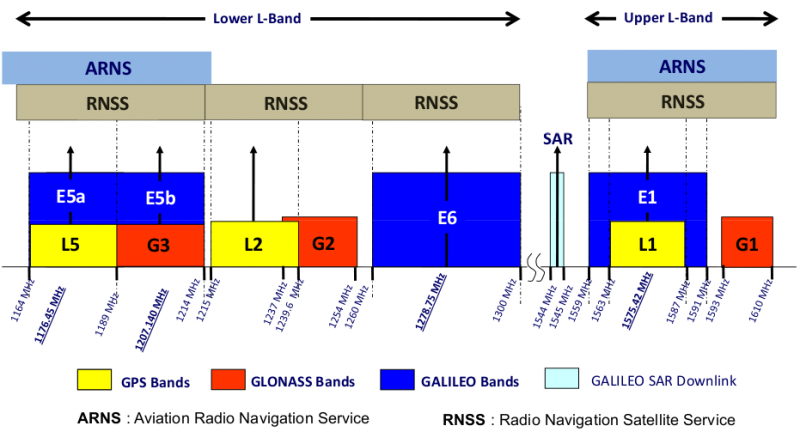
Frequencies and bands used by GNSS
Frequencies labeled ARNS are typically used by aviation, while terrestrial receivers use RNSS frequencies.
Triangulation and trilateration
The satellite cannot send you your location, because everyone has their own location, and your device does not transmit anything to the outside world. That is, the coordinates need to be calculated directly on the receiver, and for this, one satellite signal is not enough, so you have to catch several at once (usually at least three or four). They all send you their own coordinates and times. Already from this data, using simple formulas, you can determine the location. To find coordinates, two main methods are used: triangulation and trilateration.Triangulation is the determination of the location of a point using three landmarks. The reference points in this case are satellites, but since spacecraft fly at an altitude of about 20 thousand kilometers, it is very difficult to use this method due to the need to very accurately know the distance to each of the satellites. To facilitate the process, trilateration is used.
Trilateration is a method for determining point coordinates that uses a system of spheres.
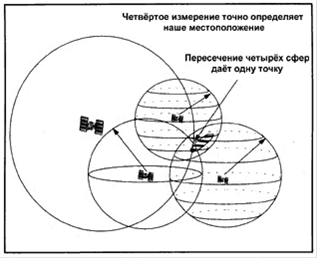
Trilateration
The distance to the satellites can be determined by the travel time of the signal from the satellite to the receiver, multiplied by the speed of light, but for this you need to know the exact time at which the signal was sent.
An easy way to determine coordinates
In practice, if you have, for example, a microcontroller, you don't need to solve this mountain of linear algebra yourself just to get your coordinates. All this is successfully done by cheap GNSS receivers, which will spit out the coordinates and the source of their receipt (from which satellite system) in NMEA format.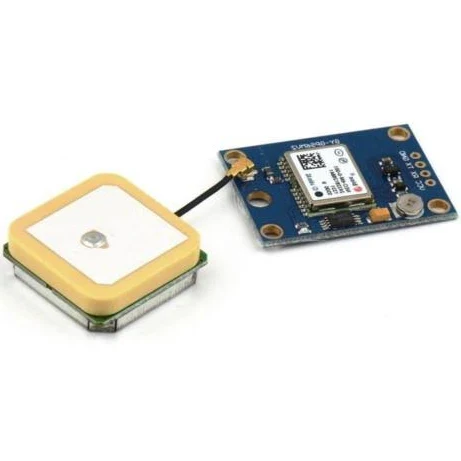
GPS receiver
NMEA is a standardized format for transmitting GNSS data. That is, if you want to make a device that will work with GNSS, you will need to work with the NMEA format, and not look for documentation for the format of each satellite system.
To obtain this data, you can connect to the receiver via USB or UART. I only have the UART wired, so I built a bridge out of Auduino and went outside to collect the data.
If you use a ready-made GNSS receiver, then at its output you can see something like the following picture:
$GPRMC,102668.00,A,2565.63860,N,05723.41802,E,44.621,122.82,301122,,,A*54
$GPVTG,122.82,T,,M,44.621,N,82.638,K,A*34
$GPGGA,102669.00,2995.64530,N,05723.40668,E,1,04,2.16,19.7,M,-26.4,M,,*48
$GPGSA,A,3,07,09,04,14,,,,,,,,,6.09,2.16,5.70*05
$GPGSV,2,1,05,04,43,108,34,07,53,338,35,09,73,051,37,14,33,217,28*7B
$GPGSV,2,2,05,16,04,038,*44
$GPGLL,2585.64930,N,05123.40668,E,102608.00,A,A*6E
$GPRMC,107129.00,A,2565.63860,N,05723.41802,E,47.084,123.07,301122,,,A*5C
These are messages in NMEA format, that is, data from the satellite already processed by the GNSS receiver. It doesn't look very clear, but it's actually quite easy to get our coordinates from this.
Let's look at the first message as an example:
$GPRMC,102668.00,A,2565.63860,N,05723.41802,E,44.621,122.82,301122,,,A*54
As you may have noticed, each message begins with a dollar sign, followed by five letters and a comma. This header indicates the type of data in the message. The first two letters (in our case GP) indicate the GNSS system from which the information was obtained. Our GP stands for GPS. You may come across other satellite systems - here is a list of possible answers:
- GP - GPS only;
- GL - GLONASS only;
- BD - BeiDou only;
- GA - Galileo only;
- GN - several systems are used simultaneously.
Let's omit all fields except coordinates (a description of the missing fields can be read in the NMEA documentation). 2565.63860,N is latitude in the format DDMM.MMMMMwhere N it means the northern hemisphere, and 05723.41802,E is longitude in the format DDDMM.MMMMMwhere E it means the eastern hemisphere. That is, the coordinates of our test point are 25 degrees 65.63860 minutes north latitude and 57 degrees 23.41802 minutes east longitude.
To view this point on maps on the Internet, you need to convert GPS coordinates to decimal degrees. To do this, you can use an online calculator.
TTFF
TTFF - time to first fix, or time to determine location. This is the time it takes for the device to collect data and determine its location. This parameter is very important for spoofing.If the device does not have any satellite data, the process can take up to twelve minutes, but usually only takes two to three minutes.
PRACTICE
There are plenty of GPS spoofing guides on the Internet, but they have one thing in common: they don't work in 2024 (for me that's exactly the case). Many phones are now able to determine location not only by satellites - they use Wi-Fi and Bluetooth for this. Cell towers can also be involved in the process. First, we will try to replace the GPS on an Android smartphone and see what difficulties may arise during the replacement.Equipment
In my experiment I use:- bladeRF 2.0 Micro Xa4 as transmitter;
- HackRF One as receiver and transmitter;
- RFSPACE antenna;
- Mi A2.
BladeRF
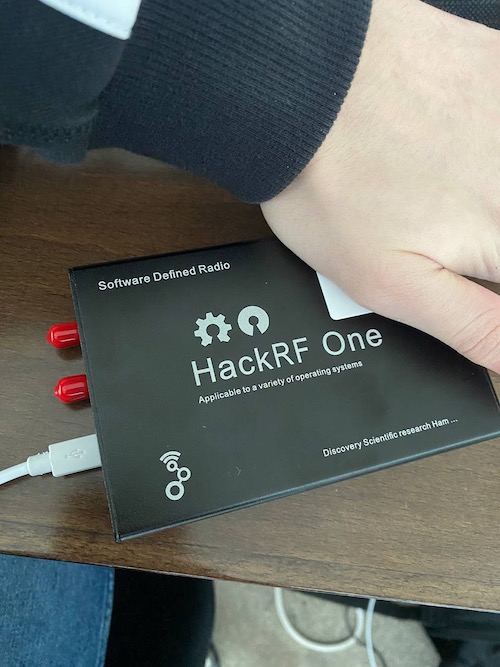
HackRF one
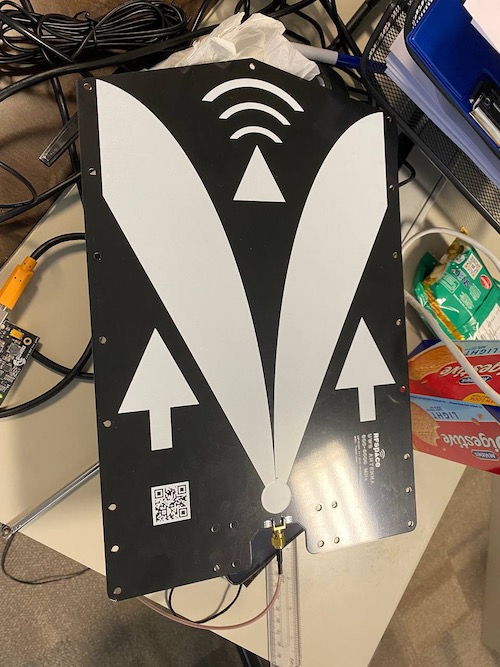
RFSPACE
Mi A2
GPS-SDR-SIM
GPS-SDR-SIM allows you to generate data for any location or trajectory. To do this, you need to download a table of ephemeris (satellite coordinates for a specific time) and specify the location.WWW
GPS-SDR-SIM is one of the most popular and certainly the most famous tool for spoofing GPS data. At the time of publication, the repository already has more than 2000 stars and is updated regularly.So, first, download the sources and build the program:
git clone https://github.com/Nuand/gps-sdr-sim
cd gps-sdr-sim
gcc gpssim.c -lm -O3 -o gps-sdr-sim
Let's connect bladeRF and generate the file:
./gps-sdr-sim -e hour3060.22n -l 21.296965,-157.815687,100 -b 16 -o gpssim.bin -t $(date -u +%Y/%m/%d,+%X)
WWW
Satellite data can be downloaded from the NASA website. Data is provided here for every hour, which will allow you to avoid errors with time - it is in almost all the guides that I could find.The parameter -t is responsible for the time that the “satellites” will transmit. This parameter is very important, since new phones do not work with data that is only two to three hours behind in time.
Using static location mode.
Start time = 2022/11/02.07:21:33 (2234:285693)
Duration = 300.0 [sec]
02 180.0 25.6 22759545.5 6.5
06 54.7 20.9 23631267.8 5.3
11 90.0 38.3 22154769.5 4.3
12 355.4 46.2 21368898.6 4.0
13 163.0 4.3 25471171.1 10.3
15 186.1 19.4 24115672.2 7.7
19 38.7 3.5 25179568.2 5.6
20 119.8 1.4 25729982.2 7.7
24 102.8 78.9 20375053.9 3.1
25 312.8 32.9 22268020.3 5.5
29 231.8 37.9 22208289.9 5.3
32 306.8 14.9 24242464.5 8.5
Time into run = 300.0
Done!
Process time = 46.2 [sec]
Don't be afraid of the Invalid Start Time error: it means that NASA has not yet updated the data on the site. You need to wait a little, download a new file and repeat the generation.
When the file is ready, download a GPS monitoring application called GPS Test to our test device, launch it and enable transmission on the computer:
lll@lll ~/s/gps-sdr-sim (master)> bladeRF-cli -i
bladeRF>set frequency 1575.42M
For best results, it is not recommended to set both RX and TX to the
same frequency. Instead, consider offsetting them by at least 1 MHz
and mixing digitally.
For the above reason, 'set frequency ' is deprecated and
scheduled for removal in future bladeRF-cli versions.
Please use 'set frequency rx' and 'set frequency tx' to configure
channels individually.
RX1 Frequency: 1575419998 Hz (Range: [70000000, 6000000000])
RX2 Frequency: 1575419998 Hz (Range: [70000000, 6000000000])
TX1 Frequency: 1575419998 Hz (Range: [47000000, 6000000000])
TX2 Frequency: 1575419998 Hz (Range: [47000000, 6000000000])
bladeRF> set samplerate 2.6M
Setting RX1 sample rate - req: 2600000 0/1Hz, actual: 2600000 0/1Hz
Setting RX2 sample rate - req: 2600000 0/1Hz, actual: 2600000 0/1Hz
Setting TX1 sample rate - req: 2600000 0/1Hz, actual: 2600000 0/1Hz
Setting TX2 sample rate - req: 2600000 0/1Hz, actual: 2600000 0/1Hz
bladeRF> set bandwidth 2.5M
RX1 Bandwidth: 2500000 Hz (Range: [200000, 56000000])
RX2 Bandwidth: 2500000 Hz (Range: [200000, 56000000])
TX1 Bandwidth: 2500000 Hz (Range: [200000, 56000000])
TX2 Bandwidth: 2500000 Hz (Range: [200000, 56000000])
bladeRF> set gain tx 56
Setting TX1 overall gain to 56 dB
Gain TX1 overall: 56 dB (Range: [-23.75, 66])
dsa: -90 dB (Range: [-89.75, 0])
bladeRF> tx config file=/home/lll/soft/gps-sdr-sim/gpssim.bin format=bin
bladeRF> tx start
bladeRF> tx wait
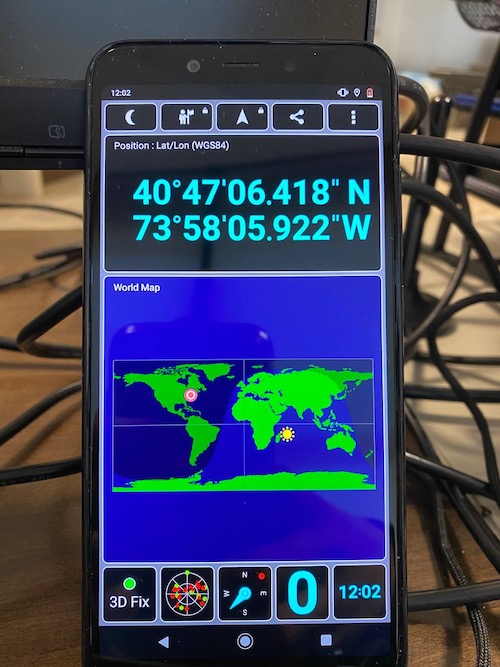
Satellites with good signal strength will be displayed on the smartphone screen.

However, we received No Fix - a system status in which it cannot determine its location. The green lines are “satellites” (which in our case are faked by bladeRF). It can be seen that the system works and sees satellites, but the phone refuses to determine the location. Sometimes the device takes a while to receive the data and use it (TTFF), so to keep the experiment clean, I rebooted the phone and turned on the transfer for five minutes. There was no result - the phone still ignored our “fake” satellites.
Since my file with coordinates was also expired, I rewinded the time on my phone a little and moved the location one kilometer from my real location. Why just a kilometer? Judging by my tests, if you suddenly change the coordinates over a long distance, the phone may reject such data as implausible, so you need to change the fake location gradually:
lll@lll ~/s/gps-sdr-sim (master)> ./gps-sdr-sim -e brdc2022_3060.22n -d 1000 -l 51.296965,124.815687,100 -b 16 -o gpssim.bin -t 2022/11/02,08:00:00
Using static location mode.
Start time = 2022/11/02.08:00:00 (2234:288000)
Duration = 1000.0 [sec]
02 174.0 43.6 21497540.2 3.6
05 140.4 4.3 25351515.3 6.8
06 41.5 11.5 24590008.1 4.2
11 66.9 36.4 22296887.8 3.3
12 20.6 45.8 21422074.0 3.1
15 176.8 7.9 25304780.7 8.2
18 198.6 4.3 25335825.2 10.3
20 104.6 6.7 25172344.8 4.8
22 314.6 4.6 25557500.2 8.9
24 146.6 63.7 20898055.3 2.7
25 332.2 40.0 21745559.7 3.7
29 253.1 49.9 21398805.8 3.4
32 290.3 19.4 23734754.8 6.5
Time into run = 1000.0
Done!
Process time = 142.4 [sec]
We start the transmission again and look at the result.

The status is displayed as 3D Fix - location determined! The time from the “satellites” is 12:00, which is a little behind the phone clock, but within normal limits. The lifetime of satellite data can range from thirty minutes to four hours, depending on the device. The real time of the smartphone (in the upper left corner) is 12:34, and an error of thirty-four minutes is considered normal in cases where other satellites are not available.
IPHONE
The same situation is on the iPhone, the location is changed without any problems. Let's land in the Persian Gulf!
Ready! This is a new phone that has never seen a GPS signal before, so it picked up the fake location pretty quickly. Wi-Fi and a connection to a cellular network did not help the phone understand that the coordinates were fake.
WHAT TO PAY ATTENTION
Here are a few simple rules to follow when spoofing GPS:- Keep an eye on the data you take from the NASA website - it is updated frequently.
- Keep an eye on the time that the “satellites” send to the device: some devices do not work with data that is too outdated.
- Give the device time to “save” the fake satellites.
- Do not immediately change the location to a distant one - such implausible valueswill be ignored, and then it will take much more time to process normal signals.
- Pay attention to Wi-Fi and cellular communications: sometimes they can be used to determine location, but on “clean” devices even they will not help.
- Use the correct antenna.
- If you use HackRF, make sure you have an external quartz resonator, otherwise time will float.
- Different satellites work in different parts of the Earth, so if you replace only the satellites that are most often found in the current location, the chance of success will be greater.
- Some maps use third-party sources to determine locations. Data from Apple Maps and Google Maps sometimes differ. Google's location was more accurate.
- Clearing old GPS data will help fool almost any device.
- The chances are increased by setting the time as close to reality as possible (in data from the NASA website), and if this does not help, you can give the device a few minutes (up to ten to fifteen) to process the new data . On a new device, this wait will almost certainly be required.
(c) https://xakep.ru/2023/04/06/gps-spoofing/