You are using an out of date browser. It may not display this or other websites correctly.
You should upgrade or use an alternative browser.
You should upgrade or use an alternative browser.
Problems with virtual machines
- Thread starter shit123
- Start date
Lord777
Professional
- Messages
- 2,577
- Reaction score
- 1,561
- Points
- 113
Hello.
Carding from a virtual machine is possible, but extremely gentle and not recommended in 2021.
Virtual machines are becoming a thing of the past and are no longer an actual tool.
Most anti-fraud systems detect them easily, but not all.
Everything depends on the settings of the antifraud system and the specific decisions of managers for each order, since they make decisions on an individual basis.
Virtual machines add more risk points, then if the store wants to make money, then he does not pay attention to this circumstance and hopes that the chargeback will not come.
You can continue to work successfully in some stores, services and exchanges.
You can also try to correctly configure the virtual machine to bypass the detection, but this does not give a 100% guarantee of success, since a lot depends on the installed anti-fraud filters.
Below I outline the steps that need to be taken to bypass the detection of an installed virtual machine.
Setting up a virtual machine for carding
First of all, download the image of the virtual disk with the OS with which you are going to work in the virtual machine. How to install an operating system on a virtual machine.
The first thing to do is create a partition (virtual device). Open VirtualBox and click on "Create". Enter any name you like, in the "Type" and "Version" sections, select those whose image you are going to install.
All the following items: memory size, type of hard disk, number of GB - click "Next" everywhere. The parameters offered by the system are fine. VirtualBox knows what characteristics need to be selected in order to emulate the OS known to it.
Customization
The next step is to configure the virtual OS. You have already allocated space for XP on your computer. Now you need to connect the Windows XP ISO image to the virtual device. Go to "Settings". In the window, select the item "Media", next to "IDE controller - click on" Empty ", next to" Drive: Secondary master "click on the disk icon. And then select "Select an optical disk image".
The image search window will open. You should find the XP ISO file. Basically, the ISO file is the installation disc for the virtual machine.
When you select a file, do not forget to confirm "OK".
Launch
You can assume that you have completely prepared the device and "stuffed into the DVD-ROM" the disc. It remains to turn on the machine and start the installation. Click "Run".
A separate window of the virtual machine will open, where the installation will take place. Most likely, you have selected 10 GB of hard disk by default, so now the system shows an unallocated area of 10237 MB.
At the bottom of the screen, you see the commands. Press "C" to create a section.
When you create it, click "Install".
Now the system offers to format the created partition. Choose NTFS formatting.
Installation started: "The installer is copying files." When the progress is complete, Windows XP will reboot and the installation will continue.
After the installation is completed, it remains to "pull out the disk from the device". Close the virtual XP window and go to "Settings" again. Where you attached the ISO image, you must now remove it. Withdraw. You can delete the ISO file.
Windows XP is ready for the first boot. To conveniently interact with the virtual machine, we will give you a few tips.
There are two modes of VirtualBox mouse - integrated and non-integrated. If you use the second one, then to return the mouse to the main OS, press the right “Ctrl”;
You can change the modes in the "Machine" tab, and there "Disable / enable mouse integration"
To work, we need to move files between the main machine and the virtual one. To do this, we need to create shared folders.
Create a folder on the main machine from which you want to share with the virtual machine.
Hover the cursor over the folder icon, right-click on "configure shared folders"
Next, click on the add folder icon, specify the path to the folder we created.
After the process is complete, the folder will look like an additional disk on the virtual machine, but on the main machine it will remain as a regular folder.
If after these steps the folder is not integrated with the virtual machine, in the virtual machine window at the top,
select the "Devices" tab in it "Connect the guest OS add-on disk image"
And everything will work.
Online anonymization. Browser antidetect from VM
The topic was not chosen by chance, I noticed that most do not know or do not understand how and how easy it is to deanonymize them on the network. They consider bundles like TOP VPN and Dedicated computers save them. But in fact, they don't even imagine how antifraud systems are and, in general, special services can easily detect you.
Today I will tell you how to set your own hardware configuration parameters to a virtual machine, plus we will replace browser fingerprints.
What will we end up with?
With each drive, you will have a unique system for driving with fingerprint substitution, that is, antifraud will not charge you penalty points, hence things will go easier. The same with a stick, this lady will be supportive of your iron.
You will have savings in terms of buying Dedicated servers (RDP), you will no longer need them. You will have your own driving machine with the characteristics of the hardware that you specify. In just 5-10 minutes, a new machine will be ready for work.
And so to the point.
Installing a virtual machine using Virtualbox as an example
To begin with, for those who have installed Virtualbox, uninstall it and reboot Be sure.
Then we install it again and during the installation process we do not install
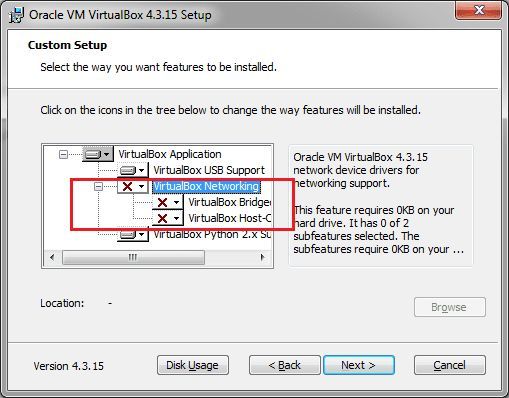
VirtualBox Networking, uncheck the box as in the picture
Anti-detection of the virtual machine.
What are we going to hide? At least these points are:
- DMI Information;
- IDE / AHCI devices (harddisks, cd-rom's);
- ACPI OEM Information;
- Ethernet Adapter MAC address;
- PXE Boot data;
- ACPI DSDT (Differentiated System Description Table);
- ACPI SSDT (Secondary System Descriptor Table);
- VGA Video BIOS data;
- BIOS data;
- VM splashscreen (optional, just for nice looking).
Download the ready-made customized AntiVMDetect script.
File: Settings.rar
Our customized system will not fire any of your main system IDs in the future. Whether it's HDD, BIOS or CPU. We will hide your poppy address and even your Windows ID and each time it will be different, with its own key.
Have you downloaded the archive? Well done, unzip it to drive C.
We will need the hidevm_ahci file from this list. Through this file, we will set random characteristics for our system. The only thing that will have to be done manually is to drive your percentages and the motherboard into this file, as for me it is not necessary because the world is full of people with such prots and a motherboard, so we only care about the BIOS ID of the HDD and the CPU that the program itself randomly exposes . I will explain how to use this below.
Installing a virtual machine and configuring it.
We do everything as in the pictures.
Starting with version 5.0 of VirtualBox, be sure to install paravirtualization on Legacy mode or in your language compatible
Display turn off acceleration.
We download the Win7ProEng64bit distribution from the off-site of the Microsoft website, how to download it from there you will find it in Google, there are articles on the site about repairing.
Install the distributor in vbox and set the name to Win7.
The main point is NEVER install an additional guest OS in your virtual machine, it will kill our whole business.
We installed our axis on the virtual machine, now we will set the parameters we need to it.
Now we will work with our hidevm_ahci file, which we unzipped to drive C.
So we run the CMD command with administrator rights, we see the following.
Microsoft Windows [Version 10.0.14393]
C: \ Windows \ System32>
Enter the command "cd ../ .." press ENTER
We went to our C drive
C: \>
Next, we run our config file
C: \> hidevm_ahci Win7
If you had Vbox running, do not be alarmed that it closed, the script is configured so that it closes it automatically to accept the necessary settings. Further we can see the following
Success: An end signal was sent to the "VirtualBox.exe" process with the identifier ****.
Success: An end signal was sent to process "VBoxSVC.exe" with id ****.
Enter Virtual Machine name: ***
We enter the name of our Win7 virtual machine, wait a couple of seconds until the inscription appears and press after ENTER
Now we register the last command
C: \> install
After loading all the configs, press ENTER and close the command line. Our system is ready and we can run the virtual machine. When you start, you will see an anime girl, this means that the antidetect went off with a bang. We check the system and the processor is all right.
This system will be our main one, from it we will make clones and drive in, register sticks, twist, etc. Each time the clone will be endowed with random identifiers.
We install all the software necessary for the work in this main machine.
When you make a clone, the command line procedure will need to be repeated in order to give the cloned system different random values so that it differs from our first.
Of course, enter the name Win72 or whatever was given to the cloned virtual machine.
Browser setting
I recommend downloading Firefox Nightly version 50.0.2 or Developer Edition the old versions are not suitable in terms of security, and the new ones have new types of prints.
Install extensions from Mozilla addons:
1. Self Destructing Cookies
The bottom line is that when we visit the site where Everkuks are active, a small file falls on our PC, which multiplies throughout the system and determines the version of the operating system, hides in hidden folders. you will not be able to delete it, because it is being restored. These zombiecakes are used primarily in banking and payment systems.
The essence of the extension is to fight against flash cookies, lso cookies, google trackers. the extension accepts cookies and throws them into RAM, then erases them after use. As a result, the site sees that the cookies are accepted, but fortunately for us, they did not fall on our pc, everyone is happy.
https://samy.pl/evercookie/ useful information about evercookie
2. Canvas Defender
The bottom line is that each browser is unique and, in theory, will not be repeated anywhere.
The extension changes the imprint.
Be sure to install version 1.0.7, it is not recognized by the anti-fraud system, that is, it is impossible to see that you are using it. For some reason, new versions are burning. Checked on the browserlix website.
Canvas test
3. Random Agent Spoofer
The anti-fraud system easily fires you up when you want to change the IP, change the browser profile, fires up if you create a multi-way payment system. This is eliminated by the extension.
Test in plugin
4. Download the vac415 archive , use this program to change the sound parameters. Without it, this cannot be done in a virtual machine, in general we create our own audio imprint, the program is flexible, you can set different values, there are hundreds of combinations. The main thing is to change the frequency of hertz.
Test
5. Empty Cache Button
Clearing the cache.
Checking the detection of the title of your browser and other information that is available through the cache
6. No Leak Control the Resource the URI
Needed in order not to burn browser version changes via Random Agent Spoofer
Test
7. WebRTC
Hide the IP address for WebRTC content.
Test
We do all this in our main system, which we are going to clone. Cooking so to speak Mother of Clones")
Bypassing the detection of a virtual machine by programs in VMWare
Developers of virus software and just developers who do not want their program to be tried to be reversed, at the stage of launching or installing, check the virtual machine, and if it is detected, they refuse to work, or even self-destruct. Under the cut, a way is described how you can try to solve this problem.
I used VMWare Fusion for Mac, but it works just as well in Workstation for Win.
1) To work, a newly installed system is required, I did not find how to make changes to an existing one.
Prepare a virtual disk, specify the system, as you usually do, and in the settings for the installed machine, I have this item called Isolation, turn off any data exchange with the host OS.
2) Next, you need to find the VMX configuration file created at the stage of creating a machine in VMWare, and add the following lines to the end:
These options prevent programs from detecting the virtual environment through such complex checks as tracking memory address space, counters.
Important! If at the stage of setting up the installation there is an option like "Express install", "Express installation" - turn them off. Also, do not install VMWare Tools on the installed system, because some software also includes the presence of this package in the check.
[B3)[/B] Save the file, point to the ISO with the system installer to load, install the OS as usual.
4) Despite the fact that the overwhelming majority of programs that do not like the virtual environment do not go beyond the checks that we cut off in step 2, some especially stubborn ones still go further and try to search, for example, everything that looks like the name of virtual controllers disks.
To defeat them in Windows, go to the registry editor in the HKLM \ SYSTEM \ CurrentControlSet \ Services \ Disk \ Enum branch. As you can see, there is a clear reference to the fact that the disk is virtual.

We need to change it by removing VMware, Virtual, Ven, etc. from the parameter, and save it like that.
It also makes sense to replace everything that changes in the registry with a VMware / Virtual search for some Intel or IBM, and not just disk variables.
Then try to launch your stubborn object of experiments - in 70 percent of cases, the steps described will help you pass the tests for the virtual environment.
Important! The value in HKLM \ SYSTEM \ CurrentControlSet \ Services \ Disk \ Enum is overwritten after every reboot, so it needs to be changed after every new system start.
Check how you will protect yourself from detection, as well as to get acquainted with other popular developers detection means sandboxes and virtual ok possible means Pafish.
Despite the fact that there are still places where you can give yourself away, the proposed method forces you to outwit most software that does not want to work in a virtual environment, in this case, in VMWare.
As you can see, stealth can also be improved by allocating more system resources to the virtual machine. As for memory, it is worth choosing values that are multiples of 1024.
However, you can try it.
Here's a great tutorial on how to properly set up a virtual machine for carding:
Here's a step-by-step installation guide:
 www.asustor.com
Carding from a virtual machine is possible, but extremely gentle and not recommended in 2021.
Virtual machines are becoming a thing of the past and are no longer an actual tool.
Most anti-fraud systems detect them easily, but not all.
Everything depends on the settings of the antifraud system and the specific decisions of managers for each order, since they make decisions on an individual basis.
Virtual machines add more risk points, then if the store wants to make money, then he does not pay attention to this circumstance and hopes that the chargeback will not come.
You can continue to work successfully in some stores, services and exchanges.
You can also try to correctly configure the virtual machine to bypass the detection, but this does not give a 100% guarantee of success, since a lot depends on the installed anti-fraud filters.
Below I outline the steps that need to be taken to bypass the detection of an installed virtual machine.
Setting up a virtual machine for carding
First of all, download the image of the virtual disk with the OS with which you are going to work in the virtual machine. How to install an operating system on a virtual machine.
The first thing to do is create a partition (virtual device). Open VirtualBox and click on "Create". Enter any name you like, in the "Type" and "Version" sections, select those whose image you are going to install.
All the following items: memory size, type of hard disk, number of GB - click "Next" everywhere. The parameters offered by the system are fine. VirtualBox knows what characteristics need to be selected in order to emulate the OS known to it.
Customization
The next step is to configure the virtual OS. You have already allocated space for XP on your computer. Now you need to connect the Windows XP ISO image to the virtual device. Go to "Settings". In the window, select the item "Media", next to "IDE controller - click on" Empty ", next to" Drive: Secondary master "click on the disk icon. And then select "Select an optical disk image".
The image search window will open. You should find the XP ISO file. Basically, the ISO file is the installation disc for the virtual machine.
When you select a file, do not forget to confirm "OK".
Launch
You can assume that you have completely prepared the device and "stuffed into the DVD-ROM" the disc. It remains to turn on the machine and start the installation. Click "Run".
A separate window of the virtual machine will open, where the installation will take place. Most likely, you have selected 10 GB of hard disk by default, so now the system shows an unallocated area of 10237 MB.
At the bottom of the screen, you see the commands. Press "C" to create a section.
When you create it, click "Install".
Now the system offers to format the created partition. Choose NTFS formatting.
Installation started: "The installer is copying files." When the progress is complete, Windows XP will reboot and the installation will continue.
After the installation is completed, it remains to "pull out the disk from the device". Close the virtual XP window and go to "Settings" again. Where you attached the ISO image, you must now remove it. Withdraw. You can delete the ISO file.
Windows XP is ready for the first boot. To conveniently interact with the virtual machine, we will give you a few tips.
There are two modes of VirtualBox mouse - integrated and non-integrated. If you use the second one, then to return the mouse to the main OS, press the right “Ctrl”;
You can change the modes in the "Machine" tab, and there "Disable / enable mouse integration"
To work, we need to move files between the main machine and the virtual one. To do this, we need to create shared folders.
Create a folder on the main machine from which you want to share with the virtual machine.
Hover the cursor over the folder icon, right-click on "configure shared folders"
Next, click on the add folder icon, specify the path to the folder we created.
After the process is complete, the folder will look like an additional disk on the virtual machine, but on the main machine it will remain as a regular folder.
If after these steps the folder is not integrated with the virtual machine, in the virtual machine window at the top,
select the "Devices" tab in it "Connect the guest OS add-on disk image"
And everything will work.
Online anonymization. Browser antidetect from VM
The topic was not chosen by chance, I noticed that most do not know or do not understand how and how easy it is to deanonymize them on the network. They consider bundles like TOP VPN and Dedicated computers save them. But in fact, they don't even imagine how antifraud systems are and, in general, special services can easily detect you.
Today I will tell you how to set your own hardware configuration parameters to a virtual machine, plus we will replace browser fingerprints.
What will we end up with?
With each drive, you will have a unique system for driving with fingerprint substitution, that is, antifraud will not charge you penalty points, hence things will go easier. The same with a stick, this lady will be supportive of your iron.
You will have savings in terms of buying Dedicated servers (RDP), you will no longer need them. You will have your own driving machine with the characteristics of the hardware that you specify. In just 5-10 minutes, a new machine will be ready for work.
And so to the point.
Installing a virtual machine using Virtualbox as an example
To begin with, for those who have installed Virtualbox, uninstall it and reboot Be sure.
Then we install it again and during the installation process we do not install
VirtualBox Networking, uncheck the box as in the picture
Anti-detection of the virtual machine.
What are we going to hide? At least these points are:
- DMI Information;
- IDE / AHCI devices (harddisks, cd-rom's);
- ACPI OEM Information;
- Ethernet Adapter MAC address;
- PXE Boot data;
- ACPI DSDT (Differentiated System Description Table);
- ACPI SSDT (Secondary System Descriptor Table);
- VGA Video BIOS data;
- BIOS data;
- VM splashscreen (optional, just for nice looking).
Download the ready-made customized AntiVMDetect script.
File: Settings.rar
Our customized system will not fire any of your main system IDs in the future. Whether it's HDD, BIOS or CPU. We will hide your poppy address and even your Windows ID and each time it will be different, with its own key.
Have you downloaded the archive? Well done, unzip it to drive C.
We will need the hidevm_ahci file from this list. Through this file, we will set random characteristics for our system. The only thing that will have to be done manually is to drive your percentages and the motherboard into this file, as for me it is not necessary because the world is full of people with such prots and a motherboard, so we only care about the BIOS ID of the HDD and the CPU that the program itself randomly exposes . I will explain how to use this below.
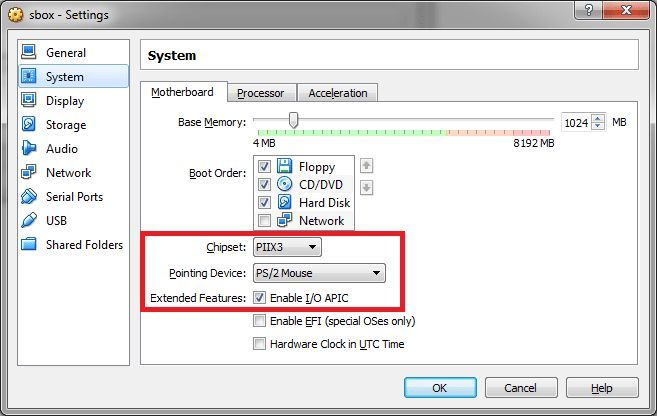
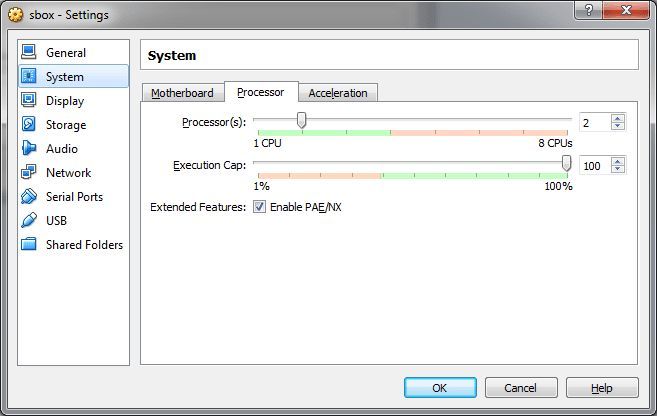
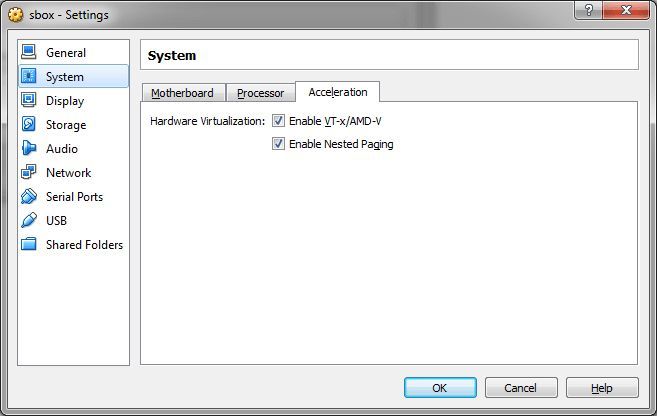
Installing a virtual machine and configuring it.
We do everything as in the pictures.
Starting with version 5.0 of VirtualBox, be sure to install paravirtualization on Legacy mode or in your language compatible
Display turn off acceleration.
We download the Win7ProEng64bit distribution from the off-site of the Microsoft website, how to download it from there you will find it in Google, there are articles on the site about repairing.
Install the distributor in vbox and set the name to Win7.
The main point is NEVER install an additional guest OS in your virtual machine, it will kill our whole business.
We installed our axis on the virtual machine, now we will set the parameters we need to it.
Now we will work with our hidevm_ahci file, which we unzipped to drive C.
So we run the CMD command with administrator rights, we see the following.
Microsoft Windows [Version 10.0.14393]
C: \ Windows \ System32>
Enter the command "cd ../ .." press ENTER
We went to our C drive
C: \>
Next, we run our config file
C: \> hidevm_ahci Win7
If you had Vbox running, do not be alarmed that it closed, the script is configured so that it closes it automatically to accept the necessary settings. Further we can see the following
Success: An end signal was sent to the "VirtualBox.exe" process with the identifier ****.
Success: An end signal was sent to process "VBoxSVC.exe" with id ****.
Enter Virtual Machine name: ***
We enter the name of our Win7 virtual machine, wait a couple of seconds until the inscription appears and press after ENTER
Now we register the last command
C: \> install
After loading all the configs, press ENTER and close the command line. Our system is ready and we can run the virtual machine. When you start, you will see an anime girl, this means that the antidetect went off with a bang. We check the system and the processor is all right.
This system will be our main one, from it we will make clones and drive in, register sticks, twist, etc. Each time the clone will be endowed with random identifiers.
We install all the software necessary for the work in this main machine.
When you make a clone, the command line procedure will need to be repeated in order to give the cloned system different random values so that it differs from our first.
Of course, enter the name Win72 or whatever was given to the cloned virtual machine.
Browser setting
I recommend downloading Firefox Nightly version 50.0.2 or Developer Edition the old versions are not suitable in terms of security, and the new ones have new types of prints.
Install extensions from Mozilla addons:
1. Self Destructing Cookies
The bottom line is that when we visit the site where Everkuks are active, a small file falls on our PC, which multiplies throughout the system and determines the version of the operating system, hides in hidden folders. you will not be able to delete it, because it is being restored. These zombiecakes are used primarily in banking and payment systems.
The essence of the extension is to fight against flash cookies, lso cookies, google trackers. the extension accepts cookies and throws them into RAM, then erases them after use. As a result, the site sees that the cookies are accepted, but fortunately for us, they did not fall on our pc, everyone is happy.
https://samy.pl/evercookie/ useful information about evercookie
2. Canvas Defender
The bottom line is that each browser is unique and, in theory, will not be repeated anywhere.
The extension changes the imprint.
Be sure to install version 1.0.7, it is not recognized by the anti-fraud system, that is, it is impossible to see that you are using it. For some reason, new versions are burning. Checked on the browserlix website.
Canvas test
3. Random Agent Spoofer
The anti-fraud system easily fires you up when you want to change the IP, change the browser profile, fires up if you create a multi-way payment system. This is eliminated by the extension.
Test in plugin
4. Download the vac415 archive , use this program to change the sound parameters. Without it, this cannot be done in a virtual machine, in general we create our own audio imprint, the program is flexible, you can set different values, there are hundreds of combinations. The main thing is to change the frequency of hertz.
Test
5. Empty Cache Button
Clearing the cache.
Checking the detection of the title of your browser and other information that is available through the cache
6. No Leak Control the Resource the URI
Needed in order not to burn browser version changes via Random Agent Spoofer
Test
7. WebRTC
Hide the IP address for WebRTC content.
Test
We do all this in our main system, which we are going to clone. Cooking so to speak Mother of Clones
Bypassing the detection of a virtual machine by programs in VMWare
Developers of virus software and just developers who do not want their program to be tried to be reversed, at the stage of launching or installing, check the virtual machine, and if it is detected, they refuse to work, or even self-destruct. Under the cut, a way is described how you can try to solve this problem.
I used VMWare Fusion for Mac, but it works just as well in Workstation for Win.
1) To work, a newly installed system is required, I did not find how to make changes to an existing one.
Prepare a virtual disk, specify the system, as you usually do, and in the settings for the installed machine, I have this item called Isolation, turn off any data exchange with the host OS.
2) Next, you need to find the VMX configuration file created at the stage of creating a machine in VMWare, and add the following lines to the end:
Code:
isolation.tools.getPtrLocation.disable = "TRUE"
isolation.tools.setPtrLocation.disable = "TRUE"
isolation.tools.setVersion.disable = "TRUE"
isolation.tools.getVersion.disable = "TRUE"
monitor_control.disable_directexec = "TRUE "
Monitor_control.disable_chksimd =" TRUE "
monitor_control.disable_ntreloc =" TRUE "
monitor_control.disable_selfmod =" TRUE "
monitor_control.disable_reloc =" TRUE "
monitor_control.disable_btinout =" TRUE "
monitor_control.disable_btmemspace =" TRUE "
monitor_control.disable_btmemspace =" TRUE "
monitor_control.disable_btseg = "TRUE"
These options prevent programs from detecting the virtual environment through such complex checks as tracking memory address space, counters.
Important! If at the stage of setting up the installation there is an option like "Express install", "Express installation" - turn them off. Also, do not install VMWare Tools on the installed system, because some software also includes the presence of this package in the check.
[B3)[/B] Save the file, point to the ISO with the system installer to load, install the OS as usual.
4) Despite the fact that the overwhelming majority of programs that do not like the virtual environment do not go beyond the checks that we cut off in step 2, some especially stubborn ones still go further and try to search, for example, everything that looks like the name of virtual controllers disks.
To defeat them in Windows, go to the registry editor in the HKLM \ SYSTEM \ CurrentControlSet \ Services \ Disk \ Enum branch. As you can see, there is a clear reference to the fact that the disk is virtual.
We need to change it by removing VMware, Virtual, Ven, etc. from the parameter, and save it like that.
It also makes sense to replace everything that changes in the registry with a VMware / Virtual search for some Intel or IBM, and not just disk variables.
Then try to launch your stubborn object of experiments - in 70 percent of cases, the steps described will help you pass the tests for the virtual environment.
Important! The value in HKLM \ SYSTEM \ CurrentControlSet \ Services \ Disk \ Enum is overwritten after every reboot, so it needs to be changed after every new system start.
Naturally, this is not an exhaustive guide, some software may also try to detect a virtual system by the following methods:
1) By checking the MAC address range (just replaced in the settings of the virtual network adapter before starting the virtual machine)
2) Through WinAPI, by polling the OS configuration and other system information (FirmwareTable)
3) Low-level tricks.
Check how you will protect yourself from detection, as well as to get acquainted with other popular developers detection means sandboxes and virtual ok possible means Pafish.
Despite the fact that there are still places where you can give yourself away, the proposed method forces you to outwit most software that does not want to work in a virtual environment, in this case, in VMWare.
As you can see, stealth can also be improved by allocating more system resources to the virtual machine. As for memory, it is worth choosing values that are multiples of 1024.
However, you can try it.
Here's a great tutorial on how to properly set up a virtual machine for carding:
Here's a step-by-step installation guide:
Virtual Machine Configuration with VirtualBox - ASUSTOR NAS
Configure and run Virtual Machines on ASUSTOR NAS with VirtualBox
Similar threads
- Replies
- 0
- Views
- 233