Teacher
Professional
- Messages
- 2,669
- Reaction score
- 829
- Points
- 113
Today's material is devoted to the most common channels for transmitting information on a home or partly corporate laptop, as well as the struggle for personal safety and anonymity.
Content
1. How to protect your browser from data leaks.
2. Temporary mailboxes
3. How to get a virtual number for receiving SMS.
4. We introduce a ban on determining the location by MAC address.
5. Is there a possibility of data leakage on VPN?
6. Checking the short URL for safety
7. Protection against web mining?
8. Configuring a VPN connection to block DNS leaks
9. The easiest ways to protect files and folders that can be found on a USB drive.
10. Improving the protection and privacy of Chrom-based browsers.
11. Tools used to analyze malicious links and files
12. Password security
13. Resources for end-point security testing
14. Blocking ads
Conclusion
1. How to protect your browser from data leaks
What is WebRTC?
WebRTC (Web Real-Time Communication) is an open source standard that allows real-time transmission of video and audio data through any modern browser using P2P technology.
This technology is built-in and enabled by default in all modern browsers - Firefox, Chrome, Chromium, Yandex Browser and Opera.
How does WebRTC work?
With WebRTC, users of multiple browsers can transfer their data to each other. No proxy server is required to store and process data. All data processing takes place through a browser or mobile applications.
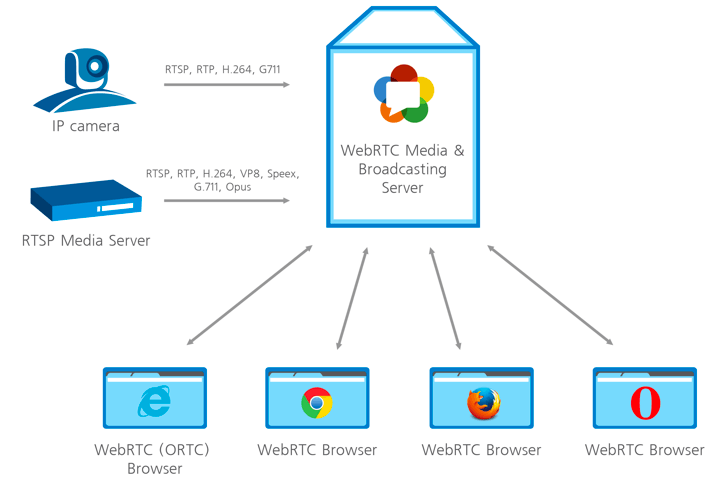
How WebRTC works
Dangers of WebRTC Vulnerabilities and Information Leaks
The biggest danger from using WebRTC is that this web technology detects your real IP address. When your connection is directly linked to any other user, website, browser, or any mobile application, the network settings are limited. To link to audio and video, the browser must work with local IP addresses.
The best solution to protect against IP leaks is to disable WebRTC technology if you are not using it. Although WebRTC uses local encryption to ensure the confidentiality of communications, there is still a general consensus among security experts and experts that the technology is less secure than conventional conferencing services. This technology poses a danger to users' browsers, which can be attacked by malware.
The aforementioned P2P technology asks for the user's real IP address when exchanging information, and WebRTC is kind enough to share this information with anyone. Even if the user is working through VPN or TOR using this miracle of technology, an attacker can easily find the user's IP address. Taking advantage of the security holes, it will of course be able to figure out your IP address, which is your real IP.
The aforementioned P2P technology asks for the user's real IP address when exchanging information, and WebRTC is kind enough to share this information with anyone. Even if the user is working through VPN or TOR using this miracle of technology, an attacker can easily find the user's IP address. Taking advantage of the security holes, it will of course be able to figure out your IP address, which is your real IP.
1.1 Testing WebRTC on capacity leakage data
WebRTC can reveal your real IP address to the sites you visit. This is a serious threat to those who use VPN services and monitor their online privacy. The problem is that users are usually not aware of this feature, and in popular browsers like Google Chrome and Mozilla Firefox, WebRTC is enabled by default. Hence, when sending requests to STUN servers, you can get the user's external and local IP addresses.
To check for a WebRTC leak, connect to a VPN service and run the WebRTC leak test. The leak will be identified if your real IP address is shown.
VPN is not an option either
Power users use VPN connections to hide their real IP address. Thus, in this scenario, in most cases, only the local device address assigned by the VPN will be discovered. However, there is a loophole that allows you to reveal your real IP address even when using a VPN service.
If you are using a proxy server, WebRTC will determine your actual proxy IP, or the VPN server IP if you are using a VPN and proxy bundle. Another reason to disable WebRTC when using a proxy is to reduce the efficiency of the proxy connection.
1.2 Disable WebRTC in Chrome
In order to completely disable the WebRTC technology in Chrome, you can use the WebRTC Control extension. Install the extension and activate it. The plugin icon should turn blue, which means that you are now protected.
1.3 Disable WebRTC in Firefox
Firefox is one of the few browsers that allows you to disable WebRTC without installing additional plugins. If you're not using the WebRTC tool, it's easy to disable it entirely. When the need arises to use it, sometimes it makes more sense to install a Firefox plugin.
To disable WebRTC in Firefox, type about: config in the address bar and press Enter. Then press with all your might on the button "I'm taking risks!".
Enter media.peerconnection.enabled in the search bar. Select the appropriate entry, right-click and select the Toggle option. WebRTC is now disabled in Firefox. You can also install the WebRTC control add-on to quickly enable and disable WebRTC.
1.4 Disable WebRTC in Yandex Browser
To completely abandon the WebRTC technology in Yandex Browser, you can use the WebRTC Control extension. Install the extension and enable it. The plugin icon should turn blue, which means that you are now protected from leaks.
1.5 Disable WebRTC in Opera
To completely abandon the WebRTC technology in Opera, go to Menu> Settings> Security, check the Show advanced settings box and in the WebRTC section select Disable unprocessed UDP.
2. Temporary mailboxes
For some left-handed sites or personal accounts, in which you will use only once, a disposable mail or a temporary mailbox will work. Therefore, when you register on any site, you can specify the email address of one of your temporary mailboxes. When you receive an email with a link to confirm your registration, activate your account by clicking the link in the email. You can close a temporary mailbox and forget about it - it will be automatically deleted after a certain period of time.
Most often, on such services, you only need to write the username before the @ symbols. that is, the first part of the email address, after which you access the contents of the mailbox. There are also services that allow you to create a temporary mailbox in which mail will be automatically forwarded to your real email address.
Please note that temporary mailboxes do not require a password to access temporary mailboxes. This is especially dangerous if emails with registration data have been sent to your inbox (as some websites do). Therefore, to increase the level of security, it is recommended to create temporary mailboxes with address names (logins) in the form of a chaotic set of characters - for example: 4еdxgr083278@notagone.com or cmpiodwvexsk@yopmail.com.
2.1 Сrazymailing
Crazy mailing - excellent service, which provides a temporary mailbox for free. I myself use this site and it suits me perfectly. So what functionality does it provide?
2.2 TempMail
TempMail provides a temporary mailbox for 60 minutes (renewable). There is no possibility to send letters. I was pleasantly pleased with the possibility of manual selection of the mailbox name and "human domain".
After the specified time has elapsed, the box can be removed. Otherwise, a simple, convenient service.
2.3 Discard.Email
Discard.Email isby far the most sophisticated temporary mail service. Provides a choice of mailbox name and domain. There are several dozen domains to choose from. Mail is stored for 30 days. What are the features of this service?
As you can see, the list of features of this service is quite long =) Also, Discard.Email has its own plugin for Firefox.
2.4 YOPmail
Disposable service of YOPmail e-mail boxes.
How to get a virtual number for receiving SMS
To receive SMS online, there are special websites that provide a special virtual number to which you can receive an SMS message. Receiving SMS over the Internet can be used primarily to increase anonymity. By using virtual numbers, the user can avoid being tracked online.
Here are some examples of using services to receive SMS messages.
3.1 Sellaite
Let's start with the Sellaite website. This site allows you to receive SMS online for free using any of the numbers available at the time. The service does not require registration. To receive SMS online, go to the website page and click on the available number.
Remember that the SMS number provided to you may change at any time. Therefore, register in it only what does not require further confirmation and a link to the number.
3.2 Receive-SMS-Online
The next site is Receive-SMS-Online. Among the possible virtual numbers, there are often Russian and Ukrainian numbers. Which can be very helpful for our audience. Registration is not required to receive SMS. We enter, choose a number and send an SMS.
3.3 FreeOnlinePhone
FreeOnlinePhone - The site offers online numbers for receiving SMS. There were no Russian numbers, but the site is still working stably.
3.4 ReceiveSMSOnline
ReceiveSMSOnline is another service that offers a virtual number for free. There were delays in testing this service. From one SMS source it took about 20 minutes, from another about 30.
3.5 ReceiveFreeSMS
The next service is ReceiveFreeSMS. Offers a free virtual number. And not a number, but a whole bunch of virtual numbers from different countries.
4. We introduce a ban on determining the location by MAC address
Now we will talk about how to find out the location of a person by the MAC address of his network card.
Google Maps is a default service, which obviously means either you use the device and consent to your older brother to receive geographic information, or you opt out of using your mobile device. And it's up to you to decide.
We find out the geographic location using Mapping a web browser to GPS coordinates via router. We go to the site and at the bottom we see such an unremarkable window, where we will enter the MAC address of our router.
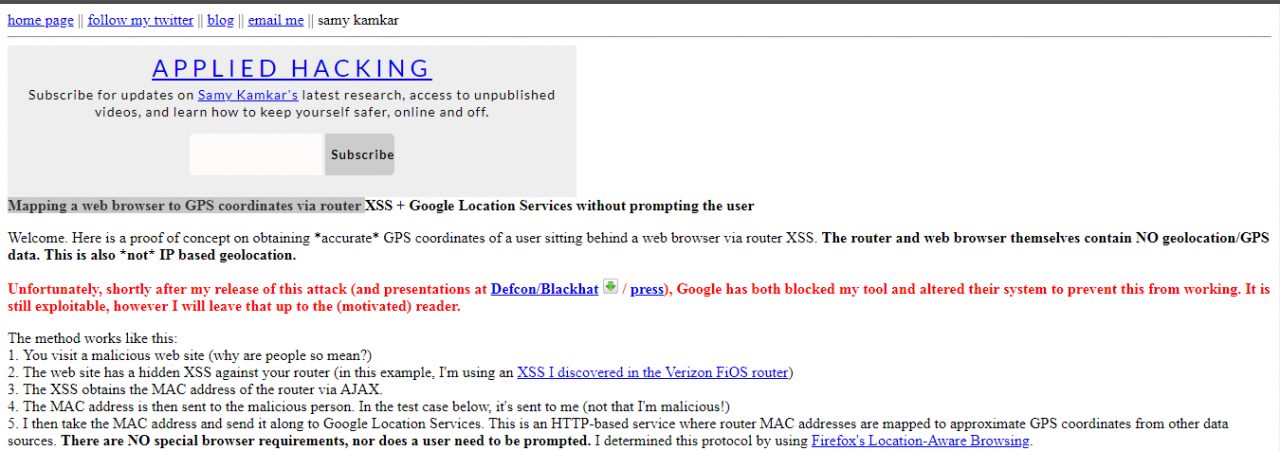
After entering, in a couple of seconds, the interface of the Google Maps service, which is familiar to us all, will appear, on which, almost with an accuracy of several meters, the location of your router will be indicated by a point.
How to protect yourself?
Cut off all geolocation, do not use Google Maps and do not link your photos to geolocation.
5. Is there a possibility of data leakage on the VPN?
Each user can see how effectively the chosen VPN service protects data privacy - whether it hides your real IP address, your actual location, and data about the Internet provider being used. With a VPN, it is expected that all traffic sent and received over an encrypted channel will be well protected. This includes your real IP address, your actual location, and information about the Internet service provider you are using. If this information is available to third-party resources, then tracking your activity is not very limited, and the data about your actions can be used not only for advertising purposes.
5.1 Checking the IP address
An IP address is a unique number assigned to the router by your Internet service provider. All devices connected to the home network receive their own internal IP address: computers, smartphones, game consoles, smart devices, etc. In this case, we are interested in the public external IP address.
IP addresses are usually associated not only with Internet service providers, but also with specific locations. If a third party service receives your IP address, it can approximate your location.
IP addresses come in several formats: IPv4 (Internet Protocol Version 4), for example , or IPv6, for example .172.16.254.12001:0db8:0012:0001:3c5e:7354:0000:5db1
To find out your IP address, enter “my IP address” in Yandex or use third-party services such as whatismyipaddress.com, whatismyip.com, or 2ip.ru. Some services not only show the address itself, but also indicate your location, determined by your IP address.
5.2 Checking for DNS Leaks
The Domain Name System (DNS) allows you to resolve IP addresses to familiar domain names. The user enters the domain name into the browser and DNS resolves the connection to the corresponding IP address of the web server domain. ISPs have their own DNS servers to simplify the conversion process - as a result, they get a different way to track users.
In fact, using a VPN means that in theory your internet traffic will be redirected to anonymous DNS servers. If your browser just sends a request to your ISP, there is a DNS leak.
There are easy ways to check for a DNS leak using the Hidester DNS Leak Test , DNSLeak.com, or DNS Leak Test.com services. These sites return information about your IP address and the owner of the DNS server used. If the results show a service from your ISP, a DNS leak occurs.

DNS Leak Check
Leakage protection
When a leak is detected, there are several possible options for further action. First of all, you can change the VPN service to one that prevents DNS leaks.
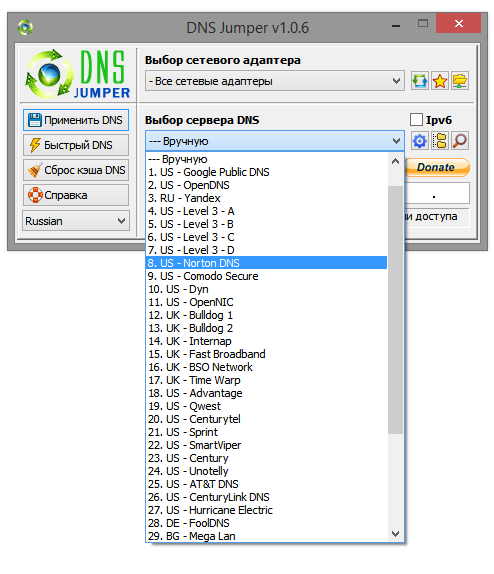
You can also change the DNS servers your router uses when sending requests to the Internet. You can use alternative DNS services: Google Public DNS, Comodo Secure DNS, Norton ConnectSafe, or OpenDNS.
6. Checking the short URL for safety
The full path of the original link is masked by the URL shortening, and its true purpose is unknown. From this condition, it becomes necessary to validate shortened URLs for security.
What is the problem?
Abbreviated links are indispensable in applications that impose character limits. The popular microblogging service Twitter has a 280 character limit for each post. The T.co abbreviation service shortens links to 23 characters and can only be used by platform users. The links use the domain name t.co. This allows Twitter to count clicks on each link and check for malicious content. Twitter itself checks the shortened URLs for the safety of blacklisted malicious sites. If the link points to possible malicious content, Twitter displays a warning.
6.1 TinyURL
TinyURL also provides a preview function. When creating a TinyURL, a preview link is available on the link page. Add the "preview" prefix in front of the TinyURL link to check the target URL.
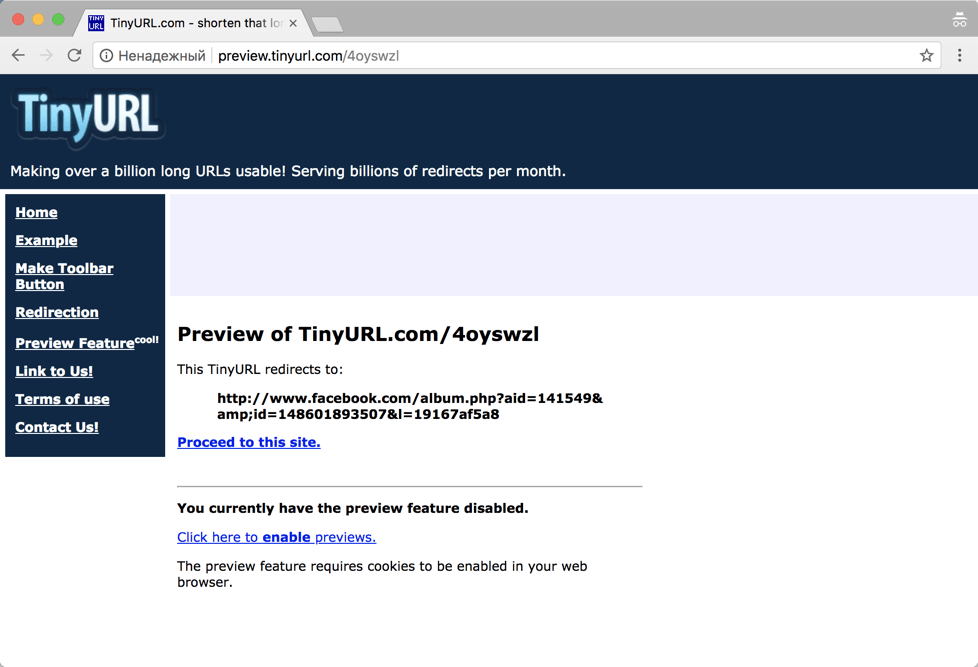
TinyURL
6.2 CheckShortURL
T.co, Bitly or TinyURL links provide some security guarantees. But what about links created by other shorteners? Many sites offer a method to validate shortened URLs for security purposes. One such site is CheckShortURL. It supports most of the popular link shortening services. Enter a short link in the search box and click Expand.
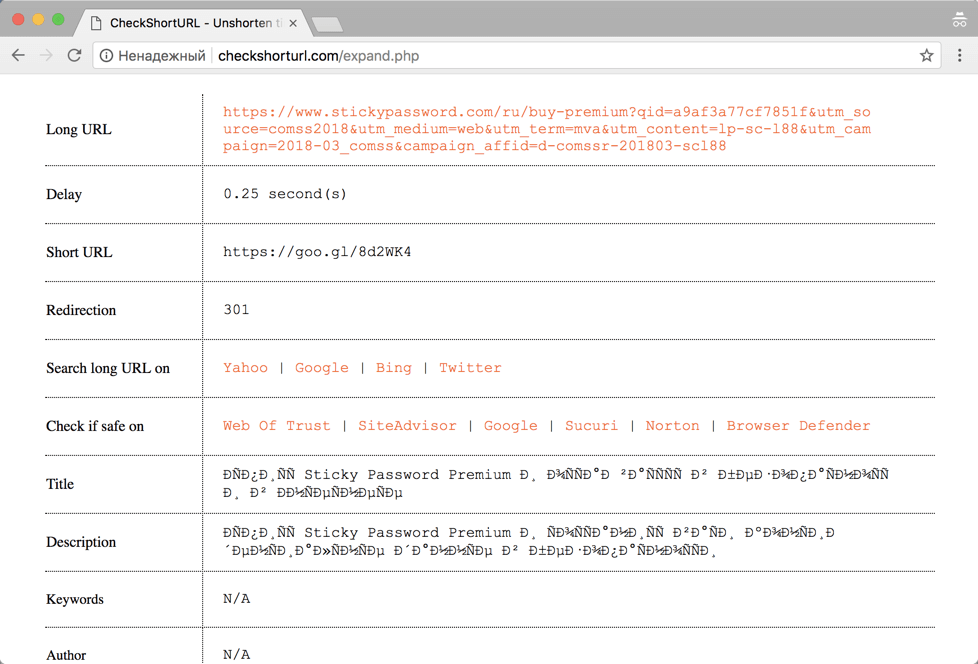
CheckShortURL
The original destination link appears on the results page. You can check the safety of a link before visiting it using public services such as Norton Safe Web.
6.3 Unshorten.It
Another site for viewing link shortened URLs Unshorten.It!. Enter the shortened link in the search box, then click the Expand button.
7. Protection from web mining?
Cryptojacking is a new type of Internet threat. This term refers to cases where websites use the computing power of the devices of site visitors to mine cryptocurrencies.
The biggest problem with cryptojacking is that digital currencies are mined against the will of the user . Sites secretly run miner scripts to use the resources of visitors' computers. Users often have no way to skip this process, and they don't even understand what's going on.
Many web resources use miner scripts for monetization. Cryptocurrency mining operations take place in the background and do not interfere with the loading of the main site content. Browser extensions can also download cryptominers. They run in the background like scripts.
Checking the browser
This website - https://cryptojackingtest.com was created by Opera Software engineers. It allows you to check the effectiveness of your browser's protection against cryptominers.
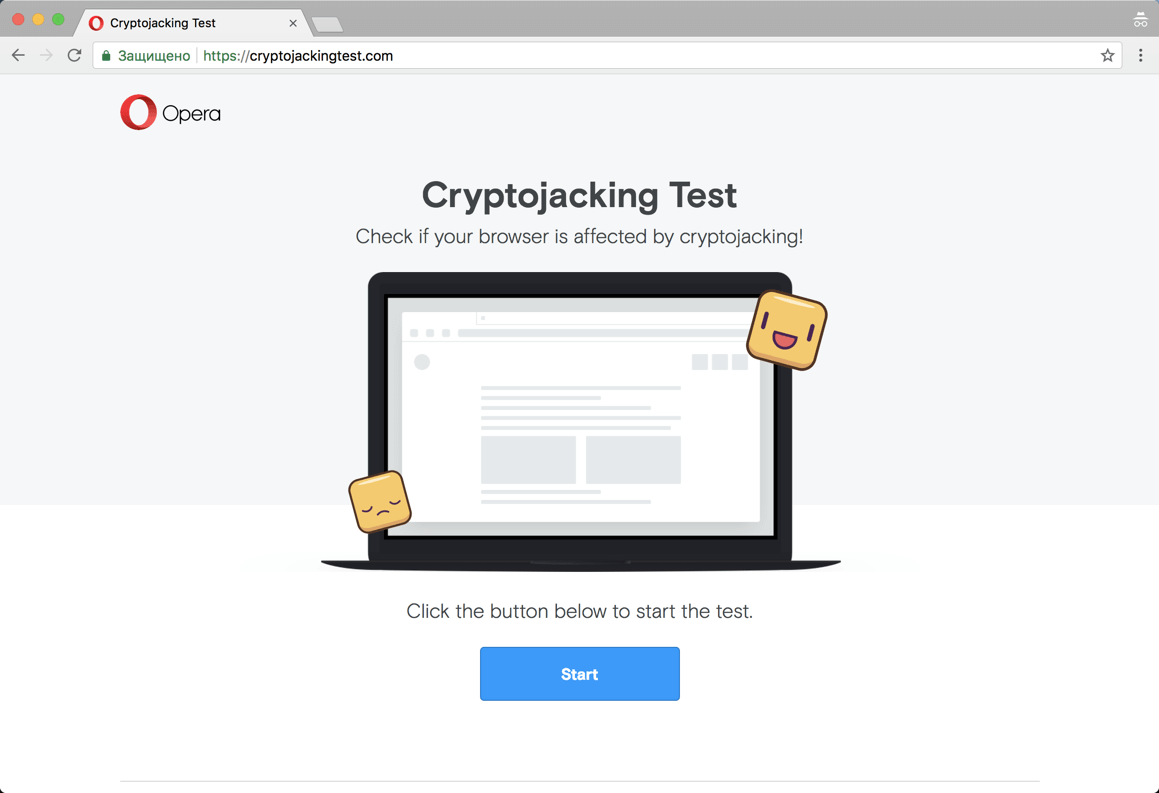
Website cryptojackingtest.com
Visit the website and click the Start button to run the test. The mining process will take a few seconds. As a result, you will know for sure whether your browser is protected from web miners or not.
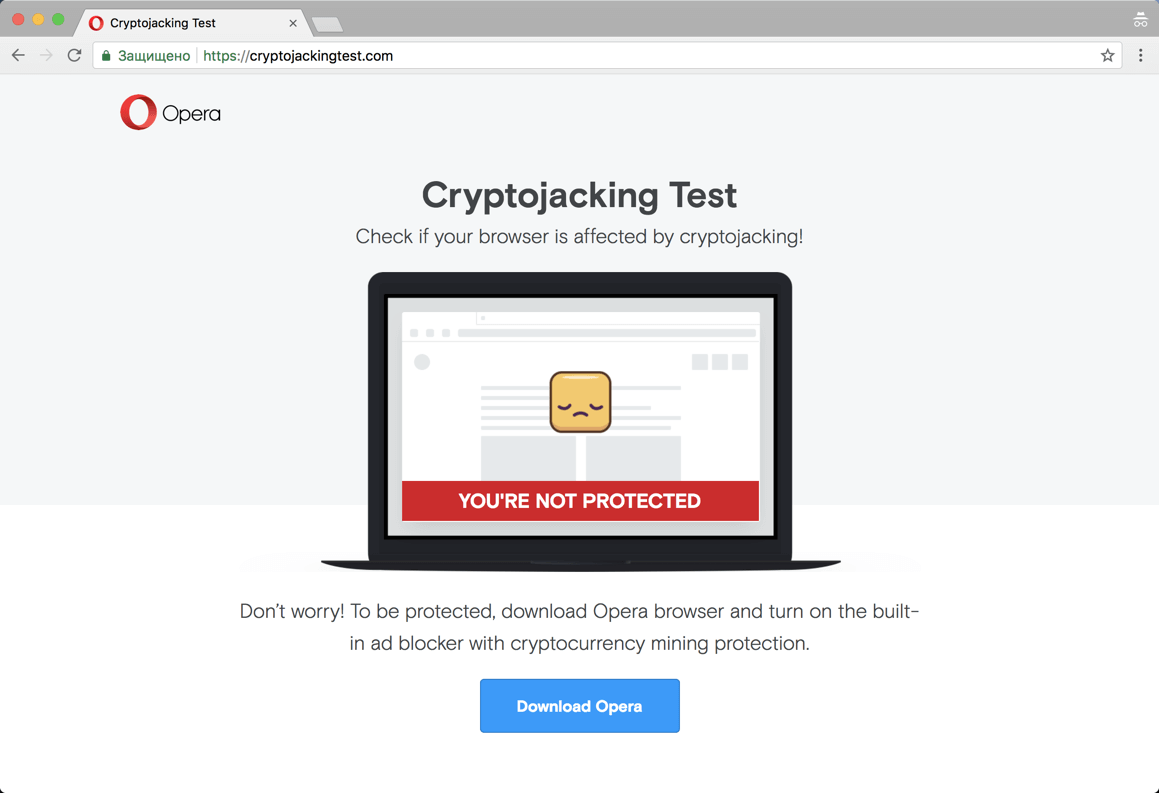
Result of checking
Miner detection in Google Chrome
Many users are often unaware that their computer is being used for unwanted mining. Typical signs of this process are computer slowdowns, freezes, or even a forced restart. If you switch to Task Manager in Windows, you find that Chrome processes are consuming an unexpectedly large amount of CPU resources.
This way you can really recognize the strange behavior of Chrome, but you will not be able to figure out additional useful information: which extension or tab was using all the free CPU resources. Luckily, Google offers a built-in tool called Task Manager to help you figure it out.
Determine which sites consume a lot of CPU resources
If your Google Chrome browser is using too much CPU resources, the first thing to do is determine if the site or an installed extension is causing this situation. In our example, we open a test site created by the Badpackets portal, which contains a built-in web miner CoinHive that uses up to 100% of the available CPU resources.
You can launch Task Manager in Chrome using the Shift + Esc hotkey or in the main menu: Chrome menu> More Tools> Task Manager.
Upon completion of the launch, the tool will display a list of all running processes and the level of CPU resource consumption. For each site, extension, internal process, or subframe, a separate process is shown in the list. The user can check the list and determine which site is wasting the most CPU resources. To close this tab, select it from the list and click the End Process button . After that, the normal operation of the computer will be restored and it will be useful to add the malicious site to the black lists of an antivirus or ad blocker.
How to protect yourself from mining?
Users who are not protected can be given several recommendations:
We continue to talk about the issues of ensuring personal security, anonymity and secrecy on the Internet on our own. Here are some more useful tips, settings, tricks and tricks for a home and partly corporate computer that you can perform on your own.
8. Configuring the VPN connection to block DNS leaks
To keep DNS domains secure over VPN connections, it is highly recommended that you disable Smart Multi-Homed Name Resolution in Windows 8.1 and Windows 10 so that DNS requests are not forwarded outside of your secure VPN connection.
8.1 Setting in Windows 8 and 8.1
The following registry tweak can only be applied on Windows 8 and 8.1 systems, it does not work on Windows 10.
8.2 Setting up Windows 10
The following method works in all versions of Windows 10, as well as Windows 8 and 8.1.
Disable Enhanced Multicast Name Resolution.
9. The easiest ways to protect files and folders that can be found on a USB stick
And so a few simple tips and ways to ensure the confidentiality of your personal files
9.1 Protecting individual files with a password
Setting up password protection for individual MS Word files.
If you only need to protect important individual documents and don't need to encrypt entire folders, you can simply limit yourself to setting up password protection for individual files.
Most programs, such as Word and Excel, have the option to save data with a password. For example, if the document you want is open in Microsoft Word, you can go to File> Info, choose Protect Document, then choose Encrypt password.
It remains only to define a strong password and confirm its installation. Remember to save the document and remember to remember or write down the password.
9.2 VeraCrypt Encrypted File Container
VeraCrypt cryptographic security software can be used as a portable application and run directly from a USB stick. The program requires administrator rights. The program supports the creation of a virtual encrypted hard disk that can be mounted like a physical hard disk.
VeraCrypt currently uses real-time encryption technology using a variety of algorithms, including 256 bit: AES, Serpents and TwoFish and combinations thereof.
Download the portable version of VeraCrypt and unzip it to a USB stick. When you launch the application, a list of available drive letters will be displayed. Select a letter and click "Create Volume". The VeraCrypt Volume Creation Wizard will start.
To create an encrypted virtual disk in a file, select the Create Encrypted File Container option and click Next.
The next step is to choose the type of volume: regular or hidden. Using a hidden volume reduces the risk of someone forcing you to reveal your password. In our example, we are creating a regular volume. Next, select the location of the encrypted disk - Removable Disk.
Configure encryption and specify the size of the volume (must not exceed the size of the USB drive). Then select the encryption and hashing algorithm, you can use the default settings. Then set a password for the volume. In the next step, your random mouse movements will determine the cryptographic strength of the encryption.
After encryption is complete, every time you plug a USB drive into your computer, you can launch the VeraCrypt hosted on it and mount the encrypted file container to access data.
9.3 Encrypt USB Drive Completely
VeraCrypt also supports encryption of entire partitions and storage devices.
Download VeraCrypt and install the program on your computer. When starting the application, a list of available drive letters will be displayed. Select a letter and click "Create Volume". The VeraCrypt Volume Creation Wizard will start.
To encrypt the entire USB drive, select the Encrypt non-system partition / disk option and click Next.
The next step is to choose the type of volume: regular or hidden. Using a hidden volume reduces the risk of someone forcing you to reveal your password. On the next screen of the wizard, you need to select a device, i.e. our removable USB drive, then click "OK" and "Next".
In our example, we will create a regular volume. On the next screen of the wizard you need to select a device, i.e. our removable USB drive, then click "OK" and "Next".
To encrypt your entire USB drive, select Encrypt Partition In Place and click Next. VeraCrypt will warn you that you should back up your data - if something goes wrong during encryption, you can restore access to your files. Then select the encryption and hashing algorithm, you can use the default settings. Then set a password for the volume. In the next step, random mouse movements will determine the cryptographic strength of the cryptography.
Then select the cleaning mode. The more rewriting cycles, the more reliable the cleaning. In the final step, select Encryption to start the encryption process.
After encryption is complete, every time you plug the USB drive into your computer, you will need to mount it using VeraCrypt to access the data.
9.4 Password protection of the archive
Modern archivers like the free 7-Zip support AES-256 encrypted compression and password protection.
Install 7-Zip, then right-click a file or folder on your USB drive and select 7-Zip> Add to Archive. In the "Add to archive" window, select the archive format and set a password. Click "OK" to start the archiving and encryption process.
10. Improving protection and privacy of Chrom-based browsers
All modern Chromium-based browsers have a Google Safe Browsing blacklist to protect users from known dangerous sites. They all have built-in sandbox isolation protection that makes them less vulnerable to attack, and they update quickly when any vulnerabilities are found. If you don't want to trust Google Personal Information with the Google Chrome web browser, there are several alternatives.
10.1 Useful extensions
Web of Trust (WOT) - after installing this extension, if you accidentally stumble upon a potentially unsafe site, WOT will close the warning screen and wait for your decision to stay or leave the site. If you combine this with your own common sense, you will be protected from many of the dangers on the web.
Bitdefender TrafficLight - After installing this extension, if you come across a dangerous website blacklisted by Bitdefender, the plugin will block the page from loading. Bitdefender TrafficLight allows you to block malicious sites, phishing and fake sites.
Adblock Plus for Google Chrome - This extension allows you to subscribe to updates from many different filter lists to help you block unwanted or malicious website content. You can subscribe to any of the lists available, but keep in mind that subscribing to too many of them will slow down your website experience. I recommend subscribing to the EasyPrivacy + EasyList combo and the Malware Domains combo.
ScriptSafe - This add-on blocks the execution of almost all scripts and other potentially dangerous content. This means that even if you come across a dangerous site, you cannot be attacked unless you manually add the scripts for that site to your whitelist. This way you are protected from malicious scripts and many privacy threats.
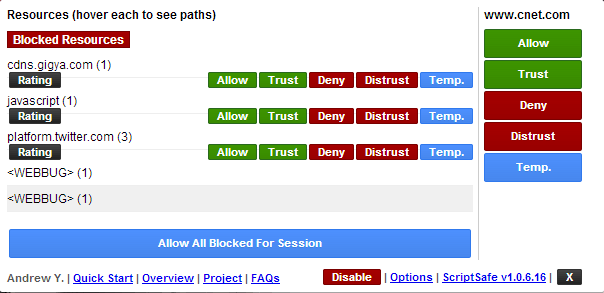
ScriptSafe
All chromium-based browsers provide the ability to launch the browser in incognito mode . When you work in this mode, most of your online traces will be deleted as soon as the browser is closed. This is not enough to adequately protect your privacy, but it’s already something.
What security changes should I make to improve my privacy?
Go to settings and click on the "Show advanced settings" link at the bottom of the page. In the "Personal Information" section , clear the "Use a prediction service to help complete searches" check box . Also, make sure that Predict network activity to improve page load performance is disabled in any browser.
For all browsers, you must also select the "Send a 'Do not track' request with your browser traffic" option . Google Chrome users may also want to disable the "Use a web service to help resolve navigation errors" option.
Now open "Content Settings" and select "Block third party cookie settings". This will prevent the download of cookies from a website other than the one you intend to visit. This way, almost all tracking cookies will be blocked with the least negative impact on your online experience.
In the "Privacy" section of the main settings page, check the "Don't tell sites how you got there (don't send the HTTP referrer header)" box . Please note, however, that this may cause problems with some sites and that some sites may need to be disabled in order for them to work properly.
HTTPS Everywhere - This extension encourages many sites that have the ability to encrypt your connection, actually encrypt it. This way, your connection to these sites will be much safer.
LastPass is a robust password manager that automatically inserts passwords and fills out forms. This not only helps protect your passwords and secrets from damage, but it also allows you to confidently create strong passwords and change them frequently.
Do Not Track Me - This extension prevents third parties, advertising agencies and search engines from tracking which web pages you visit.
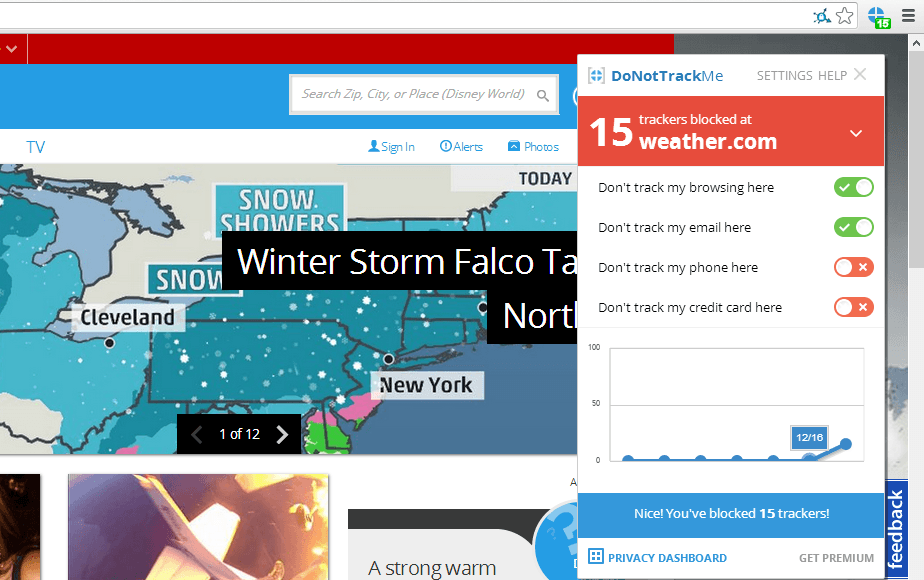
Do not track me
11. Tools used to analyze malicious links and files
Every day, malicious websites and attachments try to trick users into downloading dangerous content. Fortunately, there are many online resources and tools that can help you figure out which sites are safe and which are a trap to steal your personal information and money.
Let's start with the well-known VirusTotal resource. When you receive an email with a ZIP archive, it will be helpful to check the attached file using this service.
There are a number of other web resources that help detect malicious files or links, namely:
Again, many of the tools are available from the Internet, here are just a few of them.

MxToolbox decrypts email message headers for diagnostic information
Checking a website using the urlQuery service
[B12. Password security[/B]
Password security is one of the problems that constantly worries the modern person. The confidentiality of personal life largely depends on the degree of secrecy of passwords. Today, access to almost any application, private and commercial information is password-based and requires registration.
The first step in keeping passwords secure is to avoid using a single word password. And not because the password for the word is too short, but because this password is very predictable. Did you know that there are databases used by hackers that contain all words in any language? The purpose of these databases is to help hackers guess passwords with simple word searches. This technique is called a dictionary attack, which can also take the form of a rainbow table attack.
12.1 Password manager
Password managers are applications that help us store and organize our passwords. The only password you need to remember is the password for the password manager itself.
Sticky Password is a reliable password manager with local database and cloud sync. Supports Windows, Mac, Android, iPhone and iPad, bookmarks, create and securely store passwords, automatically sign in to websites, fill out online forms
KeePass Password Safe is a free open source password manager for Windows. Allows you to store passwords in a well-encrypted database, access to which is closed with a master password or key file 2018-11-02
LastPass is a password manager app for popular web browsers, systems, and mobile devices. The LastPass plugin makes visiting websites easier and safer.
Kaspersky Password Manager is a password manager with cloud storage and data protection functions, autofilling authorization fields and data substitution, automatic data synchronization on all devices.
Norton Password Manager is a free password manager that lets you log into the websites you visit quickly, easily, and securely. A simple password manager for your web browser, Android smartphone, iPhone and iPad
12.2 Two-factor identification
Two-factor authentication is another obstacle to keeping your passwords secure. After entering the password, the authorization system will require an additional authentication method to log into your account. Specifically, the second verification factor could be the temporary digital code generated by the authentication app on your mobile device.
Access will be granted if the login (username or email address), password and secret code are entered correctly. Two-factor authentication is the most secure way to keep your passwords safe as access will not be granted without the additional credentials entered correctly.
13. Resources for testing end-point protection
A list of free and well-known tests that are used to simulate a malicious attack.
[B14. Blocking ads[/B]
AdFender - Supports a wide range of web browsers including Chrome, Firefox, Microsoft Edge, Internet Explorer, Opera.
Adguard for Windows is a multifunctional internet filter that blocks ads in many browsers and applications without the need to install extensions. In addition to the anti-banner, it includes anti-phishing, anti-tracking, parental control. For Comss.ru users, all functions are available free of charge for 6 months. The developer also offers apps for Android, Mac and iOS.
Ad Muncher is a popular program for blocking online ads and pop-ups in most browsers. Supports creating your own filters. It became free with full functionality at the end of 2014 but hasn't been updated since then.
14.1 Extensions for Chrome, Firefox and Microsoft Edge
Currently, several major ad blockers offer extensions and add-ons for Chrome, Firefox and Edge. Let's list the most popular blockers:
AdBlock for Chrome / AdBlock for Edge is the most popular ad blocker with over 200 million downloads. There was a Firefox version, but the extension was removed for unknown reasons. AdBlock allows you to receive ads from Youtube and Google searches, but these options are disabled by default.
AdBlock Plus for Chrome / AdBlock Plus for Firefox / Adblock Plus for Edge is one of the most famous ad blockers, also very controversial because it was AdBlock Plus who originally introduced the practice of using ad whitelisting. The AdBlock Plus site also offers versions for Opera, Safari, Maxthon, Internet Explorer, and even Android.
Adguard for Chrome / Adguard for Firefox / Adguard for Edge is easy to use and makes it easy to add additional scripts to block.
Stop Reclame for Chrome is an effective solution to remove intrusive ads. An extension for Opera and Yandex Browser is also available.
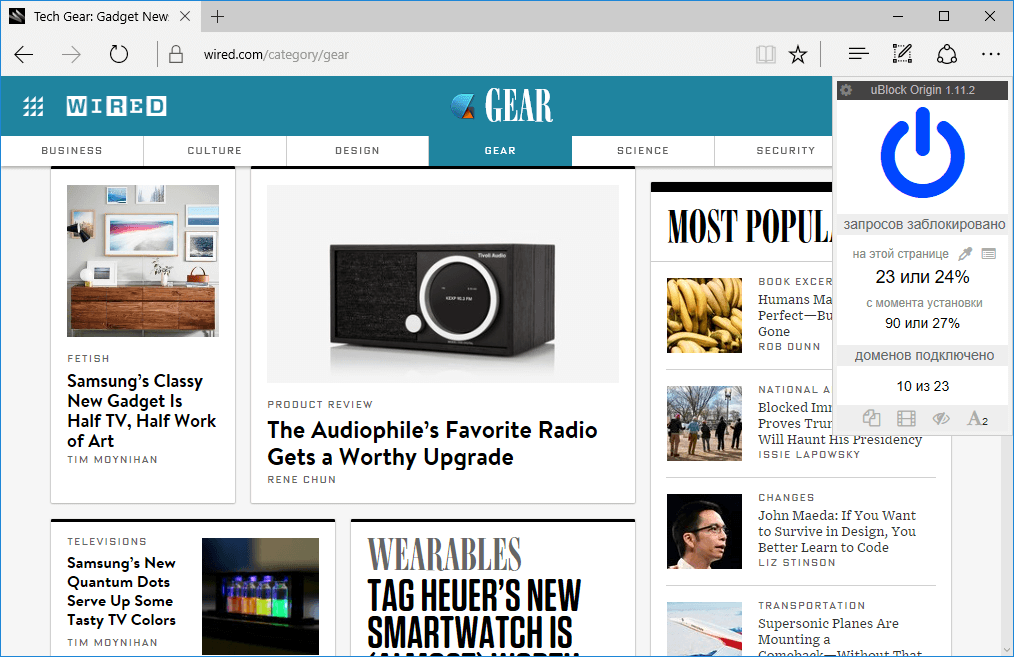
uBlock Origin for Chrome / uBlock Origin for Firefox / uBlock Origin for Edge is a promising script blocker for Chrome and Firefox. has good optimization and minimal impact on processor and memory. Not all ads are blocked by default, but you can add blacklists. The user can allow or block the extension to work on individual sites in advanced mode.
14.2 Alternative solutions for ad blocking
Adguard DNS provides an easy way to filter ads through the domain name system. You can change DNS for a specific device or configure your router to filter internet traffic for all connected devices - Windows, Mac, Linux, Android, iOS.
Adguard Home is a DNS server that blocks ads and tracking at the network level. Its function is to give you complete control over the network and all your devices without installing any client applications. At the same time, AdGuard Home offers a web interface with which you can easily manage the filtering process.
Pi-Hole offers an advanced ad blocking solution on all devices connected to your home network. You will need a Raspberry Pi single board computer and some technical knowledge. All traffic is routed through a separate device that filters the content.
14.3 Using third-party DNS services
Your ISP provides DNS servers for you, although you don't have to use them. Instead, you can use third-party DNS servers that provide many features that your ISP does not have.
Third party DNS servers such as OpenDNS and Google Public DNS also offer protection that many ISP DNS servers have not yet implemented. For example, Google Public DNS supports DNSSEC to ensure correct signature and reliability of DNS queries. Your ISP's DNS servers may not have implemented these security features yet.
UnoDNS and Unblock-Us work in the same way and do not have this limitation, but on the other hand, you have to pay for them.
UnoDNS and Unblock-Us. Access to geo-blocked content
Namebench includes an option that checks DNS servers for censorship to determine if current DNS servers are being censored.
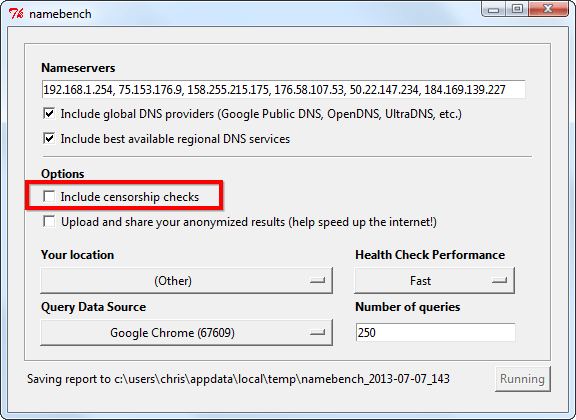
Namebench. Bypassing web censorship
Conclusion
In the end, we can say that you cannot remove the left fingerprints, but you can take preventive measures. This will keep your data safe. If you are aware of all the possible risks, you can avoid them. You can start small. Install, for example, an ad blocker, use end-to-end encrypted apps, and only visit HTTPS sites. As you take these small steps, you will feel a huge difference.
That's all! If you do all these simple tricks, you can be a little more confident that your personal information, even if it is not very sensitive, will not be shared with anyone. In any case, ordinary amateurs will definitely not get it!
(c) cryptoworld.su
Content
1. How to protect your browser from data leaks.
2. Temporary mailboxes
3. How to get a virtual number for receiving SMS.
4. We introduce a ban on determining the location by MAC address.
5. Is there a possibility of data leakage on VPN?
6. Checking the short URL for safety
7. Protection against web mining?
8. Configuring a VPN connection to block DNS leaks
9. The easiest ways to protect files and folders that can be found on a USB drive.
10. Improving the protection and privacy of Chrom-based browsers.
11. Tools used to analyze malicious links and files
12. Password security
13. Resources for end-point security testing
14. Blocking ads
Conclusion
1. How to protect your browser from data leaks
What is WebRTC?
WebRTC (Web Real-Time Communication) is an open source standard that allows real-time transmission of video and audio data through any modern browser using P2P technology.
This technology is built-in and enabled by default in all modern browsers - Firefox, Chrome, Chromium, Yandex Browser and Opera.
How does WebRTC work?
With WebRTC, users of multiple browsers can transfer their data to each other. No proxy server is required to store and process data. All data processing takes place through a browser or mobile applications.
How WebRTC works
Dangers of WebRTC Vulnerabilities and Information Leaks
The biggest danger from using WebRTC is that this web technology detects your real IP address. When your connection is directly linked to any other user, website, browser, or any mobile application, the network settings are limited. To link to audio and video, the browser must work with local IP addresses.
The best solution to protect against IP leaks is to disable WebRTC technology if you are not using it. Although WebRTC uses local encryption to ensure the confidentiality of communications, there is still a general consensus among security experts and experts that the technology is less secure than conventional conferencing services. This technology poses a danger to users' browsers, which can be attacked by malware.
The aforementioned P2P technology asks for the user's real IP address when exchanging information, and WebRTC is kind enough to share this information with anyone. Even if the user is working through VPN or TOR using this miracle of technology, an attacker can easily find the user's IP address. Taking advantage of the security holes, it will of course be able to figure out your IP address, which is your real IP.
The aforementioned P2P technology asks for the user's real IP address when exchanging information, and WebRTC is kind enough to share this information with anyone. Even if the user is working through VPN or TOR using this miracle of technology, an attacker can easily find the user's IP address. Taking advantage of the security holes, it will of course be able to figure out your IP address, which is your real IP.
1.1 Testing WebRTC on capacity leakage data
WebRTC can reveal your real IP address to the sites you visit. This is a serious threat to those who use VPN services and monitor their online privacy. The problem is that users are usually not aware of this feature, and in popular browsers like Google Chrome and Mozilla Firefox, WebRTC is enabled by default. Hence, when sending requests to STUN servers, you can get the user's external and local IP addresses.
To check for a WebRTC leak, connect to a VPN service and run the WebRTC leak test. The leak will be identified if your real IP address is shown.
VPN is not an option either
Power users use VPN connections to hide their real IP address. Thus, in this scenario, in most cases, only the local device address assigned by the VPN will be discovered. However, there is a loophole that allows you to reveal your real IP address even when using a VPN service.
If you are using a proxy server, WebRTC will determine your actual proxy IP, or the VPN server IP if you are using a VPN and proxy bundle. Another reason to disable WebRTC when using a proxy is to reduce the efficiency of the proxy connection.
1.2 Disable WebRTC in Chrome
In order to completely disable the WebRTC technology in Chrome, you can use the WebRTC Control extension. Install the extension and activate it. The plugin icon should turn blue, which means that you are now protected.
1.3 Disable WebRTC in Firefox
Firefox is one of the few browsers that allows you to disable WebRTC without installing additional plugins. If you're not using the WebRTC tool, it's easy to disable it entirely. When the need arises to use it, sometimes it makes more sense to install a Firefox plugin.
To disable WebRTC in Firefox, type about: config in the address bar and press Enter. Then press with all your might on the button "I'm taking risks!".
Enter media.peerconnection.enabled in the search bar. Select the appropriate entry, right-click and select the Toggle option. WebRTC is now disabled in Firefox. You can also install the WebRTC control add-on to quickly enable and disable WebRTC.
1.4 Disable WebRTC in Yandex Browser
To completely abandon the WebRTC technology in Yandex Browser, you can use the WebRTC Control extension. Install the extension and enable it. The plugin icon should turn blue, which means that you are now protected from leaks.
1.5 Disable WebRTC in Opera
To completely abandon the WebRTC technology in Opera, go to Menu> Settings> Security, check the Show advanced settings box and in the WebRTC section select Disable unprocessed UDP.
2. Temporary mailboxes
For some left-handed sites or personal accounts, in which you will use only once, a disposable mail or a temporary mailbox will work. Therefore, when you register on any site, you can specify the email address of one of your temporary mailboxes. When you receive an email with a link to confirm your registration, activate your account by clicking the link in the email. You can close a temporary mailbox and forget about it - it will be automatically deleted after a certain period of time.
Most often, on such services, you only need to write the username before the @ symbols. that is, the first part of the email address, after which you access the contents of the mailbox. There are also services that allow you to create a temporary mailbox in which mail will be automatically forwarded to your real email address.
Please note that temporary mailboxes do not require a password to access temporary mailboxes. This is especially dangerous if emails with registration data have been sent to your inbox (as some websites do). Therefore, to increase the level of security, it is recommended to create temporary mailboxes with address names (logins) in the form of a chaotic set of characters - for example: 4еdxgr083278@notagone.com or cmpiodwvexsk@yopmail.com.
2.1 Сrazymailing
Crazy mailing - excellent service, which provides a temporary mailbox for free. I myself use this site and it suits me perfectly. So what functionality does it provide?
- temporary mailbox (10 minutes) with the possibility of infinite extension (press the button to the right of your temporary address - and another 10 minutes are added)
- the ability to receive, write and forward messages.
- plugins for firefox / chrome that allow you to create a new temporary mailbox "in one click"
2.2 TempMail
TempMail provides a temporary mailbox for 60 minutes (renewable). There is no possibility to send letters. I was pleasantly pleased with the possibility of manual selection of the mailbox name and "human domain".
After the specified time has elapsed, the box can be removed. Otherwise, a simple, convenient service.
2.3 Discard.Email
Discard.Email isby far the most sophisticated temporary mail service. Provides a choice of mailbox name and domain. There are several dozen domains to choose from. Mail is stored for 30 days. What are the features of this service?
- Receive text and HTML emails with attachments
- Reading, writing and responding to emails
- Printing and saving received e-mail
- Letters are kept for 30 days
- Various domains available
- Some domains allow password protection
- Use your own domain - privately and anonymously
- Read incoming emails in RSS or ATOM feed
- Direct access to the created mailbox from bookmarks
- Managing your own spam list
- Fast delivery and receipt of letters
As you can see, the list of features of this service is quite long =) Also, Discard.Email has its own plugin for Firefox.
2.4 YOPmail
Disposable service of YOPmail e-mail boxes.
- mailbox in the yopmail.com domain to choose from
- random email box generator
- add-on for firefox and internet explorer and widget for opera for quick access to mailbox
- setting up automatic forwarding from a temporary mailbox to your main email address
- alternative domains (all letters received to your temporary mailbox in any of the alternative domains are automatically forwarded to the mailbox in the yopmail.com domain)
- letters are stored for 8 days
- e-mail without a password - access to the mailbox by link or mailbox name
- your own YOPmail chat
How to get a virtual number for receiving SMS
To receive SMS online, there are special websites that provide a special virtual number to which you can receive an SMS message. Receiving SMS over the Internet can be used primarily to increase anonymity. By using virtual numbers, the user can avoid being tracked online.
Here are some examples of using services to receive SMS messages.
- To receive SMS online confirmation.
- SMS online via the Internet can be used when registering on social networks, classmates, vkonatke, etc.
- Also, receiving SMS online may be needed when registering mailboxes.
3.1 Sellaite
Let's start with the Sellaite website. This site allows you to receive SMS online for free using any of the numbers available at the time. The service does not require registration. To receive SMS online, go to the website page and click on the available number.
Remember that the SMS number provided to you may change at any time. Therefore, register in it only what does not require further confirmation and a link to the number.
3.2 Receive-SMS-Online
The next site is Receive-SMS-Online. Among the possible virtual numbers, there are often Russian and Ukrainian numbers. Which can be very helpful for our audience. Registration is not required to receive SMS. We enter, choose a number and send an SMS.
3.3 FreeOnlinePhone
FreeOnlinePhone - The site offers online numbers for receiving SMS. There were no Russian numbers, but the site is still working stably.
3.4 ReceiveSMSOnline
ReceiveSMSOnline is another service that offers a virtual number for free. There were delays in testing this service. From one SMS source it took about 20 minutes, from another about 30.
3.5 ReceiveFreeSMS
The next service is ReceiveFreeSMS. Offers a free virtual number. And not a number, but a whole bunch of virtual numbers from different countries.
4. We introduce a ban on determining the location by MAC address
Now we will talk about how to find out the location of a person by the MAC address of his network card.
Google Maps is a default service, which obviously means either you use the device and consent to your older brother to receive geographic information, or you opt out of using your mobile device. And it's up to you to decide.
We find out the geographic location using Mapping a web browser to GPS coordinates via router. We go to the site and at the bottom we see such an unremarkable window, where we will enter the MAC address of our router.
After entering, in a couple of seconds, the interface of the Google Maps service, which is familiar to us all, will appear, on which, almost with an accuracy of several meters, the location of your router will be indicated by a point.
How to protect yourself?
Cut off all geolocation, do not use Google Maps and do not link your photos to geolocation.
5. Is there a possibility of data leakage on the VPN?
Each user can see how effectively the chosen VPN service protects data privacy - whether it hides your real IP address, your actual location, and data about the Internet provider being used. With a VPN, it is expected that all traffic sent and received over an encrypted channel will be well protected. This includes your real IP address, your actual location, and information about the Internet service provider you are using. If this information is available to third-party resources, then tracking your activity is not very limited, and the data about your actions can be used not only for advertising purposes.
5.1 Checking the IP address
An IP address is a unique number assigned to the router by your Internet service provider. All devices connected to the home network receive their own internal IP address: computers, smartphones, game consoles, smart devices, etc. In this case, we are interested in the public external IP address.
IP addresses are usually associated not only with Internet service providers, but also with specific locations. If a third party service receives your IP address, it can approximate your location.
IP addresses come in several formats: IPv4 (Internet Protocol Version 4), for example , or IPv6, for example .172.16.254.12001:0db8:0012:0001:3c5e:7354:0000:5db1
To find out your IP address, enter “my IP address” in Yandex or use third-party services such as whatismyipaddress.com, whatismyip.com, or 2ip.ru. Some services not only show the address itself, but also indicate your location, determined by your IP address.
5.2 Checking for DNS Leaks
The Domain Name System (DNS) allows you to resolve IP addresses to familiar domain names. The user enters the domain name into the browser and DNS resolves the connection to the corresponding IP address of the web server domain. ISPs have their own DNS servers to simplify the conversion process - as a result, they get a different way to track users.
In fact, using a VPN means that in theory your internet traffic will be redirected to anonymous DNS servers. If your browser just sends a request to your ISP, there is a DNS leak.
There are easy ways to check for a DNS leak using the Hidester DNS Leak Test , DNSLeak.com, or DNS Leak Test.com services. These sites return information about your IP address and the owner of the DNS server used. If the results show a service from your ISP, a DNS leak occurs.
DNS Leak Check
Leakage protection
When a leak is detected, there are several possible options for further action. First of all, you can change the VPN service to one that prevents DNS leaks.
You can also change the DNS servers your router uses when sending requests to the Internet. You can use alternative DNS services: Google Public DNS, Comodo Secure DNS, Norton ConnectSafe, or OpenDNS.
6. Checking the short URL for safety
The full path of the original link is masked by the URL shortening, and its true purpose is unknown. From this condition, it becomes necessary to validate shortened URLs for security.
What is the problem?
Abbreviated links are indispensable in applications that impose character limits. The popular microblogging service Twitter has a 280 character limit for each post. The T.co abbreviation service shortens links to 23 characters and can only be used by platform users. The links use the domain name t.co. This allows Twitter to count clicks on each link and check for malicious content. Twitter itself checks the shortened URLs for the safety of blacklisted malicious sites. If the link points to possible malicious content, Twitter displays a warning.
6.1 TinyURL
TinyURL also provides a preview function. When creating a TinyURL, a preview link is available on the link page. Add the "preview" prefix in front of the TinyURL link to check the target URL.
TinyURL
6.2 CheckShortURL
T.co, Bitly or TinyURL links provide some security guarantees. But what about links created by other shorteners? Many sites offer a method to validate shortened URLs for security purposes. One such site is CheckShortURL. It supports most of the popular link shortening services. Enter a short link in the search box and click Expand.
CheckShortURL
The original destination link appears on the results page. You can check the safety of a link before visiting it using public services such as Norton Safe Web.
6.3 Unshorten.It
Another site for viewing link shortened URLs Unshorten.It!. Enter the shortened link in the search box, then click the Expand button.
7. Protection from web mining?
Cryptojacking is a new type of Internet threat. This term refers to cases where websites use the computing power of the devices of site visitors to mine cryptocurrencies.
The biggest problem with cryptojacking is that digital currencies are mined against the will of the user . Sites secretly run miner scripts to use the resources of visitors' computers. Users often have no way to skip this process, and they don't even understand what's going on.
Many web resources use miner scripts for monetization. Cryptocurrency mining operations take place in the background and do not interfere with the loading of the main site content. Browser extensions can also download cryptominers. They run in the background like scripts.
Checking the browser
This website - https://cryptojackingtest.com was created by Opera Software engineers. It allows you to check the effectiveness of your browser's protection against cryptominers.
Website cryptojackingtest.com
Visit the website and click the Start button to run the test. The mining process will take a few seconds. As a result, you will know for sure whether your browser is protected from web miners or not.
Result of checking
Miner detection in Google Chrome
Many users are often unaware that their computer is being used for unwanted mining. Typical signs of this process are computer slowdowns, freezes, or even a forced restart. If you switch to Task Manager in Windows, you find that Chrome processes are consuming an unexpectedly large amount of CPU resources.
This way you can really recognize the strange behavior of Chrome, but you will not be able to figure out additional useful information: which extension or tab was using all the free CPU resources. Luckily, Google offers a built-in tool called Task Manager to help you figure it out.
Determine which sites consume a lot of CPU resources
If your Google Chrome browser is using too much CPU resources, the first thing to do is determine if the site or an installed extension is causing this situation. In our example, we open a test site created by the Badpackets portal, which contains a built-in web miner CoinHive that uses up to 100% of the available CPU resources.
You can launch Task Manager in Chrome using the Shift + Esc hotkey or in the main menu: Chrome menu> More Tools> Task Manager.
Upon completion of the launch, the tool will display a list of all running processes and the level of CPU resource consumption. For each site, extension, internal process, or subframe, a separate process is shown in the list. The user can check the list and determine which site is wasting the most CPU resources. To close this tab, select it from the list and click the End Process button . After that, the normal operation of the computer will be restored and it will be useful to add the malicious site to the black lists of an antivirus or ad blocker.
How to protect yourself from mining?
Users who are not protected can be given several recommendations:
- Use browser extensions to protect against miner JS scripts. For example NoScript and uMatrix.
- Use the Opera browser with built-in content filter or anti-banners for Google Chrome, Mozilla Firefox and Microsoft Edge.
- Use antivirus to protect against miner scripts. For example, Kaspersky Free and Norton Security.
- Install the extension against miners. For example, the No Coin extension available for Google Chrome, Mozilla Firefox, and Opera.
- Disable JavaScript on questionable sites.
We continue to talk about the issues of ensuring personal security, anonymity and secrecy on the Internet on our own. Here are some more useful tips, settings, tricks and tricks for a home and partly corporate computer that you can perform on your own.
8. Configuring the VPN connection to block DNS leaks
To keep DNS domains secure over VPN connections, it is highly recommended that you disable Smart Multi-Homed Name Resolution in Windows 8.1 and Windows 10 so that DNS requests are not forwarded outside of your secure VPN connection.
8.1 Setting in Windows 8 and 8.1
The following registry tweak can only be applied on Windows 8 and 8.1 systems, it does not work on Windows 10.
- Open the Registry Editor: press the Windows key, then type regedit.exe and press Enter. A User Account Control prompt will appear, confirm it.
- Follow the path: HKEY_LOCAL_MACHINE \ Software \ Policies \ Microsoft \ Windows NT \ DNSClient.
- If the DisableSmartNameResolution parameter already exists, make sure its value is 1.
- Otherwise, right-click the DNSClient directory and select New > DWORD (32-bit) Value from the menu.
- Name the parameter DisableSmartNameResolution.
- Set the value to 1. You can re-enable the function at any time by simply setting the value to 0 or simply deleting the parameter.
- Go to the path: HKEY_LOCAL_MACHINE \ SYSTEM \ CurrentControlSet \ Services \ Dnscache \ Parameters.
- If the DisableParallelAandAAAA parameter already exists, make sure its value is 1.
- Otherwise, right-click the Parameters directory and select New> DWORD (32-bit) Parameter from the menu.
- Name the parameter DisableParallelAandAAAA.
- Set the value to 1. You can re-enable the function at any time by simply setting the value to 0 or simply deleting the parameter.
8.2 Setting up Windows 10
The following method works in all versions of Windows 10, as well as Windows 8 and 8.1.
Disable Enhanced Multicast Name Resolution.
- Open the Local Group Policy Editor: press the Windows key, then type gpedit.msc and press Enter.
- Go to Computer Configuration> Administrative Templates> Network> DNS Client> Disable Enhanced Multicast Name Resolution.
- Set the policy status to Enabled to disable this feature in the system.
9. The easiest ways to protect files and folders that can be found on a USB stick
And so a few simple tips and ways to ensure the confidentiality of your personal files
9.1 Protecting individual files with a password
Setting up password protection for individual MS Word files.
If you only need to protect important individual documents and don't need to encrypt entire folders, you can simply limit yourself to setting up password protection for individual files.
Most programs, such as Word and Excel, have the option to save data with a password. For example, if the document you want is open in Microsoft Word, you can go to File> Info, choose Protect Document, then choose Encrypt password.
It remains only to define a strong password and confirm its installation. Remember to save the document and remember to remember or write down the password.
9.2 VeraCrypt Encrypted File Container
VeraCrypt cryptographic security software can be used as a portable application and run directly from a USB stick. The program requires administrator rights. The program supports the creation of a virtual encrypted hard disk that can be mounted like a physical hard disk.
VeraCrypt currently uses real-time encryption technology using a variety of algorithms, including 256 bit: AES, Serpents and TwoFish and combinations thereof.
Download the portable version of VeraCrypt and unzip it to a USB stick. When you launch the application, a list of available drive letters will be displayed. Select a letter and click "Create Volume". The VeraCrypt Volume Creation Wizard will start.
To create an encrypted virtual disk in a file, select the Create Encrypted File Container option and click Next.
The next step is to choose the type of volume: regular or hidden. Using a hidden volume reduces the risk of someone forcing you to reveal your password. In our example, we are creating a regular volume. Next, select the location of the encrypted disk - Removable Disk.
Configure encryption and specify the size of the volume (must not exceed the size of the USB drive). Then select the encryption and hashing algorithm, you can use the default settings. Then set a password for the volume. In the next step, your random mouse movements will determine the cryptographic strength of the encryption.
After encryption is complete, every time you plug a USB drive into your computer, you can launch the VeraCrypt hosted on it and mount the encrypted file container to access data.
9.3 Encrypt USB Drive Completely
VeraCrypt also supports encryption of entire partitions and storage devices.
Download VeraCrypt and install the program on your computer. When starting the application, a list of available drive letters will be displayed. Select a letter and click "Create Volume". The VeraCrypt Volume Creation Wizard will start.
To encrypt the entire USB drive, select the Encrypt non-system partition / disk option and click Next.
The next step is to choose the type of volume: regular or hidden. Using a hidden volume reduces the risk of someone forcing you to reveal your password. On the next screen of the wizard, you need to select a device, i.e. our removable USB drive, then click "OK" and "Next".
In our example, we will create a regular volume. On the next screen of the wizard you need to select a device, i.e. our removable USB drive, then click "OK" and "Next".
To encrypt your entire USB drive, select Encrypt Partition In Place and click Next. VeraCrypt will warn you that you should back up your data - if something goes wrong during encryption, you can restore access to your files. Then select the encryption and hashing algorithm, you can use the default settings. Then set a password for the volume. In the next step, random mouse movements will determine the cryptographic strength of the cryptography.
Then select the cleaning mode. The more rewriting cycles, the more reliable the cleaning. In the final step, select Encryption to start the encryption process.
After encryption is complete, every time you plug the USB drive into your computer, you will need to mount it using VeraCrypt to access the data.
9.4 Password protection of the archive
Modern archivers like the free 7-Zip support AES-256 encrypted compression and password protection.
Install 7-Zip, then right-click a file or folder on your USB drive and select 7-Zip> Add to Archive. In the "Add to archive" window, select the archive format and set a password. Click "OK" to start the archiving and encryption process.
10. Improving protection and privacy of Chrom-based browsers
All modern Chromium-based browsers have a Google Safe Browsing blacklist to protect users from known dangerous sites. They all have built-in sandbox isolation protection that makes them less vulnerable to attack, and they update quickly when any vulnerabilities are found. If you don't want to trust Google Personal Information with the Google Chrome web browser, there are several alternatives.
10.1 Useful extensions
Web of Trust (WOT) - after installing this extension, if you accidentally stumble upon a potentially unsafe site, WOT will close the warning screen and wait for your decision to stay or leave the site. If you combine this with your own common sense, you will be protected from many of the dangers on the web.
Bitdefender TrafficLight - After installing this extension, if you come across a dangerous website blacklisted by Bitdefender, the plugin will block the page from loading. Bitdefender TrafficLight allows you to block malicious sites, phishing and fake sites.
Adblock Plus for Google Chrome - This extension allows you to subscribe to updates from many different filter lists to help you block unwanted or malicious website content. You can subscribe to any of the lists available, but keep in mind that subscribing to too many of them will slow down your website experience. I recommend subscribing to the EasyPrivacy + EasyList combo and the Malware Domains combo.
ScriptSafe - This add-on blocks the execution of almost all scripts and other potentially dangerous content. This means that even if you come across a dangerous site, you cannot be attacked unless you manually add the scripts for that site to your whitelist. This way you are protected from malicious scripts and many privacy threats.
ScriptSafe
All chromium-based browsers provide the ability to launch the browser in incognito mode . When you work in this mode, most of your online traces will be deleted as soon as the browser is closed. This is not enough to adequately protect your privacy, but it’s already something.
What security changes should I make to improve my privacy?
Go to settings and click on the "Show advanced settings" link at the bottom of the page. In the "Personal Information" section , clear the "Use a prediction service to help complete searches" check box . Also, make sure that Predict network activity to improve page load performance is disabled in any browser.
For all browsers, you must also select the "Send a 'Do not track' request with your browser traffic" option . Google Chrome users may also want to disable the "Use a web service to help resolve navigation errors" option.
Now open "Content Settings" and select "Block third party cookie settings". This will prevent the download of cookies from a website other than the one you intend to visit. This way, almost all tracking cookies will be blocked with the least negative impact on your online experience.
In the "Privacy" section of the main settings page, check the "Don't tell sites how you got there (don't send the HTTP referrer header)" box . Please note, however, that this may cause problems with some sites and that some sites may need to be disabled in order for them to work properly.
HTTPS Everywhere - This extension encourages many sites that have the ability to encrypt your connection, actually encrypt it. This way, your connection to these sites will be much safer.
LastPass is a robust password manager that automatically inserts passwords and fills out forms. This not only helps protect your passwords and secrets from damage, but it also allows you to confidently create strong passwords and change them frequently.
Do Not Track Me - This extension prevents third parties, advertising agencies and search engines from tracking which web pages you visit.
Do not track me
11. Tools used to analyze malicious links and files
Every day, malicious websites and attachments try to trick users into downloading dangerous content. Fortunately, there are many online resources and tools that can help you figure out which sites are safe and which are a trap to steal your personal information and money.
Let's start with the well-known VirusTotal resource. When you receive an email with a ZIP archive, it will be helpful to check the attached file using this service.
There are a number of other web resources that help detect malicious files or links, namely:
- fortiguard.com/antivirus/virus_scanner.html - This site scans for malicious files and reports on potential security issues;
- hybrid-analysis.com - You can upload files to this site, but cannot work with archives;
- malwr.com/submission - Allows you to upload files and check which processes will be started. The service also shows how many VirusTotal antivirus engines have worked.
- metascan-online.com is another site for checking potentially dangerous files that may contain malicious content;
- phishtank.com - checks if the resource is contained in the database of known fraudulent sites;
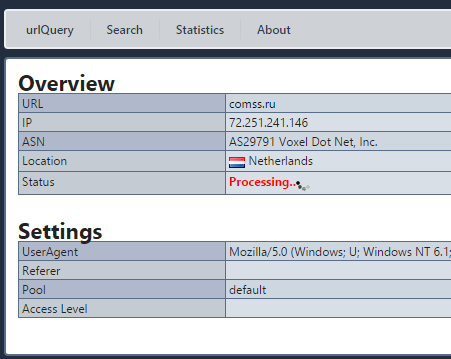
- urlquery.net - (note that the net domain zone is used, the address in the com zone is registered by an unauthorized person) this service scans site links for malicious files and dangerous activity
Again, many of the tools are available from the Internet, here are just a few of them.
- abuseipdb.com - a resource that checks the malicious activity of other sites (there is no HTTPS support);
- ipvoid.com - this site allows you to check if a specific IP address has been involved in malicious activity (there is no HTTPS support);
- mxtoolbox.com/Public/Tools/EmailHeaders.aspx - Enter the message header to determine where it was sent from.
- quttera.com/website-malware-scanner - Checks websites for malicious activity.
- virustracker.net - Analyzes if the IP address has been involved in malicious activity.
MxToolbox decrypts email message headers for diagnostic information
Checking a website using the urlQuery service
[B12. Password security[/B]
Password security is one of the problems that constantly worries the modern person. The confidentiality of personal life largely depends on the degree of secrecy of passwords. Today, access to almost any application, private and commercial information is password-based and requires registration.
The first step in keeping passwords secure is to avoid using a single word password. And not because the password for the word is too short, but because this password is very predictable. Did you know that there are databases used by hackers that contain all words in any language? The purpose of these databases is to help hackers guess passwords with simple word searches. This technique is called a dictionary attack, which can also take the form of a rainbow table attack.
12.1 Password manager
Password managers are applications that help us store and organize our passwords. The only password you need to remember is the password for the password manager itself.
Sticky Password is a reliable password manager with local database and cloud sync. Supports Windows, Mac, Android, iPhone and iPad, bookmarks, create and securely store passwords, automatically sign in to websites, fill out online forms
KeePass Password Safe is a free open source password manager for Windows. Allows you to store passwords in a well-encrypted database, access to which is closed with a master password or key file 2018-11-02
LastPass is a password manager app for popular web browsers, systems, and mobile devices. The LastPass plugin makes visiting websites easier and safer.
Kaspersky Password Manager is a password manager with cloud storage and data protection functions, autofilling authorization fields and data substitution, automatic data synchronization on all devices.
Norton Password Manager is a free password manager that lets you log into the websites you visit quickly, easily, and securely. A simple password manager for your web browser, Android smartphone, iPhone and iPad
12.2 Two-factor identification
Two-factor authentication is another obstacle to keeping your passwords secure. After entering the password, the authorization system will require an additional authentication method to log into your account. Specifically, the second verification factor could be the temporary digital code generated by the authentication app on your mobile device.
Access will be granted if the login (username or email address), password and secret code are entered correctly. Two-factor authentication is the most secure way to keep your passwords safe as access will not be granted without the additional credentials entered correctly.
13. Resources for testing end-point protection
A list of free and well-known tests that are used to simulate a malicious attack.
- Anti-malware Testfile - European Institute for Computer Anti-Virus Research
- Test your anti-Malware solution! - WICAR.org
- Security features check - Anti-Malware Testing Standards Organization
- SmartScreen Demo Pages - Microsoft
- Test Your Metal - Fortinet
- CheckMe - Check Point
- ShieldsUP! - Gibson Research Corp.
- LeakTest - Gibson Research Corp.
- Security Test Tool -SpyShelter
[B14. Blocking ads[/B]
AdFender - Supports a wide range of web browsers including Chrome, Firefox, Microsoft Edge, Internet Explorer, Opera.
Adguard for Windows is a multifunctional internet filter that blocks ads in many browsers and applications without the need to install extensions. In addition to the anti-banner, it includes anti-phishing, anti-tracking, parental control. For Comss.ru users, all functions are available free of charge for 6 months. The developer also offers apps for Android, Mac and iOS.
Ad Muncher is a popular program for blocking online ads and pop-ups in most browsers. Supports creating your own filters. It became free with full functionality at the end of 2014 but hasn't been updated since then.
14.1 Extensions for Chrome, Firefox and Microsoft Edge
Currently, several major ad blockers offer extensions and add-ons for Chrome, Firefox and Edge. Let's list the most popular blockers:
AdBlock for Chrome / AdBlock for Edge is the most popular ad blocker with over 200 million downloads. There was a Firefox version, but the extension was removed for unknown reasons. AdBlock allows you to receive ads from Youtube and Google searches, but these options are disabled by default.
AdBlock Plus for Chrome / AdBlock Plus for Firefox / Adblock Plus for Edge is one of the most famous ad blockers, also very controversial because it was AdBlock Plus who originally introduced the practice of using ad whitelisting. The AdBlock Plus site also offers versions for Opera, Safari, Maxthon, Internet Explorer, and even Android.
Adguard for Chrome / Adguard for Firefox / Adguard for Edge is easy to use and makes it easy to add additional scripts to block.
Stop Reclame for Chrome is an effective solution to remove intrusive ads. An extension for Opera and Yandex Browser is also available.
uBlock Origin for Chrome / uBlock Origin for Firefox / uBlock Origin for Edge is a promising script blocker for Chrome and Firefox. has good optimization and minimal impact on processor and memory. Not all ads are blocked by default, but you can add blacklists. The user can allow or block the extension to work on individual sites in advanced mode.
14.2 Alternative solutions for ad blocking
Adguard DNS provides an easy way to filter ads through the domain name system. You can change DNS for a specific device or configure your router to filter internet traffic for all connected devices - Windows, Mac, Linux, Android, iOS.
Adguard Home is a DNS server that blocks ads and tracking at the network level. Its function is to give you complete control over the network and all your devices without installing any client applications. At the same time, AdGuard Home offers a web interface with which you can easily manage the filtering process.
Pi-Hole offers an advanced ad blocking solution on all devices connected to your home network. You will need a Raspberry Pi single board computer and some technical knowledge. All traffic is routed through a separate device that filters the content.
14.3 Using third-party DNS services
Your ISP provides DNS servers for you, although you don't have to use them. Instead, you can use third-party DNS servers that provide many features that your ISP does not have.
Third party DNS servers such as OpenDNS and Google Public DNS also offer protection that many ISP DNS servers have not yet implemented. For example, Google Public DNS supports DNSSEC to ensure correct signature and reliability of DNS queries. Your ISP's DNS servers may not have implemented these security features yet.
UnoDNS and Unblock-Us work in the same way and do not have this limitation, but on the other hand, you have to pay for them.
UnoDNS and Unblock-Us. Access to geo-blocked content
Namebench includes an option that checks DNS servers for censorship to determine if current DNS servers are being censored.
Namebench. Bypassing web censorship
Conclusion
In the end, we can say that you cannot remove the left fingerprints, but you can take preventive measures. This will keep your data safe. If you are aware of all the possible risks, you can avoid them. You can start small. Install, for example, an ad blocker, use end-to-end encrypted apps, and only visit HTTPS sites. As you take these small steps, you will feel a huge difference.
That's all! If you do all these simple tricks, you can be a little more confident that your personal information, even if it is not very sensitive, will not be shared with anyone. In any case, ordinary amateurs will definitely not get it!
(c) cryptoworld.su