
CarderPlanet
Professional
- Messages
- 2,549
- Reaction score
- 722
- Points
- 113
Thanks to finesse.
From off. site download Bitvise SSH Client and Firefox Portable with it (eng version)
CONFIGURING BITVISE SSH CLIENT
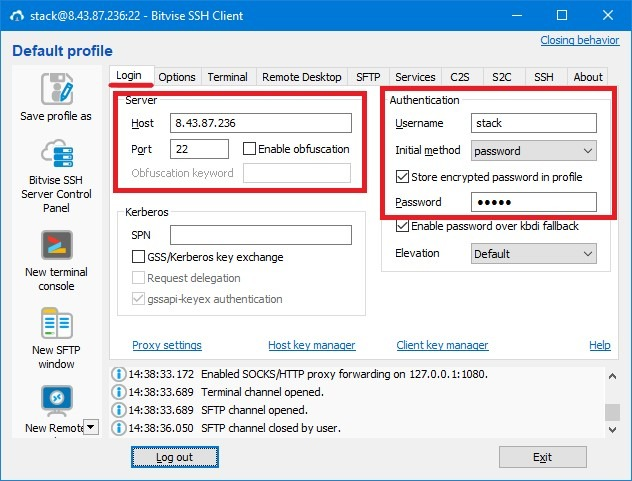
For example, I will use a tunnel:
8.43.87.236:22 stack: password here
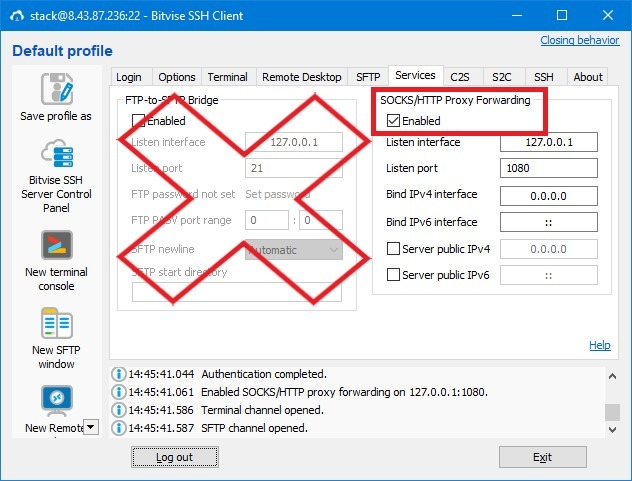
In the "Services" tab, select Enabled in the "SOCKS / HTTP Proxy Forwarding" column and enter:

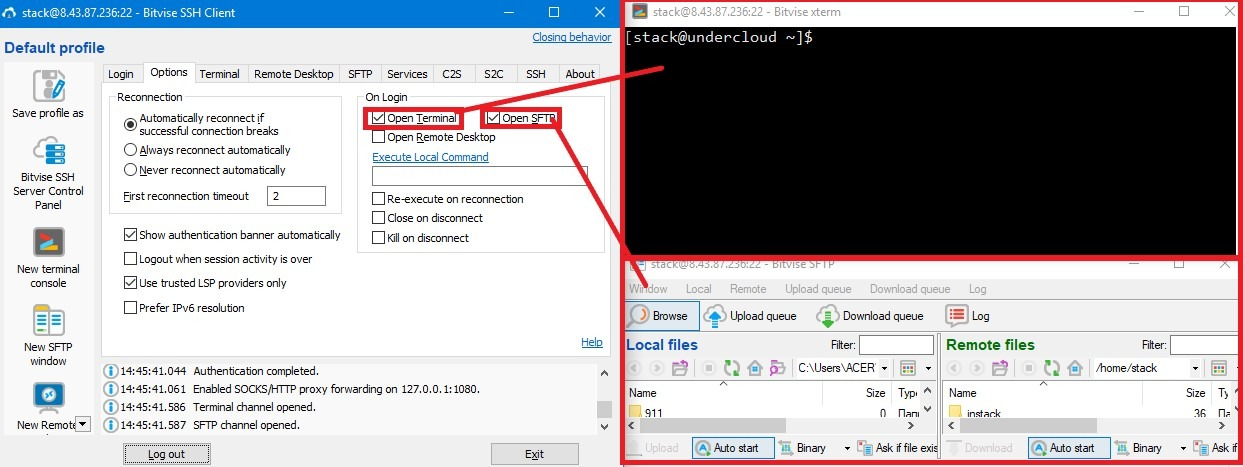
In the "Options" tab (optional / for convenience), remove the marked "Open Terminal" & "Open SFTP" so that unnecessary windows do not open.
Ideally, that's all.
Click "Login" and do things ...
At the first login to the tunnel, a permanent / one-time / cancel connection request will appear (Accept and Save / Accept for This Session / Cancel). We choose at will ...

PROBLEMS WHEN USING BITVISE
"Not combining key exchange algorithms", which makes it impossible to connect to this SSH.
I read somewhere that in Bitvise, in the "SSH" section in all the tabs written in blue, all the values must be set, since the connection is made through an encrypted channel, which I did. This may not help in every case)

ASS
The tunnel, when connected, displays a window to enter the password again and it does not match. Conclusion - the data has been changed.
With problems, everything, if the tunnel works, open Firefox Portable.
FIREFOX PORTABLE SETUP
Open Firefox Portable and click "Options"

In the "General" tab, scroll to "Network Proxy" and poke "Settings ..."

Select "Manual proxy configuration". In the "SOCKS Host" window, write ip - 127.0.0.1 in the "Port" window - 1080

Scroll down and put a check mark next to "Proxy DNS when using SOCKS v5", then click "OK"

We also disable WebRTC via - about: config
This bundle is suitable for almost any direction in carding)We do not call for illegal actions. Everything is fiction and tra la la
From off. site download Bitvise SSH Client and Firefox Portable with it (eng version)
CONFIGURING BITVISE SSH CLIENT
For example, I will use a tunnel:
8.43.87.236:22 stack: password here
Host: 8.43.87.236
Port: 22
Username: stack
Initial method: password
Password: password here
In the "Services" tab, select Enabled in the "SOCKS / HTTP Proxy Forwarding" column and enter:
Listen Interface: 127.0.0.1
Listen Port: 1080
In the "Options" tab (optional / for convenience), remove the marked "Open Terminal" & "Open SFTP" so that unnecessary windows do not open.
Ideally, that's all.
Click "Login" and do things ...
At the first login to the tunnel, a permanent / one-time / cancel connection request will appear (Accept and Save / Accept for This Session / Cancel). We choose at will ...
PROBLEMS WHEN USING BITVISE
Nowhere have they really described how to solve this problem, and I will only express my assumption:The SSH2 session has terminated with error. Reason: Error class: LocalSshDisconn, code: KeyExchangeFailed,
message: FlowSshTransport: no mutually supported key exchange algorithm. Local list:
"ecdh-sha2-1.3.132.0.10, ecdh-sha2-nistp521, ecdh-sha2-nistp384, ecdh-sha2-nistp256, diffie-hellman-group14-sha1".
Remote list: "diffie-hellman-group1-sha1".
"Not combining key exchange algorithms", which makes it impossible to connect to this SSH.
I read somewhere that in Bitvise, in the "SSH" section in all the tabs written in blue, all the values must be set, since the connection is made through an encrypted channel, which I did. This may not help in every case)
As indicated below in the "Services" column, the wrong connection was selected.Closed FTP control connection for FTP-to-SFTP bridge from 127.0.0.1:63357 on 127.0.0.1:8081. SFTP channel closed by the SSH server.
Well, it's just a dead tunnel, WRONG LOGConnection failed. FlowSocketConnector: Failed to connect to target address. Windows error 10060. The SSH2 session has been terminated
ASS
The tunnel, when connected, displays a window to enter the password again and it does not match. Conclusion - the data has been changed.
With problems, everything, if the tunnel works, open Firefox Portable.
FIREFOX PORTABLE SETUP
Open Firefox Portable and click "Options"
In the "General" tab, scroll to "Network Proxy" and poke "Settings ..."
Select "Manual proxy configuration". In the "SOCKS Host" window, write ip - 127.0.0.1 in the "Port" window - 1080
Scroll down and put a check mark next to "Proxy DNS when using SOCKS v5", then click "OK"
We also disable WebRTC via - about: config