
Tomcat
Professional
- Messages
- 2,695
- Reaction score
- 1,064
- Points
- 113
Greetings to all!
Not long ago I already talked about the development of applications for Ingenico bank terminals. And then I said that the Telium platform was chosen because it is the only one for which an SDK is publicly available.
But it so happened that software from another company that once produced terminals fell into my hands, and I decided that it would be nice to write a post about this too.

So, in the course of this article we will talk about somewhat more ancient and exotic terminals. We will find out how to write for them, where to get the software and what to do with all this. As usual, there will be a lot of interesting things.
Despite the fact that I had already tried writing under Ingenico, I wanted something more. At a minimum, because the Telium SDK was devoid of detailed documentation, and the CHM included in the kit was clearly not enough to start development, there were also some nuances with the personalization of terminals (which cannot be done using the SDK) and related issues. At the same time, it was simply interesting to know how things are going with other manufacturers.
And finally, I got everything I needed, which means that now I can try it at work and tell you about my impressions.
So, first of all, let's figure out what we're going to write to. These terminals were produced by the Israeli company Lipman Electronics Engineering, later absorbed by VeriFone, under the Nurit line. The devices ran on MC68000 or ARM processors. During this article, we will consider the latter due to the availability of software for it. However, for devices based on the MC68000, everything is largely identical, so if you manage to get hold of libraries and a compiler for them, then this article will also be useful.
So, let's take a look at typical representatives of the terminals of this company.

Nurit 2085. Old terminal on MC68000. One of the shortcomings of my copy is that the printer cover is missing.


The battery leaked inside, but I bit it out before the paths turned green.


Nurit 3020. One of the most sophisticated copies on the MC68000. There was also a 3010 model with a GSM modem.


Entrails. The terminal is not equipped with a key storage, so there are no tampers either. The memory is supported by the same battery (this time it is in perfect condition). What’s unusual is that the printer has a lever that moves the head away from the pressure roller so that a new ribbon can be inserted, but it is firmly fixed in the latched position, and the paper is loaded when scrolling (for which there is a combination of buttons). In theory, the wear and tear on the printer is higher, but oh well.

The MC68000 processor and Flash chip are inside the 3020 terminal. A certain “DEBUG CARD” connector also catches your eye. Most likely, it was used at the factory to test the board for functionality.


Nurit 8320. In appearance it is very similar to the previous one, but it is built on an ARM processor, and it is also equipped with a key storage. The GSM modem is now completely built-in (devices like the Nurit 3010 had an external antenna). Two slots for SAM modules and a nickel-metal hydride battery are still there.


Let's sort it out.

Electronics are, of course, very different. Most of the chips are on the keyboard board and are covered with a metal shield, which I removed for the photo. The documentation for the processor is nowhere to be found; apparently, it is custom made.

GSM modem Siemens MC35i.


Nurit 8000. Portable terminal with touchscreen.


Well, the insides, what would we do without them? The battery is now lithium-ion. The connectors for charging and connecting to a computer are proprietary, their pinout is unknown to me. The processor and memory are filled with resin. Like the previous model, it has tampers.
Now all this is long gone into history. The days of terminals without contactless payment are over. However, it is still possible to find such devices on the secondary market (and the price is quite reasonable), so it will not be difficult to get a copy for dissection and experiments.
Also, these devices have one nuance with the power supply: it is sixteen volts and has inverted polarity (the central contact of the connector is a minus!).
In addition to the terminals themselves, I also came across pin pads. Alas, I have neither software nor documentation for any of them. But this is not so scary, since the command system is identical to that of VeriFone, which I dedicated a separate post to. The only thing is that Nurit’s data packet containing the PIN-block is shorter by one byte. In VeriFone, this byte is reserved for the state of three programmable buttons under the screen (which were not even used in some versions of the pin pad firmware).

Nurit 272 pin pad. The pinout is identical to that of the VeriFone PP1000SE.

The display on the HD44780 also supports Russian font out of the box.
This is what entering a PIN looks like.
I didn’t disassemble the copy, since the internal battery was still alive, and I didn’t want to deal with resetting the tamper once again.

And here is another pin pad, Nurit 292. It is one of the latest.

Back side. Under the cover there are slots for SAM modules.

Innovative Israeli technology “RS-232 over USB”. The contacts of the miniUSB connector carry the levels of conventional RS-232 and twelve volts of power.

Entrails. Nurit pin pads, unlike most of those from VeriFone, have a smart card reader. The battery, as usual, is dead.

Reverse side of the small board. The miniUSB connector is visible.

View with the board removed. The insides are filled with resin.

Pin pad VeriFone PP1000SE v2. It is mentioned here for a reason - the device uses a number of Lipman developments, in particular, the operating system. The device has a “Nurit” operating mode, which allows it to be used together with terminals from this company. Actually, everything that can be said about this thing was said in the post about pin pads, so I won’t repeat it here.
Although these devices were created for banking operations, we used them for the most part in a number of other places (similar to how loyalty card service was raised on VeriFone OMNI-395 terminals).
Nurit 8010 were used as transport terminals. Interesting, by the way: what kind of reader is this and how does it connect to the terminal?

They have also found their use as mobile payment terminals in systems like OSMP (aka QIWI). They did not accept cards, but only served to communicate with the payment system server. In fact, they were complete analogues of the familiar “boxes” from which we once topped up our phone accounts, only they were managed not by us, but by operators at service points. This software is still here today . There is another version of similar software in the archived copy of the Cyberplat website.
It took a long time to find an SDK for these terminals. And for a very long time he was not found anywhere. There was, however, a certain site possoftware.ucoz.com of obscure content, where it seemed like you could buy this software. The price was not indicated on the site, but after some searching I found a post by the same friend on some moldy forum, where the required figure was still there - several thousand dollars for one SDK. After finding out all this, it became clear that I was looking in the wrong direction.
And in the comments to my post about Ingenico, comrade vladkorotnev did throw in the treasured link . As it was explained to me, the archive was lying around on some Chinese site like CodeForge.com, from where it was downloaded many years ago.
Well, first, let's talk a little about the design of the software part of these devices. All Nurit terminals run on their proprietary OS - Nurit OS (NOS). The terminal is equipped with Flash, which contains the bootloader, NOS itself, and a user application.
The bootloader launches NOS, as well as rewrites it if necessary (for example, when updating the OS). Flashing is carried out using OSP Loader software and an *.osp file, which is a password-protected ZIP archive containing all OS versions for all terminals certified for the country for which this package is intended. You can also rewrite the bootloader itself (but if something goes wrong, you can only restore the terminal using a programmer).

The bootloader also has a small Easter egg: the password to launch NOS is 1947, a landmark year for Israel, where these devices were produced.
NOS is responsible for loading the application, all service functions such as data exchange during loading, as well as working with equipment at a low level. It is through it that the application interacts with the terminal hardware. There are two operating modes of the application - Single and Multi. In the first mode, the application starts after loading NOS and interacts with its API throughout its operation until completion; in the second, when a certain event occurs, NOS calls its handler, which then returns control to the terminal operating system. In addition, switching Single->Multi in the NOS menu serves to clear Flash.
However, even in Single mode, the application must periodically give control to NOS to ensure that background processes are terminated. To do this, you need to periodically call the functions Mte_Wait() , Kb_Read() , Kb_WaitForKey() . If this is not done for more than ten seconds, the terminal will automatically reboot. That is, for example, if your application starts to stall in an endless loop, without calling these functions, the OS will consider that it has frozen and shut it down. If you have provided this very cycle (for example, the terminal is waiting for data to arrive from the port), then you need to not just hang, but call Mte_Wait(1).

Actually, this is the report that is printed during an emergency reboot.

NOS also has its own menu, which is used to load data and diagnose the device.
The application itself is universal for all terminals of the same architecture and NOS version no lower than the one for which it was compiled. However, it is possible to set the minimum system requirements when assembling the installation package, since different terminals have some differences in hardware, so it may turn out that not all functions of the application will be able to work correctly.

And here is the memory organization diagram (from the official documentation). The device is equipped with a RAM disk where you can store application data; protected models have a key storage.
Unlike Ingenico Telium, where the manager was entered by selecting a menu item, the local service menu is opened by a combination of buttons.
The most important is the four 4 + Menu + -> + Enter, which allows you to enter the NOS menu (which you will have to do every time you load the application). Sometimes a bootloader is also needed, for example, if you accidentally put the terminal into an endless wait and it does not respond to the keyboard. In this case, you need to go to NOS Loader, select “Start NOS” and enter the password: 1947
The same for Nurit 8000. Unfortunately, I don’t have the opportunity to fully launch it, since the connector for connecting to a PC is proprietary, and there is no analog I never found one for him to solder the cable.
But for the Nurit 8400. I don’t have such a terminal, but I think it won’t be superfluous here.
Let's get started with installation and launch. From the downloaded archive you will need approximately the following:
To load into the terminal you will need Fast Loader, you can download it here . OSP Loader will not work, and Smart Loader is very cumbersome and in most cases not needed.
Also, to run you will need a PC with Windows 2000 or XP or a virtual machine with it (it is highly desirable).
So, first, download ADE_ARM_1_7.49.00A.EXE from the ADE folder , then Nurit Software Development tools and Nurit Help. Installing all this is very simple and does not cause any problems.
Now it's the compiler's turn. It has a trial license, which specifically for the copy from the archive expired in ancient times. Therefore, we are moving the date to January 1, 2000 to ensure its functionality. This is precisely why it is advisable to install Windows on a virtual machine, so that such a date translation does not break the work of other software.
In the Compilador folder (archive, apparently, from somewhere in Brazil) lies hcarm_4.5a . Move this folder to the root of the system disk. In the system properties we find the environment variables, add C:\hcarm_4.5a;C:\hcarm_4.5a\bin;hcarm_4.5a\lib to Path . From the root of the archive we take CLKERN.DLL and drop it into the bin folder of the compiler.
In general, that's all. You can try to run it.
Well, time to try to write something. In general, there is no traditional “test” program in the SDK. There is something in the ApplicationExample folder from the archive, but despite the simplicity of the project, I never managed to assemble it. So let's use what we have.
Go to the address C:\ADE_ARM\ADE_ARM7\SNGL_APL\SRC , open DEMO.C there, delete all the text there, and in return insert something like the following:
In addition to this file, there are two more files - dynamically linked libraries are loaded in DLMDECLR.C , and the application header is indicated in APPLHEAD.C . It looks something like this:
Here you can specify, in particular, the minimum NOS version, as well as the version and release date of the application itself. This can later be viewed in the “Application info” menu of NOS. The project.def
file also deserves special attention . And there is something like this:
Why such difficulties with hundreds of defines and such strange renaming of files is absolutely unknown to me. So that when you move a folder to another location, you don’t have to rewrite the paths in the entire code? This way you can simply specify the path to the entire NOS_API in an environment variable, as was done in most other SDKs that I have seen. Anyway.
Next, go to RELEASE and delete everything in the OBJ folder that is there. Let's launch the batch file BUILD.BAT . If everything was done correctly, demo.log will remain empty, and demo.hex will appear in the RELEASE folder (or it will simply have a different modification date).
But demo.hex is not an application yet. To make it so, you need Application Integrator from Nurit Software Development Tools. Let's launch it.

In the window that opens, press the leftmost button on the panel, and in the window that opens, select our *.hex file. Before assembling the downloadable component, you can view information about the application (the same information that was specified in APPLHEAD.C ) or set restrictions.

Here is an example of setting restrictions: for example, you can set the mandatory presence of any ports if your application uses them.
Now click the second button on the panel, and a ready-made package for downloading to the terminal will be created.

According to the level of protection, Nurit terminals are divided into two types - Secured and NOT Secured. The differences between them are that the “unprotected” device does not use tampers (that is, it can be disassembled and nothing will be done to it), downloading an application from one terminal to another is allowed, and some restrictions are set on cryptography. There are also hardware differences, for example, the protected terminals inside are filled with resin. You can find out what type of terminal your terminal is by opening NOS, selecting “Terminal ID”, and then exiting it. In this case, Terminal is Secured or Terminal is NOT Secured will light up on the screen for a couple of seconds . The tamper from the protected terminal is removed by flashing the OS using OSP Loader.
If an application is loaded into a “secure” terminal, it must be signed (alas, I don’t know which software). Five hundred and twelve bytes are allocated for this signature in the corresponding field in the header.
Most likely, you will get the “simple” option, since OSMP and similar organizations did not use cryptographic functions.
Now you can download the application to the terminal. In general, Lipman provided a terminal emulator for ease of debugging, but it didn’t reach me, alas.
To do this, we need a cable for the COM port and, in fact, a download tool.
The cable diagram here is like this:

All you need for assembly is a piece of patch cord and a DB9F connector. There are seven wires from the computer to the terminal, but in reality only three are enough to boot: RX, TX, GND. The download cable for VeriFone is also suitable; the pinout is identical.
The order of contacts is visible here:

(if anything, the video is not about Nurit at all, but about VeriFone VX520. I took this screenshot more than three years ago for cable pinout)
In this photo, the red wire is ground, white and black are RX and TX.
The terminal has a 10P10C connector, but the outer contacts are not used, so you can plug in a regular 8P8C network connector there, and it will work too.

Next, open Fast Loader (or simply open the assembled application, and it will launch itself). Here we configure the port parameters.

Now it's the terminal's turn. Go to NOS, select “Download”. Next, press Enter and type any number (even “111”). You must type something, otherwise there will be an error when you try to download something.

Select “Comm Prm” to set the connection parameters.

We specify the COM1 port and the same speed that we configured in Fast Loader.

Next, select “Manual load” and confirm your action.

Now we connect our unit to the computer. Launch Fast Loader and click “Load appl” on the terminal. After a few seconds, the PC and our device will establish a connection, and “Starting DCP” will soon change to “Erasing sectors”, and then to the loading progress bar. We exit the menu, NOS will reboot. And, if we haven’t messed up anywhere, something like this should appear on the display:

Of course, the terminal is not limited to just one font. You can change them like this:

And this is what it looks like in action.
Of course, I want to print something. I didn’t want to limit myself to just text, so I decided to try some pictures at the same time.

So, we take a BMP, convert it to monochrome and set the width to strictly 384 pixels (this is the resolution of the print head in the terminal). Next, open some program that allows you to convert the image into an array. I used LCD Assistant. Rename the resulting file to myimage.c and drop it into the project folder. The array itself must have a line-by-line orientation (one byte - eight pixels from a horizontal line). The program for all this turned out like this:

And here is the result. Please note that you must wait until each item is printed, otherwise subsequent data sent to the printer will be ignored.
As an example of what is actually used in cryptography, consider working with a random number generator.

The manufacturer claims that the terminal is equipped with a hardware randomizer, that is, the values displayed on the screen are not pseudo-random.
Let's try to read a card with a magnetic stripe. This is done quite easily here:
Here you can see how waiting for something can be handled. If you simply keep the terminal down in a loop until the card is read, the OS will time out the application. Therefore, the delay function is constantly called here, transferring control to the OS.

And finally, let's see how the user interface is implemented. There are also special functions for this that allow you to display menus and dialog boxes. Of course, compared to VeriFone devices based on Verix OS, the space here is much smaller, but it’s still much more convenient than displaying it all manually.
Here I decided not to invent my own crutch, but to see what the documentation had to say about it. There is such an example there.
Of course, this has no practical application for a long time. These terminals are forever consigned to history, and for quite some time now. Nevertheless, the device in question turned out to be very interesting. And the presence of a detailed developer’s guide, where all functions are described in detail and examples of use are given, cannot but rejoice. I will also note that Nurits are much more oak than the previously reviewed Telium and are much more protected from incorrect operator actions (unlike Telium, you have to try harder to brick such a device), which is why such a terminal can be successfully used for some of your own purposes ( for example, as a control panel or portable thermal printer).
And, of course, my experiments with POS terminals do not end there. In particular, I do not lose hope of finding software for even more relict devices (VeriFone SC 5000, Ingenico Unicapt32, Hypercom, Datacard, Innovatron Terminaux). You can try to write some game or demo for it . And, of course, you can try to make a simulator of a payment application that would use most of the terminal functions such as cryptography and data storage.
So it goes.
Not long ago I already talked about the development of applications for Ingenico bank terminals. And then I said that the Telium platform was chosen because it is the only one for which an SDK is publicly available.
But it so happened that software from another company that once produced terminals fell into my hands, and I decided that it would be nice to write a post about this too.
So, in the course of this article we will talk about somewhat more ancient and exotic terminals. We will find out how to write for them, where to get the software and what to do with all this. As usual, there will be a lot of interesting things.
❯ The point is
Despite the fact that I had already tried writing under Ingenico, I wanted something more. At a minimum, because the Telium SDK was devoid of detailed documentation, and the CHM included in the kit was clearly not enough to start development, there were also some nuances with the personalization of terminals (which cannot be done using the SDK) and related issues. At the same time, it was simply interesting to know how things are going with other manufacturers.
And finally, I got everything I needed, which means that now I can try it at work and tell you about my impressions.
❯ Equipment overview
So, first of all, let's figure out what we're going to write to. These terminals were produced by the Israeli company Lipman Electronics Engineering, later absorbed by VeriFone, under the Nurit line. The devices ran on MC68000 or ARM processors. During this article, we will consider the latter due to the availability of software for it. However, for devices based on the MC68000, everything is largely identical, so if you manage to get hold of libraries and a compiler for them, then this article will also be useful.
So, let's take a look at typical representatives of the terminals of this company.
Nurit 2085. Old terminal on MC68000. One of the shortcomings of my copy is that the printer cover is missing.
The battery leaked inside, but I bit it out before the paths turned green.
Nurit 3020. One of the most sophisticated copies on the MC68000. There was also a 3010 model with a GSM modem.
Entrails. The terminal is not equipped with a key storage, so there are no tampers either. The memory is supported by the same battery (this time it is in perfect condition). What’s unusual is that the printer has a lever that moves the head away from the pressure roller so that a new ribbon can be inserted, but it is firmly fixed in the latched position, and the paper is loaded when scrolling (for which there is a combination of buttons). In theory, the wear and tear on the printer is higher, but oh well.
The MC68000 processor and Flash chip are inside the 3020 terminal. A certain “DEBUG CARD” connector also catches your eye. Most likely, it was used at the factory to test the board for functionality.
Nurit 8320. In appearance it is very similar to the previous one, but it is built on an ARM processor, and it is also equipped with a key storage. The GSM modem is now completely built-in (devices like the Nurit 3010 had an external antenna). Two slots for SAM modules and a nickel-metal hydride battery are still there.
Let's sort it out.
Electronics are, of course, very different. Most of the chips are on the keyboard board and are covered with a metal shield, which I removed for the photo. The documentation for the processor is nowhere to be found; apparently, it is custom made.
GSM modem Siemens MC35i.
Nurit 8000. Portable terminal with touchscreen.
Well, the insides, what would we do without them? The battery is now lithium-ion. The connectors for charging and connecting to a computer are proprietary, their pinout is unknown to me. The processor and memory are filled with resin. Like the previous model, it has tampers.
Now all this is long gone into history. The days of terminals without contactless payment are over. However, it is still possible to find such devices on the secondary market (and the price is quite reasonable), so it will not be difficult to get a copy for dissection and experiments.
Also, these devices have one nuance with the power supply: it is sixteen volts and has inverted polarity (the central contact of the connector is a minus!).
❯ Pin pads
In addition to the terminals themselves, I also came across pin pads. Alas, I have neither software nor documentation for any of them. But this is not so scary, since the command system is identical to that of VeriFone, which I dedicated a separate post to. The only thing is that Nurit’s data packet containing the PIN-block is shorter by one byte. In VeriFone, this byte is reserved for the state of three programmable buttons under the screen (which were not even used in some versions of the pin pad firmware).
Nurit 272 pin pad. The pinout is identical to that of the VeriFone PP1000SE.
The display on the HD44780 also supports Russian font out of the box.
This is what entering a PIN looks like.
I didn’t disassemble the copy, since the internal battery was still alive, and I didn’t want to deal with resetting the tamper once again.
And here is another pin pad, Nurit 292. It is one of the latest.
Back side. Under the cover there are slots for SAM modules.
Innovative Israeli technology “RS-232 over USB”. The contacts of the miniUSB connector carry the levels of conventional RS-232 and twelve volts of power.
Entrails. Nurit pin pads, unlike most of those from VeriFone, have a smart card reader. The battery, as usual, is dead.
Reverse side of the small board. The miniUSB connector is visible.
View with the board removed. The insides are filled with resin.
Pin pad VeriFone PP1000SE v2. It is mentioned here for a reason - the device uses a number of Lipman developments, in particular, the operating system. The device has a “Nurit” operating mode, which allows it to be used together with terminals from this company. Actually, everything that can be said about this thing was said in the post about pin pads, so I won’t repeat it here.
❯ A little about the application
Although these devices were created for banking operations, we used them for the most part in a number of other places (similar to how loyalty card service was raised on VeriFone OMNI-395 terminals).
Nurit 8010 were used as transport terminals. Interesting, by the way: what kind of reader is this and how does it connect to the terminal?
They have also found their use as mobile payment terminals in systems like OSMP (aka QIWI). They did not accept cards, but only served to communicate with the payment system server. In fact, they were complete analogues of the familiar “boxes” from which we once topped up our phone accounts, only they were managed not by us, but by operators at service points. This software is still here today . There is another version of similar software in the archived copy of the Cyberplat website.
❯ Where to get the software
It took a long time to find an SDK for these terminals. And for a very long time he was not found anywhere. There was, however, a certain site possoftware.ucoz.com of obscure content, where it seemed like you could buy this software. The price was not indicated on the site, but after some searching I found a post by the same friend on some moldy forum, where the required figure was still there - several thousand dollars for one SDK. After finding out all this, it became clear that I was looking in the wrong direction.
And in the comments to my post about Ingenico, comrade vladkorotnev did throw in the treasured link . As it was explained to me, the archive was lying around on some Chinese site like CodeForge.com, from where it was downloaded many years ago.
❯ Architecture
Well, first, let's talk a little about the design of the software part of these devices. All Nurit terminals run on their proprietary OS - Nurit OS (NOS). The terminal is equipped with Flash, which contains the bootloader, NOS itself, and a user application.
The bootloader launches NOS, as well as rewrites it if necessary (for example, when updating the OS). Flashing is carried out using OSP Loader software and an *.osp file, which is a password-protected ZIP archive containing all OS versions for all terminals certified for the country for which this package is intended. You can also rewrite the bootloader itself (but if something goes wrong, you can only restore the terminal using a programmer).
The bootloader also has a small Easter egg: the password to launch NOS is 1947, a landmark year for Israel, where these devices were produced.
NOS is responsible for loading the application, all service functions such as data exchange during loading, as well as working with equipment at a low level. It is through it that the application interacts with the terminal hardware. There are two operating modes of the application - Single and Multi. In the first mode, the application starts after loading NOS and interacts with its API throughout its operation until completion; in the second, when a certain event occurs, NOS calls its handler, which then returns control to the terminal operating system. In addition, switching Single->Multi in the NOS menu serves to clear Flash.
However, even in Single mode, the application must periodically give control to NOS to ensure that background processes are terminated. To do this, you need to periodically call the functions Mte_Wait() , Kb_Read() , Kb_WaitForKey() . If this is not done for more than ten seconds, the terminal will automatically reboot. That is, for example, if your application starts to stall in an endless loop, without calling these functions, the OS will consider that it has frozen and shut it down. If you have provided this very cycle (for example, the terminal is waiting for data to arrive from the port), then you need to not just hang, but call Mte_Wait(1).
Actually, this is the report that is printed during an emergency reboot.
NOS also has its own menu, which is used to load data and diagnose the device.
The application itself is universal for all terminals of the same architecture and NOS version no lower than the one for which it was compiled. However, it is possible to set the minimum system requirements when assembling the installation package, since different terminals have some differences in hardware, so it may turn out that not all functions of the application will be able to work correctly.
And here is the memory organization diagram (from the official documentation). The device is equipped with a RAM disk where you can store application data; protected models have a key storage.
❯ Login to NOS
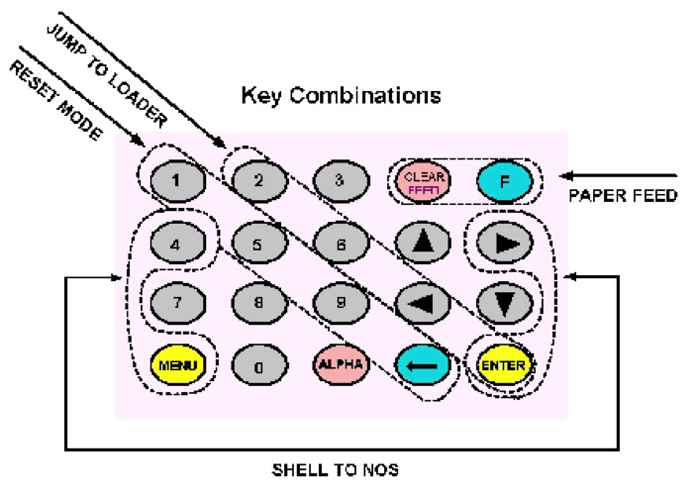
Unlike Ingenico Telium, where the manager was entered by selecting a menu item, the local service menu is opened by a combination of buttons.
The most important is the four 4 + Menu + -> + Enter, which allows you to enter the NOS menu (which you will have to do every time you load the application). Sometimes a bootloader is also needed, for example, if you accidentally put the terminal into an endless wait and it does not respond to the keyboard. In this case, you need to go to NOS Loader, select “Start NOS” and enter the password: 1947
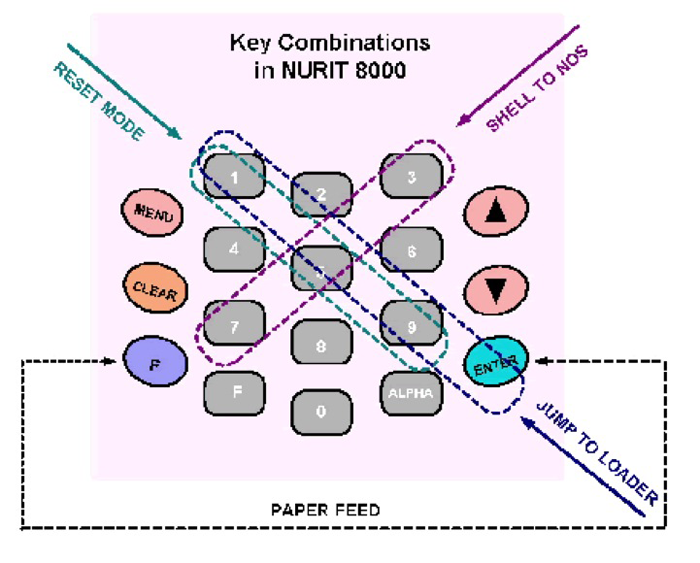
The same for Nurit 8000. Unfortunately, I don’t have the opportunity to fully launch it, since the connector for connecting to a PC is proprietary, and there is no analog I never found one for him to solder the cable.
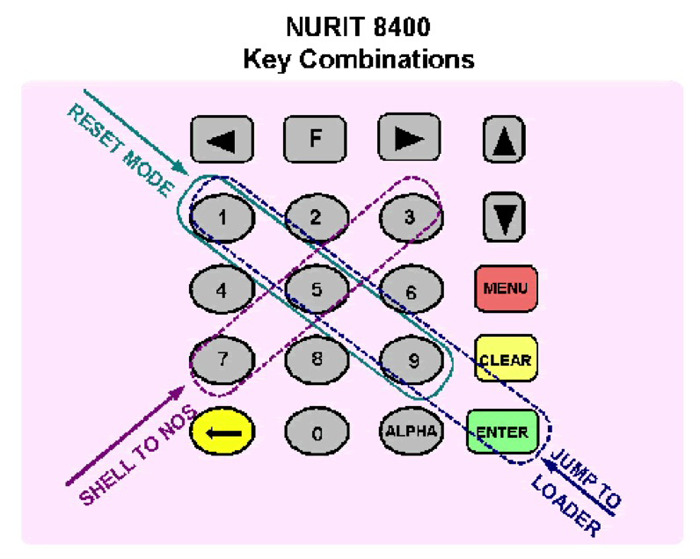
But for the Nurit 8400. I don’t have such a terminal, but I think it won’t be superfluous here.
❯ Install the software
Let's get started with installation and launch. From the downloaded archive you will need approximately the following:
- ARM-toolchain, which, in fact, will be used to assemble the program
- Libraries
- Nurit Software Development tools - application packager and downloader
- ADE - examples of projects
- LipHelp - developer reference
To load into the terminal you will need Fast Loader, you can download it here . OSP Loader will not work, and Smart Loader is very cumbersome and in most cases not needed.
Also, to run you will need a PC with Windows 2000 or XP or a virtual machine with it (it is highly desirable).
So, first, download ADE_ARM_1_7.49.00A.EXE from the ADE folder , then Nurit Software Development tools and Nurit Help. Installing all this is very simple and does not cause any problems.
Now it's the compiler's turn. It has a trial license, which specifically for the copy from the archive expired in ancient times. Therefore, we are moving the date to January 1, 2000 to ensure its functionality. This is precisely why it is advisable to install Windows on a virtual machine, so that such a date translation does not break the work of other software.
In the Compilador folder (archive, apparently, from somewhere in Brazil) lies hcarm_4.5a . Move this folder to the root of the system disk. In the system properties we find the environment variables, add C:\hcarm_4.5a;C:\hcarm_4.5a\bin;hcarm_4.5a\lib to Path . From the root of the archive we take CLKERN.DLL and drop it into the bin folder of the compiler.
In general, that's all. You can try to run it.
❯ We write the first program
Well, time to try to write something. In general, there is no traditional “test” program in the SDK. There is something in the ApplicationExample folder from the archive, but despite the simplicity of the project, I never managed to assemble it. So let's use what we have.
Go to the address C:\ADE_ARM\ADE_ARM7\SNGL_APL\SRC , open DEMO.C there, delete all the text there, and in return insert something like the following:
Code:
#include "project.def"
#include liptypes_def
#include nurit_def
#include kb_h
#include kbhw_h
#include mte_h
#include display_h
#include grphdisp_h
#include grphtext_h
#include grphtext_def
#include <string.h>
#include <stdio.h>
#include <stdlib.h>


void main (void){
    Display_SetFont(FONT_10X7);
    Display_Cls(DSPL1);
    Display_FormatWrite(DSPL1,1,LEFT_JST ,"Hello, Habr!");
    for(;;){
        Kb_WaitForKey();
    }
}
In addition to this file, there are two more files - dynamically linked libraries are loaded in DLMDECLR.C , and the application header is indicated in APPLHEAD.C . It looks something like this:
Code:
#include "project.def"
#include nurit_def
#include liptypes_def
#include applhead_def
#include dlmlinkr_def

extern void static_data_size(void);
extern DLMEntryData BaseDlmIndex;

static const application_header id =

              {
                APPL_SIGNATURE,                     /* Signatrue              */
                ((unsigned long)static_data_size),  /* End of Static data     */
                {'0','1','.','0','0'},              /* minimum NOS Version    */
                {"demo"},                           /* Application Name       */
                {'0','1','.','0','0'},              /* Application Version    */
                {"demo"},                           /* Appl Description       */
                {"06/06/01"},                       /* Date                   */
                0,                                  /* New header format      */
                0,                                  /* Number of DLMs         */
                DLMS_FIRST_DLM(BaseDlmIndex),       /* Pointer to DLM list    */
                0,                                  /* Industry type          */
                0,                                  /* Protocol type          */
                0,0                                 /* Spare bytes            */

              };
Here you can specify, in particular, the minimum NOS version, as well as the version and release date of the application itself. This can later be viewed in the “Application info” menu of NOS. The project.def
file also deserves special attention . And there is something like this:
Code:
/*----  SYSTEM DEFINITIONS  ----*/

#define PACKED _Packed
#define packed _Packed

/*--------------------------*/
/*----  8000 NOS FILES  ----*/
/*--------------------------*/

#define   liptypes_def "..\..\nos_api\liptypes.def"
#define   applhead_def "..\..\nos_api\applhead.def"
#define   dlmlinkr_def "..\..\nos_api\dlmlinkr.def"
#define   dlmhead_def  "..\..\nos_api\dlmhead.def"
#define   evd_hd_def   "..\..\nos_api\evd_hd.def"
#define   nurit_def    "..\..\nos_api\nurit.def"
#define   comhndlr_def "..\..\nos_api\comhndlr.def"
#define   formater_def "..\..\nos_api\formater.def"
#define   gsm_msg_def  "..\..\nos_api\gsm_msg.def"
#define   multiapp_def "..\..\nos_api\multiapp.def"
#define   atmmenu_def  "..\..\nos_api\atmmenu.def"
#define   winform_def  "..\..\nos_api\winform.def"
#define   encryptr_def "..\..\nos_api\encryptr.def"
#define   seckb_def    "..\..\nos_api\seckb.def"
#define   session_def  "..\..\nos_api\session.def"
#define   grphtext_def "..\..\nos_api\grphtext.def"
#define   grphdisp_def "..\..\nos_api\grphdisp.def"
#define   bmp_def "..\..\nos_api\bmp.def"
#define   colors_def "..\..\nos_api\bmp.def"

#define   dialtgts_prm "..\..\nos_api\dial_3.prm"
#define   rdiotgts_prm "..\..\nos_api\rdio_3.prm"
#define   comhndlr_prm "..\..\nos_api\comhnd_3.prm"
#define   modem_prm    "..\..\nos_api\modem_3.prm"
#define   at_radio_prm "..\..\nos_api\at_radio.prm"
#define   gsmradio_prm "..\..\nos_api\gsmradio.prm"

#define   applmngr_h   "..\..\nos_api\applmngr.h"
#define   appload_h    "..\..\nos_api\appload.h"
#define   atmhw_h      "..\..\nos_api\atmhw.h"
#define   atmmenu_h    "..\..\nos_api\atmmenu.h"
#define   barcode_h    "..\..\nos_api\barcode.h"
#define   caller_h     "..\..\nos_api\caller.h"
#define   cardrdr_h    "..\..\nos_api\cardrdr.h"
#define   comhndlr_h   "..\..\nos_api\comhndlr.h"
#define   cpuhw_h      "..\..\nos_api\cpuhw.h"
#define   des_h        "..\..\nos_api\des.h"
#define   display_h    "..\..\nos_api\display.h"
#define   dns_h        "..\..\nos_api\dns.h"
#define   eeprom_h     "..\..\nos_api\eeprom.h"
#define   errlog_h     "..\..\nos_api\errlog.h"
#define   fismem_h     "..\..\nos_api\fismem.h"
#define   formater_h   "..\..\nos_api\formater.h"
#define   ftp_h        "..\..\nos_api\ftp.h"
#define   fstp_h       "..\..\nos_api\fstp.h"
#define   grphtext_h   "..\..\nos_api\grphtext.h"
#define   grphdisp_h   "..\..\nos_api\grphdisp.h"
#define   gsmradio_h   "..\..\nos_api\gsmradio.h"
#define   icctrans_h   "..\..\nos_api\icctrans.h"
#define   iccsyn_h     "..\..\nos_api\iccsyn.h"
#define   kb_h         "..\..\nos_api\kb.h"
#define   kbhw_h       "..\..\nos_api\kbhw.h"
#define   keysldr_h    "..\..\nos_api\keysldr.h"
#define   link_h       "..\..\nos_api\link.h"
#define   modem_h      "..\..\nos_api\modem.h"
#define   mte_h        "..\..\nos_api\mte.h"
#define   multiapp_h   "..\..\nos_api\multiapp.h"
#define   params_h     "..\..\nos_api\params.h"
#define   printer_h    "..\..\nos_api\printer.h"
#define   prntutil_h   "..\..\nos_api\prntutil.h"
#define   protmngr_h   "..\..\nos_api\protmngr.h"
#define   phone_h      "..\..\nos_api\phone.h"
#define   ramdisk_h    "..\..\nos_api\ramdisk.h"
#define   rtc_h        "..\..\nos_api\rtc.h"
#define   rtcutil_h    "..\..\nos_api\rtcutil.h"
#define   sysutil_h    "..\..\nos_api\sysutil.h"
#define   statist_h    "..\..\nos_api\statist.h"
#define   stat_bar_h   "..\..\nos_api\stat_bar.h"
#define   soft_kb_h    "..\..\nos_api\soft_kb.h"
#define   sign_cap_h   "..\..\nos_api\sign_cap.h"
#define   seckbmst_h   "..\..\nos_api\seckbmst.h"
#define   scanner_h    "..\..\nos_api\scanner.h"
#define   safe_h       "..\..\nos_api\safe.h"
#define   touch_h      "..\..\nos_api\touch.h"
#define   test_h       "..\..\nos_api\test.h"
#define   tcpapi_h     "..\..\nos_api\tcpapi.h"
#define   util_h       "..\..\nos_api\util.h"
#define   uart_h       "..\..\nos_api\uart.h"
#define   winform_h    "..\..\nos_api\winform.h"

/*-----------------------------*/
/*------   DLM API files  -----*/
/*-----------------------------*/

#define   demoapi_api  "..\..\dlm1\src\demoapi.api"
#define   demo2api_api "..\..\dlm2\src\demo2api.api"
Why such difficulties with hundreds of defines and such strange renaming of files is absolutely unknown to me. So that when you move a folder to another location, you don’t have to rewrite the paths in the entire code? This way you can simply specify the path to the entire NOS_API in an environment variable, as was done in most other SDKs that I have seen. Anyway.
Next, go to RELEASE and delete everything in the OBJ folder that is there. Let's launch the batch file BUILD.BAT . If everything was done correctly, demo.log will remain empty, and demo.hex will appear in the RELEASE folder (or it will simply have a different modification date).
But demo.hex is not an application yet. To make it so, you need Application Integrator from Nurit Software Development Tools. Let's launch it.
In the window that opens, press the leftmost button on the panel, and in the window that opens, select our *.hex file. Before assembling the downloadable component, you can view information about the application (the same information that was specified in APPLHEAD.C ) or set restrictions.
Here is an example of setting restrictions: for example, you can set the mandatory presence of any ports if your application uses them.
Now click the second button on the panel, and a ready-made package for downloading to the terminal will be created.
❯ Signing applications
According to the level of protection, Nurit terminals are divided into two types - Secured and NOT Secured. The differences between them are that the “unprotected” device does not use tampers (that is, it can be disassembled and nothing will be done to it), downloading an application from one terminal to another is allowed, and some restrictions are set on cryptography. There are also hardware differences, for example, the protected terminals inside are filled with resin. You can find out what type of terminal your terminal is by opening NOS, selecting “Terminal ID”, and then exiting it. In this case, Terminal is Secured or Terminal is NOT Secured will light up on the screen for a couple of seconds . The tamper from the protected terminal is removed by flashing the OS using OSP Loader.
If an application is loaded into a “secure” terminal, it must be signed (alas, I don’t know which software). Five hundred and twelve bytes are allocated for this signature in the corresponding field in the header.
Most likely, you will get the “simple” option, since OSMP and similar organizations did not use cryptographic functions.
❯ Fast Loader
Now you can download the application to the terminal. In general, Lipman provided a terminal emulator for ease of debugging, but it didn’t reach me, alas.
To do this, we need a cable for the COM port and, in fact, a download tool.
The cable diagram here is like this:
All you need for assembly is a piece of patch cord and a DB9F connector. There are seven wires from the computer to the terminal, but in reality only three are enough to boot: RX, TX, GND. The download cable for VeriFone is also suitable; the pinout is identical.
The order of contacts is visible here:
(if anything, the video is not about Nurit at all, but about VeriFone VX520. I took this screenshot more than three years ago for cable pinout)
In this photo, the red wire is ground, white and black are RX and TX.
The terminal has a 10P10C connector, but the outer contacts are not used, so you can plug in a regular 8P8C network connector there, and it will work too.
Next, open Fast Loader (or simply open the assembled application, and it will launch itself). Here we configure the port parameters.
Now it's the terminal's turn. Go to NOS, select “Download”. Next, press Enter and type any number (even “111”). You must type something, otherwise there will be an error when you try to download something.
Select “Comm Prm” to set the connection parameters.
We specify the COM1 port and the same speed that we configured in Fast Loader.
Next, select “Manual load” and confirm your action.
Now we connect our unit to the computer. Launch Fast Loader and click “Load appl” on the terminal. After a few seconds, the PC and our device will establish a connection, and “Starting DCP” will soon change to “Erasing sectors”, and then to the loading progress bar. We exit the menu, NOS will reboot. And, if we haven’t messed up anywhere, something like this should appear on the display:
❯ Fonts
Of course, the terminal is not limited to just one font. You can change them like this:
Code:
  Display_Cls(DSPL1);
    Display_SetFont(FONT_13X7);
    Display_FormatWrite(DSPL1,1,LEFT_JST ,"Hello, Habr!");
    Display_SetFont(FONT_10X7);
    Display_FormatWrite(DSPL1,2,LEFT_JST ,"from MaFrance351");
And this is what it looks like in action.
❯ A printer
Of course, I want to print something. I didn’t want to limit myself to just text, so I decided to try some pictures at the same time.
So, we take a BMP, convert it to monochrome and set the width to strictly 384 pixels (this is the resolution of the print head in the terminal). Next, open some program that allows you to convert the image into an array. I used LCD Assistant. Rename the resulting file to myimage.c and drop it into the project folder. The array itself must have a line-by-line orientation (one byte - eight pixels from a horizontal line). The program for all this turned out like this:
Code:
#include "project.def"
#include "myimage.c"
#include liptypes_def
#include nurit_def
#include printer_h
#include prntutil_h
#include kb_h
#include kbhw_h
#include mte_h
#include display_h
#include grphdisp_h
#include grphtext_h
#include grphtext_def
#include <string.h>
#include <stdio.h>
#include <stdlib.h>

    static ExGraphicsDescriptor   egd = { EX_SINGLE_LINEAR, /*graphical mode */
                                          EX_DIRECT,  /*0 - use a pointer to the data - static array*/
                                          48,  /*bytes in one line can be less or equal to the number set in mode*/
                                          403, /*number of lines*/
                                          EX_ALLIGN_CENTRE, /*bmp allignement*/
                                          {0,0,0,0,0,0,0,0} /*must be 0*/
                                        };

void main(void)
{
    byte key;
    Display_SetFont(FONT_13X7);
    Display_Cls(DSPL1);
    Display_FormatWrite(DSPL1,1,LEFT_JST ,"Printer test");
    Mte_Wait(2000);
    Printer_LineSpacing (0,FALSE);

    while(1)
    {
        key = Kb_WaitForKey();
        if (key == '1')
        {
                    while(!Printer_WriteStr("I'm printing\n"));;
                    while(!Printer_WriteStr("on Nurit 8320!\n"));;
                                        while(!Printer_WriteStr("\n\n\n"));;
                    while(!Printer_PrintBitMap (&egd,(byte*)myBMP));;
        }
    }
}
And here is the result. Please note that you must wait until each item is printed, otherwise subsequent data sent to the printer will be ignored.
❯DSCh
As an example of what is actually used in cryptography, consider working with a random number generator.
Code:
#define nos_h "..\..\nos_api\nos.h"
#include "project.def"
#include <stdio.h>
#include <string.h>
#include <stdlib.h>
#include <stdio.h>
#include <string.h>
#include <stdlib.h>
#include "project.def"
#include nurit_def
#include random_h
#include kb_h
#include mte_h
#include display_h
#include grphdisp_h
#include grphtext_h
#include grphtext_def
#include cardrdr_h
#include printer_h
#include prntutil_h

 void main(void)
 {

    char   toLCD[64];
    usint  random_num;

    Display_Cls(DSPL1);
    Display_WriteStr(DSPL1,"Press any key");
    while(1)
    {
        Kb_WaitForKey();
        random_num = Random_GetRnd();
        sprintf( toLCD, "Random No:  %u", random_num );
        Display_WriteStr(DSPL1, toLCD);

    }
         }
The manufacturer claims that the terminal is equipped with a hardware randomizer, that is, the values displayed on the screen are not pseudo-random.
❯ Magnetic reader
Let's try to read a card with a magnetic stripe. This is done quite easily here:
Code:
#include <stdio.h>
#include <string.h>
#include <stdlib.h>
#include "project.def"
#include nurit_def
#include kb_h
#include mte_h
#include display_h
#include grphdisp_h
#include grphtext_h
#include grphtext_def
#include cardrdr_h
#include printer_h
#include prntutil_h

void main(void)
{
    sint tr1_error, tr2_error;
    char *get_tr2;
    Display_Cls(DSPL1);
    CardRdr_SetBeepTime(200);
    CardRdr_Enable();
        while(1)
        {
            Display_WriteStr(DSPL1,"Swipe card");
            while (!CardRdr_IsCardCompleted(&tr1_error,&tr2_error)) Mte_Wait(1);
            get_tr2 = (char*)CardRdr_GetTrack2() + 1;
            Display_FormatWrite(DSPL1, 1, LEFT_JST, get_tr2);
            Mte_Wait(2000);
        }
}
Here you can see how waiting for something can be handled. If you simply keep the terminal down in a loop until the card is read, the OS will time out the application. Therefore, the delay function is constantly called here, transferring control to the OS.
❯ Menu
And finally, let's see how the user interface is implemented. There are also special functions for this that allow you to display menus and dialog boxes. Of course, compared to VeriFone devices based on Verix OS, the space here is much smaller, but it’s still much more convenient than displaying it all manually.
Here I decided not to invent my own crutch, but to see what the documentation had to say about it. There is such an example there.
❯ Something like that
Of course, this has no practical application for a long time. These terminals are forever consigned to history, and for quite some time now. Nevertheless, the device in question turned out to be very interesting. And the presence of a detailed developer’s guide, where all functions are described in detail and examples of use are given, cannot but rejoice. I will also note that Nurits are much more oak than the previously reviewed Telium and are much more protected from incorrect operator actions (unlike Telium, you have to try harder to brick such a device), which is why such a terminal can be successfully used for some of your own purposes ( for example, as a control panel or portable thermal printer).
And, of course, my experiments with POS terminals do not end there. In particular, I do not lose hope of finding software for even more relict devices (VeriFone SC 5000, Ingenico Unicapt32, Hypercom, Datacard, Innovatron Terminaux). You can try to write some game or demo for it . And, of course, you can try to make a simulator of a payment application that would use most of the terminal functions such as cryptography and data storage.
So it goes.