Hello! We develop mobile applications and high-load projects for large businesses, and almost never projects do without the implementation of payment systems. In this article, we will look at the integration of the Stripe payment system in a Flutter application, and then we will take a little walk further into the wild, beyond mobile applications. I will tell you how electronic payment systems work using the example of GooglePay and ApplePay and how they are connected to payment gateways. Let's look at the security aspects that are important to keep in mind and get acquainted with the PCI DSS standard.

The modern user is accustomed to having the ability to pay in a mobile application. He no longer wonders whether it is safe to make an online payment, or how his bank card data will be protected from intruders during the transaction. But if you are a developer of mobile applications or backend services, then you cannot help but worry about this issue. An experienced developer knows the pitfalls of integration with payment systems, and also foresees the consequences of poor-quality integration.
First we need to set publishableKey for our application.
Stripe has 2 main types of keys - publishableKey, which is used, for example, in a mobile application, and secretKey, which must be on the server. Orders in Stripe (PaymentIntent) are created on the server using secretKey.
To create an order, we will transfer the order details to our backend, which has already been integrated with the payment gateway. The request could look, for example, like this:
Please note that we do not transmit any price tags to the backend. We only transmit what we want to buy, as well as, for example, promotional codes. The backend itself determines the cost. He and only he can know what should cost and how much. In another case, an attacker can use a modified client and create an order with any value.
In response to the request, the backend will return you the details of the newly created order. It will contain various data that describes this order. All this is arbitrary and to taste. The most important thing that the backend will return to you is client_secret:
client_secret is the unique key of the PaymentIntent. It consists of the PaymentIntent id and a secret string. This key allows the client to work with the PaymentIntent object using it and the publishableKey. It is for this secret that the client will make his payments in Stripe.
We will use Stripe Elements to enter card details. This is a set of widgets that is designed in such a way that you won’t even physically receive the card data in the code. And that's good! We don't want to see them because they are scary. Let's place the CardField widget:
In the widget you can specify your own styling parameters, for example, we just specified the text color. As you can see, the widget does not provide for any data exchange with the outside world. We cannot pass any input event handler or controller into it. Internally, this widget is rendered as a native component depending on the OS. The editable value is not available in our client code and is set globally in the Stripe SDK code. This widget is convenient because it itself validates card data, and also determines the card vendor and displays its icon.
Let's assume the user has entered their details. Now is the time to send a payment confirmation request to Stripe:
PaymentMethodParams in this case simply acts as a label indicating that we are going to pay using the card details that we entered through Stripe Elements. StripeException contains detailed information about the failed payment. From it you can get a message, for example, about an insufficient card balance or a 3dsecure processing error.
The confirmPayment method returns a PaymentIntent object. From it you can get order data: cost, currency and, most importantly, status.
One of the conveniences of Stripe is automatic 3DSecure processing. When calling confirmPayment, if 3DSecure is required, Stripe SDK itself will open a page with the OTP code entered. In this case, Future will hang in the pending state until the user understands 3DSecure. This saves a lot of time.
Did you notice anything? We didn't learn anything about the user's card data! They did not affect our backend servers or even our application on the Flutter side. We have delegated the security of this sensitive data to Stripe. Stripe itself will receive this data and then transfer it to its servers in a secure way and will use it for payment.
If you need to save the card for future payments in the application, you can create a PaymentMethod:
Calling this method will also update the card data in the global Stripe SDK object. But you will have to thoroughly make sure that you do not log card data by mistake, do not save it anywhere, and do not transfer it anywhere.
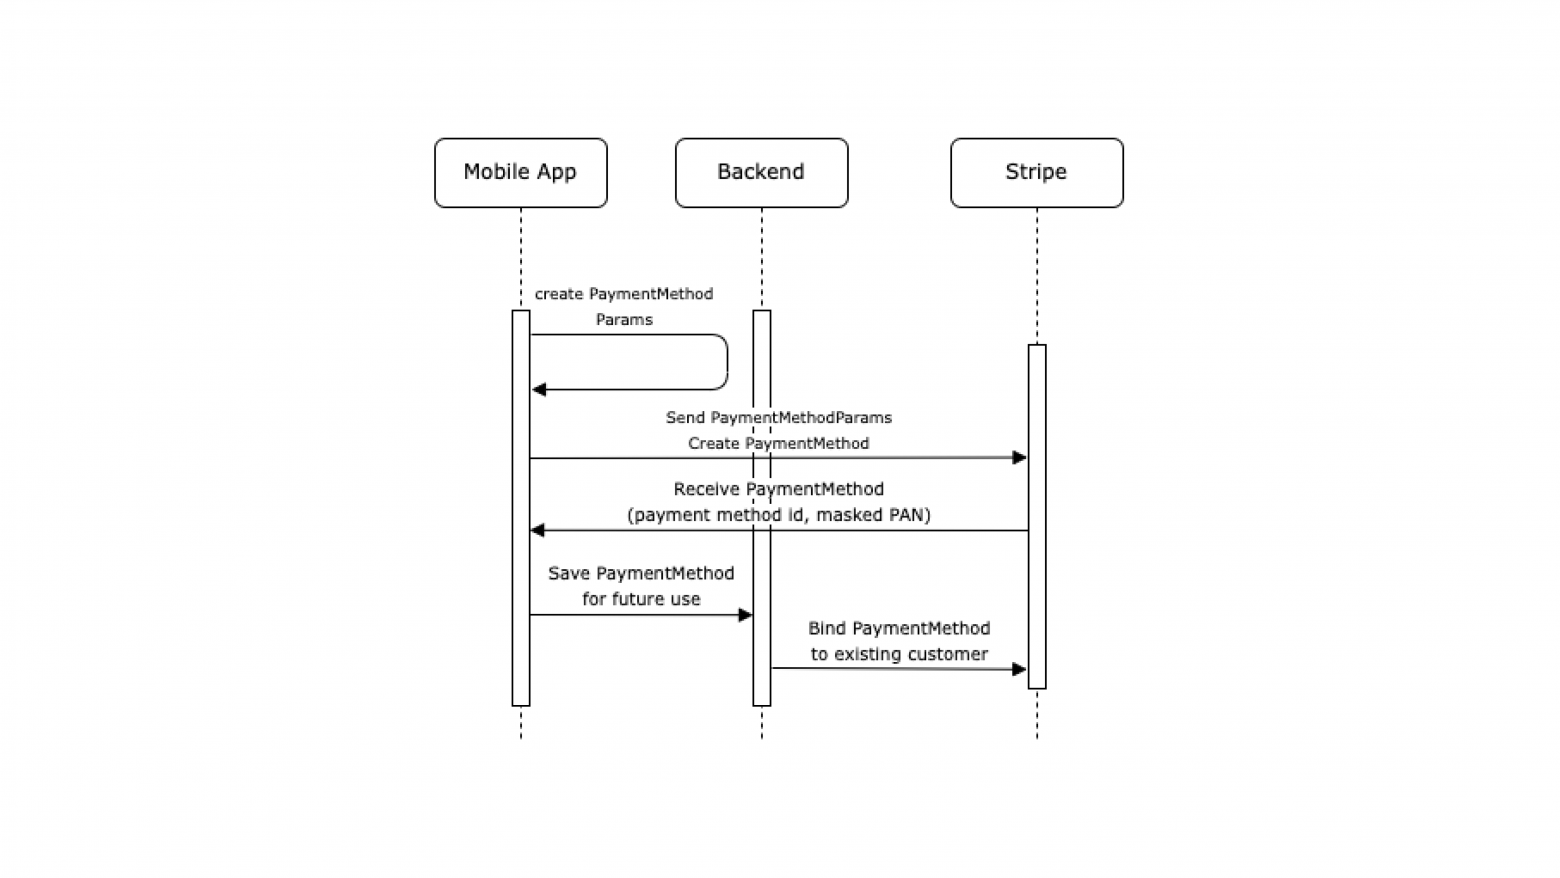
Below is a sequence diagram for creating an order and payment instrument.
Creating an order:

Creating a means of payment:
The most important entities in Stripe are PaymentIntent and PaymentMethod. PaymentMethod is any means of payment that can be used to make a payment. Stripe supports many different tools. For example, you can save the card and pay using ApplePay, GooglePay, Kiwi wallet. To pay using a PaymentMethod, you will need the id of this PaymentMethod, which you will receive upon creation. This token doesn't even contain card data, so it's useless to a potential attacker (however, these tokens still need to be stored in a secure location, as Stripe's documentation says).
It's also worth mentioning the Customer entity. PaymentMethods can be linked to Customer for protection. A linked PaymentMethod can only be used to pay for orders issued to the same Customer to which the PaymentMethod is linked. Let's create a buyer and link a payment instrument to it:
The newly created means of payment can be used only once (to pay for any order, including the order of any buyer). To make subsequent payments, you need to link the payment instrument to the buyer. The buyer's payment method can only be used to pay for orders that are linked to the same buyer. Anonymous orders cannot be paid for. It is a good practice to immediately bind the PaymentMethod to the Customer after creation if you intend to use this PaymentMethod in the future (example - saving a card in the application).
How it works? When you select a card in the native GooglePay popup, you receive a token for this card. This token is reusable, but is not used directly by us (the merchant). We pass it to Stripe, receiving a PaymentMethod in return, or we immediately confirm the PaymentIntent with its help.
To work with electronic payment systems, the pay plugin is useful. Flutter Stripe SDK supports it and allows you to process tokens. Regardless of the payment gateway you choose, you will have to configure payment profiles. Payment profile is a json that stores your MerchantId, and can also contain other necessary payment gateway data in a custom format. In addition, you can specify which card networks you use (visa, mastercard) and other parameters.
This is what a payment profile for using GooglePay with Stripe might look like:
Be sure to indicate these profiles in the pubspec.yaml assets:
When using GooglePay, you can specify that payments will be made in a test environment. Very convenient for testing! You can use any saved cards, the funds will remain on your card, but, for example, buyer data will be pulled from GooglePay.
After setting up payment profiles, you can proceed directly to writing code. First of all, you need to download the profiles.
The pay plugin does not have any global object for storing configuration, so you will have to manage the plugin object yourself. For example, you can register it as a Singleton, as shown above.
The plugin allows you to check the electronic payment systems available on the user’s device:
The Stripe SDK method PaymentMethodParams.cardFromToken creates a familiar PaymentMethodParams object with a GooglePay token. This object can then be used to pay or create a means of payment, as was shown earlier in the case when payment was made by card.
Key safety aspects to pay attention to:
Separately, I note that this article refers specifically to the standard version 3.2.1. In 2022, the PCI Council introduced version 4.0 of the standard, but it will not fully come into force until March 31, 2025. The version 4.0 standard puts forward more stringent requirements for merchants.
PCI DSS involves checking your system for vulnerabilities that could compromise the payment information of your application users. The standard describes the following verification options:
The standard also describes data that is not confidential. There are no special requirements for their use. You can receive and process them, as well as store them. Such data includes, for example, the anonymized card number (last 4 digits) or the card brand. It's even useful to use this data to help your user visually identify a saved map in the app.
Merchant levels. Merchant levels were mentioned above. The merchant's level reflects his degree of responsibility. There are four levels in total. The level depends on the number of transactions per year. A level 4 merchant implies a minimum of responsibility, a level 1 merchant means a maximum. Tier 1 merchants are merchants who conduct more than 6 million transactions per year. Self-assessment sheets are not used for such merchants. They must engage an audit company to confirm their compliance with PCI DSS.
The modern user is accustomed to having the ability to pay in a mobile application. He no longer wonders whether it is safe to make an online payment, or how his bank card data will be protected from intruders during the transaction. But if you are a developer of mobile applications or backend services, then you cannot help but worry about this issue. An experienced developer knows the pitfalls of integration with payment systems, and also foresees the consequences of poor-quality integration.
Stripe SDK for Flutter. Integration example.
Let's start right away with a specific example of integration. Let's consider the integration of payment using a new card. Stripe provides an official SDK for Flutter - https://pub.dev/packages/flutter_stripe.First we need to set publishableKey for our application.
Code:
Stripe.publishableKey = 'YOUR_PUBLISHABLE_KEY';Stripe has 2 main types of keys - publishableKey, which is used, for example, in a mobile application, and secretKey, which must be on the server. Orders in Stripe (PaymentIntent) are created on the server using secretKey.
To create an order, we will transfer the order details to our backend, which has already been integrated with the payment gateway. The request could look, for example, like this:
Code:
await _dio.request(
     '/order/',
     options: Options(method: HttpMethod.post),
     data: {
       'products': [
         {'productId': 1, 'amount': 2},
         {'productId': 14, 'amount': 1},
         {'productId': 4, 'amount': 11},
       ]
     },
   );
Please note that we do not transmit any price tags to the backend. We only transmit what we want to buy, as well as, for example, promotional codes. The backend itself determines the cost. He and only he can know what should cost and how much. In another case, an attacker can use a modified client and create an order with any value.
In response to the request, the backend will return you the details of the newly created order. It will contain various data that describes this order. All this is arbitrary and to taste. The most important thing that the backend will return to you is client_secret:
Code:
{
   "client_secret": "pi_3M2cdHIeSIdLVBri2yWPzgXo_secret_XBrtcPcmxnaQlzxzkf7Su53IP",
   ...
}
client_secret is the unique key of the PaymentIntent. It consists of the PaymentIntent id and a secret string. This key allows the client to work with the PaymentIntent object using it and the publishableKey. It is for this secret that the client will make his payments in Stripe.
We will use Stripe Elements to enter card details. This is a set of widgets that is designed in such a way that you won’t even physically receive the card data in the code. And that's good! We don't want to see them because they are scary. Let's place the CardField widget:
Code:
CardField(
 style: TextStyle(color: Colors.black),
)
In the widget you can specify your own styling parameters, for example, we just specified the text color. As you can see, the widget does not provide for any data exchange with the outside world. We cannot pass any input event handler or controller into it. Internally, this widget is rendered as a native component depending on the OS. The editable value is not available in our client code and is set globally in the Stripe SDK code. This widget is convenient because it itself validates card data, and also determines the card vendor and displays its icon.
Let's assume the user has entered their details. Now is the time to send a payment confirmation request to Stripe:
Code:
  try {
     final intent = await Stripe.instance.confirmPayment(
       clientSecret,
PaymentMethodParams.card(
         paymentMethodData: PaymentMethodData(),
       ),
     );


     return intent;
   } catch (error) {
     if (error is StripeException) {
       final errorMessage =
           error.error.message ?? CustomErrorObject.defaultErrorCaption;
       throw CustomErrorObject(errorMessage);
     }


     throw CustomErrorObject(CustomErrorObject.defaultErrorCaption);
   }
PaymentMethodParams in this case simply acts as a label indicating that we are going to pay using the card details that we entered through Stripe Elements. StripeException contains detailed information about the failed payment. From it you can get a message, for example, about an insufficient card balance or a 3dsecure processing error.
The confirmPayment method returns a PaymentIntent object. From it you can get order data: cost, currency and, most importantly, status.
One of the conveniences of Stripe is automatic 3DSecure processing. When calling confirmPayment, if 3DSecure is required, Stripe SDK itself will open a page with the OTP code entered. In this case, Future will hang in the pending state until the user understands 3DSecure. This saves a lot of time.
Did you notice anything? We didn't learn anything about the user's card data! They did not affect our backend servers or even our application on the Flutter side. We have delegated the security of this sensitive data to Stripe. Stripe itself will receive this data and then transfer it to its servers in a secure way and will use it for payment.
If you need to save the card for future payments in the application, you can create a PaymentMethod:
Code:
final paymentMethod = await Stripe.instance.createPaymentMethod(
       const PaymentMethodParams.card(
         paymentMethodData: PaymentMethodData(),
       )
 );[CODE]

As you can see, in both cases the PaymentMethodParams object is used. It is with its help that we transfer payment instrument data (bank card or GooglePay token).

[HEADING=3]Another way to enter card details[/HEADING]
Let's say that Stripe Elements doesn't suit you for some reason, and you want to enter card details in your own widget. You can use the dangerouslyUpdateCardDetails method:

     [CODE]Stripe.instance.dangerouslyUpdateCardDetails(
       CardDetails(
         number: '4242424242424242',
         cvc: '123',
         expirationMonth: 12,
         expirationYear: 25
       ),
     );
Calling this method will also update the card data in the global Stripe SDK object. But you will have to thoroughly make sure that you do not log card data by mistake, do not save it anywhere, and do not transfer it anywhere.
Below is a sequence diagram for creating an order and payment instrument.
Creating an order:
Creating a means of payment:
Stripe. What can we even do with it?
In this section we are already moving away from the usual Flutter environment. How to create a PaymentIntent in Stripe? In general, you can completely experiment with Stripe to your heart's content using the " Test mode " and http client. If you're in the development stage and the backend is having problems with integration while you're on a deadline, you can send requests via curl and test your integration that way. The official Stripe API documentation has examples of requests using curl. Example of creating a PaymentIntent:
Code:
curl -X POST https://api.stripe.com/v1/payment_intents \
 -u $SECRET_KEY
 -d amount=2000 \
 -d currency=usd \
 -d "payment_method_types[]"=card
Answer:

{
 "id": "pi_3M9XDnIeSIdLVBri2QhaeCyl",
 "object": "payment_intent",
 "amount": 2000,
 ...
 "client_secret": "pi_3M9XDnIeSIdLVBri2QhaeCyl_secret_iTY9NP9CuAW9sNbqdDBJ3hAz0",
 ...
 "currency": "usd",
 ...
}
Secret key allows you to request PaymentIntent data even without client_secret:

curl -X GET https://api.stripe.com/v1/payment_intents/pi_3M2cdHIeSIdLVBri2yWPzgXo \
  -u $SECRET_KEY


# Ответ
{
   "id": "pi_3M2cdHIeSIdLVBri2yWPzgXo",
   "object": "payment_intent",
  "amount": 2000,
   ...
   "currency": "usd",
   ...
}
The most important entities in Stripe are PaymentIntent and PaymentMethod. PaymentMethod is any means of payment that can be used to make a payment. Stripe supports many different tools. For example, you can save the card and pay using ApplePay, GooglePay, Kiwi wallet. To pay using a PaymentMethod, you will need the id of this PaymentMethod, which you will receive upon creation. This token doesn't even contain card data, so it's useless to a potential attacker (however, these tokens still need to be stored in a secure location, as Stripe's documentation says).
It's also worth mentioning the Customer entity. PaymentMethods can be linked to Customer for protection. A linked PaymentMethod can only be used to pay for orders issued to the same Customer to which the PaymentMethod is linked. Let's create a buyer and link a payment instrument to it:
Code:
curl https://api.stripe.com/v1/customers \
 -u $SECRET_KEY \
 -d description="Test customer"
# cus_MthUiCmgGHkVlN


curl https://api.stripe.com/v1/payment_methods \
 -u $SECRET_KEY \
 -d type=card \
 -d "card[number]"=4242424242424242 \
 -d "card[exp_month]"=11 \
 -d "card[exp_year]"=2024 \
 -d "card[cvc]"=313
# pm_1M9vBTIeSIdLVBri2X5xuNBQ


curl https://api.stripe.com/v1/payment_methods/pm_1M9vBTIeSIdLVBri2X5xuNBQ/attach \
 -u $SECRET_KEY \
 -d customer=cus_MthUiCmgGHkVlN
The newly created means of payment can be used only once (to pay for any order, including the order of any buyer). To make subsequent payments, you need to link the payment instrument to the buyer. The buyer's payment method can only be used to pay for orders that are linked to the same buyer. Anonymous orders cannot be paid for. It is a good practice to immediately bind the PaymentMethod to the Customer after creation if you intend to use this PaymentMethod in the future (example - saving a card in the application).
Electronic payment systems. Integration example.
Electronic payment systems are the familiar ApplePay and GooglePay. You save the card, for example, in GooglePay and can pay for purchases without entering data.How it works? When you select a card in the native GooglePay popup, you receive a token for this card. This token is reusable, but is not used directly by us (the merchant). We pass it to Stripe, receiving a PaymentMethod in return, or we immediately confirm the PaymentIntent with its help.
To work with electronic payment systems, the pay plugin is useful. Flutter Stripe SDK supports it and allows you to process tokens. Regardless of the payment gateway you choose, you will have to configure payment profiles. Payment profile is a json that stores your MerchantId, and can also contain other necessary payment gateway data in a custom format. In addition, you can specify which card networks you use (visa, mastercard) and other parameters.
This is what a payment profile for using GooglePay with Stripe might look like:
Code:
{
   "provider": "google_pay",
   "data": {
     "environment": "TEST",
     "apiVersion": 2,
     "apiVersionMinor": 0,
     "allowedPaymentMethods": [
       {
         "type": "CARD",
 "tokenizationSpecification": {
           "type": "PAYMENT_GATEWAY",
           "parameters": {
             "gateway": "stripe",
             "stripe:version": "2018-10-31",
             "stripe:publishableKey": "***"
           }
         },
         "parameters": {
           "allowedCardNetworks": ["VISA", "MASTERCARD"],
           "allowedAuthMethods": ["PAN_ONLY", "CRYPTOGRAM_3DS"],
           "billingAddressRequired": true,
           "billingAddressParameters": {
             "format": "FULL",
             "phoneNumberRequired": true
           }
         }
       }
     ],
     "merchantInfo": {
       "merchantId": "***",
       "merchantName": "My merchant name"
     },
     "transactionInfo": {
       "countryCode": "US",
       "currencyCode": "USD"
     }
   }
 }
And for ApplePay:

{
 "provider": "apple_pay",
 "data": {
   "merchantIdentifier": "merchant.ru.mycompany.myapp.ios",
   "displayName": "My app",
   "merchantCapabilities": ["3DS", "debit", "credit"],
   "supportedNetworks": ["amex", "visa", "discover", "masterCard"],
   "countryCode": "US",
   "currencyCode": "USD",
   "requiredBillingContactFields": [
   "emailAddress",
     "name",
     "phoneNumber",
     "postalAddress"
   ],
   "requiredShippingContactFields": [],
   "shippingMethods": []
 }
}
Be sure to indicate these profiles in the pubspec.yaml assets:
Code:
assets:
   - assets/payment_profile_google_pay.json
   - assets/payment_profile_apple_pay.json
When using GooglePay, you can specify that payments will be made in a test environment. Very convenient for testing! You can use any saved cards, the funds will remain on your card, but, for example, buyer data will be pulled from GooglePay.
After setting up payment profiles, you can proceed directly to writing code. First of all, you need to download the profiles.
Code:
GetIt.instance.registerSingleton<Pay>(
   Pay.withAssets([
     'payment_profile_google_pay.json',
     'payment_profile_apple_pay.json',
   ]),
 );
The pay plugin does not have any global object for storing configuration, so you will have to manage the plugin object yourself. For example, you can register it as a Singleton, as shown above.
The plugin allows you to check the electronic payment systems available on the user’s device:
Code:
 googlePayAvailable = await payClient.userCanPay(PayProvider.google_pay);
 applePayAvailable = await payClient.userCanPay(PayProvider.apple_pay);
Depending on the available systems, you choose your preferred one. Although we usually only have one of the two, there is no denying the possibility of other systems that can exist together on a user's device without conflicting (or, for example, there may be a device on which neither of the above is available).
Finally, we request a system popup from GooglePay:

 final result = await pay.showPaymentSelector(
     provider: PayProvider.google_pay,
     paymentItems: [
       PaymentItem(
         label: 'Total',
         amount: '99.99',
         status: PaymentItemStatus.final_price,
       )
     ],
   );


   final token = result['paymentMethodData']['tokenizationData']['token'];


   final tokenJson = Map.castFrom(jsonDecode(token));
   // здесь в игру вступает Stripe SDK
   final params = PaymentMethodParams.cardFromToken(
     paymentMethodData: PaymentMethodDataCardFromToken(
       token: tokenJson['id'],
     ),
   );
The Stripe SDK method PaymentMethodParams.cardFromToken creates a familiar PaymentMethodParams object with a GooglePay token. This object can then be used to pay or create a means of payment, as was shown earlier in the case when payment was made by card.
Conclusion
The article looked at an example of integrating the Stripe payment gateway into a Flutter application.Key safety aspects to pay attention to:
- Card details. You must handle them with the utmost care. Never pass them through your API to the server (unless you want to fill out the SAQ D yourself and do the ASV scan). Ideally, you should not have any access to them (as is the case with Stripe Elements, for example).
- Saved cards. You must be sure that the stored tokenized card cannot be used for anything other than paying for orders of the user who owns the card.
- Prices. The backend should not accept any data about the cost of goods from the application. The backend itself and only itself determines the cost and issues an invoice.
- Keys. Only the public key is intended for use in the application. Make sure that the private key cannot be obtained in any way from your server.
- Anonymized card data. You can use non-sensitive card data so that the user can recognize his card and select the one he wants to use for payment now. Such data includes, for example, the last 4 digits of the card number and the card brand.
- Payment gateway documentation. Carefully review your service provider's documentation. Often there you will find security warnings as well as integration recommendations that will help you minimize possible risks.
Addendum. PCI DSS. What is it and why would you want nothing to do with it?
About the standard in general terms
PCI DSS is the payment card industry security standard. It is approved by the largest payment systems (Visa, MasterCard, American Express) and describes the requirements that must be met to ensure payment security. In terminology, there are two main participants in the process. TSP (trade and service enterprise, merchant, that is, we) and service provider (payment gateway). There is also a payment brand (visa, mastercard) and an acquirer (bank).Separately, I note that this article refers specifically to the standard version 3.2.1. In 2022, the PCI Council introduced version 4.0 of the standard, but it will not fully come into force until March 31, 2025. The version 4.0 standard puts forward more stringent requirements for merchants.
PCI DSS involves checking your system for vulnerabilities that could compromise the payment information of your application users. The standard describes the following verification options:
- SAQ – self-assessment sheet. There are several types, for example,
SAQ A for companies that have completely delegated the processing of payment data to a third party (a payment gateway that complies with PCI DSS requirements).
SAQ A-EP is for companies that have fully delegated the processing of payment data to a third party (a payment gateway that is PCI DSS compliant) but may have an impact. This often applies to sites with custom input fields for card details, as XSS attacks can be used to phishing payment data.
SAQ D is for companies that do not qualify for other SAQ types. For example, your server accepts payment information.
The service provider (payment gateway) can fill out the self-assessment sheets for you, just like Stripe does, without you having to spend time doing it. This applies to SAQ A, but does not apply to SAQ D, which you will have to complete yourself. - ASV scanning . An ASV scan is a vulnerability scan conducted by a certified scanning vendor. In the case of SAQ A, you do not need to perform an ASV scan. But SAQ D already implies quarterly scans.
- QSA audit A system audit conducted by an independent third party. Typically applies to Tier 1 merchants.
Confidential data
The standard defines the concept of “ sensitive data ” . These include, for example, magnetic tape data, cvc code, pin code. According to PCI DSS, this data can be transferred and processed (if you comply with the standard, of course), but it cannot be stored anywhere (even your service provider must delete it). If this is necessary, the standard involves discussing this issue with the payment brand. Is it worth considering the question of what will happen if some merchant that does not comply with the standard stores this data on its server?The standard also describes data that is not confidential. There are no special requirements for their use. You can receive and process them, as well as store them. Such data includes, for example, the anonymized card number (last 4 digits) or the card brand. It's even useful to use this data to help your user visually identify a saved map in the app.
Merchant levels. Merchant levels were mentioned above. The merchant's level reflects his degree of responsibility. There are four levels in total. The level depends on the number of transactions per year. A level 4 merchant implies a minimum of responsibility, a level 1 merchant means a maximum. Tier 1 merchants are merchants who conduct more than 6 million transactions per year. Self-assessment sheets are not used for such merchants. They must engage an audit company to confirm their compliance with PCI DSS.
Risks
Failure to comply with the PCI DSS standard may result in a fine from companies providing electronic payment services. There is also a fine for data leaks. Among other things, failure to comply with the standard can lead to legal proceedings against your company.Sources
- A guide to PCI compliance
- Security at Stripe. Integration security guide
- Cloudpayments / Infrastructure / PCI DSS
- FAQ: Can card verification codes/values be stored for card-on-file or recurring transactions?
- PCI DSS standard 3.2.1
- Stripe API Reference
- Cloudpayments. Payment by cryptogram
- Payment Card Industry (PCI). Data Security Standard. Self-Assessment Questionnaire D and Attestation of Compliance for Merchants
- When are ASV scans required?
- Do or Do Not – ASV for SAQ A
- 5 CONSEQUENCES TO PCI NON-COMPLIANCE