BadB
Professional
- Messages
- 2,568
- Reaction score
- 2,792
- Points
- 113

Hydra? BUT? Who Said Hydra?
I said GHIDRA. This is a framework for SRE (software reverse engineering), or in Russian, reverse software from NSA. Yes, the US NSA gave us this opportunity.
In this article we will walk through the installation process, initial configuration, see how to download projects and consider using a simple “crackme” CTF as an example.
I do not consider myself an expert either on reverse, in general, or, moreover, on this instrument, in particular. We will briefly go over the main advantages of the tool and take a look at its disadvantages. If you need a course on GHIDRA, you can watch it on YouTube, it seems like the NSA itself has made some short guide for this great tool.
To use this tool, you need at least a rudimentary knowledge of assembler and PC architecture.
What is GHIDRA?
This is a platform for reverse or, simply, disassembly, code from the NSA. It includes a disassembly tool for different architectures, as well as a decompiler (which pleases me, because the same popular IDA does not have a decompiler for everything). With the light hand of the NSA, this tool became available to a wide audience.
In fact, this is a disassembler with its own features and bugs, but it was made for money, so the quality is still better than that of completely open-source solutions.
Detailed information can be found on the official website of the project (it does not allow IP from Russian, use a VPN or proxy) - link.
You can also download it there, which we will do.
Installation
GHIDRA written in JAVA, therefore, requires the installation of JDK 11. This component can be downloaded from here link.
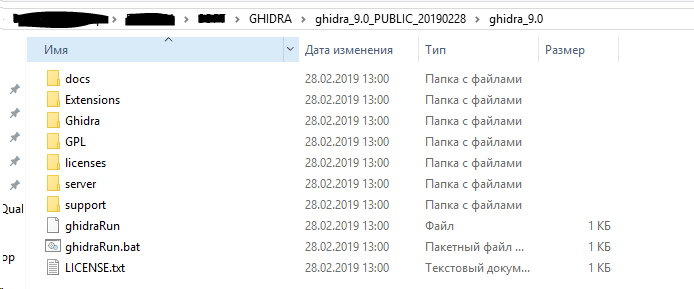
No installation is required, just unpack the archive into any directory convenient for you.
Launch
If you have done everything correctly, then to run you just need to run the file “ghidraRun.bat”. After that, you will see this:

This is the boot menu, just wait a bit and it will change to:
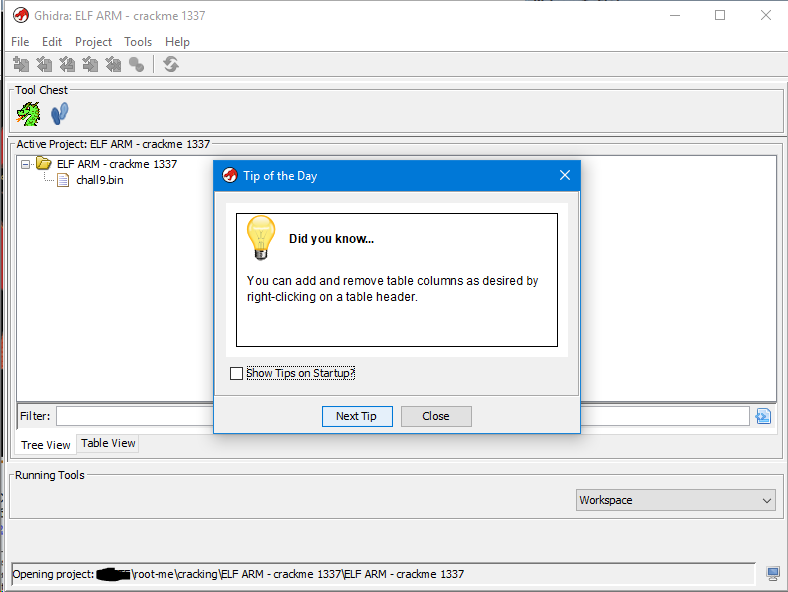
Here you see a small daily advice (you can turn them off by simply unchecking the checkbox), and a launcher with projects.
One of the nice features is that you can create a project and in this project create folders for each binary file, so it is convenient to navigate between small binaries. This can be useful when examining a family of related files (application, large application, etc.)
Project creation
Let's try to create a new project.
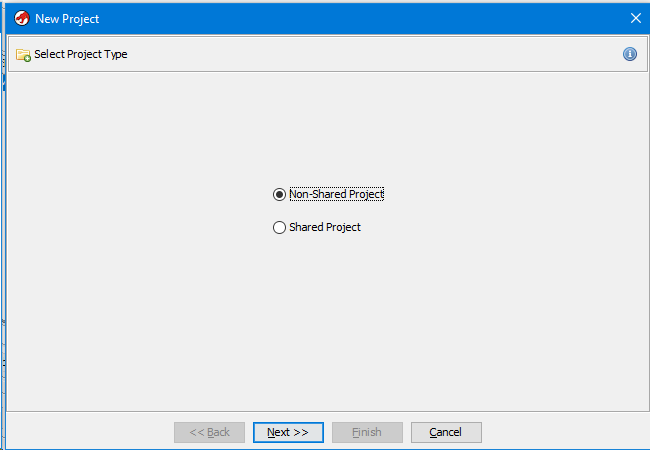
In the top menu, select “File-> New Project”. After that, a window for selecting the type of project will appear, it can be local or remote (based on some server). This feature is also worth noting. If you are working on a project with a group of reverse engineers, this is extremely convenient.
We will create a local project, that is, we need to select “Non-Shared Project”.
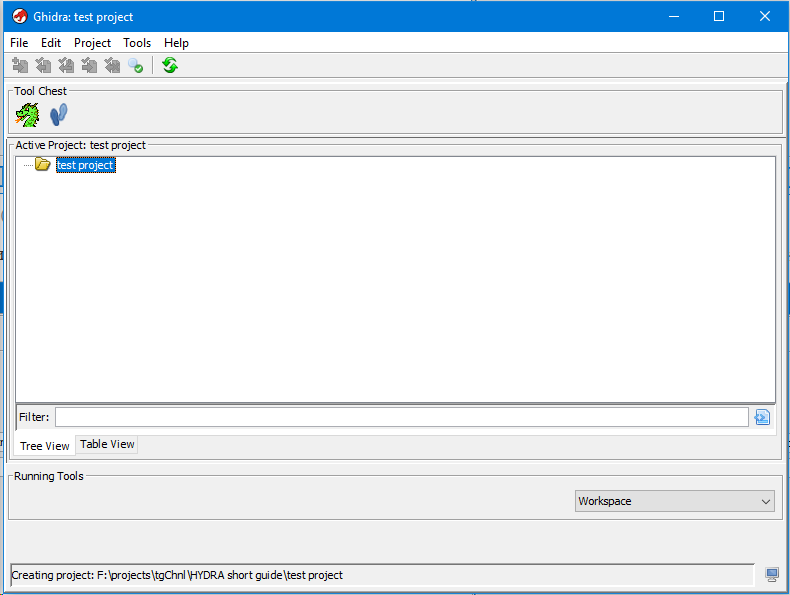
Next, we need to select where the project will be stored and specify its name.
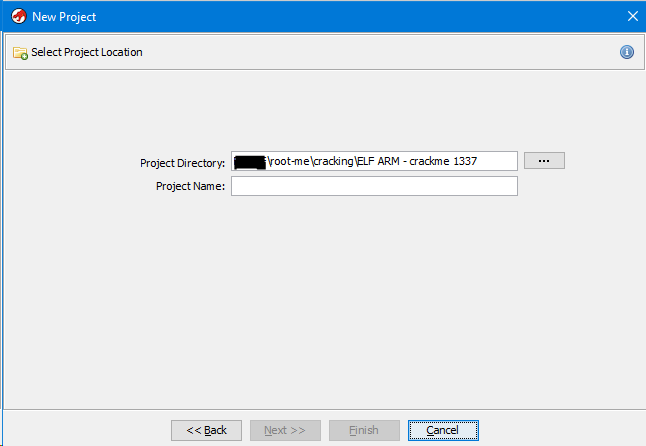
There is not much to comment on here. After entering the name and clicking the “Next >>” button, a new project is created and your menu will now look something like this.
The project is well created, but it is currently empty. To add a binary for research, you can simply drag it into this window.
For example, let's take one of the tasks of the “Reverse” category from UTCTF.
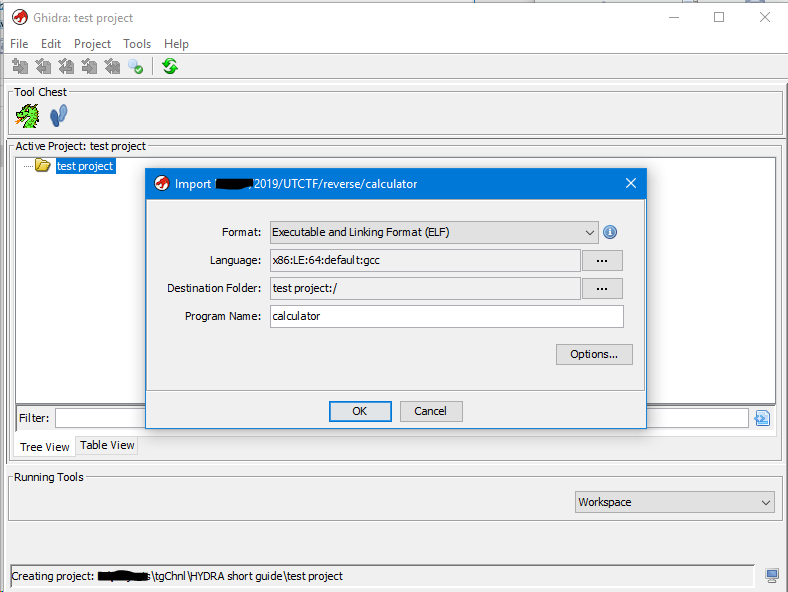
We see that when loading the binar, the following parameters were defined:
- Format
- Language (although the name of the microprocessor architecture is spelled out)
- Destination folder in the project
- Binary name
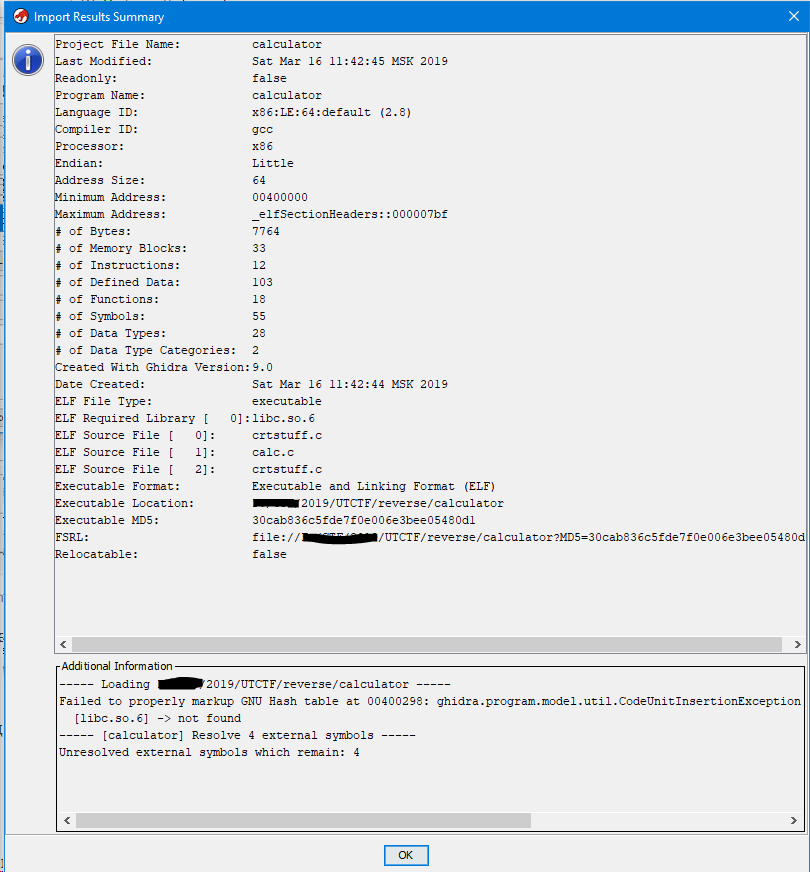
Here is some extended general and import information.
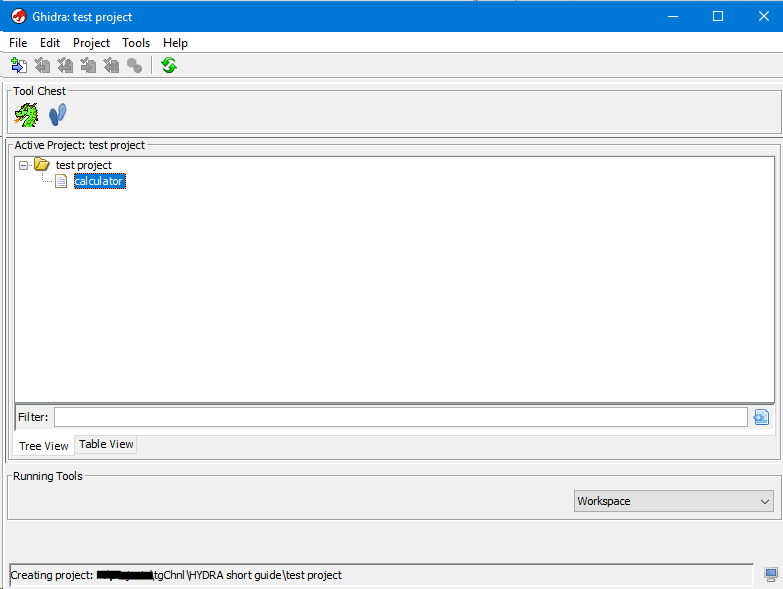
Now our project looks like this.
In order to open a binary file in GHIDRA and start examining it, you can simply select the file of interest and double-click on it. After that, the disassembler itself starts and prompts you to conduct a complete analysis of the file.
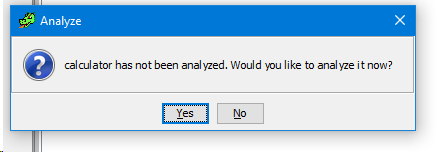
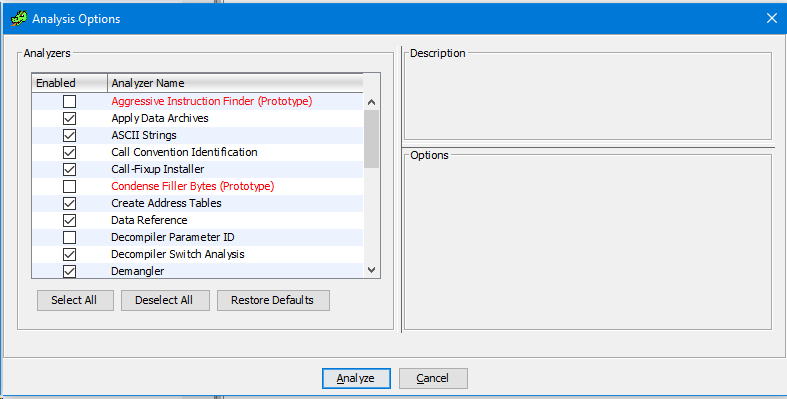
We agree and choose which analysis options we want to enable or disable.
Then we press "Analyze" and wait for the end of the analysis. You can watch the analysis process in the lower right corner of the screen, where there is a panel of the current state of a particular process.

Great, now we have an analyzed binary and we can start working on its study.
Now that we have figured out the loading of the binary and its auto-analysis, we will consider setting up the CodeBrowser itself, in which most of the work is done.
Configuring CodeBrowser
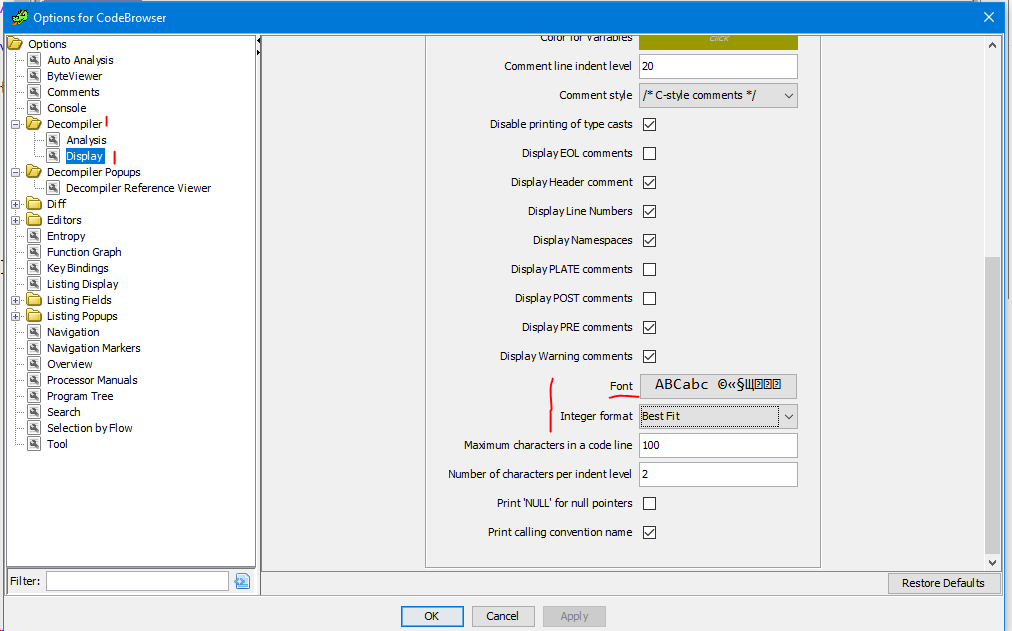
Use the “Edit-> Tool options” menu to configure. There you will find the next big menu.

Initially I recommend adjusting the fonts and colors. the standard ones are not very pleasant to the eye (although to each his own). But these are settings only for a regular browser. There are separate settings for the decompiler which can be found here.
It is worth noting that there are not many default hotkeys in GHIRDA, and those that are not in quite familiar places (if you have used IDA for a long time, it will be painful). To solve this problem, you can rebind using the corresponding menu in the settings.
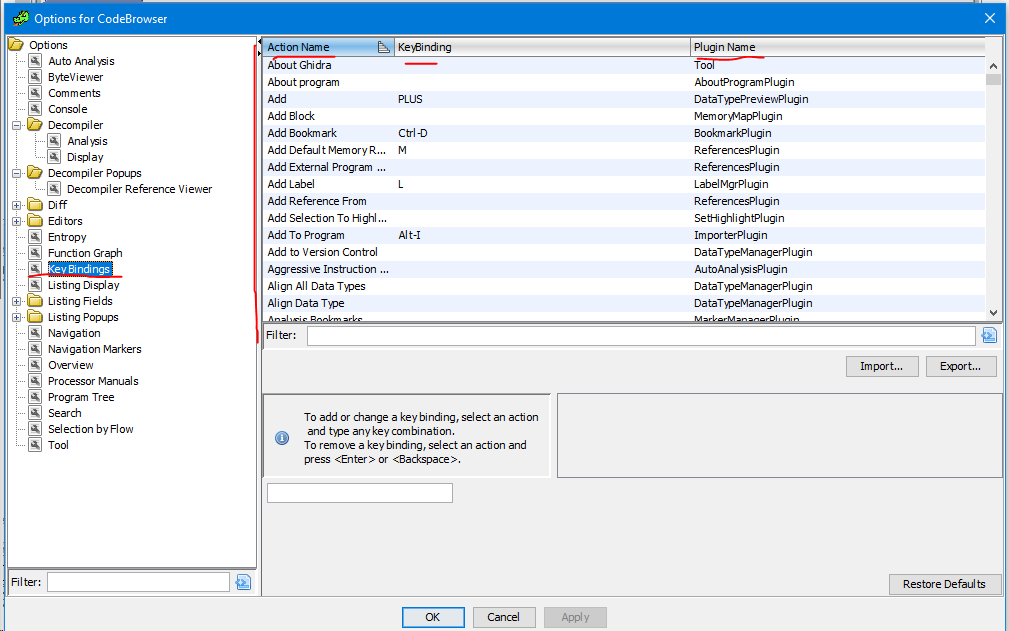
Here you will already need to dig and customize everything for yourself (in principle, this should always be done, you are setting it up for personal ease of use).
The standard configuration menu is quite good and flexible, but still I could not configure some points, for example, highlighting all occurrences of the selected name in the code, which is very inconvenient when analyzing a more or less large function.
Let's take a look at some commands.
Basic commands
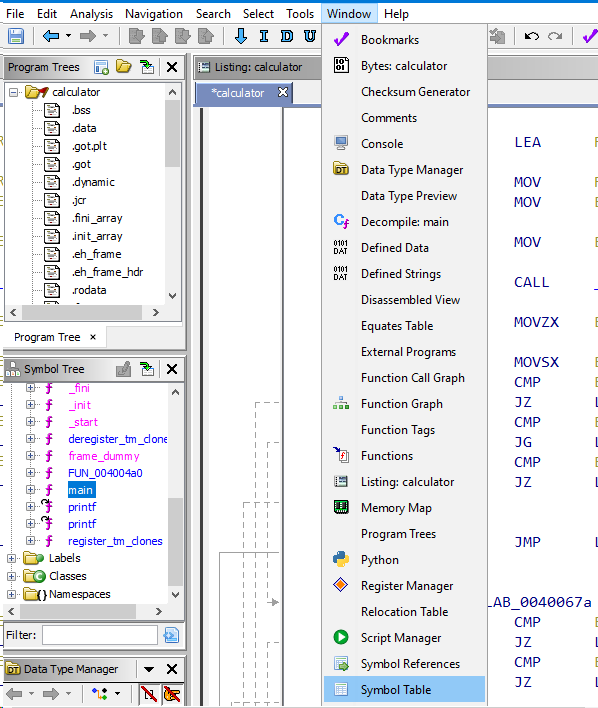
You can use the “Windows” option to call up various displays of this or that information contained in the file.
For example, the "Defined Strings" window will contain all the strings that were found automatically in the binary.
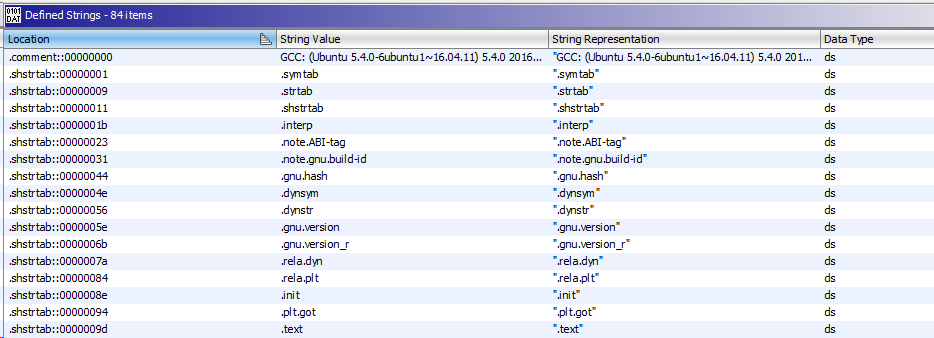
Not a very familiar display, of course.
In the "Script Manager" window you can find more than 200 built-in scripts for various tasks, this is quite an interesting solution, to immediately embed scripts, which in fact must be created by the user for his tasks.
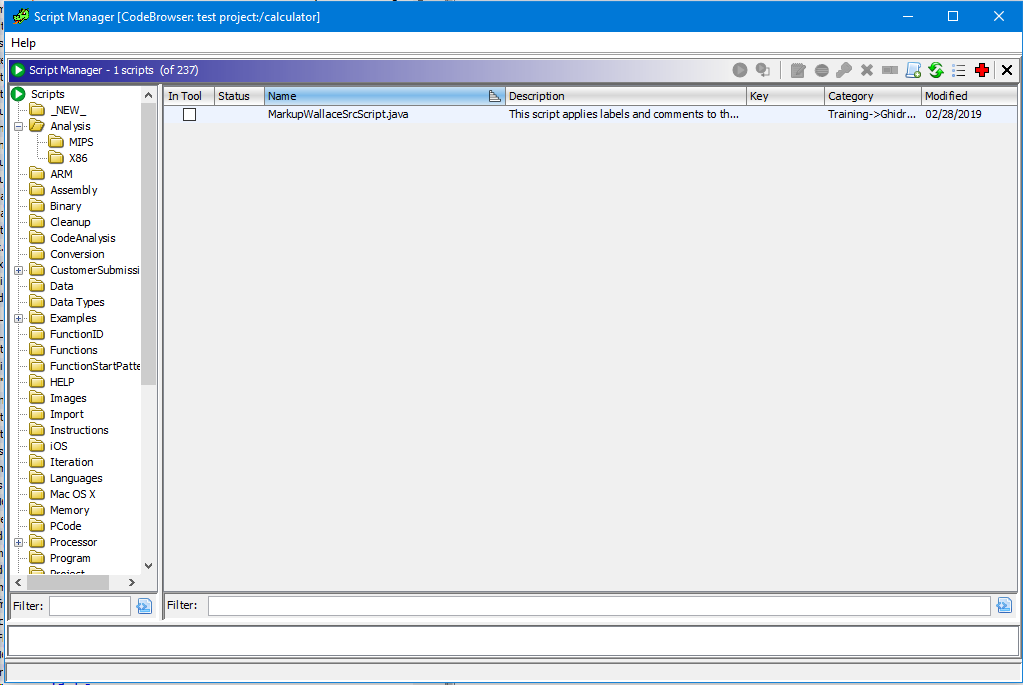
I don’t know how applicable they are, until I have studied in detail, but in general such a solution is worthy of praise, especially if there are scripts there to solve popular problems of reverse engineering.
It should also be noted that there is a menu with a choice of various analyzes above the file.
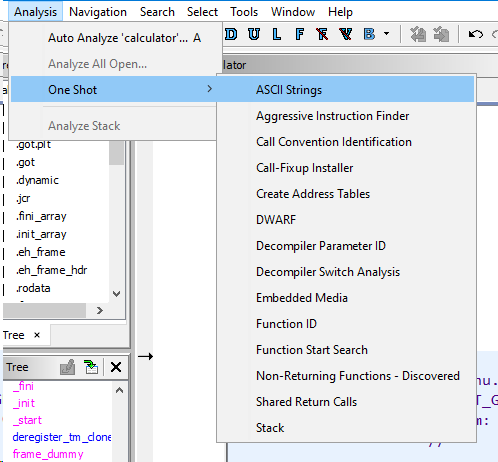
This can be useful when analyzing the firmware, because loading them is usually tricky.
Outcomes
If you do not go into details, there are not very many differences in functionality with IDA, it is suitable for most tasks. But there is one caveat, that there is no difference with the paid version of IDA, which not everyone can afford. And GHIDRA is completely free.
There are inconveniences for those who are accustomed to the interface of other tools, but in general GHIDRA performs its tasks “with a bang”.
The decompiler for other architectures is especially happy.
You can study a lot more in the device of this tool, look at the support for the scripting language provided by the API, and so on, but this will take much more time and, I think, it will be useful to do it yourself. If you succeed, you have embarked on the right path of a reverser.
For those who want to learn more about this wonderful tool from the NSA, here are the links:
- Official page on the US NSA website
- Github project
- The first review in the magazine "Hacker"
- Great YouTube channel with a breakdown of programs in Ghidra
Chasing Hydra?
Step 1.crackme
Let's take a simple crackme program for our experiments. I just went to the site crackmes.one, indicated in the search the difficulty level = 2-3 ("simple" and "medium"), the source language of the program = "C / C ++" and the platform = "Multiplatform", as in the screenshot below:
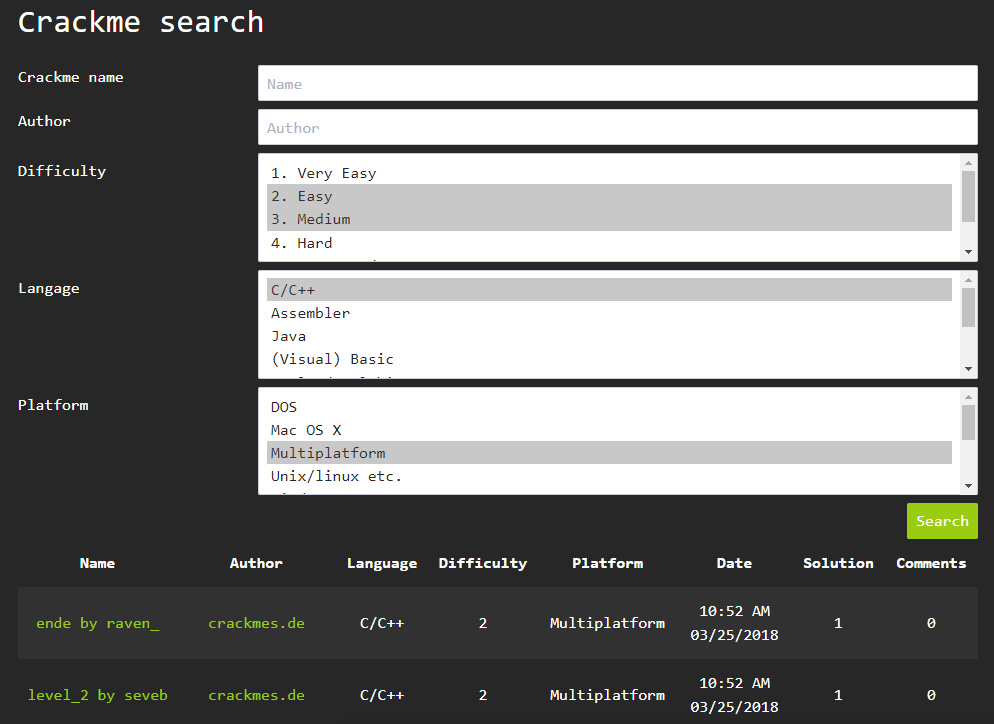
The search returned 2 results (below in green). The first one turned out to be 16-bit and did not start on my Win10 64-bit, but the second one (level_2 by seveb) came up. You can download it from this link.
Download and unpack the crack; the password for the archive, as indicated on the website, is crackmes.de. In the archive we find two directories corresponding to Linux and Windows operating systems. On my machine, I go to the Windows directory and find the only "executable" in it - level_2.exe. Let's run and see what she wants:

Sounds like a bummer! When launched, the program does not output anything. We try to run it again, passing it an arbitrary string as a parameter (what if it is waiting for a key?) - and again nothing ... But do not despair. Let's assume that we also have to figure out the launch parameters as a task! It's time to uncover our "Swiss knife" - Hydra.
Step 2. Project creation in Hydra and preliminary analysis
Let's assume that you already have Hydra installed. If not yet, then everything is simple.
Installing Ghidra
Launch Hydra and immediately create a new project in the opened Project Manager; I gave it the name crackme3 (i.e. the projects crackme and crackme2 have already been created for me). A project is, in fact, a directory of files, you can add any files for study (exe, dll, etc.) to it. We will immediately add our level_2.exe ( File | Import or just the I key):
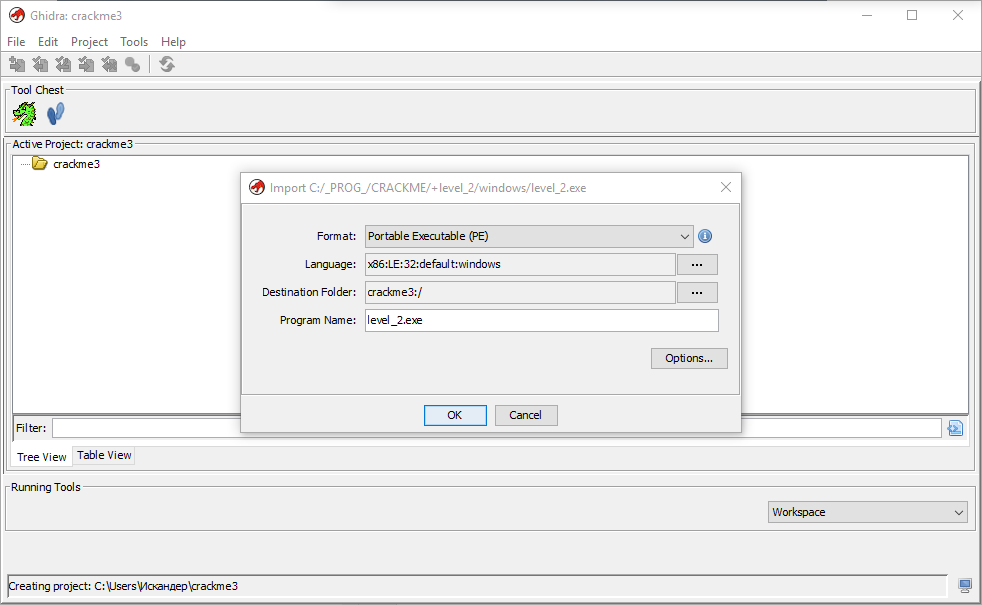
We see that already before the import, Hydra defined our experimental quack as a 32-bit PE (portable executable) for the Win32 OS and the x86 platform. After import, ours is waiting for even more information:
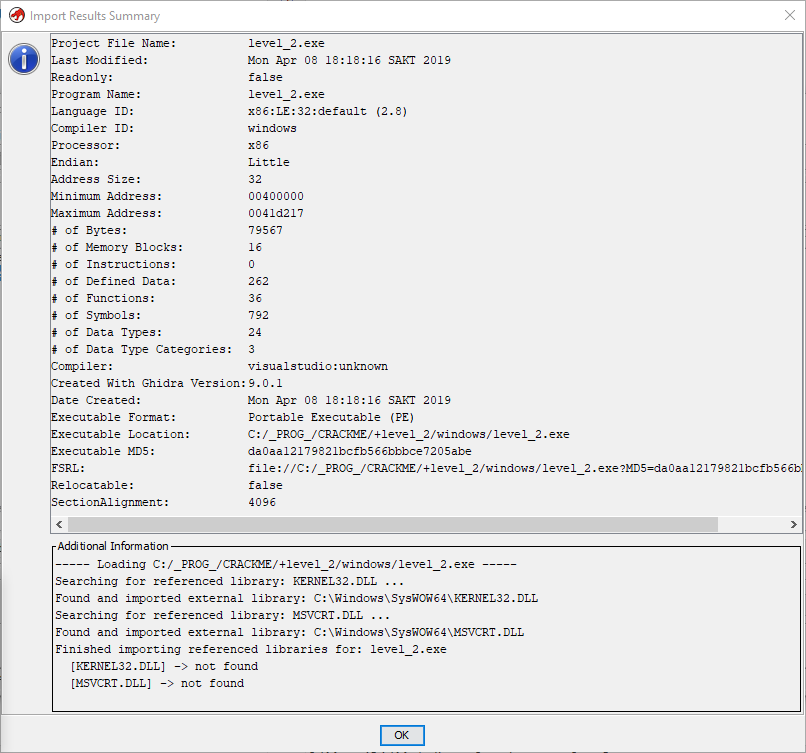
Here, in addition to the above bit depth, we may be interested in the endianness, which in our case is Little (from the lowest to the highest byte), which is to be expected for the "Intel" 86 platform.
We are done with the preliminary analysis.
Step 3. Performing automatic analysis
Time to start a full automatic analysis of the program in Hydra. This is done by double clicking on the appropriate file (level_2.exe). With a modular structure, Hydra provides all of its core functionality with a system of plugins that you can add / disable or develop yourself. It's the same with analysis - each plugin is responsible for its own type of analysis. Therefore, at first, such a window opens in front of us, in which you can select the types of analysis of interest:
Analysis settings window
For our purposes, it makes sense to leave the default settings and run the analysis. The analysis itself is quite fast (it took me about 7 seconds), although users on the forums complain that for large projects Hydra loses in speed to IDA Pro. This may be true, but for small files this difference is insignificant.
So the analysis is complete. Its results are displayed in the Code Browser window:
This window is the main one for working in Hydra, so you should study it more carefully.
Code Browser Interface Overview
Step 4. Examining the program algorithm - main () function
Well, let's proceed to the direct analysis of our quack program. In most cases, you should start by looking for the entry point of the program, i.e. the main function that is called when it starts. Knowing that our crack is written in C / C ++, we guess that the name of the main function will be main () or something like that. No sooner said than

Done. Enter "main" into the Symbol Tree filter (in the left pane) and see the _main () function in the Functions section. We go to it with a mouse click.
Main () function overview and renaming incomprehensible functions
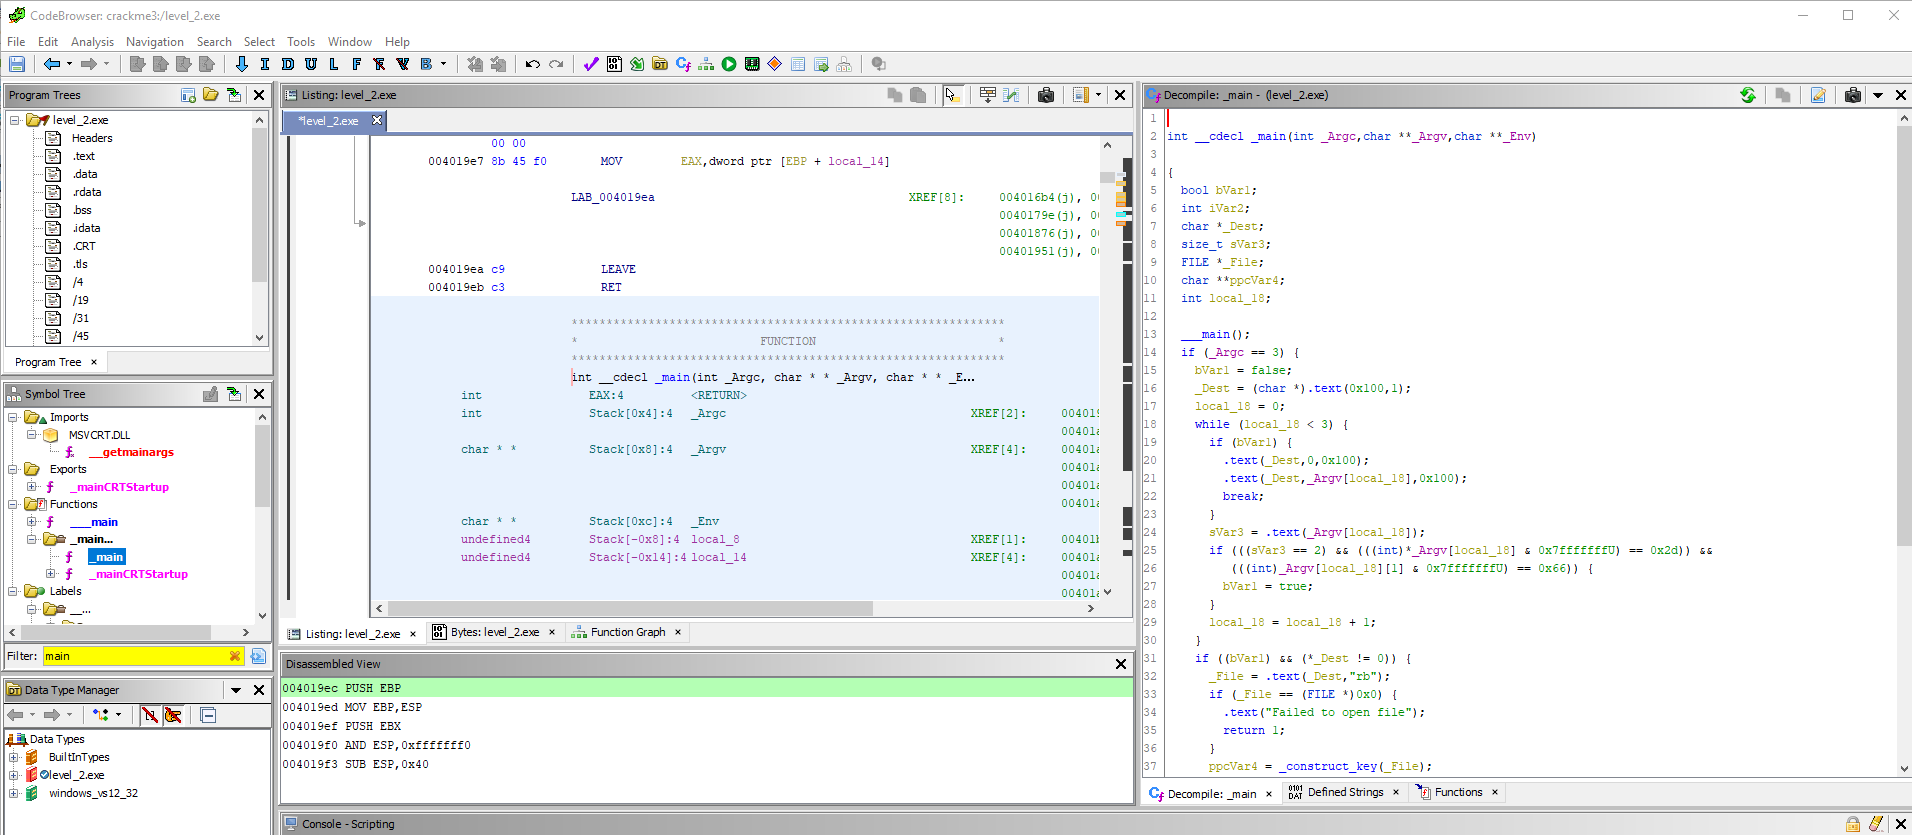
In the listing of the disassembler, the corresponding section of the code is immediately displayed, and on the right we see the decompiled C code of this function. It is worth noting here another convenient feature of Hydra - the synchronization of selection: when a range of ASM commands is selected with the mouse, the corresponding section of the code in the decompiler is also selected and vice versa. In addition, if the memory browser is open, the allocation is synchronized with memory. As they say, all ingenious is simple!
Immediately, I would like to note an important feature of working in Hydra (as opposed to, say, working in IDA). Work in Hydra is focused primarily on the analysis of decompiled code . For this reason, the creators of Hydra (we remember - we are talking about spies from the NSA
") ) paid great attention to the quality of decompilation and ease of work with the code. In particular, you can go to the definition of functions, variables and memory sections by simply double-clicking in the code. Also, any variable and function can be immediately renamed, which is very convenient, since the default names do not carry any meaning and can be confusing. As you will see later, we will use this mechanism often.
) paid great attention to the quality of decompilation and ease of work with the code. In particular, you can go to the definition of functions, variables and memory sections by simply double-clicking in the code. Also, any variable and function can be immediately renamed, which is very convenient, since the default names do not carry any meaning and can be confusing. As you will see later, we will use this mechanism often.So, before us is the main () function, which Hydra "dissected" as follows:
Listing main ()
Everything seems to be okay - variable definitions, standard C types, conditions, loops, function calls. But taking a closer look at the code, we notice that for some reason the names of some functions were not determined and were replaced by the _text () pseudo- function (in the decompiler window - .text ()). Let's start defining what these functions are right away.
By double-clicking on the body of the first call
_Dest = (char *)_text(0x100,1);
we see that this is just a wrapper function around the standard calloc () function for allocating memory for data. So let's just rename this function to calloc2 () . Having placed the cursor on the title of the function, call the context menu and select Rename function (hotkey - L ) and enter a new name in the field that opens:

We see that the function was immediately renamed. We return back to the body of main () (the Back button in the toolbar or Alt + <-) and see that here, instead of the mysterious _text (), there is already calloc2 (). Excellent!
We do the same with all the other wrapper functions: we go to their definitions one by one, see what they do, rename (I added index 2 to the standard names of C functions) and go back to the main function.
Comprehending the code of the main () function
Okay, we figured out the incomprehensible functions. We begin to study the code of the main function. Skipping variable declarations, we see that the function returns the value of the iVar2 variable, which is equal to zero (a sign of the function's success) only if the condition specified by the string is met
if (_Argc == 3) { ... }
_Argc is the number of command line parameters (arguments) passed to main () . That is, our program "eats" 2 arguments (the first argument, as we remember, is always the path to the executable file).
OK, let's move on. Here we create a C string ( char array ) of 256 characters:
char *_Dest;
_Dest = (char *) calloc2 (0x100,1); // equivalent to new char [256] in C ++
Next, we have a loop of 3 iterations. In it, we first check if the bVar1 flag is set, and if so, copy the following command line argument (string) to _Dest:
while (i < 3) {
/ * loop through com arguments. lines * /
if (bVar1) {
/ * initialize array * /
memset2 (_Dest, 0,0x100);
/ * copy the line to _Dest and break the loop * /
strncpy2(_Dest,_Argv,0x100);
break;
}
...
}
This flag is set when the following argument is parsed:
n_strlen = strlen2(_Argv);
if (((n_strlen == 2) && (((int)*_Argv & 0x7fffffffU) == 0x2d)) &&
(((int)_Argv[1] & 0x7fffffffU) == 0x66)) {
bVar1 = true;
}
The first line calculates the length of this argument. Next, the condition checks that the length of the argument must be 2, the penultimate character == “-” and the last character == “f”. Notice how the decompiler "translated" the extraction of characters from the string using a byte mask.[/B]
After the loop comes this code:Decimal values of numbers, and at the same time the corresponding ASCII characters, can be spied by holding the cursor over the corresponding hexadecimal literal. The ASCII display does not always work (?), So I recommend looking at the ASCII table on the Internet. You can also convert scalars from any number system to any other right in Hydra (via the context menu -> Convert), in this case, this number will be displayed everywhere in the selected number system (in the disassembler and in the decompiler); but personally, I prefer to leave hexes in the code for the slenderness of the work, tk. memory addresses, offsets, etc. are specified everywhere in hexes.
if ((bVar1) && (*_Dest != 0)) {
* if received arguments 1) "-f" and 2) string -
open the specified file for reading in binary format * /
_File = fopen2 (_Dest, "rb");
if (_File == (FILE *) 0x0) {
/ * return 1 on read error * /
perror2("Failed to open file");
return 1;
}
...
}
Here I added comments right away. We check the correctness of the arguments (“-f path_to_file”) and open the appropriate file (2nd passed argument that we copied to _Dest). The file will be read in binary, as indicated by the "rb" parameter of the fopen () function. If there is a read error (for example, the file is unavailable), an error message is printed to the stderror stream and the program exits with code 1.
Further - the most interesting:
/ * !!! CHECKING THE KEY IN THE FILE !!! * /
ppcVar3 = _construct_key (_File);
if (ppcVar3 == (char **) 0x0) {
/ * if you got an empty array, print "Nope" * /
puts2 ("Nope.");
_free_key ((void **) 0x0);
}
else {
/ * array is not empty - display the key and free memory * /
printf2("%s%s%s%s\n",*ppcVar3 + 0x10d,*ppcVar3 + 0x219,*ppcVar3 + 0x325,*ppcVar3 + 0x431);
_free_key(ppcVar3);
}
fclose2(_File);
The open file descriptor (_File) is passed to the _construct_key () function, which obviously checks the required key. This function returns a two-dimensional byte array (char **) that is stored in ppcVar3. If the array turns out to be empty, the laconic "Nope" is printed to the console (that is, in our opinion "Nope!") And the memory is freed. Otherwise (if the array is not empty), the apparently correct key is displayed and the memory is freed as well. At the end of the function, the file descriptor is closed, memory is freed, and the iVar2 value is returned .
So, now we understand what we need:
1) create a binary file with the correct key;
2) pass its path in quacks after the "-f" argument
Step 5 - Overview of the _construct_key () Function
Let's take a look at the complete listing of this function right away:
Listing of the _construct_key ()
function With this function, we will proceed in the same way as before with main () - first, we will go through the "disguised" function calls. As expected, all these functions are from the standard C libraries. I will not describe the procedure for renaming functions anew - return to the first part of the article if necessary. As a result of renaming, the following standard functions were found:
- fread()
- strncmp()
- strlen()
- ftell()
- fseek()
- puts()
Let's assume that this array contains data to validate the key. Let's call it, say, key_array. Since Hydra allows you to rename not only functions, but also variables, let's take advantage of this and rename the incomprehensible local_14 to a more understandable key_array. This is done in the same way as for functions: through the menu of the right mouse button (Rename local) or by pressing the L key from the keyboard.
So, immediately after the declaration of local variables, a certain function _prepare_key () is called:
key_array = (char **)__prepare_key();
if (key_array == (char **)0x0) {
key_array = (char **)0x0;
}
We will return to _prepare_key () , this is already the 3rd level of nesting in our hierarchy of calls: main () -> _construct_key () -> _prepare_key (). For now, let's assume that it creates and somehow initializes this "check" two-dimensional array. And only if this array is not empty, the function continues its work, as evidenced by the else block immediately after the given condition.
Then the program reads the first 4 bytes from the file and compares it with the corresponding part of the key_array array. (The code below is after the renames made, including the variable local_19, I renamed first_4bytes.)
first_4bytes = 0;
/ * read first 4 bytes from file * /
fread2 (& first_4bytes, 1.4, param_1);
/ * compare with key_array [1] [0 ... 3] * /
iVar1 = strncmp2((char *)&first_4bytes,*(char **)key_array[1],4);
if (iVar1 == 0) { ... }
Thus, further execution occurs only if the first 4 bytes match (remember this). Then we read 2 2-byte blocks from the file (and the same key_array is used as a buffer for writing data ):
fread2(key_array[1] + 4,2,1,param_1);
fread2(key_array[1] + 6,2,1,param_1);
And again - then the function works only if the next condition is true:
if ((*(short *)(key_array[1] + 6) == 4) && (*(short *)(key_array[1] + 4) == 5)) {
// continue ...
}
It is easy to see that the first of the 2-byte blocks read above should be 5, and the second 4 (the short data type takes just 2 bytes on 32-bit platforms).
Further - this is:
local_30 [0] = * key_array; // ie key_array [0]
local_30[1] = *key_array + 0x10c;
local_30[2] = *key_array + 0x218;
local_30[3] = *key_array + 0x324;
local_20 = *key_array + 0x430;
Here we see that the array local_30 (declared as char * local_30 [4]) contains a pointer offset key_array. That is, local_30 is an array of marker strings, into which data from the file will most likely be read. With this assumption, I renamed local_30 to markers. In this part of the code, only the last line seems a little suspicious, where the assignment of the last offset (at index 0x430, i.e. 1072) is performed not to the next markers element, but to a separate variable local_20 (char *). But with this we will figure it out, but for now - let's move on!
Then a cycle awaits us:
i = 0; // renamed local_10 to i
while (i < 5) {
// ...
i = i + 1;
}
Those. only 5 iterations from 0 to 4 inclusive. The loop immediately starts reading from the file and checking for compliance with our markers array:
char c_marker = 0; // renamed from local_35 / * read next. byte from file * /
fread2 (& c_marker, 1, 1, param_1);
if (* markers ! = c_marker) {
/ * hereinafter - return an empty array on error * /
_free_key (key_array);
return (char **) 0x0;
}
That is, the next byte is read from the file into the c_marker variable (in the original decompiled code - local_35) and checked against the first character of the i-th markers element. If there is a mismatch, the key_array is zeroed out and a null double pointer is returned. Further along the code, we see that this is done every time when the read data does not match the verification data.
But here, as they say, "the dog is buried." Let's take a closer look at this cycle. There are 5 iterations in it, as we found out. This can be verified if desired by looking at the assembler code:


Indeed, the CMP command compares the value of the local_10 variable (we have it already i) with the number 4, and if the value is less than or equal to 4 (JLE command), the transition to the label LAB_004017eb is performed, i.e. the beginning of the loop body. Those. the condition will be met for i = 0, 1, 2, 3, and 4 - 5 iterations in total! Everything would be fine, but markers are also indexed by this variable in a loop, and this array is declared with only 4 elements:
char *markers [4];
This means that someone is clearly trying to deceive someone.
Remember, I said that this line raises doubts?
local_20 = *key_array + 0x430;
And how! Just look at the entire function listing and try to find at least one more reference to the local_20 variable. She's gone! From here we conclude: this offset should also be stored in the markers array, and the array itself should contain 5 elements. Let's fix this. Go to the variable declaration, press Ctrl + L (Retype variable) and safely change the size of the array to 5:
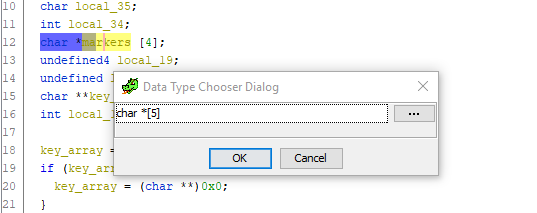
Done. Scroll down to the code for assigning pointer offsets to markers, and lo and behold ! - an incomprehensible superfluous variable disappears and everything falls into place:
markers[0] = *key_array;
markers[1] = *key_array + 0x10c;
markers[2] = *key_array + 0x218;
markers[3] = *key_array + 0x324;
markers[4] = *key_array + 0x430;// the misappropriation escaped ... we caught you!
Let's go back to our while loop (in the original code it will most likely be for, but we don't care). Next, a byte is read from the file again and its value is checked:
byte n_strlen1 = 0; // renamed from local_36 / * read next. byte from file * /
fread2 (& n_strlen1,1,1, param_1);
if (n_strlen1 == 0) {
/ * value must not be null * /
_free_key (key_array);
return (char **) 0x0;
}
OK, this n_strlen1 must be non-zero. Why? Now you will see, and at the same time you will understand why I assigned this name to this variable:
/ * write the value n_strlen1) to (markers + 0x104) * /
* (uint *) (markers + 0x104) = (uint) n_strlen1;
/ * read from file (n_strlen1) bytes (-> some line?) * /
fread2 (markers + 1,1, * (size_t *) (markers + 0x104), param_1);
n_strlen2 = strlen2 (markers + 1); // renamed from sVar2
if (n_strlen2! = * (size_t *) (markers + 0x104)) {
/ * length of the read line (n_strlen2) must == n_strlen1 * /
_free_key (key_array);
return (char **) 0x0;
}
I added comments that should make everything clear. N_strlen1 bytes are read from the file and stored as a sequence of characters (ie a string) into the markers array - that is, after the corresponding "stop character", which are already written there from the key_array. Storing the value of n_strlen1 in markers at offset 0x104 (260) is irrelevant here (see the first line in the code above). In fact, this code can be optimized as follows (and this is probably the case in the source code):
fread2(markers + 1, 1, (size_t) n_strlen1, param_1);
n_strlen2 = strlen2(markers + 1);
if (n_strlen2 != (size_t) n_strlen1) { ... }
It also checks that the length of the read string is n_strlen1. This may seem overkill, given that this parameter was passed to the fread function, but fread reads no more than the specified bytes and can read less than specified, for example, if it encounters an end-of-file (EOF) marker. That is, everything is strict: the file specifies the length of the line (in bytes), then the line itself goes - and so exactly 5 times. But we are getting ahead of ourselves.
Further on this code (which I also immediately commented):
uint n_pos = 0; // renamed from local_3c / * read next. byte from file * /
fread2 (& n_pos, 1,1, param_1);
/ * increase by 7 * /
n_pos = n_pos + 7;
/ * get file cursor position * /
uint n_filepos = ftell2 (param_1); // renamed from uVar3
if (n_pos <n_filepos) {
/ * n_pos should be> = n_filepos * /
_free_key (key_array);
return (char **) 0x0;
}
Here everything is even simpler: we take the next byte from the file, add 7 and compare the resulting value with the current position of the cursor in the file stream, obtained by the ftell () function. The n_pos value must be at least the position of the cursor (that is, the offset in bytes from the beginning of the file).
The final line in the loop:
fseek2(param_1,n_pos,0);
Those. move the file cursor (from the beginning) to the position indicated by n_pos with the fseek () function. OK, we do all these operations in a loop 5 times. The _construct_key () function ends with the following code:
int i_lastmarker = 0; // renamed from local_34 / * read the last 4 bytes from file (int32) * /
fread2 (& i_lastmarker, 4,1, param_1);
if (* (int *) (* key_array + 0x53c) == i_lastmarker) {
/ * this number should == key_array [0] [1340]
... then everything is OK
* /puts2 ("Markers seem to still exist");
}
else {
_free_key (key_array);
key_array = (char **) 0x0;
}
Thus, the last block of data in the file must be a 4-byte integer value and must equal the value in key_array [0] [1340]. In this case, a congratulatory message awaits us in the console. Otherwise, an empty array is returned without any praise.
Step 6 - Overview of the __prepare_key () Function
We have only one unparsed function left - __prepare_key (). We have already guessed that it is in it that the verification data is formed in the form of the key_array array, which is then used in the _construct_key () function to verify the data from the file. It remains to find out what kind of data is there!
I will not go into detail about this function and will immediately give the full listing with comments after all the necessary variable renaming:
Listing of the __prepare_key () function
The only place worth considering is this line:
*(undefined4 *)key_array[1] = 0x404024;
How do I understand that the line "VOID" is hidden here? The fact is that 0x404024 is an address in the program's address space leading to the .rdata section . Double-clicking on this value allows us to see at a glance what is there:

By the way, the same can be understood from the assembler code for this line:
004015da c7 00 24 MOV dword ptr [EAX], .rdata = 56h V
40 40 00
The data corresponding to the "VOID" line is located at the very beginning of the .rdata section (at a zero offset from the corresponding address).
So, at the output of this function, a two-dimensional array should be formed with the following data:
[0] [0]:'b' [268]:'l' [536]:'W' [804]:'p' [1072]:152 [1340]:1122
[1] [0-3]:"VOID" [4-5]:5 [6-7]:4
Step 7 - Preparing the Crack Binary
Now we can start synthesizing the binary. We have all the initial data in our hands:
1) verification data ("stop symbols") and their positions in the verification array;
2) the sequence of data in the file
Let's restore the structure of the required file using the algorithm of the _construct_key () function. So, the sequence of data in the file will be as follows:
File structure
For clarity, I made the following table in Excel with the data of the required file:

Here in the 7th line - the data itself in the form of characters and numbers, in the 6th line - their hexadecimal representations, in the 8th line - the size of each element (in bytes), in the 9th line - the offset relative to the beginning of the file. This view is very convenient because allows you to enter any lines in the future file (marked with yellow filling), while the values of the lengths of these lines, as well as the offsets of the position of the next stop symbol are calculated by formulas automatically, as required by the program algorithm. Above (lines 1-4) is the structure of the key_array.
The excel itself plus other source materials for the article can be downloaded from the link.
Binary file generation and validation
The only thing left to do is to generate the desired file in binary format and feed it with our crackers. To generate the file, I wrote a simple Python script:
The script for generating the file
The script accepts the path to the cracks as a single parameter, then generates a binary file with the key in the same directory and calls the cracks with the appropriate parameter, translating the program output to the console.
The struct package is used to convert text data to binary data. The pack () method allows you to write binary data in a format that specifies the data type (“B” = “byte”, “i” = int, etc.), and you can also specify the order (“>” = “Big -endian "," <"=" Little-endian "). The default order is Little-endian. Because We have already determined in the first article that this is our case, then we indicate only the type.
The entire code as a whole reproduces the program algorithm we found. As the line displayed in case of success, I indicated "I solved this crackme!" (you can modify this script to be able to specify any line).
Checking the output:

Hooray, everything works! So, after sweating a little and analyzing a couple of functions, we were able to completely restore the program's algorithm and "crack" it. Of course, this is just a simple crack, a test program, and even then it is of the 2nd level of complexity (out of 5 offered on that site). In reality, we will deal with a complex hierarchy of calls and dozens - hundreds of functions, and in some cases - encrypted data sections, garbage code and other obfuscation techniques, up to the use of internal virtual machines and P-code. But this, as they say, is already a completely different story.
This is the first step on a long road reverser. Good luck learning.
Last edited by a moderator: