
Carder
Professional
- Messages
- 2,620
- Reaction score
- 2,042
- Points
- 113
A little healthy paranoia hasn't hurt anyone yet. In addition to messengers with end-to-end encryption, encryption of files on smartphones "out of the box" and mandatory use of SSL on websites, it will not be superfluous to protect data on virtual servers. Moreover, modern technologies have made it simple and accessible to any user. Large providers providing VPS hosting services offer to encrypt user data using standard operating system tools. For example, Microsoft, in its Azure cloud, uses BitLocker for servers on Windows, and DM-Crypt for virtual machines on Linux. These tools allow you to keep your data private, even if an attacker gains access to the data center where the server is located or your local computer.
You can trust your data to hosters providing VPS, you can not trust, but no one will forbid you to use the same methods with any VPS provider, configured yourself. In this article, I'll show you how to do it.
And for faster BitLocker, use the smallest SSD.
We will connect via standard RDP, which should be configured a little before use. To do this, click the "Show parameters" switch at the bottom of the window, check the "Clipboard" box in the "Local resources" tab, and select "Disks" in the dialog called by the "Details" button.
This will allow you to copy the files to your computer or paste them through the regular clipboard. RDP will honestly warn that: "This remote connection can be harmful ...", due to the sharing of local resources. Let's take note and connect to the server.
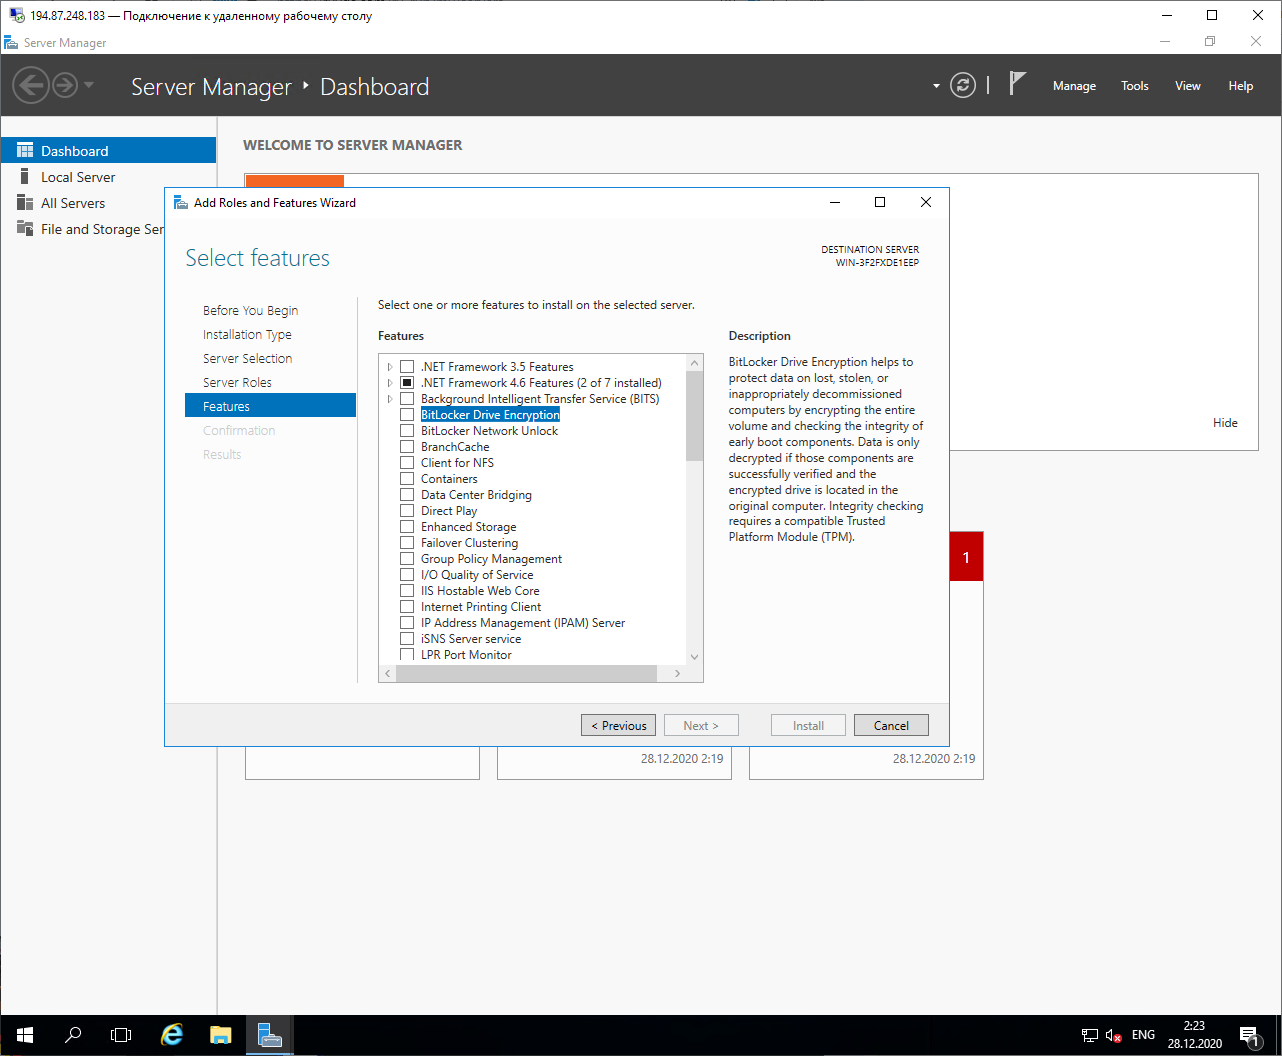
After login, we will see the usual desktop and administration panel. Let's connect the BitLocker service directly from it by selecting the "Add roles and features" option. On the first screen, check the "Skip ..." checkbox so as not to read the warning every time you change the configuration, then click "Next" and select "Role-based or feature-based installation", then select our local server and in the "Features" section, check "BitLocker Drive Encryption".
Confirm "Add Features", click "Next", check the option "Restart the destination server automatically if required" and click "Install".

After installing the service, the system will automatically reboot, and the next time you connect, a window will appear that the installation was successful.
Since we have a virtual server, it does not have a "Trusted Platform Module" crypto processor, which means that we will need to configure access policies so that BitLocker prompts for a password at system boot. If you do not do this, when you try to enable encryption, the system will display an error message:

We go to the search, insert the program name there: "gpedit.msc" and run it. We need to find the option along the following path: Local Computer Policy → Computer Configuration → Administrative Templates → Windows Components → BitLocker Drive Encryption → Operating System Drives

It is necessary to activate the policy by selecting "Enabled", select the checkbox "Allow BitLocker without a compatible TPM (requires a password or a startup key on a USB flash drive)" in the options and click "OK".
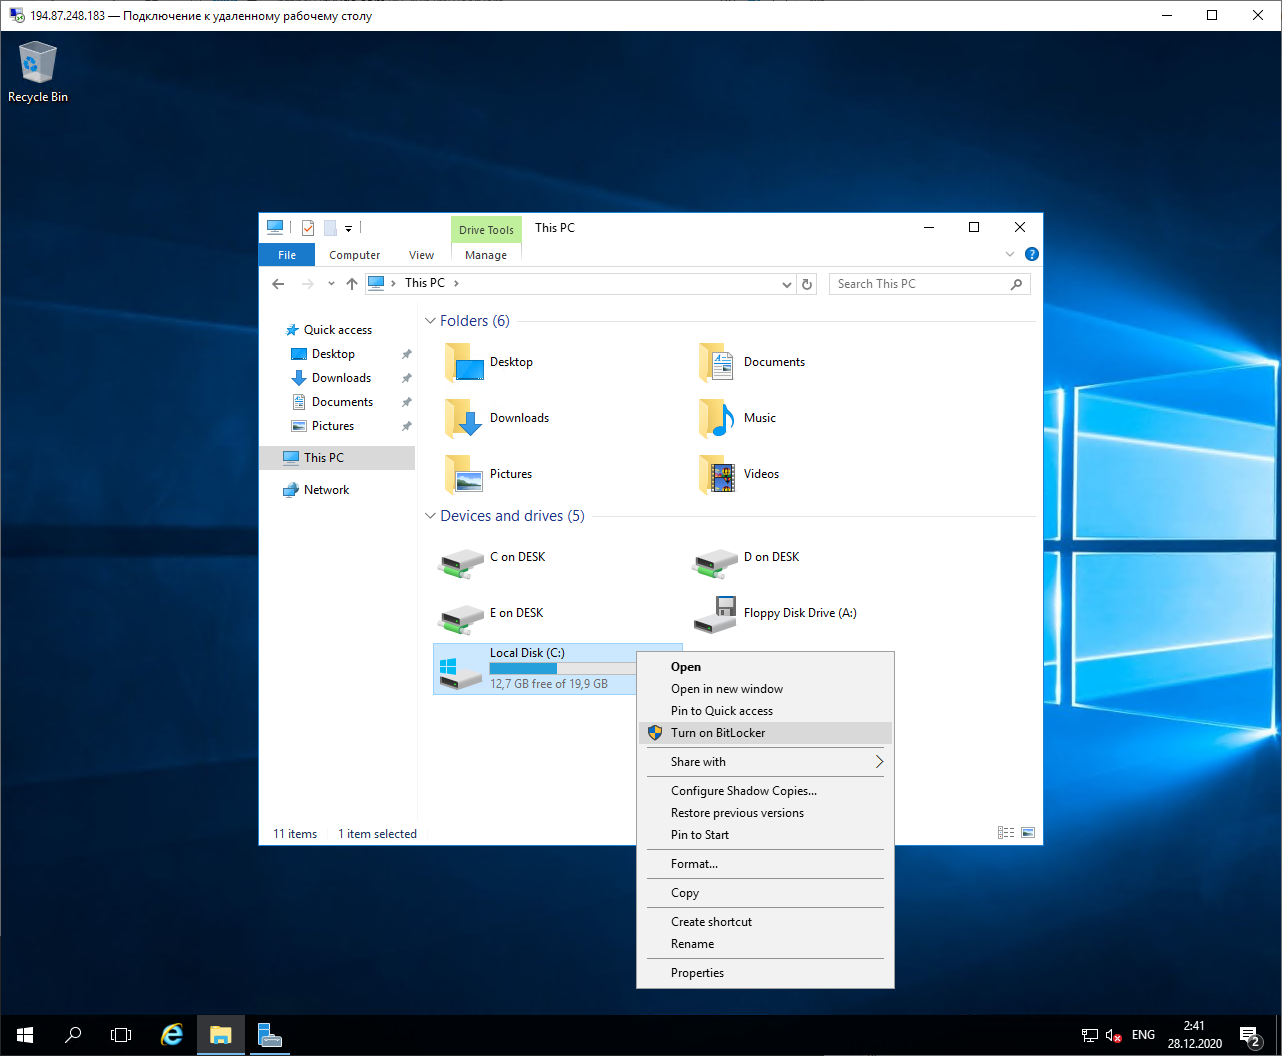
It remains to select the drives that you want to encrypt in Explorer.
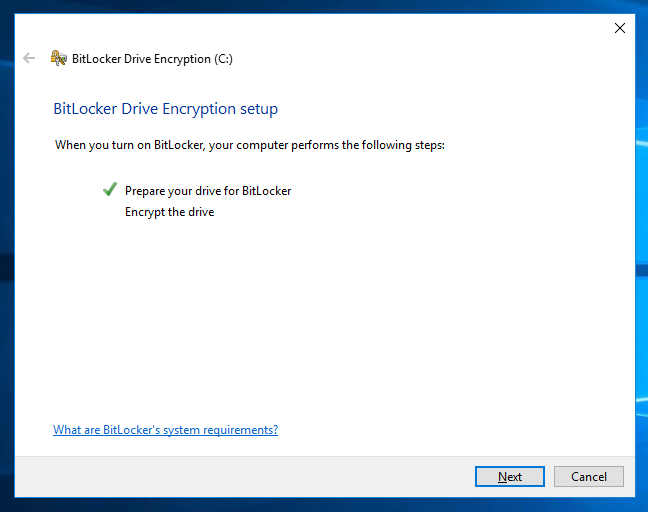
The setup wizard will analyze the system and ask you to continue ("Next"). In the next dialog box, he will warn that the drive will be used by BitLocker and will recommend that you first backup critical data. Good idea, but assuming you've already done this, click Next. The system will prepare the disk for encryption, but in the process, it will warn you that there is nowhere to transfer your Windows Recovery data and will offer to enable and configure this system after encryption. The installation is almost complete and the wizard will require you to reboot the system.

After the reboot, the service will be installed and the system will offer to encrypt the disk
On the next dialog box, the wizard will ask you to insert a USB flash drive or enter a password. Since our server is virtual, we choose the latter. In the next window, we come up with, enter and confirm the password, the system will swear if it is too simple or short, you have to show your imagination.
Next, we will be prompted to choose the way in which the access recovery key will be saved in case we forget the BitLocker password.
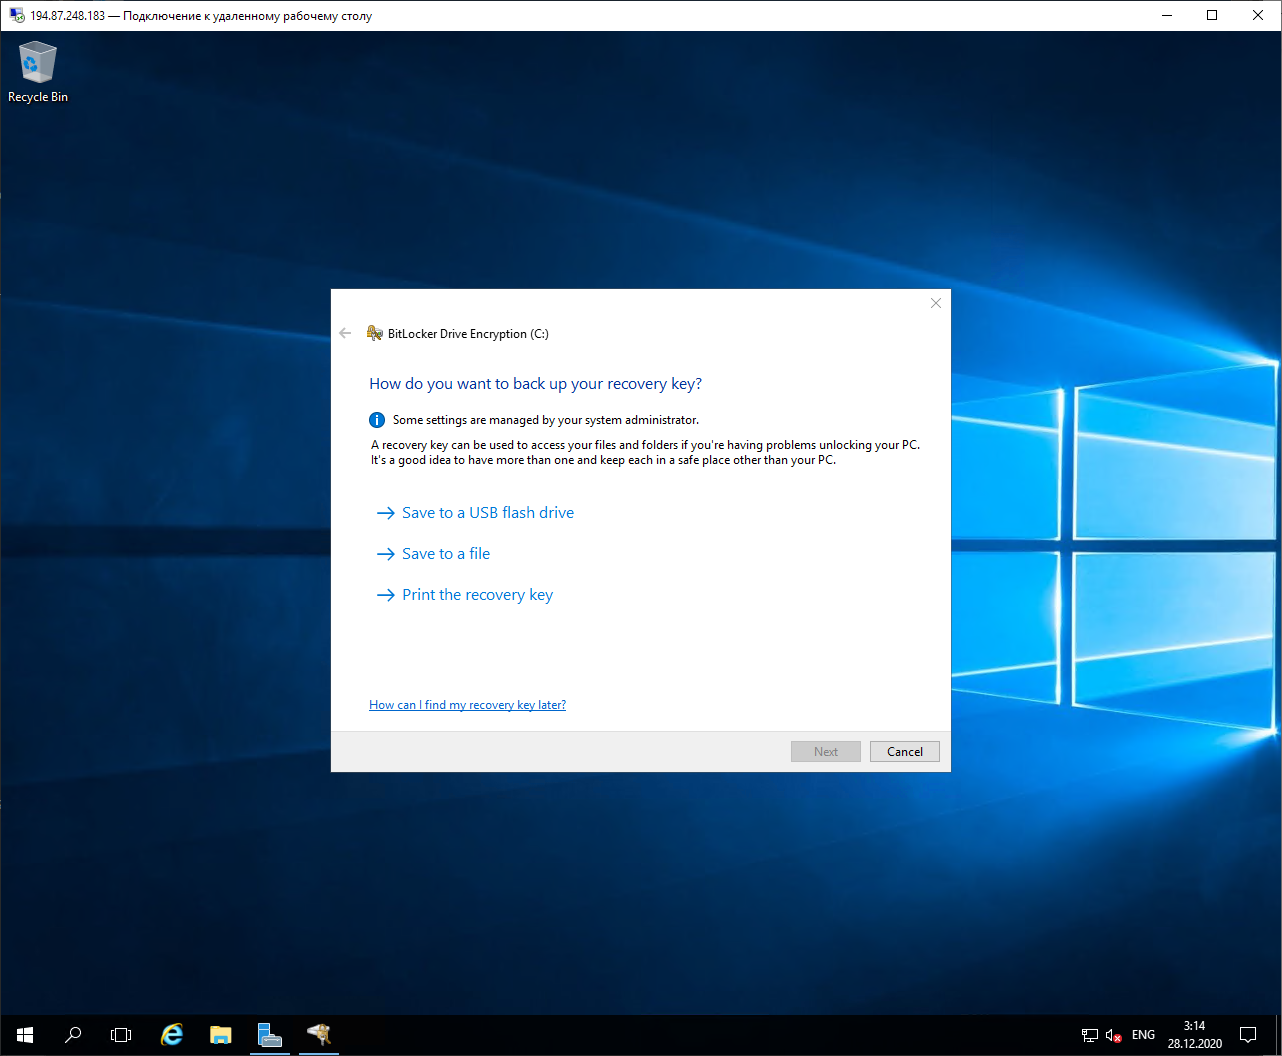
We have nowhere to insert USB, you can select the local disk of your computer, access to which was opened in the RDP options. The file will be named something like this: "BitLocker Recovery Key BE32F397-9C84-4765-9840-50BF3893CAB6.TXT". And inside there will be a short instruction and a recovery key.
Look
Having saved the file, we proceed to the choice of the type of encryption. Since our local hard drive is protected, we select the first option: "New encryption mode".
The next screen requires confirmation that we really want to encrypt the disk, click "Continue", we get a message that the process will start after reboot and a proposal to reboot the computer.
Everything - the system disk of our server is encrypted.
We try to connect to it and ... Nothing happens!
Everything is logical. BitLocker will require you to enter a password at boot, and this happens even before the system is ready for remote operation. This cannot be done via RDP.
We go to the RuVDS page, which contains information about running servers.
Something very similar to the system prompt. Indeed, we will have to use the emergency mode access console in order to enter the password before booting the system:
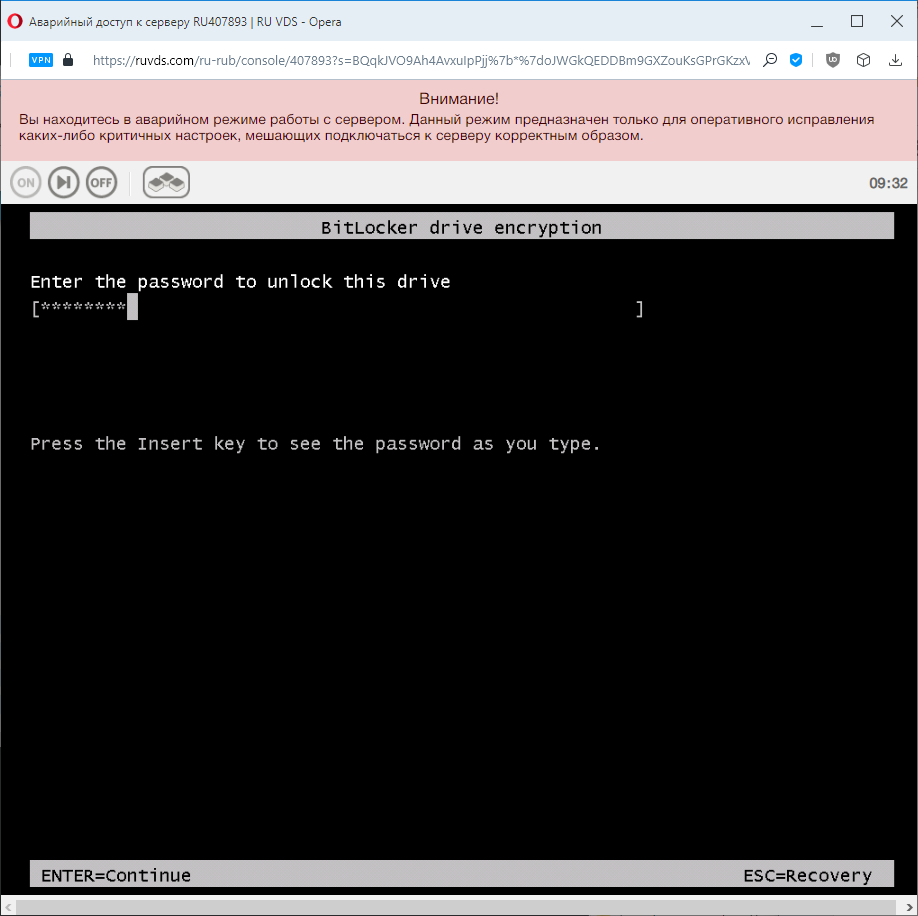
Enter the password and see the continuation of the download. The emergency console can be closed and connected via RDP. By the way, we need such an operation every time the virtual server is restarted. Not very convenient, but that's the price of security.
Now, when we open the drive menu, we see new items in it: "Change BitLocker password" and "Manage BitLocker". Having opened the second item, we can see the status of the disk and its encryption management. Since I deliberately chose a small SSD for the demonstration, the encryption took less than five minutes. When it ended, the interface looked like this:
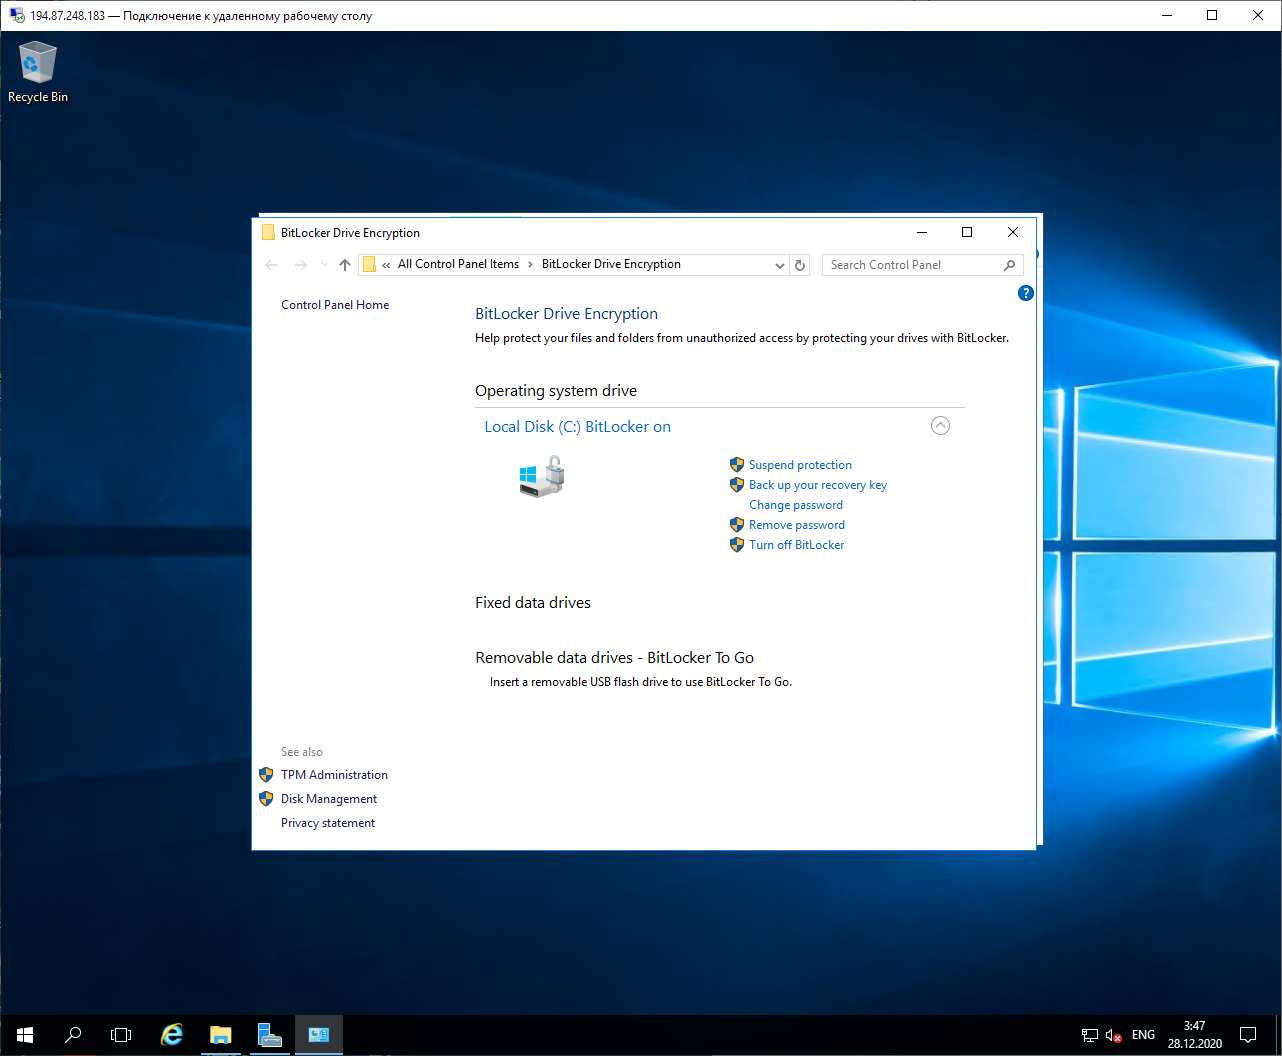
Bitlocker installation and disk encryption on the virtual server are now complete. Now, if someone gains physical access to your computer, they will not be able to connect to the server, even if they go to the provider's website under your login. And if he comes to the data center and connects from the inside to your VPS, he will still not be able to receive the data - it will be encrypted.
The main thing is not to keep in sight the file that contains the key to restore access!
By the way, how do you use this key if you forgot your BitLocker password? It's very simple, you need to reboot the server and go to the emergency console, but now choose not to log in, but restore. Press ESC and get an invitation to enter the key. One subtlety, you only need to enter numbers, and minus separators will be inserted automatically. If you enter incorrectly, you will receive an error message and a request to enter the key again. If entered correctly, the system will continue booting.
Configuring BitLocker on a Remote Server - Completed.
dm-crypt - a standard disk encryption system based on Linux kernel, based on: Device mapper, the subsystem creates and provides transparency to work with virtual devices; and crypt o API , an encryption subsystem that is used for VPN over IPsec and a number of other functions. Dm-crypt has two ways of working with a cryptocontainer, plain - in which the data does not contain a visible format and looks like a random set of bytes, and LUKS - which provides more options, for example, automatic detection of cryptocontainers by the system, but the file will contain metadata, according to which can determine the very fact of encryption. We will use the second method, via the LUKS protocol.
The server is selected in the same way as in the first section, except for the operating system. We will skip the pre-configuration steps, they can be found in the RuVDS manual and proceed to installing the encryption system. Let's update the package list and install cryptsetup - the dm-crypt command line interface (for simplicity, all commands will be entered as root):
To store encrypted data, you must first create a special file, which will then act as a device. It must be inseparable, and for this there are several ways, with varying degrees of security.
One of them is with the fallocate command.
Let's create a 512MB file named test-crypt in the home directory of the root user:
This is the easiest and fastest method, but the least secure, because the command simply allocates disk space without overwriting the data that was contained there.
It is safer to create a file using the dd (dataset definition) utility, it allows you not only to create a file, but also write information into it that will overwrite the previous content from the selected area. For example zeros from / dev / zero virtual device:
The most paranoid way is to populate the file from / dev / urandom. But it is also the slowest:
After creating the file, you need to convert it to a LUKS section:
Answer YESthe program prompt and then set a password. Unlike BitLocker, there will be no recovery methods, private keys and other conveniences here; if you forget your password, the data will be irretrievably lost! Approach this issue very responsibly. Therefore, be sure to use the option -ythat asks for password confirmation.
Let's check what we got with the utility file:
The output should show something like:
This means that the crypto container is created and ready to use, it remains to deploy it to the crypt-volume device:
Create a filesystem there:
And select the mount point:
The encrypted device is ready to use, all that remains is to mount it and use it as a regular disk, all encryption and decryption operations take place "on the fly", transparent to the user and the system.
Let's check our device. Let's copy some data into it, for example, the contents of the / etc / ssh directory and see what the dh utility says
As we can see, the device is mounted, has the volume determined by us and is filled by about 1% with files from the ssh directory.
In order to finish working with the crypto container, you need to unmount it and then disable it:
The work with the device is finished and we have the most ordinary file encrypted with our password, data that is not available to an outsider, even if he gets physical access to the server.
To use the crypto container again, you will need to initialize and mount it again:
This completes the review of data encryption systems that can be used on virtual servers.
Good connection everyone!
You can trust your data to hosters providing VPS, you can not trust, but no one will forbid you to use the same methods with any VPS provider, configured yourself. In this article, I'll show you how to do it.
Encrypting data on Windows with BitLocker
The simplest but most reliable encryption method for Windows is the built-in BitLocker service. Its configuration is simple and fast, so the easiest way is to use the graphical interface. Let's analyze this process using the example of Windows Server 2016, located at the RuVDS provider. I will choose a server location in Moscow to reduce ping.And for faster BitLocker, use the smallest SSD.
We will connect via standard RDP, which should be configured a little before use. To do this, click the "Show parameters" switch at the bottom of the window, check the "Clipboard" box in the "Local resources" tab, and select "Disks" in the dialog called by the "Details" button.
This will allow you to copy the files to your computer or paste them through the regular clipboard. RDP will honestly warn that: "This remote connection can be harmful ...", due to the sharing of local resources. Let's take note and connect to the server.
After login, we will see the usual desktop and administration panel. Let's connect the BitLocker service directly from it by selecting the "Add roles and features" option. On the first screen, check the "Skip ..." checkbox so as not to read the warning every time you change the configuration, then click "Next" and select "Role-based or feature-based installation", then select our local server and in the "Features" section, check "BitLocker Drive Encryption".
Confirm "Add Features", click "Next", check the option "Restart the destination server automatically if required" and click "Install".
After installing the service, the system will automatically reboot, and the next time you connect, a window will appear that the installation was successful.
Since we have a virtual server, it does not have a "Trusted Platform Module" crypto processor, which means that we will need to configure access policies so that BitLocker prompts for a password at system boot. If you do not do this, when you try to enable encryption, the system will display an error message:
We go to the search, insert the program name there: "gpedit.msc" and run it. We need to find the option along the following path: Local Computer Policy → Computer Configuration → Administrative Templates → Windows Components → BitLocker Drive Encryption → Operating System Drives
It is necessary to activate the policy by selecting "Enabled", select the checkbox "Allow BitLocker without a compatible TPM (requires a password or a startup key on a USB flash drive)" in the options and click "OK".
It remains to select the drives that you want to encrypt in Explorer.
The setup wizard will analyze the system and ask you to continue ("Next"). In the next dialog box, he will warn that the drive will be used by BitLocker and will recommend that you first backup critical data. Good idea, but assuming you've already done this, click Next. The system will prepare the disk for encryption, but in the process, it will warn you that there is nowhere to transfer your Windows Recovery data and will offer to enable and configure this system after encryption. The installation is almost complete and the wizard will require you to reboot the system.
After the reboot, the service will be installed and the system will offer to encrypt the disk
On the next dialog box, the wizard will ask you to insert a USB flash drive or enter a password. Since our server is virtual, we choose the latter. In the next window, we come up with, enter and confirm the password, the system will swear if it is too simple or short, you have to show your imagination.
Next, we will be prompted to choose the way in which the access recovery key will be saved in case we forget the BitLocker password.
We have nowhere to insert USB, you can select the local disk of your computer, access to which was opened in the RDP options. The file will be named something like this: "BitLocker Recovery Key BE32F397-9C84-4765-9840-50BF3893CAB6.TXT". And inside there will be a short instruction and a recovery key.
Look
Having saved the file, we proceed to the choice of the type of encryption. Since our local hard drive is protected, we select the first option: "New encryption mode".
The next screen requires confirmation that we really want to encrypt the disk, click "Continue", we get a message that the process will start after reboot and a proposal to reboot the computer.
Everything - the system disk of our server is encrypted.
We try to connect to it and ... Nothing happens!
Everything is logical. BitLocker will require you to enter a password at boot, and this happens even before the system is ready for remote operation. This cannot be done via RDP.
We go to the RuVDS page, which contains information about running servers.
Something very similar to the system prompt. Indeed, we will have to use the emergency mode access console in order to enter the password before booting the system:
Enter the password and see the continuation of the download. The emergency console can be closed and connected via RDP. By the way, we need such an operation every time the virtual server is restarted. Not very convenient, but that's the price of security.
Now, when we open the drive menu, we see new items in it: "Change BitLocker password" and "Manage BitLocker". Having opened the second item, we can see the status of the disk and its encryption management. Since I deliberately chose a small SSD for the demonstration, the encryption took less than five minutes. When it ended, the interface looked like this:
Bitlocker installation and disk encryption on the virtual server are now complete. Now, if someone gains physical access to your computer, they will not be able to connect to the server, even if they go to the provider's website under your login. And if he comes to the data center and connects from the inside to your VPS, he will still not be able to receive the data - it will be encrypted.
The main thing is not to keep in sight the file that contains the key to restore access!
By the way, how do you use this key if you forgot your BitLocker password? It's very simple, you need to reboot the server and go to the emergency console, but now choose not to log in, but restore. Press ESC and get an invitation to enter the key. One subtlety, you only need to enter numbers, and minus separators will be inserted automatically. If you enter incorrectly, you will receive an error message and a request to enter the key again. If entered correctly, the system will continue booting.
Configuring BitLocker on a Remote Server - Completed.
Encrypting data on Linux with dm-crypt
There are many different partition encryption solutions for Linux, we will use dm-crypt, a simple and reliable system that Microsoft uses in its Azure cloud.dm-crypt - a standard disk encryption system based on Linux kernel, based on: Device mapper, the subsystem creates and provides transparency to work with virtual devices; and crypt o API , an encryption subsystem that is used for VPN over IPsec and a number of other functions. Dm-crypt has two ways of working with a cryptocontainer, plain - in which the data does not contain a visible format and looks like a random set of bytes, and LUKS - which provides more options, for example, automatic detection of cryptocontainers by the system, but the file will contain metadata, according to which can determine the very fact of encryption. We will use the second method, via the LUKS protocol.
The server is selected in the same way as in the first section, except for the operating system. We will skip the pre-configuration steps, they can be found in the RuVDS manual and proceed to installing the encryption system. Let's update the package list and install cryptsetup - the dm-crypt command line interface (for simplicity, all commands will be entered as root):
Code:
apt update
apt install cryptsetup
To store encrypted data, you must first create a special file, which will then act as a device. It must be inseparable, and for this there are several ways, with varying degrees of security.
One of them is with the fallocate command.
Let's create a 512MB file named test-crypt in the home directory of the root user:
Code:
fallocate -l 512M / root / test-cryptThis is the easiest and fastest method, but the least secure, because the command simply allocates disk space without overwriting the data that was contained there.
It is safer to create a file using the dd (dataset definition) utility, it allows you not only to create a file, but also write information into it that will overwrite the previous content from the selected area. For example zeros from / dev / zero virtual device:
Code:
dd if = / dev / zero of = / root / test-crypt bs = 1M count = 512The most paranoid way is to populate the file from / dev / urandom. But it is also the slowest:
Code:
dd if = / dev / urandom of = / root / test-crypt bs = 1M count = 512After creating the file, you need to convert it to a LUKS section:
Code:
cryptsetup -y luksFormat / root / test-cryptAnswer YESthe program prompt and then set a password. Unlike BitLocker, there will be no recovery methods, private keys and other conveniences here; if you forget your password, the data will be irretrievably lost! Approach this issue very responsibly. Therefore, be sure to use the option -ythat asks for password confirmation.
Let's check what we got with the utility file:
Code:
file / root / test-cryptThe output should show something like:
Code:
test-crypt: LUKS encrypted file, ver 2 [,, sha256] UUID: 820a6557-ee7b-4f67-9f53-eb11586cc5dcThis means that the crypto container is created and ready to use, it remains to deploy it to the crypt-volume device:
Code:
cryptsetup luksOpen / root / test-crypt crypt-volumeCreate a filesystem there:
Code:
mkfs.ext4 -j / dev / mapper / crypt-volumeAnd select the mount point:
Code:
mkdir / mnt / crypt-filesThe encrypted device is ready to use, all that remains is to mount it and use it as a regular disk, all encryption and decryption operations take place "on the fly", transparent to the user and the system.
Code:
mount / dev / mapper / crypt-volume / mnt / crypt-filesLet's check our device. Let's copy some data into it, for example, the contents of the / etc / ssh directory and see what the dh utility says
Code:
cp -r / etc / ssh / / mnt / crypt-files /
df -h

Filesystem Size Used Avail Use% Mounted on
udev 928M 0 928M 0% / dev
tmpfs 191M 648K 191M 1% / run
/ dev / sda1 20G 2.7G 16G 15% /
tmpfs 955M 0 955M 0% / dev / shm
tmpfs 5.0M 0 5.0M 0% / run / lock
tmpfs 955M 0 955M 0% / sys / fs / cgroup
tmpfs 191M 0 191M 0% / run / user / 1000
/ dev / mapper / crypt-volume 465M 1.3M 429M 2% / mnt / crypt-files
As we can see, the device is mounted, has the volume determined by us and is filled by about 1% with files from the ssh directory.
In order to finish working with the crypto container, you need to unmount it and then disable it:
Code:
cd /
umount / mnt / crypt-files
cryptsetup luksClose crypt-volume
The work with the device is finished and we have the most ordinary file encrypted with our password, data that is not available to an outsider, even if he gets physical access to the server.
To use the crypto container again, you will need to initialize and mount it again:
Code:
cryptsetup luksOpen / root / test-crypt crypt-volume
mount / dev / mapper / crypt-volume / mnt / crypt-files
This completes the review of data encryption systems that can be used on virtual servers.
Good connection everyone!