
Carding
Professional
- Messages
- 2,870
- Reaction score
- 2,488
- Points
- 113
Hello everyone. It's no secret that the correct setting of an antique and substitution for a cardholder device is one of the most important components of a successful drive. There are many different types of antiques, each with its own pros and cons. Today we will analyze Che Browser-an anti-detection tool for embedding. Yes, this is how Che developers position their anti-detection software, which is a key advantage for us over other software. In this article, we will analyze Che Browser in detail, its weaknesses and strengths, and also configure it for driving.
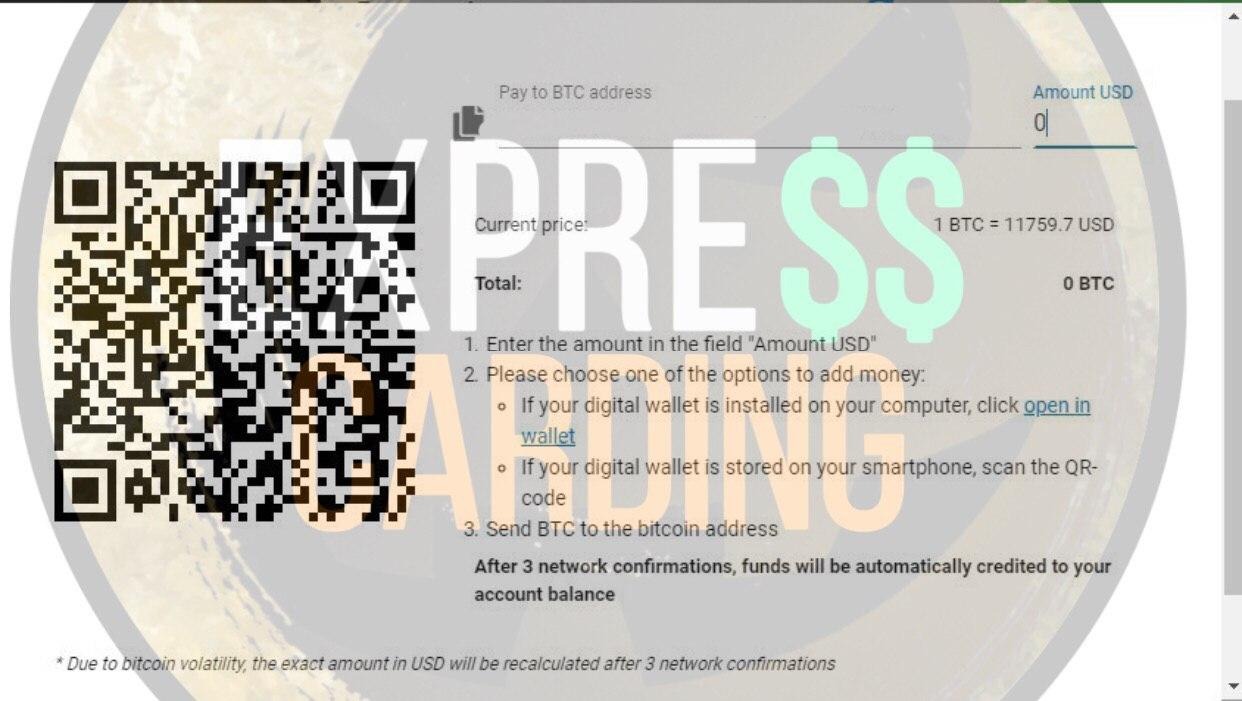
This section will contain all your transactions. Here you can also view the trance status and the number of confirmations. To add money to your balance, click "Add Money To Balance".

In the "Pay to BTC address" field, there will be a wallet attached to your account. We enter the deposit amount in "Amount USD" and transfer this amount to the kosh given to you. I advise you to immediately top up your balance with a reserve, as transactions in Che take a long time.
After the money arrives and the transaction is confirmed, go to the "Shopping" section.
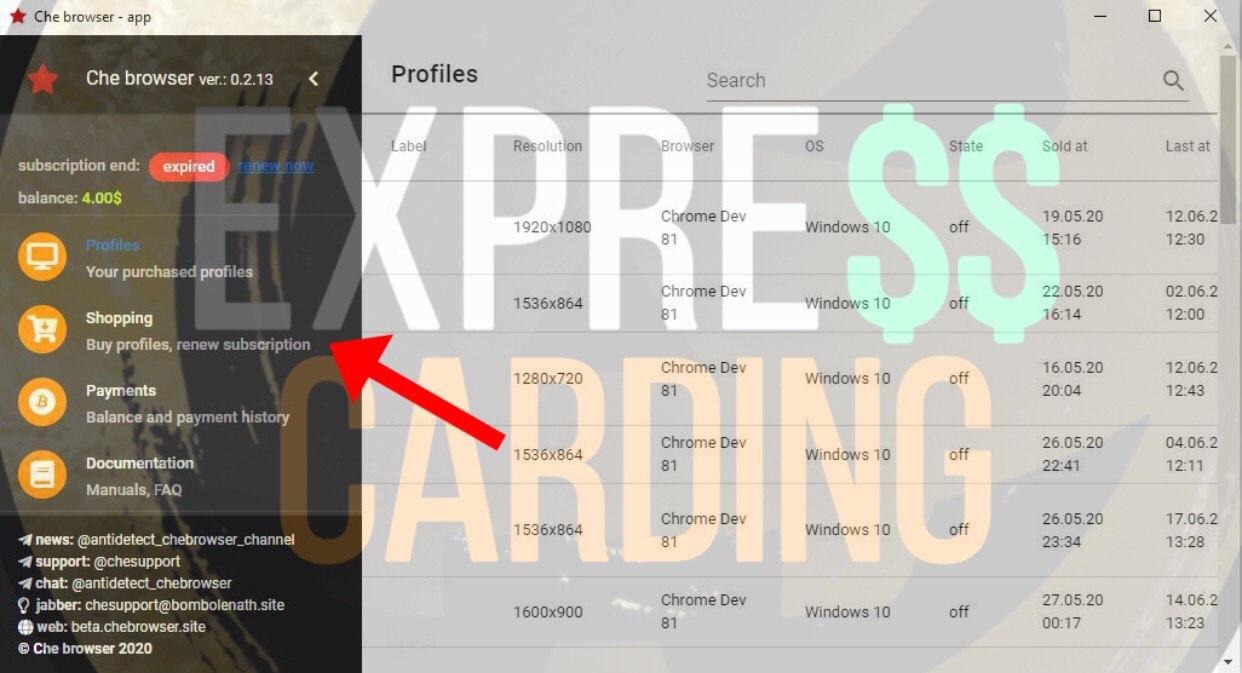
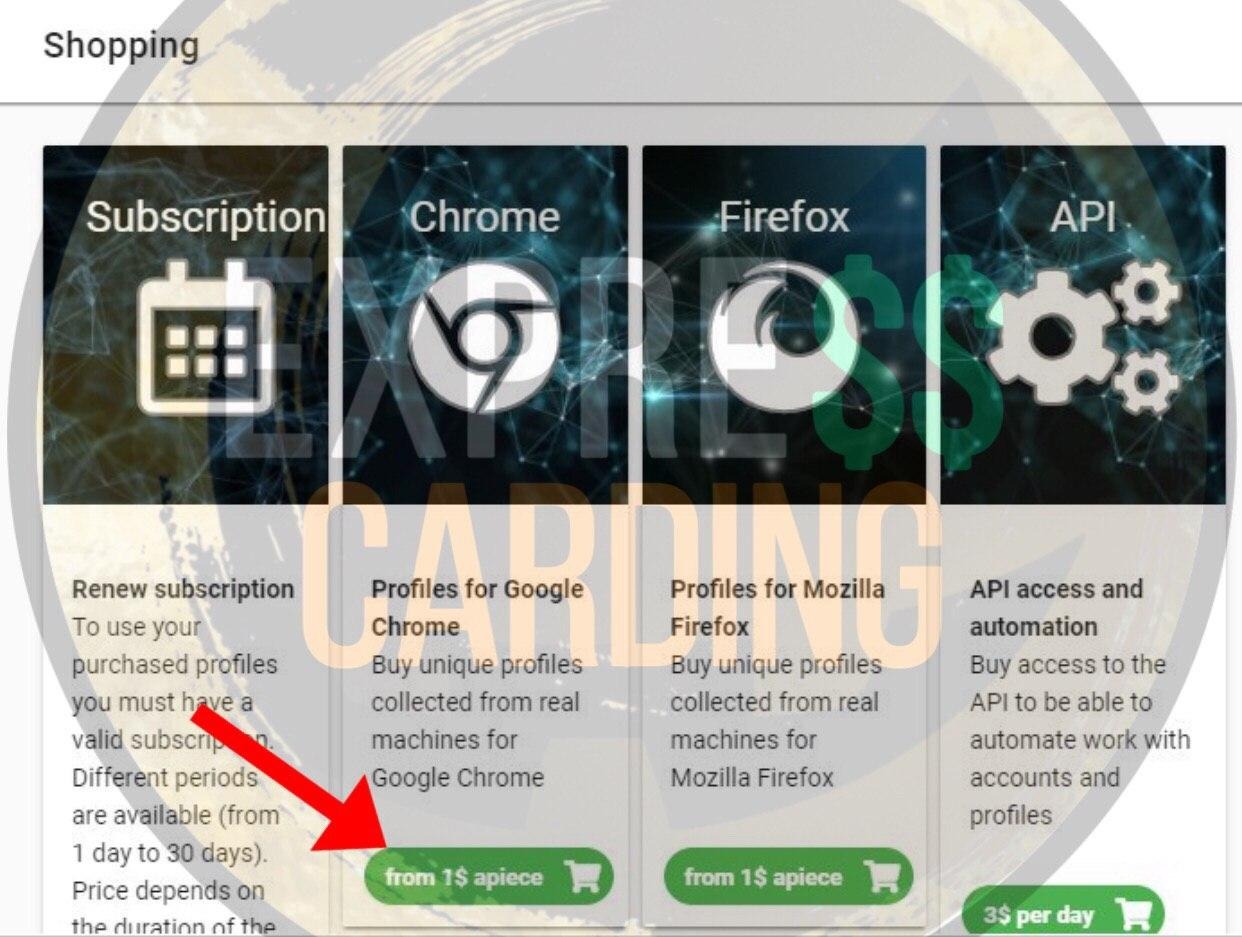
In this section, you will buy configs and subscriptions. To purchase a license, go to the "Subscription" section.
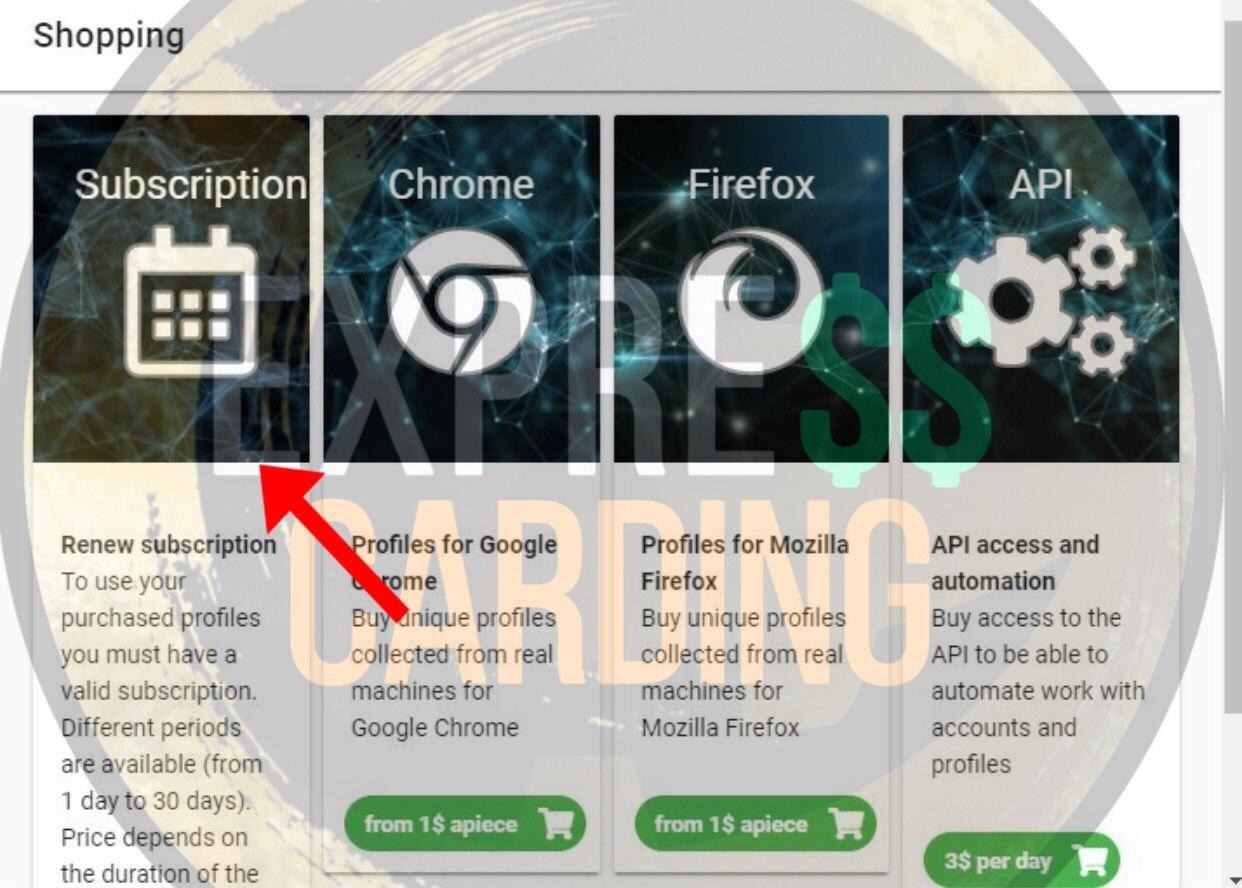
You can purchase an antique for a day, 7 days, or a month. You can see the price list below:

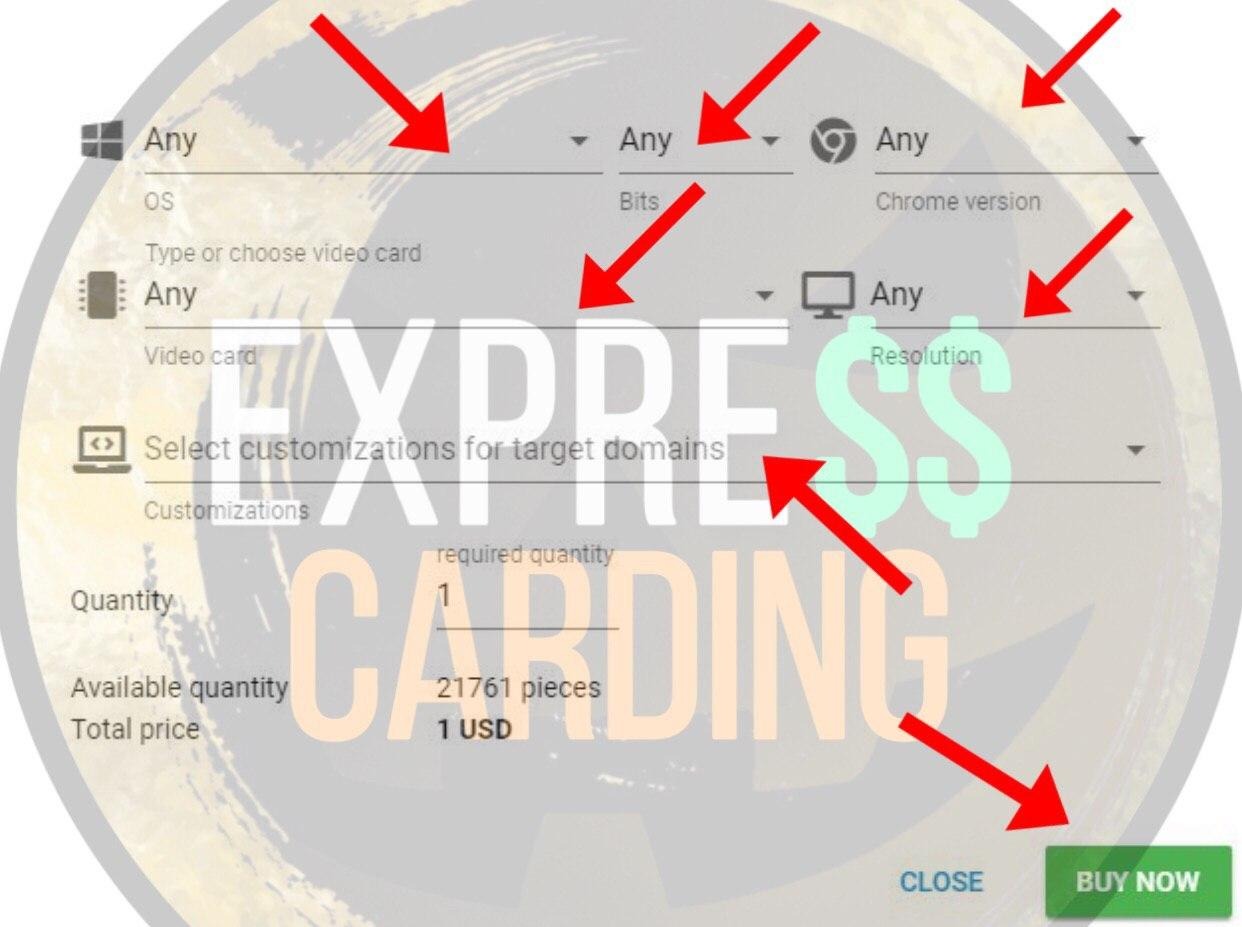
Now we configure your config for cardholder. In "OS" we enter the version of Windows cardholder, in Bits its bit depth. Choose the version of Chrome, I advise you to take the penultimate one, then choose the video card and screen resolution. After you have everything set up, click "Buy now".
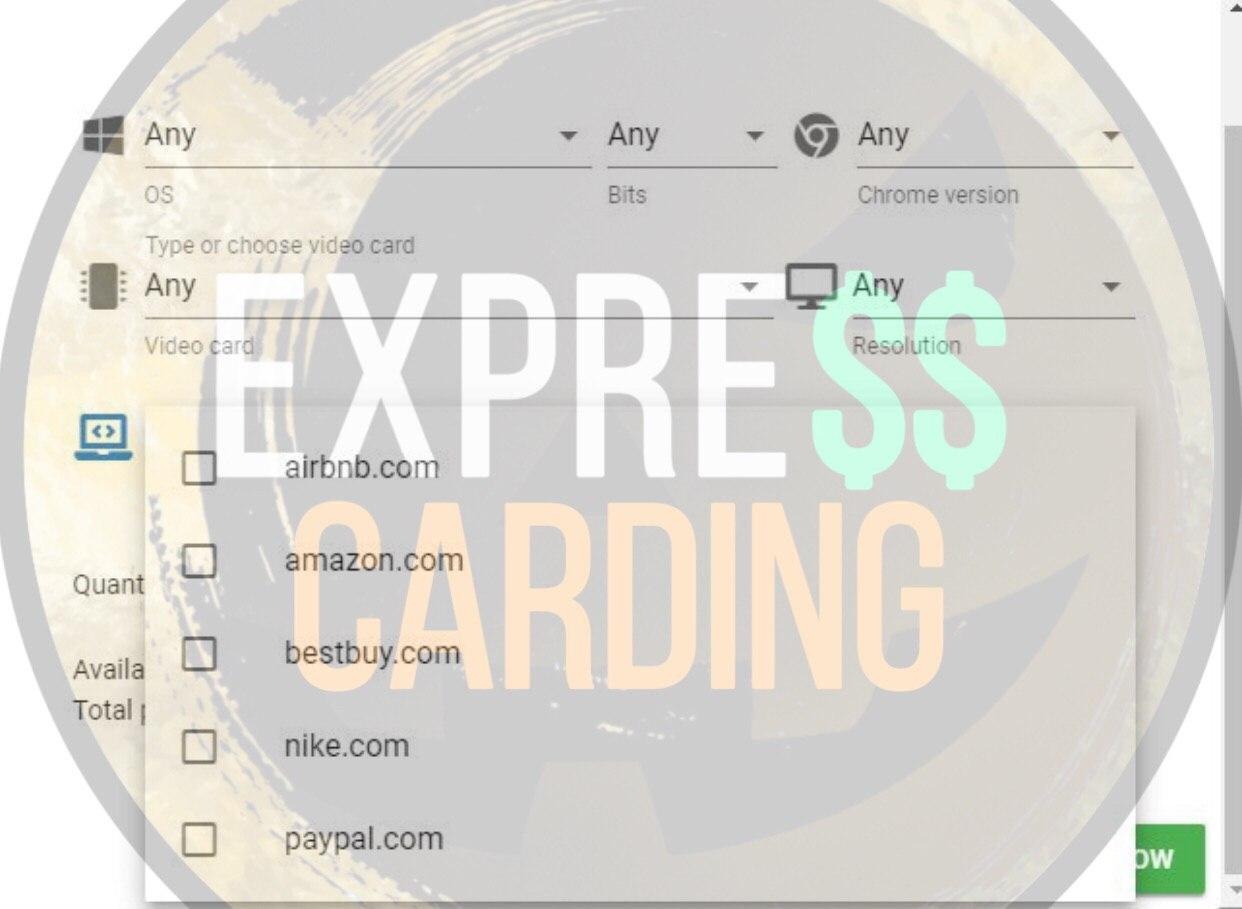
You can also add a special config for your link. This way your service will be even more loyal to you. Che offers configs for airbnb, paypal, and amazon. In my experience, I can say that these configs work really well, but the session cost will no longer be$ 1, but $ 2 or $ 3, depending on the config you add.
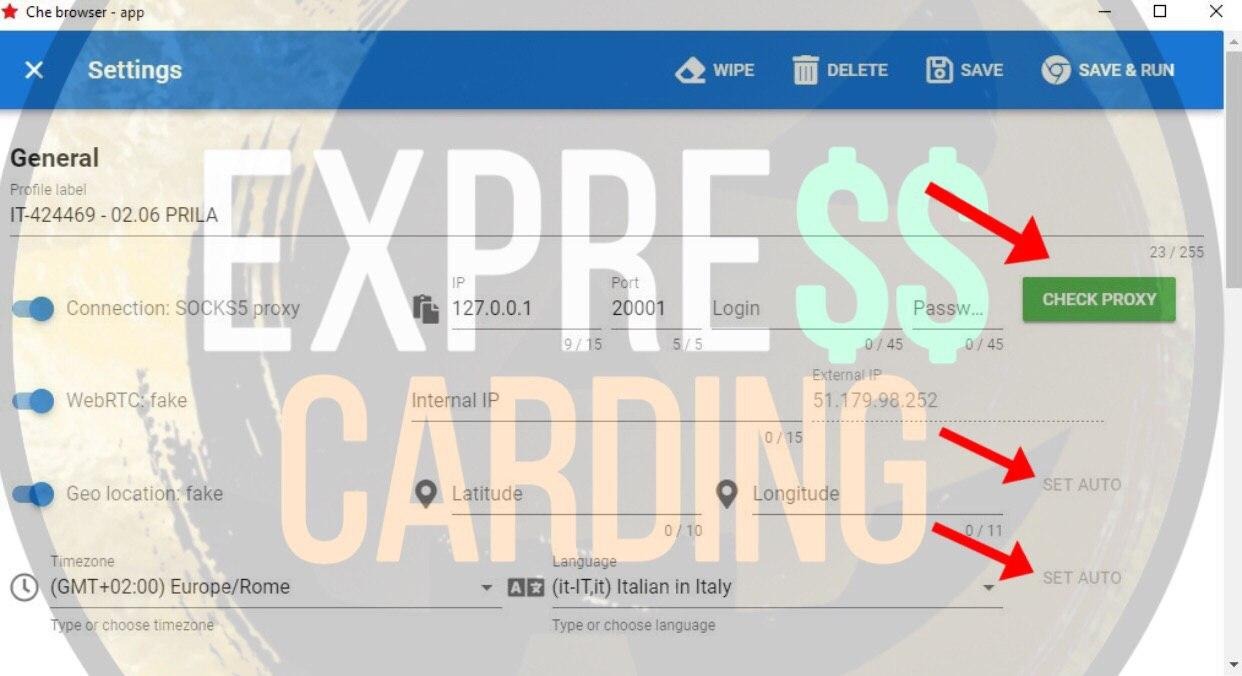
Next, go to the "Profiles" section and poke at the session that we purchased. Register the IP and port, click "Check Proxy". Che will create settings for your sock, such as city, timezone, and language. Click on "Set Auto" in both sections, as shown in the screenshot.
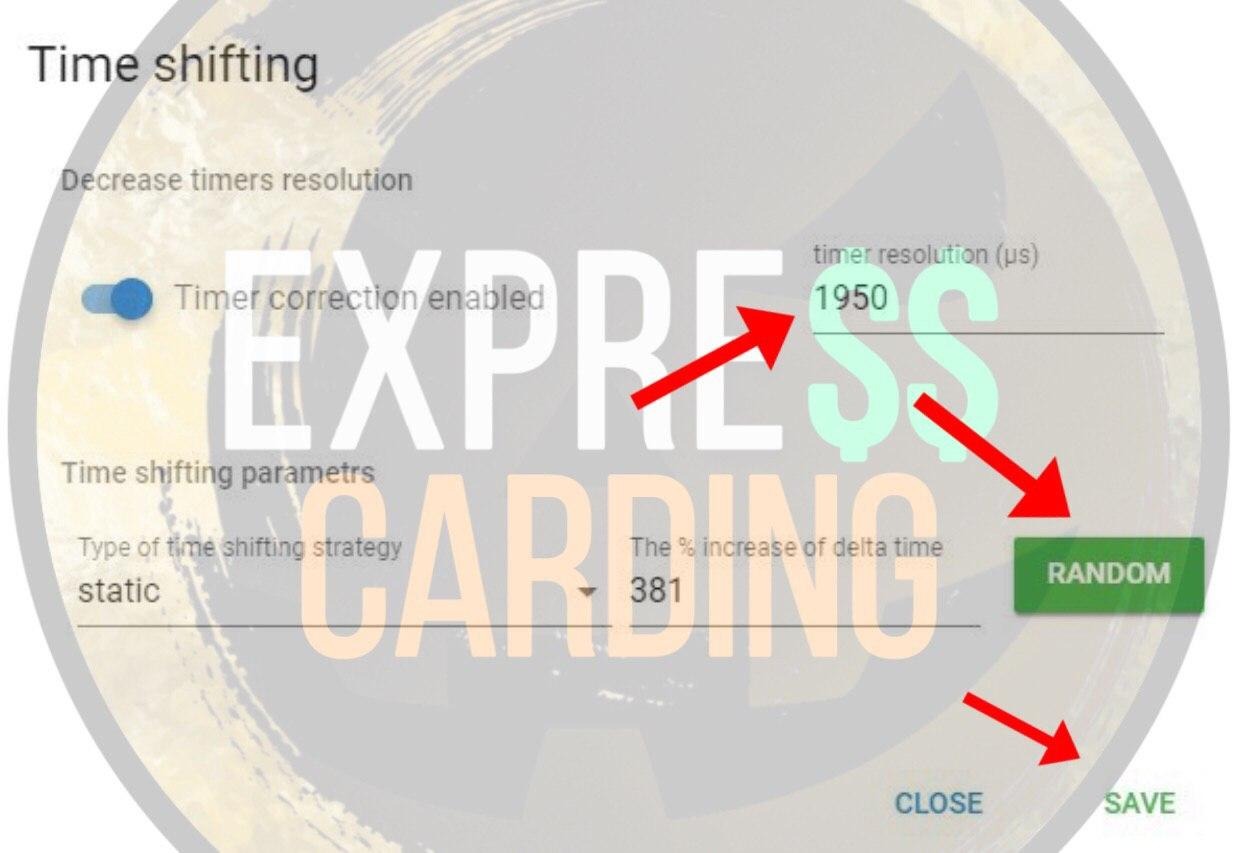
Scroll through below, now configure the remaining sections. Click on "Time Shifting".

In the "timer resolution" field, enter any number greater than 1000, then click on the "Random" button until the number in the "The % increase of delta time" section is in the range from 200 to 400. After that, click "Save".
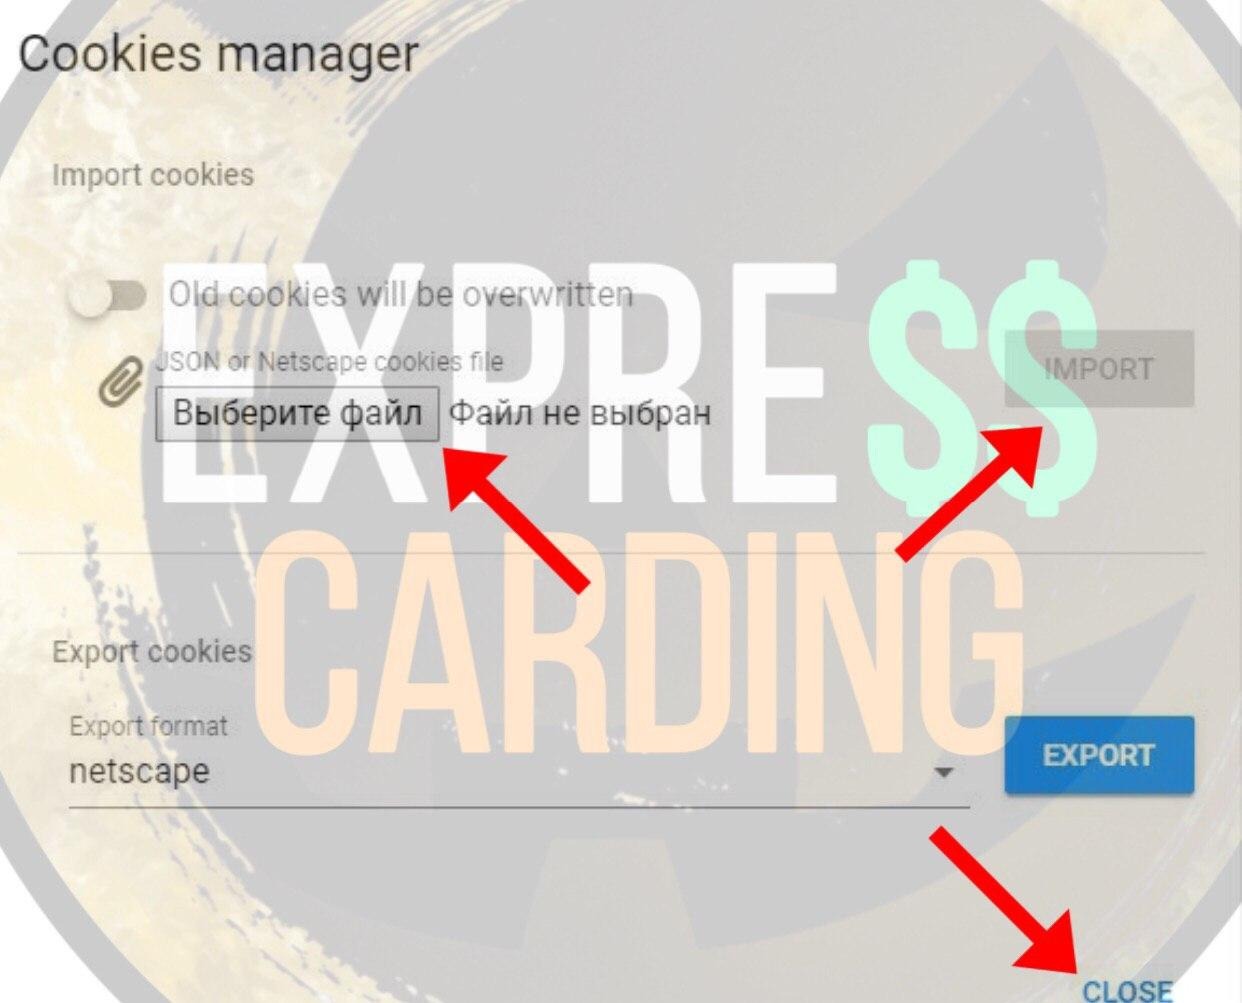
After that, we load the cookie. Click on the "Cookie Manager" button, add a file with our cookies and click import. When the cookies are loaded, click "Close".
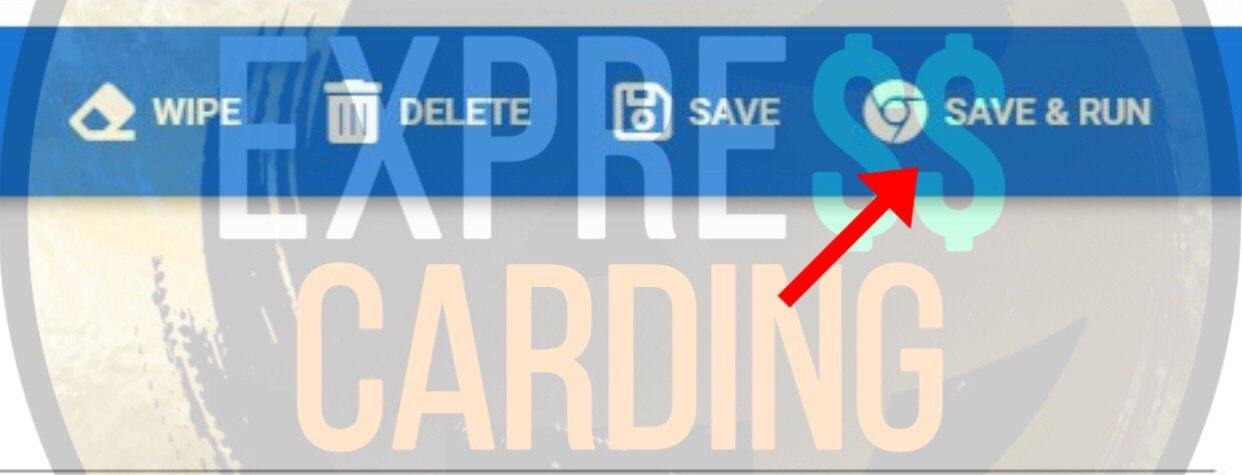
After you have set up everything, click "Save & Run" and that's it - your session is saved and started.
If you purchased this antique and set it up using the manual , everything is ready, your session is set up, and you can start working.
Good luck to all and see you soon!
Choosing an antique for work is a very important point. But do not think that the software will beat you in, pay you, and bring you money on a silver platter. Antic will help you easily and quickly make a replacement for the cardholder device, which will significantly increase the chances of successful insertion, but if something doesn't work out, you should first look for the problem in yourself.
Moving on to the purchase
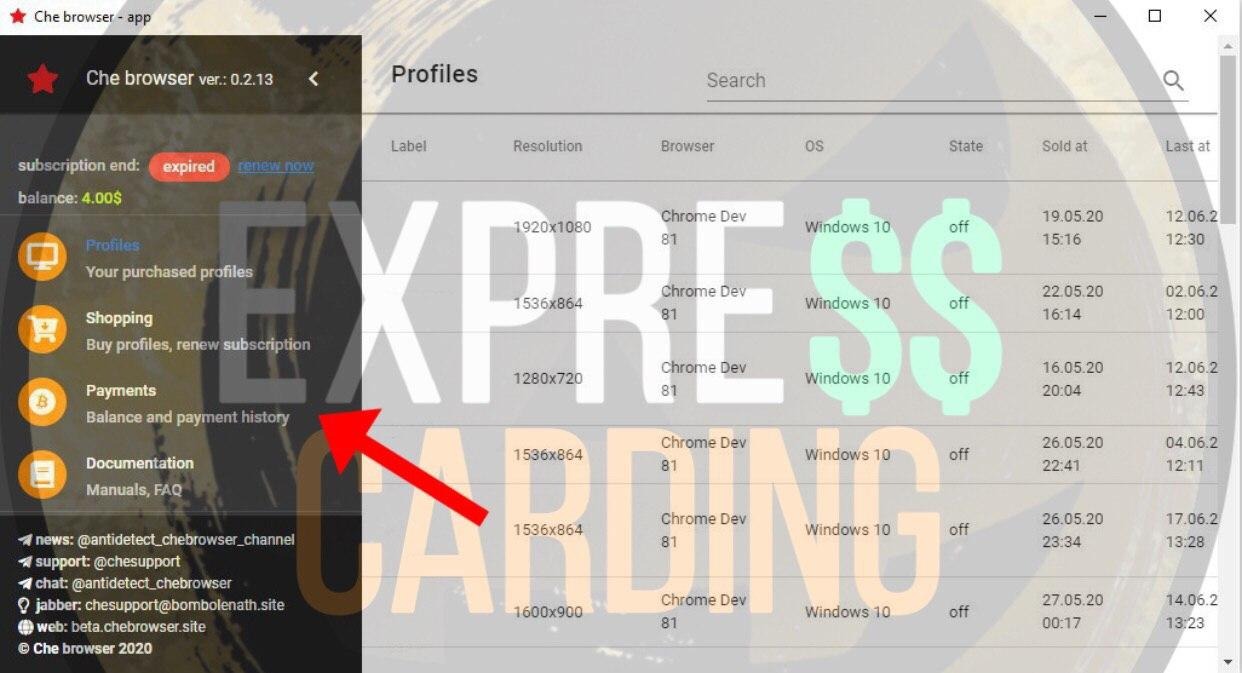
First, you need to install Che Browser and register. Initially, prepare your email address for registration. You can install the software from the official Che website: https://beta.chebrowser.site/After completing registration, the main menu will open in front of you. To pay for the license and further sessions and configs, you need to top up your balance. To do this, go to the "Payments" section.You can register from the app itself. After you have installed the software, launch it, go through the register and you're done. You can also request a trial for a week from their support team - @CheSupport.
This section will contain all your transactions. Here you can also view the trance status and the number of confirmations. To add money to your balance, click "Add Money To Balance".
In the "Pay to BTC address" field, there will be a wallet attached to your account. We enter the deposit amount in "Amount USD" and transfer this amount to the kosh given to you. I advise you to immediately top up your balance with a reserve, as transactions in Che take a long time.
After the money arrives and the transaction is confirmed, go to the "Shopping" section.
In this section, you will buy configs and subscriptions. To purchase a license, go to the "Subscription" section.
You can purchase an antique for a day, 7 days, or a month. You can see the price list below:
- 1 day - 5$
- Week - 14$
- Month - 30$
Setting up a session
To create a session in Che, you need to buy a config file. A basic Chromium config costs $ 1. Accordingly, 1 session = $ 1. But you can use this session as much as you want. Click on "Chrome" and go to session settings.
Now we configure your config for cardholder. In "OS" we enter the version of Windows cardholder, in Bits its bit depth. Choose the version of Chrome, I advise you to take the penultimate one, then choose the video card and screen resolution. After you have everything set up, click "Buy now".
You can also add a special config for your link. This way your service will be even more loyal to you. Che offers configs for airbnb, paypal, and amazon. In my experience, I can say that these configs work really well, but the session cost will no longer be$ 1, but $ 2 or $ 3, depending on the config you add.
Next, go to the "Profiles" section and poke at the session that we purchased. Register the IP and port, click "Check Proxy". Che will create settings for your sock, such as city, timezone, and language. Click on "Set Auto" in both sections, as shown in the screenshot.
Scroll through below, now configure the remaining sections. Click on "Time Shifting".
In the "timer resolution" field, enter any number greater than 1000, then click on the "Random" button until the number in the "The % increase of delta time" section is in the range from 200 to 400. After that, click "Save".
After that, we load the cookie. Click on the "Cookie Manager" button, add a file with our cookies and click import. When the cookies are loaded, click "Close".
After you have set up everything, click "Save & Run" and that's it - your session is saved and started.
Results
I believe that Che in terms of substitution is one of the best products on the market of anti-detect browsers. Whether to use it or not is up to you, but I can safely say that when working with it, you will never encounter banal leaks and fraud.If you purchased this antique and set it up using the manual , everything is ready, your session is set up, and you can start working.
Good luck to all and see you soon!