Brother
Professional
- Messages
- 2,590
- Reaction score
- 518
- Points
- 83

So, we have a tunnel to the VPN provider and we want to be sure that all traffic, including DNS requests, goes only through this tunnel, and if it is unavailable, users should in no case go directly through the provider's network. Installed pfSense CE version 2.5.2, registration on CyberGhost passed - let's go.
CyberGhost
You may have another VPN provider - CyberGhost was chosen for its ease of setup and to demonstrate how to get DNS servers when connected. If ExpressVPN is not blocked in your country, the settings will be almost identical.Registration passed, the required number of months was paid. On the VPN> Device Management page, select Manual Installation -> Configure Device. In the window that appears, we simply select OpenVPN as the protocol, which country and server group you want. We call this pfSense.
Further, on the VPN> Device Management page, we see pfSense in the list of active VPN devices. Click on "view" in a new window and download the archive with the configurations. Username and Password will also be useful to us when setting up the client.
Certificates
We unpack the downloaded archive pfsense_openvpn.zip and see several files there. First we need ca.crt, client.crt and client.key.Go to pfSense on the System / Certificate Manager / CAs page and click the Add button.

We call this case GyberGhost VPN CA, select an existing Certificate Authority as the Import method and paste the contents of the ca.crt file into the Certificate data field. CA is imported.

Now go to the System / Certificate Manager / Certificates tab, the Add button, select the Import an existing Certificate as the method , name CyberGhost Client Certificate and copy the contents of the client.crt file into the Certificate data field, and the client. key file into the Private key data field ...
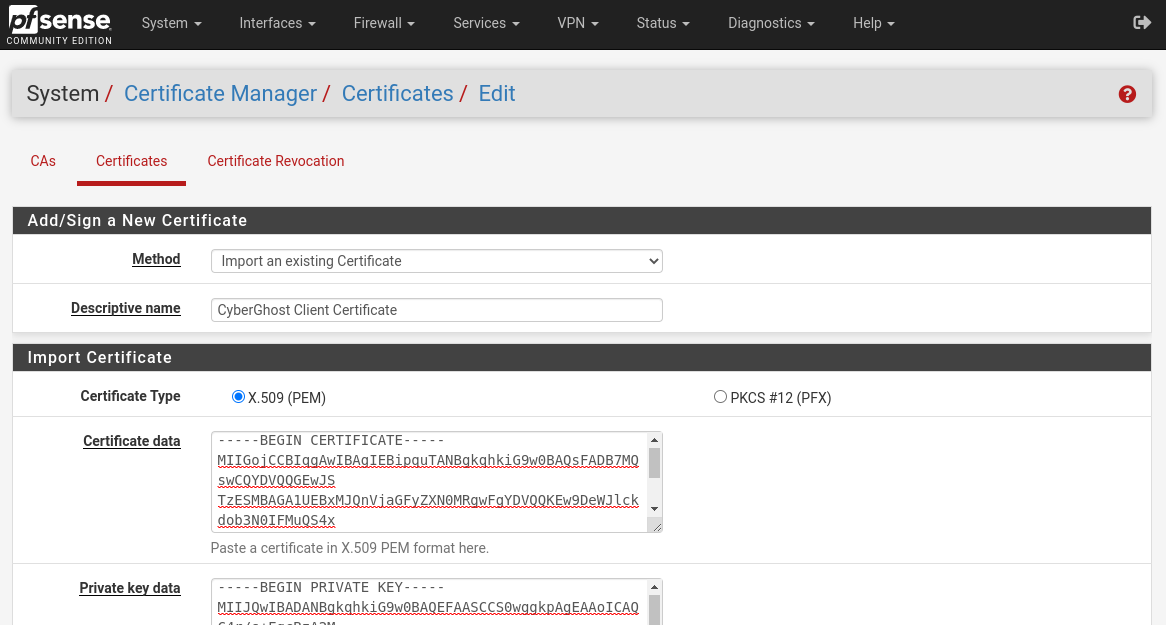
The certificate is imported.

OpenVPN client
Let's configure the OpenVPN client. Click Add on the VPN / OpenVPN / Clients page, and also open the contents of the openvpn.ovpn file from the archive. In my case, it looks like this:
Code:
client
remote 87-1-at.cg-dialup.net 443
dev tun
proto udp
auth-user-pass

resolv-retry infinite
redirect-gateway def1
persist-key
persist-tun
nobind
cipher AES-256-CBC
ncp-disable
auth SHA256
ping 5
ping-exit 60
ping-timer-rem
explicit-exit-notify 2
script-security 2
remote-cert-tls server
route-delay 5
verb 4

ca ca.crt

cert client.crt

key client.key
We begin to fill in the client settings fields. If something is not specified, then we leave it by default. Go:
- Server host or address: host from the remote line, in my case 87-1-at.cg-dialup.net
- Server port: port from the remote line, in my case 443
- Description: CyberGhost VPN
- Username / Password: copy from the router preview page (see above)
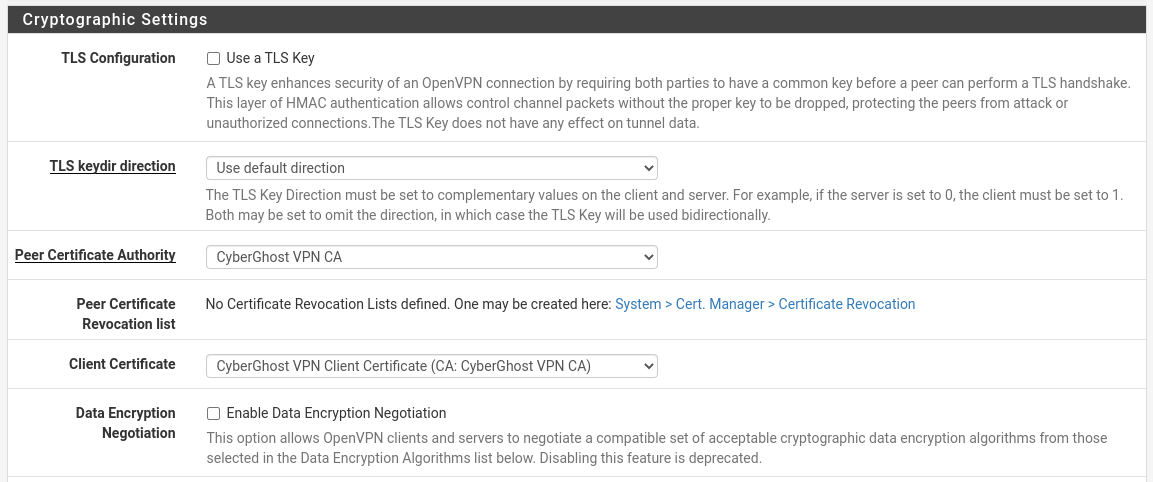
- TLS Configuration: removing
- Peer Certificate Authority: CyberGhost VPN CA
- Client Certificate: CyberGhost VPN Client Certificate
- Data Encryption Negotiation: disable (line ncp-disable)
- Fallback Data Encryption Algorithm: leave AES-256-CBC (cipher line)
- Auth digest algorithm: keep SHA256 (auth line)
- Pull DNS: allows you to use the DNS provided by the client, enable
Save and check on the Status / OpenVPN page that the client is connected (Status = up):

DNS setup
Our task is to prohibit the use of public DNS servers by network clients - we do not want to show where clients go through the VPN tunnel (ie exclude DNS Leak).
To begin with, we will assign an interface to OpenVPN, this will be useful to us in the future. On the Interfaces / Interface Assignments page, select ovpnc1 and click Add. Name CyberGhost_VPN, check Enable and save.

Go to the System / General Setup page and remove everything from the DNS Servers list. Check the DNS Server Override checkbox - this will allow the DNS server received from OpenVPN to be used as a forwarder.
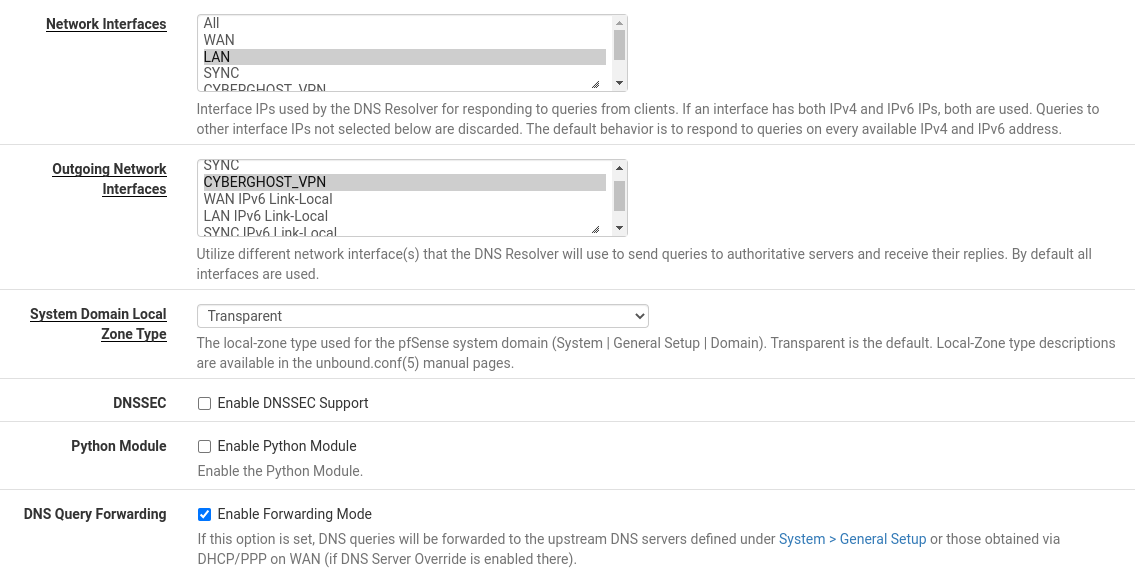
Let's configure the DNS server at Services / DNS Resolver / General Settings . We only allow requests on LAN and loopback interfaces - Network Interfaces = LAN, Localhost. Select only CyberGhost_VPN in Outgoing Network Interfaces and tick DNS Query Forwarding.
Eliminate DNS Leak
This is where the trick begins. Depending on the type of connection to the provider, we need to make different settings in order to exclude the provider's DNS from entering the forwarder list, otherwise, if the VPN is dumped, all DNS requests will go through the next DNS priority, ie the one that we automatically receive from the provider.First, let's add the VPN server addresses on the Services / DNS Resolver> Host Overrides page. First, we get them with the command `dig a 87-1-at.cg-dialup.net`:
Code:
$ dig a 87-1-at.cg-dialup.net

... missed ...

;; ANSWER SECTION:
87-1-at.cg-dialup.net. 30 IN A 37.19.223.231
87-1-at.cg-dialup.net. 30 IN A 37.19.223.5
87-1-at.cg-dialup.net. 30 IN A 37.19.223.10
87-1-at.cg-dialup.net. 30 IN A 37.19.223.203
87-1-at.cg-dialup.net. 30 IN A 37.19.223.32
87-1-at.cg-dialup.net. 30 IN A 37.19.223.217
87-1-at.cg-dialup.net. 30 IN A 89.187.168.165
87-1-at.cg-dialup.net. 30 IN A 37.19.223.251
87-1-at.cg-dialup.net. 30 IN A 37.19.223.8
87-1-at.cg-dialup.net. 30 IN A 37.19.223.250
Let's create a Host Entry by listing the received addresses separated by commas:

If a static address is used to connect to the provider, then everything is ready for this part, we will not have any other DNSs except those that arrive when connecting via OpenVPN.
If we have a DHCP connection, then we need to disable the reception of DNS settings via DHCP. There is no such option in the interface settings, but there is a Configuration Override that allows you to use your own configuration file. So we will use it.
Let's copy the script launched when connecting via DHCP:
Code:
cp / usr / local / sbin / pfSense-dhclient-script /usr/local/sbin/pfSense-dhclient-script.nodnsAnd comment out lines 359, 388-390 in it. Let's copy the automatically generated DHCP client config:
Code:
cp /var/etc/dhclient_wan.conf /usr/local/etc/nodns_dhcp.confAnd we will change only the `script` line there:
Code:
script "/usr/local/sbin/pfSense-dhclient-script.nodns";We indicate the path to our config in the Configuration File Override:

That's all - now the DNS settings received via DHCP will be ignored.
What if a PPPoE connection? We'll have to fix something in the script called upon connection, - /usr/local/sbin/ppp-linkup. Let's replace one line a bit:
Code:
- if [ "${DNSALLOWOVERRIDE}" = "true" ]; then
+ if [ "${DNSALLOWOVERRIDE}" = "X" ]; then
Likewise, now the DNS settings received via PPPoE will be ignored. But that is not all.
Here attentive pfSense users may ask - why all these edits, if the DNS server received via OpenVPN will have priority over those that arrive via DHCP / PPPoE? The fact is that if for some reason the VPN provider's DNS server does not respond, the resolver will start trying to send a request to the next priority DNS server, and the requests will go past the tunnel.
Firewall configuration
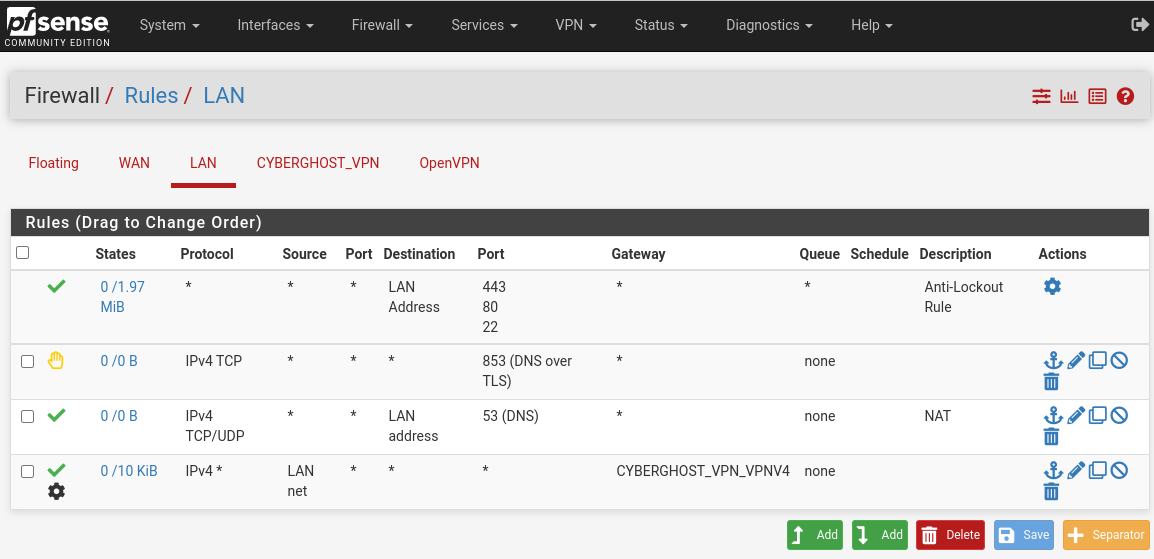
It is necessary to exclude the possibility of using any other DNS servers by users / programs of our LAN; in addition, it is provided by the VPN provider.To do this, create a rule that blocks DNS-over-TLS traffic (853 TCP port) on the Firewall / Rules / LAN - Add tab with an up arrow (!):
- Action: Reject
- Address Family: IPv4
- Protocol: TCP
- Source / Destination: Any

And let's create a Port Forwarding rule that redirects all DNS requests outward to our pfSense. Firewall / NAT / Port Forward tab -> Add:

- Interface: LAN
- Address Family: IPv4
- Protocol: TCP / UDP
- Destination: Invert match - enable , Type : LAN Address
- Destination port range: DNS
- Redirect target IP: LAN address
- Redirect target port: DNS
- Filter rule association: Add associated filter rule

On the System / Advanced / Miscellaneous page, enable Skip rules when gateway is down, so that when the VPN is dumped, rules that use the gateway of this VPN are not created. In this case, there are no rules, as it were, and there are no other rules, - respectively, deny, traffic will be dropped.
Let's create the rule itself (Add with a down arrow):
- Action: Pass
- Interface: LAN
- Address Family: IPv4
- Protocol: Any
- Source: LAN net
- Destination: Any
- Advanced Options / Gateway: CYBERGHOST_VPN_VPNV4
Let's configure Outbound NAT for LAN clients. On Firewall / NAT / Outbound, switch Mode to "Hybrid Outbound NAT rule generation" and click Save. Now you can add the following rule:
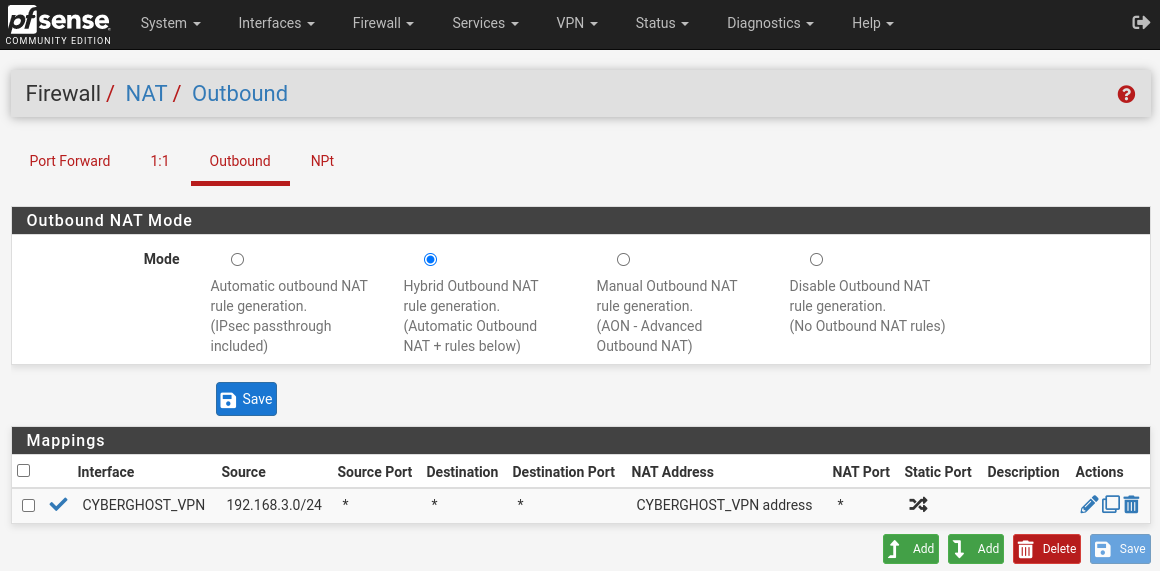
- Interface: CYBERGHOST_VPN
- Address Family: IPv4
- Protocol: any
- Source: the address of our LAN network, in my case - 192.168.3.0/24
- Destination: Any
- Address: Interface Address
Setting up pfBlockerNG
I already wrote in more detail about setting up this miracle blocker earlier, so let's go over only what we need from it. First, install the pfBlockerNG-devel package via System / Package Manager / Available Packages, make the default configuration using the wizard on Firewall / pfBlockerNG and move on to things specific to us.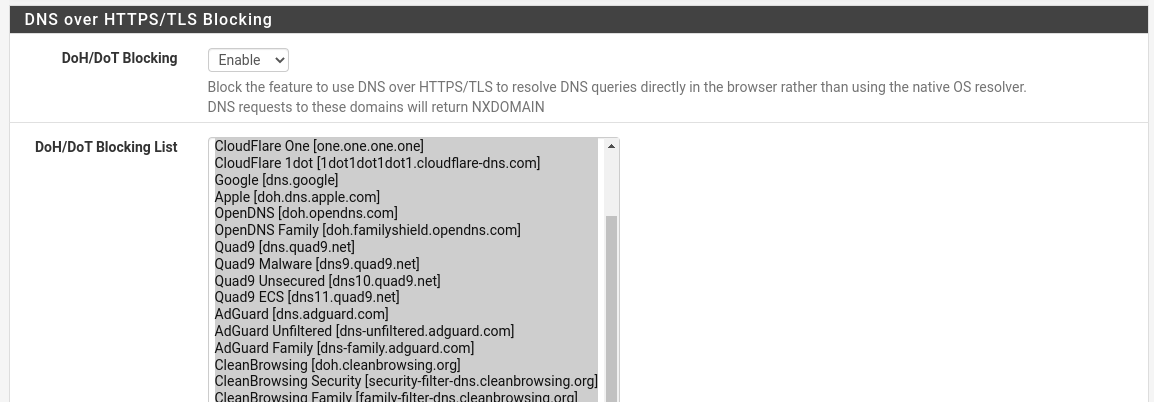
Namely, blocking DoH servers. On the Firewall / pfBlockerNG / DNSBL / DNSBL SafeSearch page, translate DoH / DoT Blocking to Enable and select all servers in the DoH / DoT Blocking List via Ctrl + A.
Basically, this is the main thing we need from pfBlockerNG - to exclude DNS leak through DoH servers. Optionally, you can configure feeds to block IP or DNS addresses, for example, use feeds from the Firebog_Trackers category for the track block, or block ads using Firebog_Advertisement, ADs and Easylist feeds.
Don't forget to run Force / DNSBL on Firewall / pfBlockerNG / Update to apply the changes.
Ready
Checking: https://www.cyberghostvpn.com/You can additionally check that the traffic will not go past the VPN if it falls off - just stop the OpenVPN client on Status / OpenVPN (the icon with a "brick") and make sure that clients will not even be able to ping anything by the IP address.
As mentioned at the beginning, this configuration is applicable to other VPN providers working on OpenVPN, minor differences can only be in the correct "interpretation" of the .ovpn config and for configuring the OpenVPN client in pfSense.