CarderPlanet
Professional
- Messages
- 2,552
- Reaction score
- 696
- Points
- 83
Things to know and do before installation
The first thing to take care of is root permissions. Without them, some functions of the utilities installed by us may not be supported or work incorrectly. Therefore, I highly recommend getting them. This is especially true for users with Android 10 and later.Getting root is unique in each case, because it directly depends on the specific device model and Android version. In this article, I will use my old Samsung Galaxy S6 (SM-G920F) on Android 7.0 Nougat, which already has a special tool for root. In other cases, you will have to google and find out how to get the root specifically on your device. On the w3bsit3-dns.com forum, there is almost always the necessary instruction.
We also need Termux - a simple and convenient terminal that gives many features of the Linux environment, which will allow us to execute our commands in a suitable environment and not bother with pre-setting the environment.
I also recommend installing the tsu utility, which will give you the ability to execute commands from root. If it doesn't work as expected, check out the GitHub repository that configures Termux to root. This is necessary so that Termux immediately has root access, which may be needed for further operations.
I also recommend updating the package list, as we usually do in the Kali desktop:
Code:
$ apt-get updateA few words about Kali NetHunter
If you are one of those lucky ones whose device is on the list of supported devices, I recommend giving Kali NetHunter a try. It is a platform created by the Kali Linux developers specifically for Android phones. A lot of working software from the desktop version of Kali is immediately available in NetHunter. The images can be found on the official website. This is a more powerful suite than what you can get with Termux.
Installing Metasploit
The full description of Metasploit is a topic for a separate article, so let's go over it briefly. The Metasploit Framework is a framework for building, debugging, and of course exploiting.You can install Metasploit Framework (MSF) on Android 7 or higher using two commands:
Code:
$ pkg install unstable-repoOn Android 5.xx - 6.xx MSF is installed using a slightly different method:
Code:
$ curl -LO https://github.com/termux/termux-packages/files/3995119/metasploit_5.0.65-1_all.deb.gzWARNING
Installation may be delayed. Do not close your Termux session until the end of the MSF installation!All these commands should be executed with the rights of a regular user, unless otherwise specified: when executed from root, intractable problems may arise.
In particular, when running apt from root, we get crashed SELinux contexts, which will then prevent us from installing packages.
WARNING
Now, to make sure everything works for us, run Metasploit:It is not worth updating MSF by manually editing $PREFIX/opt/metasploit, as this can lead to dependency problems.
Code:
$ msfconsole
Metasploit Framework
As you can see, everything is fine and you have 2014 exploits at your disposal.
Install ngrok
Ngrok is a cross-platform software for creating secure network tunnels from a public endpoint to a locally running network service. The utility also collects all traffic and logs it for analysis.Before proceeding, make sure that the Internet is connected (via "mobile data") and the access point is activated, as it is necessary for ngrok to work correctly.
First, we update and install Python 2:
Code:
$ pkg update && pkg upgrade && pkg install python2Now we need to register our ngrok account.
As soon as you register, you will be redirected to your personal account page, where you will need to find and copy your authentication token, as shown in the screenshot.

AuthToken for ngrok
Next, you need to download the archive with ngrok for Linux-based systems with ARM architecture.

Download ngrok
Then go to Termux and go to the directory where you downloaded the archive with ngrok. For example:
Code:
$ cd / sdcard / DownloadsEnter the command ls |grep ngrok and check that the archive is here. Now we need to unzip it:
Code:
$ unzip ngrok-stable-linux-arm.zipAfter that, enter again ls |grep ngrok and check if you have the ngrok executable file. If it is not there, then before the next step, go to the directory with it:
Code:
$ cd ngrok-stable-linux-armAnd move the executable to Termux home directory:
Code:
$ mv -v ngrok / $ HOMELook where the file was moved and navigate there using the cd and commands ls.
Now you need to set the executable flag of the file:
Code:
$ chmod + x ngrokAnd do the first run:
Code:
$ ./ngrokRemember you copied your authentication token? Enter this command so ngrok knows who is using it:
Code:
$ ./ngrok authtoken tokenAnd start the server:
Code:
$ ./ngrok http 80You will see the screen as in the screenshot.

Ngrok
Great, now you're ready to attack any targets!
Install sqlmap
Quoting from the official website: "Sqlmap is an open source penetration testing tool that automates the detection and exploitation of SQL injection flaws and hijacking database servers."SQL injection made easy."
With the installation, everything is elementary. You have a choice: install the stable version 1.4.3 or the newest version 1.4.5.34. The first can be put simply nowhere:
Code:
$ pkg install sqlmapAnd that's all. To run the utility, write the command
Code:
$ sqlmap -u <URL>
Sqlmap 1.4.3
Or you can install yourself a newer version, which is still in development. To do this, you need to clone the official sqlmap project from GitHub:
Code:
$ git clone https://github.com/sqlmapproject/sqlmap.gitNext, go to the folder with sqlmap:
Code:
$ cd sqlmapAnd, using python2, run sqlmap with the same required parameter:
Code:
$ python2 sqlmap.py -u link
Sqlmap 1.4.5.34
Now more than half of the Internet databases can be in your smartphone! But don't forget that by using this powerful tool, you risk getting into trouble with the law.
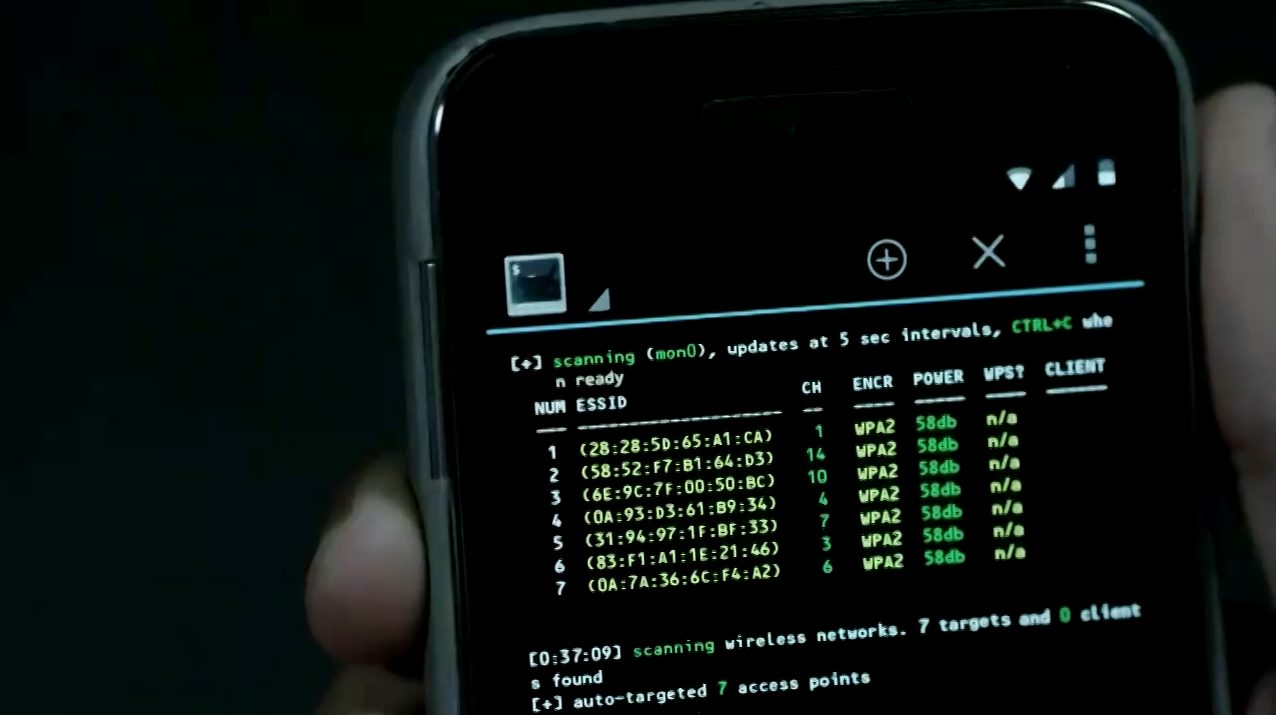
Install aircrack-ng
Aircrack-ng is a set of utilities designed to detect wireless networks, intercept their traffic and audit WEP and WPA / WPA2-PSK encryption keys.Here, everything is far from so simple. I think you've heard how difficult it is to put your smartphone's Wi-Fi adapter into monitoring mode. In the official Termux repositories, there is an iwconfig utility package for this case, which manages wireless networks. We need to install it.
First, you need auxiliary utilities:
Code:
$ pkg install root-repoNow you can install iwconfig with the rest of the tools to work with wireless networks:
Code:
$ pkg install wireless-toolsAnd also put iw separately:
Code:
$ pkg install iwNow you will need to log in as root and create an instance of the monitor. To do this, we will do this:
Code:
$ tsuLet's check our adapters and their statuses:
Code:
$ iwconfigIf something is displayed wrong, check if the Wi-Fi is working and make sure it is not connected to any networks.
Next, we need to bring up our monitor:
Code:
$ ifconfig mon0 upOf course, not all Android devices support monitoring mode. You can check this with the bcmon application, which, among other things, can enable monitoring mode on compatible Broadcom chips (these are Nexus devices and some others). For everyone else, you will have to buy a USB-OTG adapter, into which you can plug one of the supported Kali desktop adapters. To do this, you need to rebuild the kernel with the necessary drivers. If you have no experience in rebuilding the kernel, I recommend contacting the topic of your device at w3bsit3-dns.com or XDA-developers. Often there are builds of Kali with a ready-made kernel.
Now we can install aircrack-ng:
Code:
$ pkg install aircrack-ngLet's look at a short man:
Code:
$ man aircrack-ng
Aircrack-ng
And we can run airodump-ng:
Code:
$ airodump-ng -i mon0Now you can intercept traffic from open points, spam with deauth frames, disconnecting unwanted neighbors from third-party devices from the Internet, catch handshakes to crack passwords. It's not for me to teach you.
Installing Nmap
Nmap is a utility for scanning networks. It can find open ports, trace, check for vulnerabilities using NSE scripting. For a better understanding of this application, it is worth reading two articles from our magazine about NSE scripting and its use to bypass firewalls, DoS attacks and more.In our case, the capabilities of Nmap may be slightly curtailed, because we are using the version ported to Android. However, it is in the official Termux repositories, which makes life easier for us:
Code:
$ pkg install nmapLet's see a short man:
Code:
$ nmap
Nmap
For intensive scanning, I use the following parameters:
Code:
nmap -T4 -A -vWe put a full-fledged Kali Linux on the phone
Kali NetHunter can be installed on some phones, but we are not going to talk about it now. We will install a full-fledged Kali image on our phone and connect to its desktop via VNC. You will have an image of Kali Linux, which will allow you to use those programs that you cannot start on Termux (for example, BeEF-XSS).First, we need to download an installer for the cut-down distributions from Google Play - Linux Deploy, a set of necessary packages for correct operation (BusyBox) and, of course, VNC Viewer - a VNC client. It doesn't matter that in reality this machine will be located at 127.0.0.1.
You also need to download the Kali image for Android from the Internet. Personally, I downloaded the full version with the ext4 file system, which is suitable for the ARM architecture (the fifth file from the top). When the archive is downloaded, your task is to extract a 5.5 GB image from there and place it in the directory of your /storage/emulated/0 mobile device. After that, rename the file to linux.img.
Now we need to pay attention to BusyBox. Now on Google Play, there are a lot of options from different manufacturers. The fact is that some devices have to find the right BusyBox so that all utilities are installed correctly. In my case, the most popular BusyBox Free package came up, the files of which I installed in /su/xbin. Remember this directory, it is important when updating the installer environment.
Now go to Linux Deploy and click on the distro settings icon in the bottom right. Choosing a Kali Linux distribution. The architecture you need will be displayed automatically, but if it doesn't work, try it armhf.
Settings.
Next, change the user's password, it is located below.
And at the very end you will find the items responsible for enabling the SSH and VNC servers. Check the boxes next to them. If you don't need a graphical environment, SSH will suffice. Then you can download any SSH client and connect to our machine from Kali to 127.0.0.1. In order not to download unnecessary applications, you can use the usual one openssh-client right in Termux, for which just open another tab.
If you still need a graphical environment, then enable the corresponding item, and then I will show you how to connect to the Kali desktop via VNC.
Now you need to set up your working environment. In the variable settings, PATH specify the path where BusyBox installed packages.
SSH and VNC.
And update the working environment (button below).
Next, we need to configure our container. Go to the main page, in the upper right corner, click on the menu icon and select the "Configure" item.
It remains only to start our container. Click the Start button below. Check if there are any lines marked fail when starting the container. If so, make sure you have specified the correct PATH working environment and configured the container. If so, then try changing the architecture to armhf and doing it all over again.
Now go to VNC Viewer or another VNC client, add a localhost connection (127.0.0.1) and name it. Next, connect, confirm that you want to continue using an unencrypted connection, and enter the user password that you specified in Linux Deploy.
Ready!

Kali and nmap
Of course, the distribution is old, but all the software is working, and, as you can see, the same Nmap functions without errors.
For the test, I use the command
Code:
$ nmap -A -v <IP>The parameter -A is responsible for enabling scanning of the operating system, its version, scanning by scripts, as well as tracing the route (traceroute). The parameter -v displays more detailed information.
You can see the output of the scan results in the screenshot below.

Nmap results